Monday, July 27, 2015

Vanilla-Mango Panna Cotta : TWD

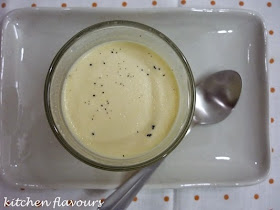
Over at Tuesdays With Dorie (TWD), our assignment for this week is Vanilla-Mango Panna Cotta, a refreshing and cooling dessert, and in our hot humid weather, this dessert is most welcome anytime of the day! We are baking from Dorie's latest cookbook, "Baking Chez Moi". Though for this week, there's no need to turn on the oven! 


An easy dessert to make, the bottom is a layer of delightful mango puree, where fresh mangoes are pureed in the food processor, with some honey (I've used about 1 tablespoon honey, or may use sugar if preferred) to taste, with some lime juice. Just like Dorie, I like mine a little tart, so I've used the juice of two limes. Divide the puree among glasses or bowls, and keep them in the freezer for about 30 minutes, just so until they are firm, as you would want the puree to stay in place when the hot panna cotta mixture is poured over.

The panna cotta layer is made by mixing cream, sugar, milk and the seeds of a vanilla bean along with the bean, in a saucepan and bring to a boil. Remove from heat and let steep for 20 minutes, while you prepare the gelatin by liquefy it in the microwave with some water. Return the mixture to a boil remove the bean, and pour over the gelatin, stir until the gelatin has completely dissolve. Let mixture cool slightly, about 20 minutes, then divide the mixture between the glasses with the mango puree. Refrigerate at least two hours until chilled before serving.


I've used Calamansi Limes from the garden pot. They were very juicy!


I chilled the panna cotta for about 6 hours. I like how the panna cotta layer is scattered with the vanilla seeds. It has set rather nicely, and everyone is just so impatient to dig in!


This is very yummy. The slightly tart mango puree with the creamy smooth panna cotta are so good together. A perfect cold dessert to enjoy with the family. I would love to try this with our other local fruits; like pineapple, dragon fruits, melons! Yums!


I'm linking this post with Tuesdays With Dorie (TWD).


and

Cook-Your-Books


Thursday, July 23, 2015

Devil's Food Cupcakes with Chocolate Frosting : Bake-Along #83

It's time for some cupcakes at Bake-Along #83. Zoe has selected Devil's Food Cupcakes with Chocolate Frosting from Bon Appetit Desserts Cookbook, to bake together with Lena and myself, and anyone who wishes to bake-along with us.


Easy and simple to make, and yummy to eat! I made the full recipe and uses the standard muffin pan which yield 11 cupcakes. I've reduced both the sugars (brown and caster), and the cupcakes turned out to be just right for us, though it might not be sweet enough for some. With the chocolate frosting on the cupcakes, the sweetness balances out nicely.


As for the frosting, mine turned out a little thick. First thing is, I do not have any sour cream on hand, forgotten to buy! There's no more yoghurt, so I have used two tablespoons of milk instead. The chocolates, heavy cream and butter are stirred over a saucepan of simmering water until melted and smooth, remove from heat, then the vanilla extract, sour cream and icing sugar are stirred in until well blended. I have however did not read the instructions properly, and simply mixed everything to together. Ooops!!  Because I've used only 2 tablespoons of milk instead of 1/2 cup of sour cream, the frosting appears to be quite thick and I could use it immediately to spread over the cupcakes. And I've used only 2 tablespoons of icing sugar. As for the chocolate, I did not weigh them, simply break some pieces into the bowl. I was lazy to use the piping noozle (lazy to wash!), so I've just spread the frosting over the cupcakes using a small offset spatula.


I thought that my frosting was too fudgy and thick, but then both my kids love the frosting, there's even a request from my daughter to make the same frosting for her birthday cake. 
This cupcake is really nice. The cake is soft, airy, moist and chocolaty, made even yummier with the fudgy thick chocolate frosting.


** my changes listed in blue.
Devil's Food Cupcake with Chocolate Frosting
(adapted from "Bon Appetit Desserts Cookbook", Barbara Fairchild)
Makes 16
Cupcakes
1/2 cup natural unsweetened cocoa powder
2 ounces high quality milk chocolate (such as Lindt or Perugina), chopped
1/2 cup boiling water
1/2 cup buttermilk
1 cup cake flour
3/4 tsp baking soda
1/2 tsp salt
2/3 cup (packed) dark brown sugar (1/3 cup)
1/2 cup canola oil
1/2 cup sugar (1/3 cup)
2 large eggs
1 tsp vanilla extract

Frosting
4 ounces bittersweet or semisweet chocolate (do not exceed 61% cacao), chopped
2 ounces high quality milk chocolate (such Lindt or Perugina), chopped
2 tbsp heavy whipping cream
2 tbsp (1/4 stick) unsalted butter
1/2 cup sour cream 
1 tsp vanilla extract
1/4 cup powdered sugar

CUPCAKES: Preheat oven to 350°F. Line 16 standard (1/3-cup) muffin cups with paper liners. Combine cocoa powder and chocolate in medium bowl. Pour 1/2 cup boiling water over; whisk until smooth. Whisk in buttermilk.

Whisk flour, baking soda, and salt in another medium bowl to blend Using electric mixer, beat brown sugar, oil, 1/2 cup sugar, eggs, and vanilla in large bowl until light and creamy, about 2 mins. Beat in flour mixture, alternating with chocolate mixture in 2 additions. Divide batter among paper liners.


Bake until tester inserted into center comes out with some crumbs attached, about 18 mins. Cool in pans on cooling rack 10 mins. Transfer cupcakes to rack and cool completely.


FROSTING: Stir both chocolates, cream, and butter in medium bowl over saucepan of simmering water until melted and smooth. Remove from over water. Whisk in sour cream and vanilla, then powdered sugar. Let stand until thick enough to spread, about 10 mins.


DO AHEAD: Can be made 3 days ahead. Store frosted cupcakes airtight at room temperature.


********************************

Do stop by Lena of Frozen Wings and Zoe of Bake For Happy Kids, and all our friends who has baked along with us in the linky below :

For our next Bake-Along, we will be baking "Theme : Hokkaido Chiffon Cupcakes", . Please do join us, and  link your post to our linky which will open from 6th August till 15th August. Everyone is welcome to join us! Only current post please.


Photobucket


A friendly reminder when linking to our linky :
1. Please mention Bake-Along event in your own post linking direct to any of the hosts' post (JoyceLena or Zoe)
2. Please link only new and current post, PLEASE FOLLOW THE BAKE OR THEME provided by us. Unrelated post will be deleted.
3. Feel free to display our Bake-Along badge in your post.


and I'm sharing this post with :
Cook-Your-Books #25 @ kitchen flavours
 photo 77951578-1914-4b72-8eda-9e40a91183ac_zps331eb4b4.jpg


Friday, July 17, 2015

Cranberry Bread

A soft and fluffy bread, that is perfect for breakfast, tea-time, and anytime throughout the day. It is not only soft, but so fluffy soft, and really, really good!

The original recipe is called Figgy Cardamom Bread, which uses dried figs and ground cardamom. I have however replaced the dried figs with dried cranberries and have omitted the cardamom. 


I've used instant yeast, so I have skipped the ten minutes step to make it foamy, but mixed it with the other ingredients and proceed with the instructions in the recipe.


The recipe makes a really huge braid! It would be a great idea to divide the dough into two halves and make two sets of braided loaves instead. 


This loaf is not only soft, but so deliciously fluffy soft.


Good to eat on its own or with a generous spread of salted butter. With a cup of your favourite tea or coffee.


Figgy Cardamom Bread (I've made as Cranberry Bread)
(adapted from "Williams-Sonoma : Home Baked Comfort", Kim Laidlaw)
makes 1 large loaf
1 cup (8fl oz/250ml) whole milk, warmed (110F/43C)
1 package (2-1/4 tsp) active dry yeast (I use 2 tsp instant yeast)
1/3 cup (3oz/90gm) sugar, plus more for sprinkling
3-1/2 cups (17-1/2oz/545gm) all-purpose flour (I use 3-1/2 cups + 3 tbsp bread flour)
1 tsp kosher salt (1/4 tsp salt, as butter is salted)
1 tsp ground cardamom (omit)
3 large eggs
6 tbsp (3oz/90gm) unsalted butter, at room temperature, cut into chunks (salted butter)
1-1/2 cups (9oz/280gm) quartered dried figs (replaced with dried cranberries)

In the bowl of a stand mixer, stir together the milk, yeast, and 1/3 cup sugar. Let stand until foamy, about 10 minutes. (Since I've used instant yeast, I skipped the 10 minutes, and proceed with the next step).

In another bowl, whisk together the flour, salt, and cardamom. Add the dry ingredients and 2 of the eggs to the yeast mixture. Attach the dough hook and knead the dough on medium-low speed until it starts to look shaggy. While continuing to knead, add the butter. Knead until the dough is fairly smooth, about 10 minutes. Dump the dough onto a floured work surface and flatten into a disk. Scatter the figs (cranberries) over the dough and gather it into a ball. Knead the dough gently to incorporate the figs (cranberries). Gather the dough into a ball, transfer to an oiled bowl, cover with plastic wrap, and let rise in a warm, draft-free spot until doubled, about 1 hour.

Line a baking sheet with parchment paper. Dump the dough onto the lightly floured work surface and divide it into 3 equal pieces. Roll each piece into a rope about 16 inches (40cm) long. Lay the ropes next to each other, touching, on the work surface. Braid the ropes together, tucking the ends underneath the braid. Place on the prepared pan, cover loosely with a kitchen towel, and let rise until puffy, about 45 minutes.

Position a rack in the middle of the oven and preheat to 350F (180C). In a small bowl, beat the remaining egg with a little water. Brush the dough gently with the egg wash, then sprinkle generously with sugar. Bake until golden brown, about 35 minutes. Let cool completely on a wire rack before slicing.


I'm linking this post with :

Cook-Your-Books

Tuesday, July 14, 2015

Peach-Blueberry Tart : TWD

Tuesdays with Dorie (TWD)'s bakers are baking "Apricot-Raspberry Tart" this week. I could not find any fresh apricots and raspberries are pretty costly. So I have used canned peaches and frozen blueberries instead, thus this tart is called "Peach-Blueberry Tart". Canned apricots are not easily available too, but canned peaches can be found in almost every supermarkets. 

The tart start off with the sweet pastry crust. I have made this crust before from BFMHTY, and find that it is a little too sweet for me, so I have used only half the amount of confectioners' sugar and it turned out great, with just the right amount of sweetness.


The crust is partially baked and the base is filled with either ladyfingers, stale cake  or Brioche crumbs. I happened to have two slices of leftover orange bundt cake, so that was what I've used. Break them up into crumbs and scatter them all over the prebaked crust. There's only ten pieces of peach halves in the can, so I could not overlap the fruits as per Dorie's instructions. I spaced them out to cover the base and sprinkle some sugar over the top, using only half the amount (as canned peaches are slightly sweet from the syrup). Bake for 30 minutes, sprinkle some sugar (again, I've used only half the amount), scatter the blueberries and some slivers of cold butter. Since the canned peaches are already softened, I baked for a further 20 minutes just until the crust is a nice golden brown.  


There's not enough of cake crumbs, making the tart looks a little "unfilled"! Now I know what to do with leftover cakes, freeze them for future tart making, as the crumb makes a nice base to soak up any juices from fresh fruits, thus preventing the crust from getting soggy. I really like the tart crust, it is flaky, tender, light and buttery. The next time I'll roll them a little thicker, as I did not realize that I have rolled mine so thin! I even have extra dough to make a small 4" tart crust which I've kept frozen.


To view the other bakers' posts on this tart, please visit the links at TWD.
,


Sunday, July 12, 2015

Crispy Spiced Thai Chicken

"Mystery Box Madness : July 2015", the theme for this week at I Heart Cooking Clubs (IHCC). Ten mystery box ingredients are given and we are to choose at least three from which to cook from any of IHCC's past or present featured chefs' recipe. The ten ingredients are Chicken, Seaweed, Sesame Seeds, Parsley, Mozzarella Cheese, Pasta, Mango, Brown Sugar, Zucchini and Mint.

I've chosen Chicken, Sesame Seeds and Brown Sugar, to cook Donna Hay's delicious and simple Crispy Spiced Thai Chicken. Yup, another chicken dish!  


An easy and simple dish to cook, takes only about half an hour from start to finish! Chicken breast fillet is quartered and mix with egg white, rice flour, chilli, chopped coriander, shredded kaffir lime leaves from my garden pot and sesame seeds. I did not have any red chillies (forgotten to buy!), so I have replaced with some coarse chilli flakes instead. I've added some salt to taste, though it was not indicated in the recipe. Heat up some oil, and pan-fry the chicken fillet on both sides for a few minutes until cooked. Served with some watercress sprigs, which I do not have, so I have shredded some green cabbage and it was great with the chicken.

The dipping sauce is made by mixing soy sauce, lemon juice and brown sugar in a small bowl until the sugar dissolves. I have used calamansi lime from my garden pot instead of lemon. 

Note : I used only 1 large chicken breast fillet (instead of 3 as per the recipe) but following the full amount of the other ingredients listed in the recipe below.


A simple, and very, very tasty chicken dish! Both the kaffir lime leaves and the fresh coriander bring such a lovely fragrance and taste. The sesame seeds gives a nice nutty aroma. The next time though, I would bash the chicken fillet lightly to a slightly thinner piece. Eating it together with the shredded cabbage and the dipping sauce is delicious. We had this chicken dish as part of our dinner meal, eaten with white rice and other dishes. There's no leftovers!


Crispy Thai Spiced Chicken
(source from : donnahay.com)
3 chicken breast fillets, quartered (I use 1 large fillet)
some salt to taste (my addition)
2 eggwhites, lightly beaten (I use 1 eggwhite)
2 tablespoons fine rice flour
2 red chillies, chopped (I use 1 heaped teaspoon coarse chilli flakes)
3 tablespoons chopped coriander (cilantro) leaves
4 kaffir lime leaves, shredded
3 tablespoons sesame seeds
2-3 tablespoons peanut oil
watercress sprigs, to serve

Dipping sauce :
3 tablespoons soy sauce
2 tablespoons lemon juice
1 tablespoon brown sugar

Combine the chicken, eggwhite, rice flour, chilli, coriander, lime leaves and sesame seeds in a bowl. Heat a frying pan over medium heat. Add the oil and cook the chicken for 3 minutes on each side or until golden and cooked through. Drain on absorbent paper.

To make the dipping sauce, place the soy, lemon juice and sugar in a bowl and mix to combine. Serve the chicken on some watercress with dipping sauce on the side. Serves 4.


I'm linking this post with I Heart Cooking Clubs (IHCC), for this week's theme :
Mystery Box Madneses : July 2015"


Thursday, July 9, 2015

Lemon Bars : Bake-Along #82

It's time for Bake-Along #82, and the theme selected by me is "Lemon Bars". I love lemon bars, and I've selected this theme to bake together with Lena and Zoe. Everyone is welcome to join us!

These lemon bars are just so addictive! I have made them many times, but have never posted it in my blog before.


These squares are so easy to make, and even easier to finish! Either squares or bars, they are the same. Cut into squares, they are called lemon squares, cut into rectangles, they are called lemon bars. The base is a shortbread crust, which is tender and buttery. The topping is tangy lemon curd. Some recipes call for the lemon curd to be cooked before spreading onto the lightly baked crust and baked till done. But this recipe is easier. The ingredients for the topping is mixed in a bowl, and then pour over the crust, baked till the topping is just set. Really easy!


Cut into squares or bars, whichever your prefer. Sprinkle some powdered sugar over the squares just before serving.


These are so addictive! Really difficult to stop at just two pieces! The first time I made this, I followed the exact measurement in the recipe, and find that the topping is really sour. Lemons that are sold here are very sour, unlike the Meyer lemons which has a sweeter taste. I have not tasted Meyer lemons before, have read about it though, and would love to get my hands on some, but have not seen them before. However, the author has made a note for "a less pucker-up lemon flavour", to decrease the lemon juice to 1/3 cup and the flour to 2 tablespoons. I followed this less pucker-up measurements, and the result is one outstanding delicious square, and I have made these delicious squares many times now. Try it yourself, be warned, they are rather addictive!


note : my changes listed in blue
Lemony Lemon Squares
(adapted from "Bake Something Great", Jill Snider)
Preheat oven to 350F (180C)
8-inch square cake pan, greased

Crust :
1 cup all-purpose flour
1/4 cup granulated sugar (less 1 tablespoon)
1/2 cup cold butter, cubed (100gm)

Topping :
3 eggs
1 cup granulated sugar (scant 3/4 cup)
3 tbsp all-purpose flour (2 tbsp)
2 tsp grated lemon zest
1/2 cup freshly squeezed lemon juice (1/3 cup)

  1. For the crust : In a bowl, combine flour and sugar. Using a pastry blender, 2 knives or your fingers, cut in butter until mixture resembles coarse crumbs. Press evenly into prepared pan. Bake in preheated oven until lightly browned around the edges, 12 to 15 minutes.
  2. For the topping : In a bowl, whisk eggs, sugar, flour, lemon zest and juice just until smooth. Don't overbeat. Pour over crust.
  3. Return to oven and bake just until set, 25 to 30 minutes. Let cool completely in pan on rack. Cut into squares.

********************************

Do stop by Lena of Frozen Wings and Zoe of Bake For Happy Kids, and all our friends who has baked along with us in the linky below :

For our next Bake-Along, we will be baking "Devil's Food Cupcake", (from Bon Appetit Desserts Cookbook, pg 129 or here). Please do join us, and  link your post to our linky which will open from 23rd July till 1st August. Everyone is welcome to join us! Only current post please.


Photobucket


A friendly reminder when linking to our linky :
1. Please mention Bake-Along event in your own post linking direct to any of the hosts' post (JoyceLena or Zoe)
2. Please link only new and current post, PLEASE FOLLOW THE BAKE OR THEME provided by us. Unrelated post will be deleted.
3. Feel free to display our Bake-Along badge in your post.


and I'm sharing this post with :
Cook-Your-Books #25 @ kitchen flavours
 photo 77951578-1914-4b72-8eda-9e40a91183ac_zps331eb4b4.jpg


Monday, July 6, 2015

Cook-Your-Books #25

Cook-Your-Books is all about cooking or baking from your many cookbooks or magazines that you have collected over the years. If you love collecting cookbooks, read them like novels and love trying out new recipes, then this is the perfect place to share. It's time to get those books (or magazines) out of the shelves, and start using them. Bake or cook anything from any of your books or magazines, and link your posts to Cook-Your-Books here at Kitchen Flavours. The linky will start on the 7th of every month right up to the end of the month. The three most viewed submissions will be featured at the next Cook-Your-Books.


 photo 77951578-1914-4b72-8eda-9e40a91183ac_zps331eb4b4.jpg


Featured posts for this month
The three most viewed posts from Cook-Your-Books #24


Orange Syrup Cake
by No-Frills Recipes


Macadamia Fruity Bread
by Coco's Sweet Tooth


Thank you everyone for sharing all the delicious dishes and bakes from your cookbooks!

It's now time to link-up!

A little note when submitting your post to Cook-Your-Books
  1. Linky for submissions will start on the 7th of every month right up to the end of the month. The submission with the most views will be featured at the next Cook-Your-Books.
  2. All submissions must be new and current posts, within the current month. Old posts will be deleted. Please link directly to your post, not your homepage.
  3. Please mention from which book or magazine you are cooking or baking from, as this is a cooking/baking event using recipes from cookbooks and magazines.
  4. Please mention Cook-Your-Books in your post and link it back to Kitchen FlavoursYou may display Cook-Your-Books badge anywhere in your post.
  5. Please leave a comment after you have linked.
  6. It would be great if you could visit at least one link, everyone loves visitors.

Link-up with Cook-Your-Books #25 from 
7th - 31st July 2015