Friday, September 25, 2015

Garlic and Parsley Hearthbreads

"September 2015 IHCC Potluck", the theme for this week at I Heart Cooking Clubs (IHCC). For our potluck week, I've made Nigella's garlicky flatbread.

I've been wanting to make this flatbread for quite sometime. With garlic and parsley, it already sounds so aromatic. According to Nigella, "These are something between garlic naan and herby focaccia". Yes, it is similar to a focaccia and can't help thinking how close it is to a fougasse too, when I took a crispy bite of it! Crispy crust with chewy texture on the inside.


Oops...ignore the pinch-off corners of the bread! The photos before this, are not clear, so I've got to clean the lens of the camera and took the photo again, but that corner was torn off by then, (for quality control purposes!! hahaha!).

The dough is mixed and left to proof before it's punched down, separate into two halves and shape each half into squares or oval, flattened and leave to proof until puffy. Make some dimples on the puffy breads with your fingers, and spread the garlicky parsley mixture over it. Bake till golden and crispy. I have reduced the amount of salt slightly to 3/4 tablespoon and the next time, I will reduce just a little bit more. I have used only 1 cup of water, and still find that the dough is sticky, so I have added about 1/4 cup of bread flour. The type of flour and our humidity weather do make a difference when mixing a dough for bread making, so adjust accordingly.

For the garlic and parsley mixture, firstly the garlic is baked for about 45 minutes, enclosed in a parcel of foil. Leave until cool enough to handle. Parsley leaves are chopped in the food processor, then the garlic is squeezed out of their skins into the food processor and process again. Pour in some oil, while processing to a paste. I "overdo" it for both the garlic and the parsley. I added extra garlic heads and used a large bunch of parsley. The paste does not look anywhere like Nigella's, but I am not complaining, it tasted good! I added some salt and coarse black pepper to the paste too. (I omitted the sprinkle of salt during serving).


These hearthbreads are yummy! Especially so when fresh out of the oven. I've baked them a little longer than the recipe stated, because I love crispy crust. With the crispy crust and chewy bread texture on the inside, this reminded me of eating a fougasse! And even though the garlicky-parsley paste did not look at all like Nigellas, it is delicious! And I'm glad I've added some coarse black pepper, yummy! 


I did not sprinkle any salt or drizzle any oil over it. The paste is oily enough and the bread itself is salty enough. Good enough to eat it as it is. I had this with a mug of hot tea, it was good!


Garlic and Parsley Hearthbreads
(adapted from "How To Be A Domestic Goddess", Nigella Lawson)
3-1/2 cups white bread flour (additional 1/4 cup)
1 package (1/4 ounce) rapid-rise yeast or 1 tablespoon fresh yeast (2 teaspoons instant yeast)
1 tablespoon salt (use about 3/4 tablespoon, and will reduce slightly more the next time)
1-1/3 - 1-2/3 cups warm water (1 cup)
5 tablespoons olive oil, plus more for greasing and for pouring over the garlic
3 large or 4 small heads of garlic
extra-virgin olive oil for drizzling
bunch of flat-leaf parsley
1/4 tsp coarse black pepper (my addition)
salt for sprinkling

2 baking sheets

Preheat the oven to 375F.
Combine the flour, yeast, and salt in a bowl. Pour 1-1/3 cups warm water into a measuring cup and stir in the olive oil. Mix the liquid with the dry ingredients to make a soft but firm dough, adding more liquid as needed, and either turn this out onto a surface and knead by hand or keep in the bowl and use a mixer fitted with the dough hook and knead until smooth, supple, and full of elastic life. Form into a ball, wash out and dry the bowl, oil it, and turn the dough in it so it's lightly oiled all over. Cover the bowl with plastic wrap and leave to rise for an hour or so until doubled in size.

While the bread is rising, trim the tops off the heads of the garlic, making sure they remain whole, sit them in some torn-off squares of foil, dribble over some oil, and wrap them loosely. That's to say, the package should be baggy but the foil tightly sealed at the edges. Cook the garlic packages for 45 minutes; they should not be mushy by this stage but still just holding their shape. Remove from the oven, unwrap, and let cool till you can handle them. Turn the oven up to 400F.

Tear the parsley leaves from their stems and add a good handful to the bowl of the food processor - not worrying if some stems here and there are left on - and chop. Squeeze the soft garlic cloves out of their skins and into the bowl and process again. Pour in enough extra-virgin oil to make a runny paste down the funnel, while still processing, and leave this pungent emulsion where it is while you get back to the bread.

When the dough's risen, punch it down and leave to rest for 10 minutes. Divide the dough in half, and get out 2 sheets of baking parchment. Sit a ball of dough on each, and roll out to form a curved rectangle or bulky oval. Then, using your hands, press out a little more. Transfer the breads on their papers to the baking sheets, cover with tea towels and leave to rise and get puffy for about 25 minutes.

Poke your fingers all over the tops of the breads to dimple them, then go back to the processor and pulse once or twice to make sure the parsley, garlic, and oil are combined and pour this green mixture all over the corrugated flatbreads.

Put the baking sheets into the oven and bake for 20 minutes or until the breads are cooked - becoming golden in parts, with the garlic flecks a darker brown, and the rims puffing up around the oily topping. Whip out of the oven and drizzle over a generous amount of good extra-virgin olive oil. Sprinkle over some salt and set down on the table for people to tear greedily at with their bare hands.
Serves 4 generously.


I'm linking this post with I Heart Cooking Clubs (IHCC), theme for this week 
September 2015 IHCC Potluck


Sunday, September 20, 2015

Flat Potato Omelette

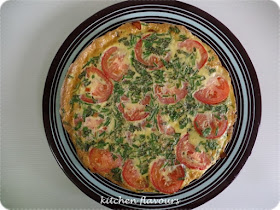
"Seasonal Specialities", the theme for this week at I Heart Cooking Clubs (IHCC), where we are cooking any Jacques Pepin dish made with seasonal ingredients. Well, in Malaysia, we are blessed with tropical climate, most of our veggies comes from the highlands where the weather is very much cooler but sunny, which is ideal for growing veggies. We do not have the four seasons, so most of our produce are available the whole year round. Vegetables and most fruits, like pumpkin, zucchinis, tomatoes, cabbages, salad greens, mangoes, watermelon, pineapples, etc... are available the whole year! How lucky are we! So in line with this week's theme, I've chosen tomatoes (which is always in season!), and some herbs from my garden pots.


Simple, quick and easy dish to prepare. Onions and potatoes are sauteed in a some oil until brown. Arrange a layer of sliced tomatoes over the top, cover and cook for a minute. Break the eggs into a bowl, mix with the chopped herbs, and season with salt and pepper. Pour the egg mixture over the tomatoes, using a fork to gently stir so that the eggs flow between the tomatoes and potatoes. Cook for a minute or two, and place the skillet in the oven, using the top broiler, for a few minutes until the eggs are set. 


A mixture of fresh herbs from my potted garden ; cilantro, chives, Thai basil.


Slide the omelet onto a plate and cut to wedges to serve. 


I made this for an afternoon lunch with some leftover salad from the day before. I like the onions which has caramelized, and would add on extra onions the next time. Lovely with the chopped fresh herbs, tomatoes and potatoes. 


Flat Potato Omelette
(adapted from "Essential Pepin", Jacques Pepin)
Serves 4
1 1/2 tablespoons olive oil
1 tablespoon unsalted butter
1 1/2 cups sliced onions
2 medium baking (Idaho) potatoes, peeled and thinly sliced (about 2 1/2 cups)
1 large tomato (about 8 ounces), cut into thin slices
6 large eggs, preferably organic
1/3 cup coarsely chopped fresh chives (I used a mixture of chives, cilantro and basil)
1/2 teaspoon salt
1/4 teaspoon freshly ground black pepper
Heat the oil and butter in an 8- to 10-inch nonstick skillet until hot but not smoking. Add the onions and potatoes and cook, covered, for about 10 minutes, stirring occasionally to brown on all sides.
Add the tomato slices to the skillet, arranging them so they cover most of the potato and onion mixture. Cover and cook for 1 minute.
Meanwhile, break the eggs into a bowl. Add the chives, salt, and pepper and mix with a fork.
Preheat the broiler. Add the egg mixture to the skillet and stir gently with a fork for about 1 minute so the eggs flow between the potatoes and tomatoes. Slide the skillet under the broiler, 3 to 4 inches from the heat, and cook for about 3 minutes, until the eggs are set.
Slide onto a platter, cut into wedges, and serve.

I'm linking this post with I Heart Cooking Clubs (IHCC), theme for this week,
"Seasonal Specialities"

grab button for I Heart Cooking Clubs


Thursday, September 17, 2015

Chocolate Pots de Creme : Bake-Along #87

It's time for our Bake-Along #87, and this week's recipe is selected by me! I have been meaning to make Chocolate Pots de Creme for the longest time!  I'm baking this chocolaty dessert with Lena and Zoe, and everyone is invited to join us.

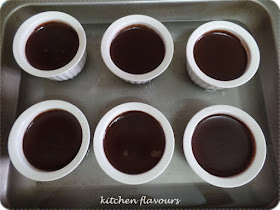
A simple straightforward dessert, baked "bain-marie" style, in a water bath. Very easy to make, simply combine the cream, milk, chocolate, espresso powder and cook over a low heat, taking care not to let it boil, until the chocolate has melted and the liquid is hot. In a medium bowl, whisk the egg yolk and sugar until blended, and while still whisking, pour the hot chocolate mixture gradually into the egg yolk mixture. Whisk to evenly combine and pour this mixture into a large measuring cup over a sieve. Skim off any foam or bubbles. 


Pour into ramekin moulds, place them in a roasting pan, fill the pan with hot water until halfway up the sides of the ramekin, cover the pan with foil, and carefully place the roasting pan in a preheated oven at 150C. Bake until set, about 50-60 minutes. Remove pan from oven, remove the foil and leave the ramekins in the water until cool enough to handle. Cover and refrigerate the ramekins until well chilled.


I chilled the Chocolate Pots de Creme overnight and we had it the next day.


The kids can't wait...well, it's chocolate, their favourite! (And I like my new ramekin moulds...I love ramekin moulds!)


 Yummilicious! Creamy, smooth, and so chocolaty! Not too sweet, which is a plus for me! 


It is quite rich and delicious! 
And so gloriously luscious!
(They rhyme!! ) 

Chocolate Pots de Creme
(adapted from "The Williams-Sonoma Baking Book")
makes 6 servings
1-1/3 cups (11fl oz/340ml) heavy (double) cream
1-1/3 cups (11fl oz/340ml) whole mill
6 oz (185gm) bittersweet chocolate, finely chopped
1 tbsp instant espresso powder or instant coffee powder
6 large egg yolks
1/4 cup (1-3/4 oz/50gm) sugar

Preheat the oven to 300F (150C). Have ready six 3/4-cup (6fl oz/180ml) ramekins and a shallow roasting pan.

In a saucepan over medium-low heat, combine the cream, milk, chopped chocolate, and espresso powder and cook, whisking frequently, until the chocolate is melted and the liquid is hot. Do not let boil. Remove from the heat.

In a bowl, whisk together the egg yolk and sugar until well blended. While whisking constantly, gradually pour the hot chocolate mixture into the yolk mixture. Pour the custard through a sieve placed over a 4-cup (32fl oz/1-liter) glass measuring pitcher. Using a large spoon, skim off any foam and bubbles from the top.

Divide the custard evenly among the ramekins. Place the ramekins in the roasting pan and pour very hot tap water into the pan to come halfway up the sides of the cups. Cover the pan with aluminium foil.

Bake the custards until they are set but the centers still jiggle slightly when a cup is gently shaken, 55-60 minutes. Remove the pan from the oven and leave the ramekins in the water until cool enough to handle. Cover and refrigerate until well chilled, at least 2 hours or up to overnight. Serve chilled.


********************************

Do stop by Lena of Frozen Wings and Zoe of Bake For Happy Kids, and all our friends who has baked along with us in the linky below :

Bake-Along is taking a break in October and we will be back on 17th November with our baking theme : "Theme - Galette". You may bake any galette recipe and link your post to our linky which will open from 17th to 28th NovemberEveryone is welcome to join us! Only current post please.


Photobucket


A friendly reminder when linking to our linky :
1. Please mention Bake-Along event in your own post linking direct to any of the hosts' post (JoyceLena or Zoe)
2. Please link only new and current post, PLEASE FOLLOW THE BAKE OR THEME provided by us. Unrelated post will be deleted.
3. Feel free to display our Bake-Along badge in your post.


Wednesday, September 9, 2015

Blue Cheese, Hazelnut and Apple Salad

"September 2015 Mystery Box Madness Challenge", this week's theme at I Heart Cooking Clubs (IHCC). Ten ingredients are given and we are to select at least three to make a dish from any of IHCC's past or present featured chefs.

The ten ingredients are Salmon (fresh, smoked, canned), Green Peas (dried, fresh, frozen or canned), Hazelnuts, Eggplant, Parmesan Cheese, Kale, Apples (any colour/kind), Blue Cheese, Rosemary, Bread Rolls/Buns.


My selected ingredients : Blue Cheese, Apples and Hazelnuts 
Selected IHCC's chef : Jamie Oliver


I've made Jamie Oliver's Blue Cheese, Hazelnut and Apple Salad. 

Simple, easy, quick and refreshing! This is the first time I'm trying Blue Cheese, and find that I like it! It is a little strong in taste, creamy with a distinctive smell. It is a little salty, so I've used  a small amount for a plateful of salad. 

I did not have any spinach but have used lettuce greens which I've sliced to shredded pieces. I've used two apples, red and green, to get a mixture of sweet and sour.  To assemble the salad, place the shredded lettuce on a serving plate, top with apple slices, crumble the blue cheese over, scatter the toasted hazelnuts, squeeze the juice of a lemon over and drizzle with some extra virgin olive oil. 


I like this salad! Sweet and sour from the apples, fresh lettuce greens, salty cheese and crispy toasted hazelnuts, with the lemon juice and olive oil, makes such a lovely combination! 


Blue Cheese, Hazelnut and Apple Salad
(adapted from "Jamie's 15 Minute Meals", Jamie Oliver)
50gm blanched hazelnuts
200gm baby spinach
1 apple
40gm blue cheese
juice of a lemon
1 teaspoon extra virgin olive oil

Toast the almonds in a small frying pan until golden, tossing regularly. Put the spinach in a salad bowl, coarsely grated the apples over or slice to matchstick, then crumble over the blue cheese. Crush the toasted nuts in a pestle and mortar, then scatter over the salad. Drizzle the salad with extra virgin olive oil, and squeeze over the juice of lemon.


I'm linking this post with I Heart Cooking Clubs (IHCC), theme for this week
September 2015 Mystery Box Madness"


Saturday, September 5, 2015

Skillet Broccoli Bits

 Le Plat du Jour (Dish of the Day), the theme for this week at I Heart Cooking Clubs (IHCC). What is your special Dish of the Day at your house? In my house, we love veggies! In an Asian household, the normal dinner meal would be the daily rice, with some dishes like meat, chicken or fish, sometimes a bowl of soup, and always a plate of veggies. 

I bought a head of broccoli, and usually would stir-fry it with lots of garlic. If I am in a hurry, I would sometimes place the broccoli florets in a microwaveable bowl, add some salt, onion or garlic oil and a light sprinkling of water, microwave on high for about 3 minutes or so.

This recipe of Jacques Pepin uses similar ingredients (olive oil, salt, water) but the cooking is done in a skillet, but I've used a wok instead. There's no stir-frying, but the florets and the stems are cooked with the rest of the ingredients, covered in a skillet for a few minutes, and uncover for a further 2 minutes until the broccoli are tender but still firm. According to JP, for him, the stems are the best part of the broccoli. Just like him, I love the stems, and would never discard them when I cook broccoli. Simply peel off the outer skin, and cut the stems to thin slices,  and cook them together with the florets. 


This simple dish is really tasty. I like how the broccoli still remain vibrant green, yet tender and still firm to the bite. A plateful of this, is lovely as a side dish to any meal.


Skillet Broccoli Bits 
(adapted from "More Fast Food My Way", Jacques Pepin)
1 bunch broccoli (about 1-1/4 pounds)
1/4 cup water
2 tablespoons olive oil
1/2 teaspoon salt

Cut the broccoli florets off the stems and divide the florets into 1- to 1-1/2 inch pieces. Peel the skin from the stems with a sharp knife or a vegetable peeler. Cut the peeled stems into 1-inch pieces.
Put the broccoli into a stainless-steel skillet and add the water, oil, and salt. Bring to a boil and cook, covered, over high heat for about 3 minutes. Remove the cover and cook over high heat for about 2 minutes, or until the water is gone and the broccoli is glazed and tender but still firm. Serve.


I'm linking this post to I Heart Cooking Clubs (IHCC), theme for this week,


Thursday, September 3, 2015

Soft Pretzels : Bake-Along #86

The theme for our Bake-along #86 is "Yeasted Pretzels", chosen by Lena to bake together with Zoe, myself and everyone is invited to bake-along with us.

I could not decide whether should I make savoury or sweet pretzels, so I made half of each!


My puffy pretzels! Looks more like buns! Haha! 


About to go into the boiling bicarbonate of soda solution. 


After boiling in the bicarbonate of soda solution for just under one minute, and they are a little out of shape after that! For the sweet pretzels, I've sprinkled a mixture of cinnamon powder and brown sugar over the top. And for the savoury pretzels, I've sprinkled a mixture of garlic powder and dried oregano. (I did not sprinkle the top with coarse salt as per instructions in the recipe).


Sweet and savoury, which one do I prefer?


These pretzels are soft, chewy and the one with the cinnamon-sugar over the top, is really nice. Makes a wonderful snack with a cup of tea.


The recipe says to serve the pretzels with some grainy mustard. I have not tried that before!


Surprisingly, it was really good eating the savoury pretzels with grainy mustard! I like them both, both the sweet and savoury.


Soft Pretzels with Grainy Mustard
(adapted from "Williams-Sonoma : Home Baked Comfort", Kim Laidlaw)
makes 12 pretzels
1 cup (8fl oz/250ml) warm water (110F/43C)
1 package (2-1/4 tsp) active dry yeast
1 tbsp sugar
3 tbsp olive oil, plus more if needed
3-1/4 cups (16-1/2oz/515gm) all-purpose flour (I use bread flour)
1 tsp kosher salt (1/2 tsp sea salt)
1/3 cup (2-1/2 oz/75gm) baking soda
coarse salt for sprinkling
grainy mustard for serving

In the bowl of a stand mixer, stir together the warm water, yeast, and sugar. Let stand until foamy, about 10 minutes. Add the 3 tablespoons oil, the flour, and kosher salt. Attach the dough hook and knead the dough on medium-low speed until smooth, about 10 minutes. Form the dough into a ball, cover the bowl with plastic wrap, and let rise in a warm, draft-free spot until doubled, about 1 hour.

Line 2 baking sheets with parchment paper and brush the parchment with oil. Dump the dough onto a lightly floured work surface, then cut it into 12 equal pieces. Roll each piece into a long rope about 18 inches (45cm) long. With each rope positioned horizontally, bring the 2 ends up and toward the center as if forming an oval, cross one end over the other, and press each end into the bottom of the oval to create a pretzel shape. Place the pretzels on the prepared pan, spacing them evenly.

Position a rack in the middle of the oven and preheat to 450F (230C). Fill a large, wide saucepan with 7 cups (56fl oz/1.75liter) water, stir in the baking soda, and bring to a boil. Gently drop 2 or 3 pretzels at a time into the boiling water (be careful not to overcrowd them). Boil for just under 1 minute, turning once with a large slotted spoon or spatula. Return the boiled pretzels to the baking sheet, top side up.

Sprinkle the pretzels with coarse salt. Bake until beautifully browned, about 10 minutes, rotating the pans about halfway through. Serve warm with big spoonfuls of grainy mustard.


********************************

Do stop by Lena of Frozen Wings and Zoe of Bake For Happy Kids, and all our friends who has baked along with us in the linky below :

For our next Bake-Along, we will be baking "Chocolate Pots de Creme" (from Williams-Sonoma Baking Book, pg 356, or here). Please do join us, and link your post to our linky which will open from  17th till 26th September. Everyone is welcome to join us! Only current post please.


Photobucket


A friendly reminder when linking to our linky :
1. Please mention Bake-Along event in your own post linking direct to any of the hosts' post (JoyceLena or Zoe)
2. Please link only new and current post, PLEASE FOLLOW THE BAKE OR THEME provided by us. Unrelated post will be deleted.
3. Feel free to display our Bake-Along badge in your post.