Saturday, January 30, 2016

Stir-Fried Cilantro Chili Noodles with Egg

Cookbook Countdown is a monthly cooking/baking event, which I'm co-hosting with Emily's Cooking (Makan2) Foray.  Everyone is welcome to join us. How does it work? To summarize, you may select a cookbook from your own cookbook collection, to cook or bake from each month. That selected book shall be your cookbook of the month. You may cook any recipes and as many recipes as you want from your selected book of the month. This is a fabulous way of using your cookbooks at least once! For more information on Cookbook Countdown, please click here. Do join us! 


************************

Cookbook Countdown #1 : Recipe No. 6
from my selected cookbook for this month, Stir-Frying To The Sky's Edge by Grace Young.


I ccok noodles very often at home, and my most favourite noodles are bee hoon (rice vermicelli). So when I saw this recipe from the book, I knew that sooner or later I will be stir-frying this noodle dish. 


The recipe uses 1 cup of fresh cilantro leaves and stems, but I have used a big bunch, probably about 3 cups. Firstly, I love lots of veggies in any noodle dish, and secondly I love cilantro. I don't think too much veggie is a bad thing! Cilantro is really a herb, but in this dish, it is like a refreshing veggie in a noodle stir-fry. I like this rice vermicelli dish a lot. Really tasty, fragrant and with the shredded eggs, extra yummy. Made this for our lunch and I can say that I will be cooking this again.


Stir-Fried Cilantro Chili Noodles with Egg
(adapted from "Stir-Frying To The Sky's Edge", by Grace Young, or here)
8 ounces (1/2 package) thin rice stick noodles (vermicelli)
1/2 cup chicken broth or vegetable stock
2 tablespoons soy sauce
2 teaspoons rice vinegar
2 teaspoons plus 2 tablespoons peanut or vegetable oil
2 large eggs, beaten
1 to 2 tablespoons minced Anaheim chilies, with seeds
1 tablespoon minced ginger
1 cup chopped cilantro sprigs and stems
1/2 teaspoon sugar
1/4 teaspoon salt
1/8 teaspoon freshly ground pepper
2 teaspoons sesame oil
Cilantro sprigs

  1. Soak the noodles in a large pan or bowl with enough warm water to cover for 20 minutes or until they are soft and pliable. Drain the noodles in a colander, shaking well to remove excess water. Using kitchen shears, roughly cut the noodles into 6-8-inch long pieces. In a small bowl combine the broth, soy sauce, and rice vinegar.
  2. Heat a 14-inch flat bottomed wok over high heat until a bead of water vaporizes within 1 to 2 seconds of contact. Swirl in 2 teaspoons of the peanut oil, making sure the bottom of the wok is completely coated in oil. Add the eggs and cook 30 seconds to 1 minute, tilting the pan so that the egg covers the surface as thinly as possible to make a pancake. When the bottom is just beginning to brown and the pancake is set, using a metal spatula flip the pancake and allow it to set, about 5 seconds, before transferring it to a cutting board. Allow to cool, then cut the pancake into 1/4-inch-wide shreds.
  3. Swirl the remaining 2 tablespoons peanut oil into the wok. Add the chillies and ginger, then, using the spatula, stir-fry 10 seconds or until the aromatics are fragrant. Swirl the broth mixture into the wok, add the drained noodles, reduce the heat to medium, and stir-fry 2 minutes or until the noodles are just tender and almost all the liquid has been absorbed by the noodles. Add the cilantro and egg shreds, sprinkle on the sugar, slat, and pepper, and stir-fry 1 minute or until well combined. Stir in the sesame oil. Garnish with cilantro.


"I'm linking this post with Cookbook Countdown hosted by 


Thursday, January 28, 2016

Toasted Pita and Herb Salad

"January Potluck", the theme at I Heart Cooking Clubs (IHCC). For this week, we get to cook with any of IHCC's past and present featured chefs. I've made Ellie Krieger's simple salad using toasted pita and fresh herbs.


I love this simple salad. The salad dressing is a mixture of lemon juice, lemon zest, olive oil and seasoned with salt and pepper. The scallions and fresh mint are from my garden pot, along with the fresh cucumber which I've freshly harvested that morning. What I like about this salad is the combination of the fresh herbs with the lemony dressing, very refreshing. The crisp leafy greens and the crunch of the toasted pitas with my addition of hard-boiled eggs makes this a satisfying plate for a light lunch. 


Toasted Pita and Herb Salad
(adapted from "The Food You Crave", Ellie Krieger)
One 6-inch whole-wheat pita bread with pocket
2 tablespoons lemon juice
1/2 teaspoon finely grated lemon zest
salt and freshly ground black pepper to taste
2 tablespoons extra-virgin olive oil
1/2 large head romaine lettuce, leaves torn into bite-size pieces (about 5 cups lightly packed)
1/2 cup chopped fresh flat-leaf parsley
1 scallion (white and green parts), thinly sliced
1/4 cup chopped fresh mint
1/2 large English cucumber, cut in half lengthwise, seeded, and thinly sliced into half-moons
1/2 pint grape tomatoes, cut in half
2 hard-boiled eggs, peeled and quartered (my addition)

Preheat the oven to 375F.
Split the pita into 2 rounds and toast on a baking sheet on the middle rack of the oven until golden brown, about 10 minutes. Allow the pita to cool and break into bite-size pieces. Set aside.
In a small bowl, whisk together the lemon juice, lemon zest, salt and pepper. Add the oil and whisk to incorporate.
Toss the lettuce, parsley, scallion, mint, cucumber and tomatoes together in a large serving bowl. Right before serving, add the pita and dressing to the salad. Toss well to coat and serve.


I'm linking this post with I Heart Cooking Clubs (IHCC), theme for this week
Potluck


Tuesday, January 26, 2016

Lemon Squares, French Style : TWD

It's Tuesdays With Dorie (TWD) week. We have two selected recipes to bake from each month and for this month, we were given the choice to select which recipe to bake first. I've made Fluted Carrot-Tangerine Cake two weeks ago, and for this week, it is Lemon Squares, French Style. I love lemon bars, one of my favourite baked lemony treats. Dorie's French style lemon squares comes in three layers. The bottom layer is a buttery shortbread dough, using the same dough, some is reserved as a streusel topping, with some chopped almonds sprinkled over. Sandwiched in between these two layers is the delicious lemony curd. 

I made the lemon curd the day before and bake the lemon squares on the next day. Made half the recipe and some changes to the amount of butter and sugar. There's quite an amount of butter for the curd itself! For half a recipe, it calls for 1 stick plus 1 tablespoon butter, which is about 130gm. I used only 60gm and it works out just fine for me. As for the sugar, I've used a scant 1/2 cup of sugar, with slightly less than 1/3 cup of lemon juice. The lemon curd cooks up pretty quick and it is lemony, silky, and very, very yummy! Love it!


Lemon curd, so silky smooth and very addictive!


The shortbread dough is easy to make. But the amount of sugar in the recipe is a little too much for me. I like salty buttery crust, instead of sweet crust. Since the lemon curd is lemony sweet, I've reduced the amount of sugar for the dough to 50gm (original amount for half a recipe is 125gm). Some of you may be wondering about the texture of the dough with the amount of sugar I've reduced, but it works for me, and I have always reduced the sugar for Dorie's sweet pastry dough recipe each time I make it. And the dough has always turns out buttery, tender and flaky without being overly sweet.


For half a recipe, I've baked the lemon squares in a 7" square baking pan.
Some chopped almonds is sprinkled over the streusel topping and bake until the edges are caramelized and the curd is puffy, about 45 minutes. Remove from oven and allow to cool completely in pan over a rack. Dorie says to allow at least 2 hours and up to 6 hours before cutting. I've left mine to cool overnight and cut it the next morning.


These bars are really yummy with the perfect amount of sweetness. The dough is buttery, salty, flaky just as I like. The struesel topping with the bits of almonds is a different take on the usual lemon bars that I've made before. Much as I like these bars with the streusel topping, my personal preference is still the old-fashioned way with just the shortbread base and the lemon curd without any topping, with just a sprinkling of powdered sugar over the squares. But that being said, these bars are really yummy, I would say no if served a piece of these!


A yummy lemony treat, good to snack on anytime.


I'm linking this post with Tuesdays With Dorie (TWD)


Sunday, January 24, 2016

Better Blueberry Muffins

"You Have It Made", the theme for this week at I Heart Cooking Clubs (IHCC).  You Have It Made is Ellie Krieger's latest cookbook recently released in January 2016. This latest book is all about making meals ahead of time, which can be refrigerated or freeze to be reheated and serve when needed. This week's theme is to make any make ahead meals from Ellie Krieger's recipes. Now, since I do not have Ellie's latest cookbook (it's on my wishlist!!), I turned to her other books which I already have and found this delightful muffins.


According to the recipe, these muffins can be refrigerated for 3 days, or wrap individually and freeze for up to 3 months. Why are these called Better Blueberry Muffins? Because it uses applesauce and a small amount of canola oil instead of butter. The sugar is very much less than other muffin recipes. And it has yoghurt and milk, both low fat. But both my yoghurt and milk that I used are full-cream! oops....!! On top of that, there's whole meal flour with an equal amount of plain flour.


Like most muffin recipes, these are pretty easy and quick to make. Mix the dry ingredients in a bowl. Mix the wet ingredients in another bowl. Add the dry ingredients to the wet ingredients, stir to combine, do not overmix. Add the blueberries and stir to combine. Then scoop onto the prepared muffin pans and bake until golden.

These muffins are soft, moist and not too sweet. Perfect for breakfast, tea-time or just something to snack on when you are feeling a little hungry. I freeze a few by individually wrapping them in foil, and I thaw them completely before reheating them in a 375F oven for 12-15 minutes still wrapped for breakfast a few days later. They are just as soft and moist, very nice.


Better Blueberry Muffins
(adapted from "Comfort Food Fix" by Ellie Krieger)
Makes 12 muffins
Nonstick cooking spray
1 cup all-purpose flour
1 cup whole-grain pastry flour or whole-wheat flour
2 teaspoons baking powder
1/4 teaspoon baking soda
1/2 teaspoon salt
3/4 cup sugar
1/4 cup canola oil
2 large eggs
1 cup natural unsweetened applesauce
1/2 cup plain low-fat yoghurt
1/4 cup nonfat milk
1 teaspoon vanilla extract
1-1/2 teaspoons finely grated lemon zest
1-1/2 cups fresh or frozen (unsweetened and unthawed) blueberries

Preheat the oven to 400F. Coat a 12-cup muffin pan with cooking spray. 
In a medium bowl, whisk together the flours, baking powder, baking soda, and salt.
In a large bowl, beat together the sugar, oil, and eggs, until the mixture is light yellow and slightly frothy. Whisk in the applesauce, yoghurt, milk, vanilla and lemon zest. Stir the dry ingredients into the wet, mixing just enough to combine them. Do not overmix. Gently stir in the blueberries.
Pour the batter into the prepared muffin pan. Tap the pan on the counter a few times to remove any air bubbles. Bake until a wooden toothpick inserted into the center of one of the muffins comes out clean, about 20 minutes.
Allow to cool on a wire rack for 15 minutes. Run a knife around them to loosen and unmold. Enjoy warm or let cool completely before storing in an airtight container in the refrigerator for up to 3 days or wrap individually and freeze for up to 3 months.


I'm linking this post with I Heart Cooking Clubs (IHCC), theme for this week,
You Have It Made


Friday, January 22, 2016

Kung Pao Chicken

Cookbook Countdown is a monthly cooking/baking event, which I'm co-hosting with Emily's Cooking (Makan2) Foray.  Everyone is welcome to join us. How does it work? To summarize, you may select a cookbook from your own cookbook collection, to cook or bake from each month. That selected book shall be your cookbook of the month. You may cook any recipes and as many recipes as you want from your selected book of the month. This is a fabulous way of using your cookbooks at least once! For more information on Cookbook Countdown, please click here. Do join us! 


************************


Cookbook Countdown #1 : Recipe No. 5
from my selected cookbook for this month, Stir-Frying To The Sky's Edge by Grace Young.


Kung Pao Chicken is a dish that is a favourite of many. It is one of the dishes that we would often order when we eat out at Chinese restaurants. There are many versions of Kung Pao Chicken. According to Grace Young, this version is one of her favourites. As with most stir-fry dishes, this is great as a main dish with rice. 


I have used cashew nuts instead of peanuts, as I have always prefer cashew nuts in Kung Pao Chicken. I have one green bell pepper instead of red, so I have used that instead. I have omitted the powdered Sichuan peppercorns, simply because I have forgotten to toast the whole Sichuan peppercorns and ground them into powder. Whole Sichuan peppercorn tastes quite pungent, so I have not included them in the dish. Note to self, to make some powdered Sichuan peppercorns, as there are some other recipes that uses this ingredient. There's an ingredient which I've completely forgotten to add into the dish, my half cup of chopped scallions! I've found my small bowl of chopped scallions hidden behind some bowls when I began to clear away the dishes after dinner! Nevertheless, this is a tasty dish! 


Kung Pao Chicken
(adapted from "Stir-Frying To The Sky's Edge", by Grace Young, or here)
1 pound boneless, skinless chicken thigh or breast, cut into 3/4-inch cubes
2 tablespoons minced ginger
1 tablespoon minced garlic
2-1/2 teaspoons cornstarch
1 teaspoon soy sauce
1 teaspoon plus 1 tablespoon Shao Hsing rice wine or dry sherry
2 teaspoons sugar
3/4 teaspoon salt
2 tablespoons chicken broth
1 tablespoon Chinkiang or balsamic vinegar
1 teaspoon dark soy sauce
1 teaspoon sesame oil
2 tablespoons peanut oil or vegetable oil
4 to 8 dried red chili peppers, snipped on one end
1/2 teaspoon roasted and ground Sichuan peppercorns (omitted this)
1 large red bell pepper, cut into 1-inch squares
3/4 cup unsalted roasted peanuts (I use cashew nuts)
1/2 cup minced scallions

  1. In a medium bowl combine the chicken, ginger, garlic, cornstarch, soy sauce, 1 teaspoon of the rice wine, 1 teaspoon of the sugar, 1/2 teaspoon of the salt, and 1 teaspoon cold water. Stir to combine. In a small bowl combine the broth, vinegar, dark soy sauce, sesame oil, and the remaining 1 tablespoon rice wine.
  2. Heat a 14-inch flat-bottomed wok or 12-inch skillet over high heat until a bead of water vaporizes within 1 to 2 seconds of contact. Swirl in 1 tablespoon of the peanut oil, add the chillies and ground Sichuan peppercorns, then, using a metal spatula, stir-fry 15 seconds or until the chillies just begin to smoke. Push the chilli mixture to the sides of the wok, carefully add the chicken, and spread it evenly in one layer in the wok. Cook undisturbed 1 minute, letting the chicken begin to sear. Then stir-fry 1 minute or until the chicken is lightly browned but not cooked through.
  3. Swirl the remaining 1 tablespoon peanut oil into the wok. Add the bell peppers and stir-fry 1 minute or until the peppers begin to soften. Swirl the broth mixture into the wok and stir-fry 1 minute or until the chicken is just cooked through. Add the peanuts and scallions, sprinkle on the remaining 1 teaspoon sugar and 1/4 teaspoon salt, and stir-fry 30 seconds or until the scallions are bright green.

"I'm linking this post with Cookbook Countdown hosted by 


Thursday, January 21, 2016

Strawberry Shortcakes : Bake-Along #91

This week's Bake-Along #91 theme is Strawberry Shortcake. Selected by Zoe to bake together with Lena, myself and everyone is invited to bake-along with us. 

I have so many Strawberry Shortcake from my many baking cookbooks. There's recipes that uses sponge cakes and others that uses a buttery dough as the cake base, with the same filling, strawberries and whipped cream. After going through a few recipes, I've decided on this simple one, though the recipe from Flour Bakery Cookbook sounds good, with balsamic strawberries. I might just make that one of these days.


The shortcake base is pretty easy to make, it is similar to making scones. I've made them into squares though the photo in the book is actually lovely rounds. I was lazy to use a round cookie cutter and by cutting them in squares, I do not have to re-roll the scraps. Yup, I can get pretty lazy at times! As for the strawberries, I've added 1 tablespoon of kirsch which gives a lovely fragrant aroma. 


The shortcakes are buttery and tender. Lovely when sandwiched with the filling of the fragrant boozy strawberries and the lightly sweetened whipped cream. I drizzled some lovely juice, (there's a lot of juice!), from the macerated strawberries onto the plate, and the shortcakes soaks the juices up pretty quick. These Strawberry Shortcakes makes a lovely dessert treat. 


Strawberry Shortcakes
(adapted from WillIiams-Sonoma's Dessert Of The Day", Kim Laidlaw)
Serves 6
For The Shortcakes
2 cups (10 oz/315gm) all-purpose flour
1 tbsp baking powder
1/2 tsp kosher salt
2 tbsp sugar, plus more for sprinkling
1 tsp finely grated lemon zest
6 tbsp (3 oz/90gm) cold unsalted butter, cut into small pieces
1 cup (8fl oz/250ml) heavy cream, plus more for brushing
2 pt (1 lb/500gm) strawberries, hulled and sliced or halved
1/4 cup (2oz/60gm) sugar (2 tbsp)
1 tbsp kirsch (my addition)

Whipped Cream
1 cup (8 fl oz/250ml) heavy cream
2 tbsp sugar (I use icing sugar)
1/2 tsp pure vanilla extract

In a bowl, using an electric mixer fitted with the whisk attachment, whip the cream, sugar and vanilla on medium speed until medium peaks form. Use right away or cover with plastic wrap and refrigerate until ready to use, up to 4 hours. Whisk the cream briefly before using.


To make the shortcakes, preheat the oven to 400F (200C). In a bowl, whisk together the flour, baking powder, salt, sugar and lemon zest until well blended. Using a pastry blender or 2 knives, cut in the butter until the pieces are about the size of peas. Add the cream and gently toss with a fork until the flour is just moistened and the ingredients are blended. Turn the dough out onto a lightly floured work surface. Gently press into a thick rectangle about 6 by 4 inches (15 x 10cm). Trim the edges even, then cut the dough into 6 equal squares.

Place the shortcakes on an ungreased baking sheet, spacing them well apart. Brush each with a little cream, then sprinkle with sugar. Bake until puffed and golden, 15-18 minutes. Transfer to a wire rack to cool slightly.

Meanwhile, in a bowl, toss together the strawberries and sugar with a fork, lightly crushing some of the berries. Let stand until ready to serve.

Split the shortcakes in half horizontally and place the bottom halves, cut side up, on plates. Spoon some of the strawberries, including the juices, over each half and top with a dollop of whipped cream. Top with the remaining shortcake halves, cut side down, and serve.


********************************

Do stop by Lena of Frozen Wings and Zoe of Bake For Happy Kids, and all our friends who has baked along with us in the linky below :


For our next Bake-Along, we will be baking Chocolate Chip Cookies, recipe from Bake In The Day Bakery Cookbook, pg 172, or here. Link your post to our linky which will open from 25th February to 5th March. Everyone is welcome to join us! Only current posts please.


Photobucket


A friendly reminder when linking to our linky :
1. Please mention Bake-Along event in your own post linking direct to any of the hosts' post (JoyceLena or Zoe)
2. Please link only new and current post, PLEASE FOLLOW THE BAKE OR THEME provided by us. Unrelated post will be deleted.
3. Feel free to display our Bake-Along badge in your post.


Monday, January 18, 2016

Stir-Fried Eggs with Velvet Shrimp

Cookbook Countdown #1, recipe no. 4, from my selected book for this month, Stir-Frying To The Sky's Edge by Grace Young.

I've made "Stir-Fried Eggs with Velvet Shrimp". We love egg dishes, and especially so when there's shrimps, one of our favourites.


Just as it's name, the shrimps are velvety smooth and crisp tender. The shrimps are marinated in egg white-cornstarch mixture, and according to Grace Young, this is what, which gives the shrimps a crisp silky texture. 


This is a delicious stir-fried egg dish. A very nice dish to serve at dinner time and could easily be a family favourite. I have made this again a few weeks later, and have substitute the peas with a large handful of coarsely chopped cilantro, and it was very fragrant and delicious.


Stir-Fried Eggs with Velvet Shrimp
(adapted from "Stir-Frying To The Sky's Edge", Grace Young)
4 ounces small shrimp, peeled, deveined, and patted dry
4 large eggs, 1 teaspoon egg white reserved
1/2 teaspoon cornstarch
2-1/2 teaspoons Shao Hsing rice wine or dry sherry
1/8 plus 1/4 teaspoon salt
1 teaspoon plus 2 tablespoons peanut or vegetable oil
1/8 teaspoon ground white pepper
1/3 cup chopped scallions
1 tablespoon minced ginger
1/3 cup frozen peas, defrosted

  1. In a medium bowl combine the shrimp, the 1 teaspoon egg white, cornstarch, 1/2 teaspoon of the rice wine, and 1/8 teaspoon of the salt. Stir until the cornstarch has dissolved. Stir in 1 teaspoon of the oil. Put the shrimp uncovered in the refrigerator for 15 minutes. Bring the shrimp to room temperature for 15 minutes. In a medium bowl beat the eggs, pepper, and the remaining 2 teaspoons rice wine and 1/4 teaspoon salt.
  2. Heat a 14-inch flat-bottomed wok or 12-inch skillet over high heat until a bead of water vaporizes within 1 to 2 seconds of contact. Swirl in the remaining 2 tablespoons oil, add the scallions and ginger, then, using a metal spatula, stir-fry 10 seconds or until the aromatics are fragrant. Add the shrimp and stir-fry 1 minute or until the shrimp begins to turn colour but is  not cooked through. Add the peas, swirl the egg mixture into the wok, and stir-fry 1 minute or until the shrimp is cooked through and the eggs are just set but still moist. Do not overcook.


"I'm linking this post with Cookbook Countdown hosted by 


Saturday, January 16, 2016

Hit 'N' Run Traybaked Chicken

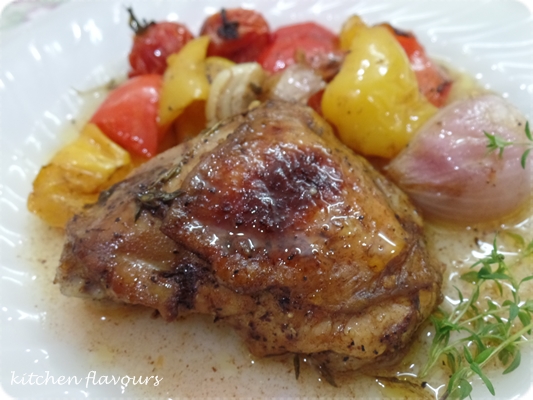
It's our monthly featured chef week at I Heart Cooking Clubs (IHCC), and the featured chef is Jamie Oliver. I have six of his books and out of the hundreds of recipes, there's one chicken dish that I've been wanting to make for a long time. Hit 'N' Run Traybaked Chicken. Such a funny and interesting name for a dish. I like its name and the dish even better!


According to Jamie "Everyone needs a hit 'n' run  recipe like this - it's the kind of fallback meal you can enjoy when prep time isn't on your side. It's simply a case of putting together a combination of ingredients that really love each other, then just tearing, mixing, marinating and baking. It's super quick to prepare, and you're letting the oven do all the work". 

Yup, this is a super easy meal to prepare.  


The chicken thighs are very moist and tender, baked to a lovely golden brown. I've used cherry tomatoes instead of large tomatoes, and have used an additional tablespoon of balsamic vinegar, adding it in when I was basting the chicken during cooking . I tasted the lovely juices during basting, and felt that it needed a little more balsamic vinegar, adjust to taste. This delicious chicken meal is served with some green salad on the side. 


Hit N Run Traybaked Chicken
(adapted from "Save With Jamie", by Jamie Oliver)
serves 4
4 large ripe tomatoes
2 red onions
1 red pepper
1 yellow pepper
6 skinless, boneless chicken thighs
4 cloves of garlic
1/2 bunch of fresh thyme (15gm)
1 teaspoon smoked paprika
2 tablespoons olive oil
2 tablespoons balsamic vinegar

Preheat the oven to 180C/350F/gas 4. Quarter the tomatoes and place them in a large baking dish or roasting tray (roughly 25cm x 30cm). Peel the onions and cut into large wedges, then deseed and roughly chop the peppers. Add all these to the tray along with the chicken thighs.

Squash the unpeeled garlic cloves with the back of your knife and add to the tray, then pick over the thyme leaves and sprinkle over the paprika. Add the oil, balsamic and a good pinch of salt and pepper. Toss everything together really well to coat, then spread across the tray, making sure the chicken isn't covered by the vegetables. Roast for around 1 hour, or until the chicken is golden and cooked through, turning and basting it a couple of times during cooking with the juices from the tray. Serve the traybake with a lovely green salad on the side. You could also buddy it up with a little rice, polenta or a loaf of crusty bread to mop up the juices.


I'm linking this post with I Heart Cooking Clubs (IHCC), theme for this week
Monthly Featured Chef : Jamie Oliver


Thursday, January 14, 2016

Yin Yang Beans

Cookbook Countdown #1, recipe no. 3, from my selected book for this month, Stir-Frying To The Sky's Edge by Grace Young.

I've cooked Yin Yang Beans, a delicious vegetable stir-fry dish, which is perfect as a part of a Chinese meal, served with  rice alongside some other dishes. 


I did make some slight changes to the recipe. Pickled ginger is used but I did not have any, so I have replaced with a tablespoon of each, sweet and salty preserved radish, both of which I've bought already chopped to small pieces. Also, I have omitted the rice wine. Instead of partially cooked the beans by boiling it in salted water, I did the easy way, I microwaved the beans for 2 minutes on high with 2 tablespoons of water and a pinch of salt. And I've used more ground pork and red pepper flakes than indicated in the recipe.

A very tasty dish, goes great with fluffly jasmine rice. One dish that I would be cooking again.


Yin Yang Beans
(adapted from "Stir-Frying To The Sky's Edge", Grace Young)
3/4 teaspoon salt
1 pound green beans, ends trimmed (about 6 cups)
1 tablespoon soy sauce
1 tablespoon Shao Hsing rice wine or dry sherry (omitted)
1 tablespoon peanut or vegetable oil
1 tablespoon minced garlic
1 tablespoon minced ginger
1/4 teaspoon red pepper flakes (1 teaspoon)
2 tablespoons ground pork (about 1 ounce) (about 4 tablespoons)
1 tablespoons minced pickled ginger (replaced with 1 heaped tablespoon each of sweet and salty preserved radish, chopped)
1/4 cup chopped scallions

  1. In a 3-quart saucepan bring 1-1/2 quarts water and 1/2 teaspoon of the salt to a boil over high heat. Add the beans and cook 1 minute or until they are bright green and the water almost returns to a boil. Drain the beans in a colander, shaking well to remove all excess water. In a small bowl combine the soy sauce and rice wine. (I microwaved the beans for 2 minutes, with 2 tablespoons of water and a pinch of salt).
  2. Heat a 14-inch flat-bottomed wok or 12-inch skillet over high heat until a bead of water vaporizes within 1 to 2 seconds of contact. Swirl in the oil, add the garlic, fresh ginger, and red pepper flakes (and preserved radishes if using) and stir-fry 10 seconds (1-2 minutes) or until the aromatics are fragrant. Add the pork, and using a metal spatula, break up the pork, and stir-fry 30 seconds to 1 minute (3-4 minutes) or until the pork is no longer pink. Add the beans, pickled ginger, and scallions and sprinkle on the remaining 1/4 teaspoon salt. Swirl the soy sauce mixture into the wok and stir-fry 1 minute or until the pork is cooked through and the beans are crisp-tender.


"I'm linking this post with Cookbook Countdown hosted by 


Tuesday, January 12, 2016

Fluted Carrot-Orange Cake : TWD

This week's bake at Tuesdays With Dorie (TWD) is Fluted Carrot-Tangerine Cake. It is an inch high, light and spongy carrot cake with the fragrance and flavours from ginger and citrus. 


I have used orange instead of tangerine. And the pie pan I used has straight sides instead of fluted. As usual, I have reduced the amount of sugar, using only a scant half cup, and it works for me. I can already taste the sweetness, and it tastes sweeter on the next day too. I cannot imagine how sweet it is with the full amount, a whole cup of it for a one-inch cake. There's grated carrots, orange zest and juice, and grated fresh ginger in the batter.


 It certainly smells lovely when the cake is baking in the oven!


I thought that this cake is nice. Light, soft and moist with a fragrant citrusy taste. Goes well with a cup of warm tea.


Please visit the other bakers at Tuesdays With Dorie (TWD).

Monday, January 11, 2016

Blueberry Blast Smoothie

"Fresh Start", the theme at I Heart Cooking Clubs  (IHCC), where we are currently cooking from Ellie Krieger's recipes. I've made one of Ellie's healthy smoothies which makes a healthy and satisfying start to any day!


Blueberry Blast Smoothie


This is so easy to make. Blend everything together and enjoy! Start your morning with something as healthy as this, made even better with your own homemade yoghurt, like I did! 


Blueberry Blast Smoothie
(adapted from "The Food You Crave", Ellie Krieger)
1/2 cup nonfat milk
1/2 cup plain nonfat yoghurt
1 cup frozen unsweetened blueberries
1 teaspoon honey

Put all the ingredients into a blender and process until smooth.


I'm linking this post with I Heart Cooking Clubs (IHCC), theme for this week,
Fresh Starts

Thursday, January 7, 2016

Ruby Jewel Cookies : Bake-Along #90

It's Bake-Along #90, and the bake for this week is Ruby Jewel Cookies, selected by Zoe, to bake along together with Lena and myself. Everyone is welcome to join our Bake-Along. 

These cookies are very easy to  make. The dough is very similar to sweet pastry dough. It is made in the food processor and takes only  a couple of minutes to come together. The dough is refrigerated for about 1 hour to chill (though I refrigerated mine for two days!). Shape the dough into small balls, about 3/4-inch sized. I've used mini muffins pans which I've lined with cute little muffin cases. Drop the round balls into the muffin cases in the pan, then using the end of a wooden spoon, make an indentation in the centre of each cookie. Fill it up with some jam. I've used a small plastic bag, fill one corner with a few tablespoons of jam, cut a small opening at the corner, and pipe the jam into the cookies. 

I've made only half a recipe, and yield exactly 30 mini cookies. The only changes I've made to the dough is to use only 40gm of sugar for the dough. And the sweetness of the cookies turns out just right for us.


I baked these cookies for exactly 18 minutes until the edges are golden. Allow them to cool in pans on wire racks.


Dust with confectioners' sugar before serving. The cookies are tender, buttery and tasted really nice with the black cherry jam that I've used. If you have an opened jar of jam in the refrigerator that is begging to be used, it would be a great idea to make these cookies.


We love these Ruby Jewel Cookies. Pretty and cute to look at, fun and delightful to eat! It is quite difficult to stop at just one! Yums!


** for half a recipe, my measurements are listed in blue
Ruby Jewel Cookies
(adapted from "The Williams-Sonoma Baking Book")
Makes about 5 dozen cookies (Yield 30 cookies for half a recipe)
2 large egg yolks (1 large)
1 tsp pure vanilla extract (1/2 tsp)
2-1/4 cups (11-1/2oz/360gm) all-purpose (plain) flour (180gm)
2/3 cup (5oz/155gm) granulated sugar  (40gm)
1 cup (8oz/250gm) cold unsalted butter, cut into small pieces (125gm)
about 1/3 cup (3-1/2oz/105gm) seedless raspberry jam or other thick jam (about 1/4 cup)
confectioners' (icing) sugar for dusting

Preheat the oven to 350F (180C). Have ready 2 ungreased baking sheets or miniature muffin pans and, if desired, about 5 dozen miniature paper muffin liners.
In a small bowl, whisk together the egg yolks and vanilla ; set aside.
In a food processor, combine the flour and granulated sugar. Process briefly to blend. With the machine running, add the butter 2 or 3 pieces at a time and process until the mixture looks crumbly. With the machine still running, add the egg yolk mixture and process until blended and the dough begins to pull away from the sides of the bowl.
Turn the dough out onto a sheet of plastic wrap and shape it into a flat disk. Wrap and refrigerate until chilled, about 1 hour.
With lightly floured hands, shape the dough into 3/4-inch (2-cm) balls. Place each ball in a paper liner, if using. Place the cookies 1 inch (2.5cm) apart on the baking sheets or in the muffin pans.
Using the end of a wooden spoon handle dipped in flour to prevent sticking, make an indentation in the center of each cookie, but do not press all the way through the dough. Using a spoon or a pastry bag fitted with a plain tip, fill each indentation with about 1/4 tsp jam.
Bake the cookies until the edges are golden, 15-20 minutes. Let the cookies cool on the pans on wire racks. (If baking on sheets without paper liners, use a thin spatula to loosen the cookies carefully while the are still warm). Transfer the cooled cookies to wire racks and, using a fine mesh sieve, dust with confectioners' sugar.


********************************

Do stop by Lena of Frozen Wings and Zoe of Bake For Happy Kids, and all our friends who has baked along with us in the linky below :

For our next Bake-Along, we will be baking Theme : Strawberry Shortcakes. You may bake any Strawberry Shortcakes recipe and link your post to our linky which will open from 21st to 20th JanuaryEveryone is welcome to join us! Only current posts please.


Photobucket


A friendly reminder when linking to our linky :
1. Please mention Bake-Along event in your own post linking direct to any of the hosts' post (JoyceLena or Zoe)
2. Please link only new and current post, PLEASE FOLLOW THE BAKE OR THEME provided by us. Unrelated post will be deleted.
3. Feel free to display our Bake-Along badge in your post.


Monday, January 4, 2016

Pork Chow Fun

I've made a stir-fry noodle dish for our weekday lunch. Recipe is from Stir-Frying To The Sky's Edge by Grace Young, the book which I'm cooking with this month, for Cookbook Countdown, which I'm co-hosting with Emily of Emily's Cooking (Makan2) Foray. For more details on how to join Cookbook Countdown, please click here.


Originally, recipe is called Beef Chow Fun, but I have used pork fillet instead of beef. A simple and tasty stir-fry broad rice noodles (which is locally called as kueh teow). This noodle dish uses fermented black beans, an ingredient which I have not used in a noodle dish before, and find that I like it. We enjoyed this Pork Chow Fun and would definitely be cooking this again. Makes a very nice meal, either for lunch or even a simple dinner.


Beef Chow Fun
(adapted from "Stir-Frying To The Sky's Edge", by Grace Young)
8 ounces lean flank steak (I use pork fillet)
2 teaspoons soy sauce
1-1/2 teaspoons cornstarch
1 teaspoon sesame oil
1 pound fresh broad rice noodles (1 sheet)
2 tablespoons oyster sauce
1 tablespoon Shao Hsing rice wine or dry sherry
2 tablespoons peanut or vegetable oil
2 teaspoons minced ginger
2 teaspoons minced garlic
1 tablespoon fermented black beans, rinsed and mashed
3 cups bean sprouts, rinsed and patter dry (about 6 ounces)
1/2 cup finely shredded scallions
1/4 teaspoon ground white pepper

  1. Cut the beef with the grain into 2-inch-wide strips. Cut each strip across the grain into 1/2-inch-thick slices. Put the beef in a shallow bowl and add the soy sauce, cornstarch, and sesame oil. Stir to combine. Leaving the noodles as a slab, cut it crosswise into 1/2-inch-wide strips. Using your hands, separate and loosen the strips to make about 4 cups. In a small bowl combine the oyster sauce and rice wine.
  2. Heat a 14-inch flat-bottomed wok over high heat until a bead of water vaporizes within 1 to 2 seconds of contact. Swirl in 1 tablespoon of the peanut oil, add the ginger and garlic, then, using a metal spatula, stir-fry 10 seconds or until the aromatics are fragrant. Push the aromatics to the sides of the wok, carefully add the beef  and spread it evenly in one layer in the wok. Cook undisturbed 1 minute, letting the beef  begin to sear. Add the fermented beans and stir-fry 30 seconds or until the beef is lightly browned but not cooked through. Transfer the beef to a plate. (Using pork, I stir-fry till the pork is fully cooked).
  3. Swirl the remaining 1 tablespoon peanut oil into the wok, add the noodles, and spread evenly in one layer in the wok. Cook undisturbed for 1 minute or until the noodles are slightly crusty. Add the bean sprouts and stir-fry 1 minute or until the sprouts are just limp. Return the beef with any juices that have accumulated to the wok, add the scallions, sprinkle on the pepper and oyster sauce mixture, and stir-fry 1 minute or until the beef is just cooked.

"I'm linking this post with Cookbook Countdown hosted by