Monday, November 30, 2015

Spiced Mixed Nuts

"Nibbles & Noshes", the theme for this week at I Heart Cooking Clubs (IHCC). I'm going "hot and nutty" this week with Spiced Mixed Nuts.


There's pumpkin seeds, peanuts, almonds, pistachios, cashew and I've thrown in some hazelnuts as well. Flavoured with the sweetness of honey (did not have maple syrup), spiced with curry powder, cayenne powder with dried rosemary and salt. Just mixed and bake until the nuts are fully toasted and crispy. They will be sticky from the honey. Some of the nuts will clump together when left to cool, no problem, just separate them later. But I find that I have to bake them about 10 minutes longer than the recipe states. 

I've used more cayenne powder, about 1/2 teaspoon and they have just the right kick in the spiciness, which I really, really like. Sweet and spicy, and very, very addictive. This is great for munching alongside a cold glass of beer!


Spiced Mixed Nuts
(adapted from "The Food You Crave" Ellie Krieger)
1/2 cup raw peanuts
1/2 cup raw almonds
1/3 cup shelled raw pistachios
1/3 cup raw cashews
1/3 cup shelled raw pumpkin seeds
1 tablespoon pure maple syrup
1/2 teaspoon curry powder
1/8 teaspoon cayenne powder, or more to taste
1/2 teaspoon dried rosemary
1/4 teaspoon salt
cooking spray

Preheat the oven to 325F. 
Combine the nuts and seeds in a medium bowl. Add the maple syrup, spices, rosemary, and salt and toss to combine,
Coat a baking sheet with cooking spray, then transfer the coated nuts to the sheet and spread evenly in a single layer. Bake, stirring once, until the nuts are fragrant and lightly toasted, 15 to 20 minutes. Remove from the oven and let cool. The nuts will keep in an airtight container in the refrigerator for up to 2 weeks.


I'm linking this post with I Heart Cooking Clubs (IHCC), theme for this week
"Nibbles and Noshes"


and 
 photo 77951578-1914-4b72-8eda-9e40a91183ac_zps331eb4b4.jpg


Saturday, November 28, 2015

Chicken, Spinach and Noodles Broth

It's November Potluck week over at I Heart Cooking Clubs (IHCC), and I'm bringing another dish. A soupy chicken broth noodle from Nigel Slater's book "Eat".


Originally, the recipe uses asparagus spears which is cut into ribbons. I do not have any asparagus but I do however have a pot of Amaranth (Chinese Spinach) growing in my garden pot, which are just about right for harvest. And these Chinese Spinach are great in soups and stir-fries. So I've used that instead. Instead of chicken thighs, I've used chicken breast fillet. I've followed the cooking instructions for the thighs, but shred the meat to pieces before serving. For the noodles, I've used dried egg noodles which is boiled till softened. 


Round Leaf Amaranth (Chinese Spinach) from my potted garden


This is an easy noodle dish to come together rather quickly. I made this for lunch, with a condiment of light soy sauce mixed with chopped birds eye chillies.


Chicken, Asparagus and Noodle Broth
(adapted from "Eat", Nigel Slater)
For 2-3 servings
Ingredients :
chicken thighs (I use chicken breast)
asparagus (I use homegrown Chinese spinach)
noodles
mushrooms (I use fresh Shiitake)
garlic
chicken stock

Brown 4 chicken thighs in a little oil in a deep pan. Slice 150gm mushrooms, such as large field, portobello or porcini, and peel and slice 2 garlic cloves. Add the mushrooms and garlic to the pan and continue browning, adding more oil if necessary. Pour in a litre of chicken stock, bring to the boil and simmer for about 30 minutes. Lift out the thighs and take the meat off the bones, returning it to the simmering stock. (I've used chicken breast fillet, cook as above, and shredded the meat before serving). Shave 4 asparagus spears into ribbons with a vegetable peeler, then add them to the soup with 200gm noodles (I've used Chinese spinach, cooking it in the soup for just a few minutes). Cook for a minute or two, then divide between deep bowls.


I'm linking this post with I Heart Cooking Clubs (IHCC), theme for this week,
November Potluck


and 
 photo 77951578-1914-4b72-8eda-9e40a91183ac_zps331eb4b4.jpg


Thursday, November 26, 2015

Cucumber, Onion and Mint Salad

"November Potluck", the theme for this week at I Heart Cooking Clubs (IHCC). We get to cook from any of IHCC's past or present featured chefs, and for this week, I've made Jacques Pepin's simple and yummy salad, Cucumber, Onion and Mint Salad.


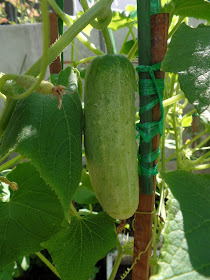
I've sliced the onions into rings (instead of diced), as I like them this way in salads. The cucumbers are from my potted garden, gorgeous fresh cucumbers! I did not peel them since these are homegrown and they have thin skins, so they really do not need any peeling. These are mini cucumbers,and there's barely any seeds in them, so I did not bother to scrape out the seeds. Also I have skipped the step where the cucumbers and onions are sprinkled with salt and left for 30 minutes to extract out the water so that they will be crunchy. My cucumbers are really crisps so I've omitted this step. The salad is made more refreshing and fresh by using mint leaves, also from my garden pot. I did not use Tabasco sauce, but have replaced with Dijon mustard instead. This salad can be prepared in advance and keep in the refrigerator until serving time. It is delicious served cold. 


Mini cucumbers. Fresh, juicy and crisp. Perfect for salads. Looking forward to more cucumber harvests this week! Big grin!!!


Mint from the garden pot.


Cucumber, Onion and Mint Salad
(adapted from : Heart&Soul, Jacques Pepin)
1 large English (seedless) cucumber (about 1 pound)
1 cup diced (1⁄2-inch) mild onion
1 1⁄2 teaspoons salt
2 tablespoons shredded fresh mint leaves
1⁄2 cup sour cream

1⁄2 teaspoon Tabasco sauce (I use Dijon mustard)

Instructions:
Peel the cucumber and cut it lengthwise in half. Using the tip of a teaspoon, scrape out the seeds. Cut the flesh into 1⁄2-inch dice. (You should have about 2 1⁄2 cups.)
Combine the cucumber and diced onion in a bowl, sprinkle with the salt, and mix well. Let cure for 30 minutes. (I skipped this step).
Drain the cucumber mixture in a colander and pat dry with paper towels. Combine with the rest of the ingredients and serve.


I'm linking this post with I Heart Cooking Clubs (IHCC), theme for this week
"November Potluck"


Tuesday, November 24, 2015

Pear-Blueberry Roll-Up Tart

This week at Tuesdays With Dorie (TWD), the selected recipe is Pear-Cranberry Roll-Up Tart. I do not have any fresh or frozen cranberry, but I do have a pack of frozen blueberries, so I have used that instead. For the filling, I've used Parkham Pears which are ripe and sweet. For the jam, I've used raspberry jam and replaced the ground ginger with ground allspice as I could not find my little jar of ground ginger. I thought I had one around!


 Roll-Up Tart about to go into the oven.

Dorie's galette dough is quite easy to handle for a round tart, or even small little tarts, but I had a little trouble rolling the dough up into a roll-up tart. With the pear and blueberry filling inside, it was not an easy smooth roll! There's one or two tears, which was easily patched up by pinching the dough together to seal. In the end I managed it somehow, though I am unable to tuck the ends of both sides under the dough, as it was getting sticky and soft by then. So I just pinched them together to seal. Brush the top with egg wash and sprinkle with demarara sugar. Make a few slits on top and bake as instructed in the recipe.


One thing I know for sure is that, Dorie's galette dough makes a flaky, tender, crisp and buttery dough crust. The juices from the filling was bubbling from the sides of the tart instead of from the slits at the top as Dorie indicated while it was baking. When it was done baking and cool to just warm, I sliced the tart and some of the slices break into pieces.


The pear pieces are tinged from the colour of the blueberries. Overall, a very nice tart, but I could not help comparing this to the Apple Pielettes which we baked last month. They are quite similar, one with apple and this with pear, and they both used different jams and spices. I prefer the Apple Pielettes. That being  said, we did enjoy slices of these tart with warm tea. 


I'm linking this post with Tuesdays With Dorie (TWD)

Sunday, November 22, 2015

Green Beans with Mushrooms and Shallots

"Scentsational Sides", the theme for this week at I Heart Cooking Clubs (IHCC). I've made another side dish, this time to go with our usual dinner of rice and some other main dishes.

A simple and very tasty veggie dish. Bought some French green beans and they were very sweet, tender and fresh. I've used fresh shiitake mushrooms instead of assorted mushrooms.


The green beans are cut into 1-inch pieces, then they are cooked in the microwave for about 4 minutes before stir-frying them with the rest of the ingredients. This is similar to what we usually cook at home, the only difference is we always used garlic instead of shallots. Next time I will use both garlic and shallots. Very tasty veggie dish, the perfect side-dish to accompany any meal. 


Green Beans with Mushrooms and Shallots
(adapted from "The Food You Crave", Ellie Krieger)
serves 4
1 pound fresh green beans, trimmed and cut into 1-inch pieces
1 tablespoon water
2 tablespoons olive oil
1/3 cup sliced shallots (about 2 medium)
3/4 pound assorted fresh mushrooms (i.e. button, baby bella, shiitake, oyster, chanterelle), sliced
salt and freshly ground black pepper to taste

Put the green beans in a microwave-safe bowl with the water.
Cover tightly and microwave on high for 4 minutes. Carefully remove the cover, drain it in a colander, shaking off any excess water, and set aside.
While the beans are cooking, heat the oil over medium-high heat in a large nonstick skillet. Add the shallots and cook, stirring, until softened slightly, about 2 minutes. Add the mushrooms and cook, stirring occasionally, until the water they release has evaporated and they begin to brown, about 10 minutes. Add the green beans and stir to combine and rewarm. Season with salt and pepper and serve.


This post is linked to I Heart Cooking Clubs (IHCC), the theme for this week
Scentsational Sides


and 
 photo 77951578-1914-4b72-8eda-9e40a91183ac_zps331eb4b4.jpg

Thursday, November 19, 2015

Scallop Potatoes Au Gratin

"Scentsational Sides", is the theme for this week at I Heart Cooking Clubs (IHCC), it's sensational side dishes that makes the meal other than the main dish, yes I agree! I've made Scallop Potatoes Au Gratin, and when it was served, we could not decide whether to taste which one first, this side dish or the main dish of roasted chicken legs. While we love roasted chicken, the Scallop Potatoes looks so golden and cheesy delicious. Side dishes like this is good enough to eat it on its own!


Simple and easy to make. Yellow potatoes are peeled, even though recipe says otherwise, and sliced thinly, boil until just tender, about 8 to 10 minutes. Drain and set aside. Prepare the sauce by making the roux, heating the milk and flour until the flour is dissolved. Sprigs of thyme and garlic are added and stir until the mixture has thickened. Remove from heat, discard the thyme sprigs and add some cheese and salt to taste, stirring until the cheese is melted. Arrange half the potatoes in a greased baking dish, pour half of the cheese sauce evenly. Arrange the remainder potatoes over and top with the remaining sauce. Scatter shredded cheese all over, bake until bubbling about 20-25 minutes. Set under the broiler on high until the cheese is golden browned, about 2 minutes.


Creamy, cheesy, delicious!


Scalloped Potatoes Au Gratin
(adapted from "Comfort Food Fix", Ellie Krieger)
Makes 8 servings
Nonstick cooking spray
3 pounds yellow potatoes, like Yukon Gold, unpeeled, sliced into 1/8-inch slices
3 cups cold low-fat (1%) milk
1/4 cup all-purpose flour
2 cloves garlic, minced
1 large or 2 small sprigs thyme
1-3/4 cups grated Gruyere cheese (6 ounces) (I use Mozzarella)
1-1/2 teaspoon salt

Preheat the oven to 350F, Spray a 2-quart shallow baking dish with cooking spray.
Place the potatoes in a large pot and cover with water. Bring to a boil, then reduce the heat and simmer until the potatoes are just tender, about 8 minutes. Drain, set aside, and allow to cool slightly.
Place the milk and flour into a large saucepan and whisk until the flour is dissolved. Add the garlic and thyme and heat over medium-high heat, stirring constantly, until the mixture comes to a boil and is thickened, about 8 minutes. Remove from the heat and discard the thyme sprig. Add the salt and 1 cup cheese, stirring until the cheese melted.
Arrange half of the potatoes in the baking dish. Pour over half of the cheese sauce. Add the remaining potatoes and top with the remaining sauce. Sprinkle with the remaining 3/4 cup cheese and bake until bubbling, about 25 minutes. Set under the broiler and broil on high until the top is browned, about 2 minutes.


This post is linked to I Heart Cooking Clubs (IHCC), the theme for this week
Scentsational Sides


and 
 photo 77951578-1914-4b72-8eda-9e40a91183ac_zps331eb4b4.jpg

Tuesday, November 17, 2015

Potato, Onion, And Cheddar Galette : Bake-Along #88

It's Bake-Along No. 88! I've selected the theme "Galette" to bake together with my baking buddies, Lena and Zoe. A galette is a rustic-style tart, is pretty much similar to a tart or pie, the difference is, it is made with a free form pastry dough which is rolled out, filled the centre with the filling of your choice and just wrap them up by folding over the pastry all around the sides, leaving the filling visible in the centre. No special tart pan or mould is needed. You just need a baking sheet. There's no need to be so perfect in shaping them, after all, it is a free-form rustic tart. 

I made a savoury galette, one that I have been thinking of making for ages, from this fabulous book "The Art & Soul of Baking" by Cindy Mushet, from Sur La Table. 


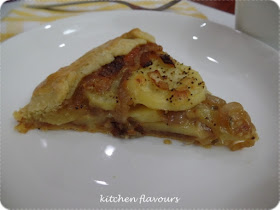
This galette has all my favourite ingredients; cheese, potatoes and caramelized onions. With the flaky, buttery, tender-crisp tart pastry dough, a slice is just perfect either for lunch or even dinner.


  I had it for tea, along with a cup of warm tea, makes a delicious afternoon tea-time treat indeed.


Potato, Onion, And Gruyere Galette
(adapted from "The Art & Soul of Baking", Cindy Mushet, or here)
Ingredients
1 recipe Flaky Pie or Tart Dough (refer recipe below)
Filling
1 large onion (12 ounces), thinly sliced
1 1/2 tablespoons olive oil
1/4 teaspoon kosher salt
5 grinds black pepper
1/2 teaspoon finely chopped fresh thyme or rosemary
4 ounces Gruyère cheese, grated (I've used Cheddar)
1 pound red potatoes
To Finish
1 tablespoon olive oil
Pinch kosher salt
3 grinds black pepper
1 egg
For Serving (optional)
Crème fraiche
Golden caviar
Equipment
Chef’s Knife, Sauté Pan, Small Bowl, Pastry Brush, Paring Knife or Skewer, Metal Spatula, Cake Lifter or Two Spatulas or the Bottom of a Tart Pan
  1. Advance Preparation: Roll the prepared dough into a 13-inch round, transfer to a parchment- or silicone-lined baking sheet, and chill for 1 hour. Preheat oven to 400°F and position an oven rack in the lower third.
  2. Make the filling: Heat the sauté pan over a medium-high flame. Add the olive oil and when it is hot, add the onion slices to the pan. Cook, stirring occasionally, until the onion is soft and lightly colored, 8 to 10 minutes. Stir in the salt, pepper, and chopped thyme or rosemary and blend well. Scrape onto a plate and set aside to cool. Wash the potatoes and pat dry, but don’t peel them. Cut into 1/4-inch-thick slices.
  3. Assemble the galette: Mix together the cooled onion mixture, grated cheese, and potato slices. Spread the mixture over the prepared pie dough, leaving a 1 1/2-inch border around the edges. Drizzle with the remaining olive oil and sprinkle lightly with salt and pepper. Fold just the border of the dough up around the filling, pleating it to make a pretty, circular enclosure, leaving the center open. In a small bowl, beat the egg with a fork. Lightly brush the pleated dough with the egg to give it shine and help it brown in the oven.
  4. Bake the galette for 45 to 50 minutes, or until the pastry is golden brown and the potatoes are soft when tested with a paring knife or skewer. Check the bottom of the galette for doneness by lifting slightly with a metal spatula. Transfer to a rack to cool for 5 to 10 minutes.
  5. Transfer the galette to a serving plate with a cake lifter or two spatulas, or the bottom of a tart pan slipped underneath to keep it from breaking as you move it. Slice and serve warm.


Flaky Pie or Tart Dough
(adapted from "The Art & Soul of Baking", Cindy Mushet or here)
Ingredients
1 stick (4 ounces) cold unsalted butter, cut into ½-inch pieces
3 to 4 tablespoons cold water
1 ¼ cups (6 ¼ ounces) unbleached all-purpose flour
1 ½ teaspoons sugar (omit for a savory crust)
¼ teaspoon salt

Equipment
Small Measuring Cup, Food Processor Fitted with a Metal Blade, Large Bowl, Rolling Pin, Pastry Brush, 9- or 10-inch Pie or Tart Pan, Kitchen Scissors

  1. Place the butter pieces in a bowl or on a plate and freeze for at least 20 minutes. Refrigerate the water in a small measuring cup until needed.
  2. Mix the dough: Place the flour, sugar, and salt in the bowl of the food processor. Process for 10 seconds to blend the ingredients. Add the frozen butter pieces and pulse 6 to 10 times (in 1-second bursts), until the butter and flour mixture looks like crushed crackers and peas.
  3. Immediately transfer the butter-flour mixture to the large bowl. Sprinkle a tablespoon of the cold water over the mixture and “fluff” it in, then add another, and another, until 3 tablespoons have been added. Continue to fluff and stir 10 or 12 times. It will not be a cohesive dough at this point but a bowl of shaggy crumbs and clumps of dough. Before bringing the dough together, you need to test it for the correct moisture content. Take a handful of the mixture and squeeze firmly. Open your hand. If the clump falls apart and looks dry, remove any large, moist clumps from the bowl then add more water, one teaspoon at a time, sprinkling it over the top of the mixture and immediately stirring or mixing it in. Test again before adding any more water. Repeat, if needed. The dough is done when it holds together (even if a few small pieces fall off). If the butter feels soft and squishy, refrigerate before continuing. If the butter is still cold and firm, continue to the next step. (Note: Adding the liquid may also be done on low speed in a stand mixer fitted with the paddle attachment—add three-fourths of the liquid, test for moistness, then add the remaining liquid if needed.)
  4. Knead and chill the dough: Turn the dough onto a work surface and knead gently 3 to 6 times. If it won’t come together and looks very dry, return it to the bowl and add another teaspoon or two of water (one at a time), mixing in as above, and try again. Flatten the dough into a 6- or 7-inch disk, wrap in plastic or parchment paper, and refrigerate for 30 minutes. This allows time for the dough to hydrate fully and for the butter to firm up again.
  5. Roll the dough: If the dough has been refrigerated for more than 30 minutes, it may be very firm and hard and will crack if you try to roll it. Let it sit on the counter for 10 to 15 minutes until it is malleable but still cold. Dust your work surface generously with flour and set the disk on the flour. Dust the top with flour. Roll, turning the dough and following the directions on page 171, until you’ve got a 14- to 15-inch circle about ¹⁄8 inch thick. If at any point the dough becomes warm and sticky, gently fold it into quarters, unfold it onto a baking sheet and refrigerate for 15 minutes, or until the butter is firm again.
  6. If a crack or hole forms while rolling, brush any flour away and patch the area according to the instructions on page 171.
  7. Transfer the dough: Fold the dough circle into quarters, brushing off any excess flour as you fold. Put the point of the folded dough in the center of the pie pan, tart pan, or baking sheet and unfold the dough, lifting it slightly as necessary to ease it into the crevices of the pan. Do not stretch or pull the dough, which can cause thin spots, holes, and/or shrinkage during baking.
  8. Trim the dough: Use a pair of kitchen scissors to trim the dough so it overhangs the edge of the pan by 1 inch. Fold the overhanging dough under itself around the pan edge, then crimp or form a decorative border (page 174). Chill for 30 minutes before baking.


********************************

Do stop by Lena of Frozen Wings and Zoe of Bake For Happy Kids, and all our friends who has baked along with us in the linky below :

For our next Bake-Along, we will be baking based on "Theme : Christmas Yeasted Bread".  You may bake any yeasted bread recipe which is calling out Christmas! Link your post to our linky which will open from 3rd to 24th DecemberEveryone is welcome to join us! Only current posts please.


Photobucket


A friendly reminder when linking to our linky :
1. Please mention Bake-Along event in your own post linking direct to any of the hosts' post (JoyceLena or Zoe)
2. Please link only new and current post, PLEASE FOLLOW THE BAKE OR THEME provided by us. Unrelated post will be deleted.
3. Feel free to display our Bake-Along badge in your post.

Thursday, November 12, 2015

Broad Rice Noodles with Chiles, Pork and Basil

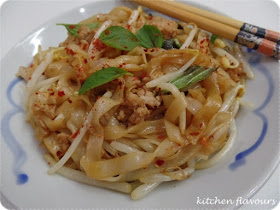
"Monthly Featured Chef Event : Mark Bittman", the theme for this week at I Heart Cooking Clubs (IHCC). I've made Mark Bittman's Broad Rice Noodles with Chiles, Pork and Basil for our afternoon lunch, and it was very tasty.


I have added fresh crunchy bean sprouts to the noodle dish, as I do like some kind of vegetables in my stir-fry noodles, and bean sprouts are always great in a stir-fry noodle dish. However, do not overcook the bean sprouts, you would want them to be cook but still crunchy. I've used crushed red pepper flakes instead of small dried hot red chillies, and have omitted the sugar. And I've added a few drops of black soy sauce.


Fresh broad rice noodles

Recipe uses dried broad rice noodles which needed to be pre-soaked in warm water before draining off and used for cooking. I have however, used fresh broad rice noodles from the market, so there's no need to pre-soak them before cooking. Fresh broad rice noodles is a common ingredient over here, and can be found in any morning wet market or even from any supermarkets.


Thai Basil plant from my garden pot. 

I've used Thai basil leaves from my garden pot. The plant is setting out flowers and I have to trim down the plant so that they would continue to grow lush green leaves instead of more flowers . Found this noodle recipe from Mark Bittman that uses Thai basil leaves, just perfect for a weekday lunch.


A simple, stir-fry noodle dish that makes a good meal anytime of the day. Very tasty! With homegrown basil leaves, even better! As with stir-fry dishes, this is quick, simple and easy to cook. For added spiciness, I've added more crushed red pepper flakes on my plate!


Broad Rice Noodles with Chiles, Pork, and Basil
(adapted from "Easy Weekend Cooking", Mark Bittman)
Makes about 4 servings
12 ounces rice noodles (fettuccine-width)
2 tablespoons peanut (preferred) or other oil
1 tablespoon minced garlic
5 small dried hot red chiles, or to taste (I've used crushed red pepper flakes)
1/3 to 1/2 pound ground pork (preferred) or other ground meat, such as beef or turkey
1 tablespoon soy sauce and 2 tablespoons fish sauce (nam pla or nuoc mam), or a combination of either
1 tablespoon sugar (omitted)
2 tablespoons rice (preferred) or other vinegar
1 cup shredded fresh basil leaves
salt, if necessary
crushed red pepper flakes (optional)
about 2 cups of bean sprouts (my addition)
a few drops of black soy sauce (my addition)

  1. Soak the noodles in warm water to cover until soft; this will take from 15 to 30 minutes. You can change the water once or twice to hasten the process slightly, or you can simply cook the noodles as you would any other, taking care not to overcook. Drain thoroughly, then toss with half of the oil.
  2. Heat the remaining oil over medium-high heat in a wok or large, deep non-stick skillet for a minute or so, until the first wisp of smoke appears. Add the garlic and chiles and cook, stirring, for a minute. Add the meat and turn the heat to medium. Cook, stirring and mashing with a wooden spoon to break up clumps.
  3. When almost all traces of red or pink disappear, add the soy and/or fish sauces and sugar; stir to mix. Add the drained noodles (black soy sauce and bean sprouts if using) and toss and stir to combine. Add the vinegar and most of the basil. Stir and taste; add salt if necessary. Serve, garnished with the remaining basil and passing the crushed pepper on the side.

I'm linking this post to I Heart Cooking Clubs (IHCC), theme for this week,
Monthly Featured Chef Event : Mark Bittman


and 
 photo 77951578-1914-4b72-8eda-9e40a91183ac_zps331eb4b4.jpg


Tuesday, November 10, 2015

Chocolate-Covered Toffee Breakups : TWD

This week's bake at Tuesdays With Dorie (TWD), is  Chocolate-Covered Toffee Breakups, an addictive snack to munch on, one that you would go back for more until there's none left. Seeing how addictive this is going to be, I've made only half a recipe! 


The base is a caramel toffee, made by melting the butter, then cook with sugar, corn syrup, and water until it reaches 300 degrees F, or until caramel coloured and bubbling. A candy thermometer would come in handy, and I'm so glad I bought one almost a year ago. Chopped toasted almonds are added to the toffee and the mixture is then poured over a greased parchment paper placed on a tray, spreading the toffee caramel out evenly. Leave to set for about 20 minutes, then it is turned onto a large cutting board (I've used the reverse side of a large baking tray), lined with parchment paper. Peel the parchment paper from the top of the caramel and allow to cool completely. Use a paper towel to dab any moisture on the toffee before coating with the melted chocolate.

Chocolate are melted and spread onto one side of the caramel base, scatter some chopped toasted almonds, pressing them down gently. At this point, I've refrigerated them still on the tray for about 30 minutes, then turned the caramel onto another tray lined with parchment paper, with the chocolate coated side facing down. Spread the remaining melted chocolate onto the caramel toffee. I did not scatter any almonds on this side, leaving it bare with only the chocolate coating. I left the tray in the refrigerator overnight for the chocolate to set. 


Break or cut into pieces before eating. However, they need to be stored in a covered container in the refrigerator, as the chocolate melts even after a few minutes after I've taken them out. 


These are good! At first bite, there's a light crunch, then both the toffee and chocolate start to melt in the mouth, followed by the crunch of the almonds. An addictive snack to munch on!


This post is linked to Tuesdays With Dorie (TWD).


Saturday, November 7, 2015

Cook-Your-Books #28

Cook-Your-Books is all about cooking or baking from your many cookbooks or magazines that you have collected over the years. If you love collecting cookbooks, read them like novels and love trying out new recipes, then this is the perfect place to share. It's time to get those books (or magazines) out of the shelves, and start using them. Bake or cook anything from any of your books or magazines, and link your posts to Cook-Your-Books here at Kitchen Flavours. The linky will start on the 7th of every month right up to the end of the month. The three most viewed submissions will be featured at the next Cook-Your-Books.


 photo 77951578-1914-4b72-8eda-9e40a91183ac_zps331eb4b4.jpg


Featured posts for this month
The three most viewed posts from Cook-Your-Books #27


Baked Spicy Nyonya Chicken
by Cooking Pleasure


Gula Melaka Palm Sugar Chiffon Cake
by Bakericious


Thank you everyone for sharing all the delicious dishes and bakes from your cookbooks!

It's now time to link-up!

A little note when submitting your post to Cook-Your-Books
  1. Linky for submissions will start on the 7th of every month right up to the end of the month. The submission with the most views will be featured at the next Cook-Your-Books.
  2. All submissions must be new and current posts, within the current month. Old posts will be deleted. Please link directly to your post, not your homepage.
  3. Please mention from which book or magazine you are cooking or baking from, as this is a cooking/baking event using recipes from cookbooks and magazines.
  4. Please mention Cook-Your-Books in your post and link it back to Kitchen FlavoursYou may display Cook-Your-Books badge anywhere in your post.
  5. Please leave a comment after you have linked.
  6. It would be great if you could visit at least one link, everyone loves visitors.

Link-up with Cook-Your-Books #28 from 
7th - 30th November 2015

Monday, November 2, 2015

Arugula, Caramelized Onion, and Mozzarella Pizza

"Anyway You Slice It", the theme for this week at I Heart Cooking Clubs (IHCC), where we are currently cooking from Ellie Krieger's recipes. I have some arugula rocket growing in my container garden, and it's time to harvest the lovely leaves! Looking through Ellie Krieger's cookbook "The Food You Crave", found a perfect way of using up that greens with a healthy version of simplified pizza, using whole-wheat tortillas. 


Arugula rocket leaves, fresh from my container garden.


Simple and quick! Thinly sliced onions are first sauteed with a little olive oil until brown and caramelized, then the roughly chopped arugula leaves are mixed in, stir for a minute until wilted, season with salt and pepper to taste. Place them on the tortilla sheet.


Recipe uses Goat's Cheese, an ingredient which is next to impossible to find in the area where I live. So I have used mozzarella cheese instead as that was what I had.  Baked in the oven for 10 minutes until the tortilla are brown at the edges and the cheese has melted.


Slice into quarters and serve. This is simple and good!  The caramelized onions are just so good, one of my favourites. The arugula leaves are peppery with a slight bitterness to it, which I find really nice. But my kids find the arugula a little too bitter for their taste, and asked that the next time use spinach instead. OK, spinach for them, and arugula for me. I really enjoyed the peppery and slight bitterness of the arugula. I would make this again, I really like it! Yums!


Arugula, Caramelized Onion, and Goat Cheese Pizza
(adapted from "The Food You Crave", Ellie Krieger)
Serves 4
1 tablespoon olive oil
1 medium red onion, cut in half and thinly sliced into half-moons
4 cups arugula, washed, dried, and coarsely chopped
salt and freshly ground black pepper to taste
Four 6-inch-diameter whole-wheat tortillas
2 ounces fresh goat cheese, preferably reduced-fat

Preheat the oven to 400F.
Heat the oil in a large nonstick skillet over medium heat. Add the onion and cook, stirring, until golden and the edges are browned, 10 to 12 minutes. Add the arugula and cook until it is wilted, about 1 minute. Season with salt and pepper.
Place the tortillas on a baking sheet and top each one with the arugula mixture. Crumble the goat cheese over each and bake until the tortillas are crisp and the cheese is slightly melted, about 10 minutes. Let cool for a few minutes, then cut each pizza into 4 wedges and serve.


I'm linking this post with I Heart Cooking Clubs (IHCC), theme for this week
"Anyway You Slice It"