Monday, August 28, 2017

Tomato and Black Olive Bread

The book, Make Ahead Bread, is filled with recipes for breads which allow you to prepare the dough the day before, and bake the next day. Most of the prepared bread dough are first allowed to rise, then deflate, and left to slow-rise in the refrigerator overnight. Great if you do not have enough of time to spend on making bread on one single day as it could take hours to make a loaf of bread or almost the whole day depending on the type of  bread you are making.

I've made this fabulous loaf, Tomato and Black Olive Bread, but did not refrigerate the dough overnight. I mixed the dough and let it rise, both times on the kitchen counter, and bake on the same day itself, since I am not rushing for time. It turned out fine. 

The recipe given below is for two large loaves, so I have scaled down to half to make only one loaf. The olives are very moist even though I've used some paper towels to pat them dry. I use the stand mixer to mix the dough, then remove it and hand-knead gently when I added the olives, as the olives are quite fragile and breaks easily. The dough is quite sticky, so I've added more flour. It will still be a little sticky, but will firm up on the second rising. Just dust the working surface lightly with flour and your hands too, when handling the dough.


The dough after the final rising.


The bread bakes up with a lovely golden brown crust.


This is one fabulous bread. With moist, soft crumbs and very tasty from the tomato juice and the black olives. Makes a nice sandwich bread and also good with stew.


Tomato and Black Olive Bread
(Make Ahead Bread, Donna Currie)
makes two 12-inch round loaves
1 cup room temperature water
1 teaspoon instant yeast
2 tablespoons sugar
5 to 5-1/2 cups bread flour, plus more as needed
1 cup tomato juice
1-1/2 tsp teaspoon kosher salt
One 6-ounce can pitted sliced black olives, drained well
3 tablespoons olive oil, divided
Cornmeal, for the pan

On Prep Day
  1. Combine the water, yeast, sugar, 5 cups of flour, the tomato juice, and salt and knead by hand (mix first in a large bowl, then turn out and knead) or in a stand mixer fitted with the dough hook, until the dough is elastic.
  2. Add the olives and 2 tablespoons of the olive oil and continue kneading until the olives are distributed throughout the dough. If the olives were very wet and the dough becomes very loose after adding them, add more flour, 1 tablespoon at a time. The dough should be soft, but not stioky. The dough will firm up a bit during refrigeration.
  3. Drizzle the remaining 1 tablespoon of olive oil into a gallon-size zip-top plastic bag; place the dough in the bag and massage the dough a bit to coat the dough with the oil. Zip the bag closed and refrigerate overnight or up to 24 hours

On Baking Day
  1. Remove the bag from the refrigerator, and sprinkle a baking sheet with cornmeal.
  2. Dust your work surface lightly with flour and divide the dough in half. Form each half into a large ball. Hold one of the balls of dough with both hands, with the bottom of the dough resting on the counter. Turn the dough - clockwise or counter-clockwise, your choice - as though the dough is a large lightbulb and you're screwing it into the countertop. You'll feel the "skin" on the outside of the dough ball begin to tighten as you do this. When the outside of the dough ball and place it on the baking sheet, leaving room between them to rise. You can also opt to bake the loaves on two separate sheets to make sure they absolutely don't touch during baking.
  3. Cover the loaves with plastic wrap and set the pan aside until the dough has doubled in size and whenyou poke the side with a fingertip, the indentation remains or fills in slowly, about 45 minutes in a warm room, depending on how cool the loaves were when you finished working with them.
  4. About 30 minutes before the dough has finished rising, heat the oven to 350F.
  5. When the dough has risen, remove the plastic and bake the loaves until they are nicely browned and the internal temperature reaches 195F on an instant-read thermometer, about 35 minutes. Let the loaves cool completely on a rack before slicing.

kitchen flavours notes :
made half a recipe for 1 loaf of bread with the following adjustments ;

  • the dough was rather sticky, so I've added a little bread flour. I used in total, 3 cups of bread flour.
  • use scant 1/2 teaspoon kosher salt
  • the rest of the ingredients, scaled down to half  to make only one loaf 


I'm linking this post with Cookbook Countdown #20 hosted by 

Sunday, August 27, 2017

Fruity Muffins

Say Moo! At I Heart Cooking Clubs, "Time to get out the milk and/or cheese and SAY MOO!". That's our theme for this week, Say Moo !

It has been a pretty busy week for me, so I've made a simple tea time snack, Muffins. Originally, this recipe is Lemon Curd Marble Muffins, from HFW's book River Cottage Everyday. I've made one of his variations which he calls as Fruity Muffins, using frozen blueberries, as I've recently bought a big pack of frozen wild blueberries. 


Just like any other muffins, these are easy and quick to make. 


Moist with tender crumbs, bursting with blueberries, and these are not too sweet, which is really a plus for me, as I tend to reduce the sugar for most bakes, but there's no need for these. Delightful with a cup of tea.


Fruity Muffins
(River Cottage Everyday, Hugh Fearnley-Whittingstall)
makes about 12
225gm plain flour
2 teaspoons baking powder
a good pinch of sea salt
100gm caster sugar
1 medium egg
125gm plain yoghurt
125ml whole milk
75gm unsalted butter, melted and slightly cooled
75gm blueberries

Put 12 large paper cases into a muffin tray. Put the flour, baking powder, salt and caster sugar in a large bowl and whisk lightly to aerate and combine.
Mix the egg, yoghurt, milk and melted butter together in a jug. Pour them into the dry ingredients and mix lightly, stopping as soon as everything is combined - it's essential not to over-mix or you'll get dense, cakey muffins.
Stir the fruit into the mixture lightly and quickly.
Spoon the mixture into the paper cases, to three-quarters fill them.
Bake in an oven preheated to 180C/Gas Mark 4 for about 20 minutes until golden brown. Transfer to a wire rack to cool. Eat on the day you bake them, ideally while still slightly warm.


I'm linking this post to I Heart Cooking Clubs (IHCC), theme for this week
Say Moo!

and

I'm linking this post with Cookbook Countdown #20 hosted by 

Thursday, August 24, 2017

Steamed Garoupa With Ginger And Spring Onion

A typical Chinese style steamed fish dish that is very commonly cooked in a Chinese household. This recipe is from Every Grain Of Rice by Fuchsia Dunlop, a dish that is served in China, though the cooking method is typically Cantonese, as the author mentioned. This is very similar as to how we cooked it over here too. 


To cook this dish, get the ingredients ready, the spring onions and ginger are sliced and cut into thin fine slivers of equal length. Put these aside while you prepare the fish. Make some diagonal cuts on both sides of the fish. Rub the inside and out with some salt and Shaoxing wine. Smack a knob of ginger and some spring onions and put them into the belly cavity of the fish. Leave to marinade for 10-15 minutes, then pour off any liquid, pat the fish dry. Arrange some spring onions on the steaming plate and place the fish on top. Steam over high heat for 15 minutes or until the fish is cooked. 
Meanwhile, dilute about 3 tablespoons of soy sauce with 2 tablespoons hot water and keep aside.
When the fish is ready, carefully remove it to a serving plate, discard the ginger and spring onion from its belly. Arrange the spring onion and ginger slivers on the top. Heat some cooking oil till smoking hot, then carefully drizzle over the ginger and spring onion silvers. There should be a sizzling sound, if not, then the hot is not hot enough. Pour the diluted soy sauce all around the fish and serve immediately while still hot.

This is very much how we cook our steamed fish over here too. Though sometimes I would use shallot oil, with a drizzling of sesame oil at the end. A lovely, delicious and popular steamed fish dish that is served both at home and in Chinese restaurants.

Note : The recipe in the book has used sea bass, but I have used garoupa for this dish, though any other fish that is great for steaming would be good, just make sure that the fish is fresh.

The recipe can be found here
(or get it from Every Grain Of Rice by Fuchsia Dunlop, pg 136)


I'm linking this post with Cookbook Countdown #20 hosted by 

Monday, August 21, 2017

Olive Oil Cake With Fresh Apricots

This month, at The Cake Slice Bakers, the four recipes selected from the book World Class Cakes by Roger Pizey, which we are currently baking from are ;

Olive Oil Cake with Fresh Peaches
Hummingbird Cake
M'hanncha
Oliver Peyton's Strawberry and Majoram Cream Tart

Members can choose any of these cakes to bake, and my choice is Olive Oil Cake with Fresh Peaches. But instead of peaches, I've used fresh apricots.


I made half a recipe and bake in a 5" cake pan, and it bakes up like a giant cupcake! Maybe I should have used a 6" cake pan instead. This is a simple cake with all the basic ingredients, instead of butter, it uses olive oil.


The cake has moist, close crumbs and I thought that this is just an ordinary cake, nothing special that would make me want to bake it again. I prefer the Danish Apple Cake which I baked months ago from the same book, maybe I have always prefer using butter in my cakes instead of oil.


Saturday, August 19, 2017

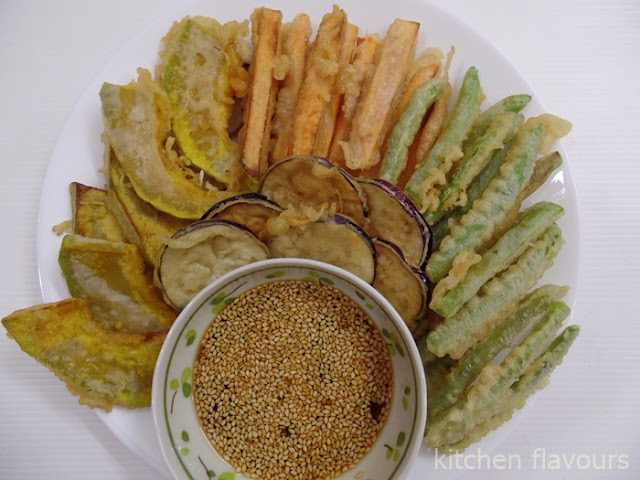
Tempura Spring Veg With Sesame Dipping Sauce

This week at I Heart Cooking Clubs (IHCC), the theme is Dippity Do Dah!, such a catchy theme! We are to make any dip or spread using any recipe from our current featured chef, Hugh Fearnley-Whittingstall.

I've made Tempura Spring Veg With Sesame Dipping Sauce, from HFW's fabulous book, River Cottage Light & Easy, a gift from a lovely friend.

HFW made the tempura using spring veg, I have however used our local veggies which are available the whole year round. 


The veggies I've used are pumpkin, sweet potatoes, French beans and brinjals. I have made some changes to the batter. In the recipe, Hugh has used only two ingredients ; white rice flour and chilled sparkling water. I do not have any sparkling water, so I have used ice cold water. And I have added one teaspoon of baking powder and a pinch of salt to taste. (thus, I have omitted the sprinkling of salt on the fried tempura at serving time). The batter was quite thin and did not really coat the veggie when I dipped some veggies into the batter for test-frying. So I have added another 2-3 tablespoons of rice flour. 

For the dipping sauce, mix the ingredients together ; toasted sesame seeds, grated ginger, grated garlic, tamari (or soy sauce), lime juice, and honey. I've used soy sauce, so I have added 1-2 tablespoons of water to dilute the taste of soy sauce a little, as the dipping sauce I've tasted at Japanese restaurants are always so light yet so tasty.


The batter coats the veggies beautifully without being too thick or too thin and fried to a light crispiness. The tempura veggies are delicious, crispy and tasty!

And we love the dipping sauce. So good with the crispy fried veggies! Yum!


I will definitely be making this again!


Tempura Spring Veg With Sesame Dipping Sauce
(River Cottage Light & Easy, Hugh Fearnley-Whittingstall)
Serves 2-4
a selection of vegetables, such as asparagus, small radishes, baby carrots
and spring onions (I've used pumpkin, sweet potato, French beans and brinjals)
sprigs of flat-leaf parsley
sunflower or groundnut oil, for frying
fine sea salt

For the batter :
100gm white rice flour
160ml chilled sparkling water (I've used chilled plain water)
1 teaspoon baking powder
added a large pinch of salt to taste

For the dipping sauce :
1/2 teaspoon freshly grated ginger
1 tablespoon tamari
1 tablespoon lime juice
1 teaspoon runny honey
2 teaspoons sesame seeds

For the sauce, mix all the ingredients together in a small bowl.
To prepare the vegetables :
Slice and cut the veggies to the same uniform thickness, making sure that they are not too thick so that they can cook quickly.
To prepare the batter :
Mix the ingredients together and used immediately.

Pour a 5cm depth of oil into a deep, heavy-based saucepan and heat to about 180C.
Use a cook's thermometer to check the temperature of the oil, or drop in 1/2 teaspoonful of batter - it should fizzle enthusiastically and just start to colour in about 1 minute.
Dip the vegetables, a few at a time, into the batter, dunking them down to the bottom of the bowl so they get a good coating. Then lift them out, briefly letting the excess batter drip back into the bowl, and swiftly drop them into the hot oil. Fry for about 2 minutes until crisp and very lightly golden. Don't let the vegetables clump together in the oil or the batter won't cook properly - it helps to drop them in one at a time.
Tansfer the cooked veg to a plate lined with kitchen paper, and, while still sizzling hot, sprinkle with a little salt. Serve as soon as they are all cooked, with the dipping sauce.


I'm linking this post with I Heart Cooking Clubs (IHCC), theme for this week,
Dippity Do Dah!


and 

I'm linking this post with Cookbook Countdown #20 hosted by 


Thursday, August 17, 2017

Crash-O-Cookies

This week at Tuesdays With Dorie, selected recipe from Dorie's Cookies, is Crash-O-Cookies. It has been awhile since I last baked with the group.

These cookies has my favourite ingredients, raisins and oats. And there's chopped milk chocolate. They are chewy and soft and lovely with a cup of coffee or a glass of milk.


I reduced the sugar to 80gm for both the caster sugar and brown sugar, and thought that these cookies were sweet enough. I mixed the dough in the morning, keep covered in the fridge, and baked the cookies at night. So I have baked them a little longer as the dough is cold from the fridge, about 20 minutes. They are a little crispy around the edges when still warm but turned soft and chewy when they have cooled down completely. 

I baked only half the batch of the dough and store the other half in the freezer. That will be for another day.


Though I am partial to crispy cookies, I do enjoy these chewy soft cookies.

The recipe for these cookies can be found at Dorie's website.

To see the other bakers review on these cookies, drop by Tuesdays With Dorie (TWD) blog roll.


Friday, August 11, 2017

French Beans With Tomatoes

I Heart Cooking Clubs (IHCC) is cooking with tomatoes this week, as the featured ingredient/dish for this month of August is Tomatoes! I've decided to cook with Hugh Fearnley-Whittingstall, our current featured chef at IHCC. Made his French Beans with Tomatoes.

A simple and easy dish to cook, with just minimal ingredients ; chopped onions, chopped garlic, canned chopped tomatoes and French beans. For the tomatoes, either canned or fresh tomatoes can be used. I have one last can of chopped tomatoes in my pantry which I wanted to clear, and seems perfect for this dish. 


Does not takes much effort at all to cook this dish, the only thing is to stir every now and then, to avoid the bottom from sticking to the pan. I did add a little water just to keep the sauce moist and nice. 

This is a delicious dish. There's the usual slight sourness from the canned tomatoes, but at the same time, you can taste the sweetness from both the onions and the French beans. Very tasty. My son seems to be taken with this dish, he loves it. At first, he thought that I have added some sugar to this dish. Well I did not, the sweetness are naturally from the onions and French beans! We had this dish with rice and a few other dishes. No leftovers!


French Beans With Tomatoes
(River Cottage Every Day, Hugh Fearnley-Whittingstall)
serves 4
1 tablespoon rapeseed or olive oil
1 onion, finely chopped
2 garlic cloves, finely chopped
400gm tin of chopped tomatoes, or 1 kg fresh tomatoes, blanched, skinned,
deseeded and roughly chopped
500gm French beans, topped, tailed and cut into 4-5cm lengths
sea salt and freshly ground black pepper

Heat the oil in a large saucepan or frying pan, add the onion and sweat for at least 10 minutes, until soft but not coloured. Add the garlic and cook gently for another minute or two, then add the tomatoes and stir well. Stir in the beans, bring the mixture to a gentle simmer and season well. Turn down the heat, partly cover the pan and cook very gently, stirring frequently, for about 30 minutes, until the beans are fully tender. If the mixture seems to be in danger of sticking, add a splash of water or stock. Serve warm or cold.

I'm linking this post with I Heart Cooking Clubs (IHCC), theme for this week
August Monthly Featured Ingredient/Dish Challenge : Tomatoes !


and 

I'm linking this post with Cookbook Countdown #20 hosted by 


Tuesday, August 8, 2017

Braised Pork with Potatoes

Another delicious recipe from Every Grain Of Rice by Fuchsia Dunlop. The author describes this as a heart-warming stew, one of those you find on display outside Sichuanese restaurants specialising in braised dishes. This stew uses just a few ingredients, the main ingredient that gives the lovely red colour and delicious flavour, is the Sichuan chilli bean paste.


I have used wavy potatoes instead of floury. As suggested by the author, carrots or other root veggies can be used instead, whichever we prefer, or a mixture of root veggies. The next time I would use daikons, one of my favourite root veggies in stews.


The Sichuan chilli bean paste makes a delicious flavourful stew with the pork braised to a soft tender texture. With a bowl of hot fluffy rice, makes a satisfying meal.

The recipe can be found here
(or from Every Grain Of Rice by Fuchsia Dunlop, pg 100)


I'm linking this post with Cookbook Countdown #20 hosted by 

Monday, August 7, 2017

Marinated Cucumber with Mint

I Heart Cooking Clubs (IHCC) is going raw this week, with the theme, In The Raw! There's certainly not short on recipes for this theme. There's tons of recipes using fresh raw veggies in Hugh Fearnley-Whittingstall's River Cottage series of cookbooks.  I've made Marinated Cucumber with Mint from HFW's lovely book, River Cottage Veg every day! I love cucumbers, especially when eaten raw.

A very simple, easy and quick salad to put together. Sliced cucumber are tossed with cider vinegar, sugar, salt, olive oil, black pepper and leave to marinate for about 10 to 15 minutes before serving. 


A refreshing salad indeed! Especially with the chopped fresh mint.


Marinated Cucumber with Mint
(River Cottage Veg Everyday, Hugh Fearnley-Whittingstall)
serves 3-4
1 medium-large cucumber
1 teaspoon cider vinegar
1 tablespoon olive oil or rapeseed oil
a good handful of mint, finely chopped
a pinch of sugar
sea salt and freshly ground black pepper

Peel the cucumber, halve it lengthways and scoop out the seeds. Slice into thick half-moons. Place in a dish with the cider vinegar, oil, mint and a pinch each of salt, sugar and pepper. Toss together thoroughly.  Leave for 15-30 minutes, toss again and then serve.

I'm linking this post with I Heart Cooking Clubs (IHCC), theme for this week
In The Raw!

and

I'm linking this post with Cookbook Countdown #20 hosted by 


Wednesday, August 2, 2017

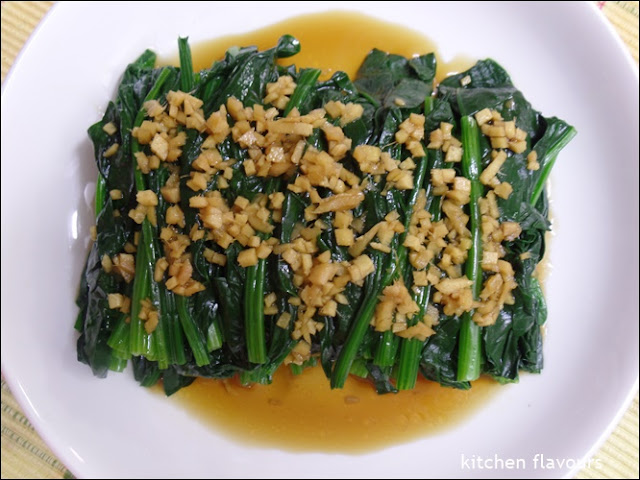
Spinach In Ginger Sauce

I have made some delicious meals from Fuchsia Dunlop's cookbook, Every Grain Of Rice. Spinach In Ginger Sauce is another winner. There are more dishes that I will be sharing as I cannot seem to stop cooking from this book!


This is listed under the Cold Dishes section in the book.  A bunch of spinach are first blanched briefly in hot boiling water, then refresh in cold water, drain and very gently squeeze out any excess water from the spinach. They are then arranged on a cutting board, cut into sections, and arrange neatly on a serving plate. The sauce is then poured over.

To make the simple sauce, you would need to finely chop some ginger, place into a small bowl and mix with some Chinkiang vinegar, soy sauce, water, salt and sesame oil. You may need to adjust the soy sauce, salt and vinegar to your liking. I did use double the amount of ginger as we love ginger!


This spinach dish goes well together when served with a rich dish such as braised pork, as part of a meal with rice, as it is slightly sour, salty and gingery nice. So it helps to cut down on the richness of the rich braised meat. We love this spinach dish, a definite repeat. 

The recipe can be found here.
(or from Every Grain Of Rice by Fuchsia Dunlop, pg 64)


I'm linking this post with Cookbook Countdown #20 hosted by