Friday, October 29, 2010

Wendy's Chili


I have never eaten a chili dish or cooked one before, but I have always knew that it would taste exactly like this! To me, it is similar yet different from spaghetti sauce, the one ingredient that makes a difference is the addition of cumin powder.  I couldn't get any pinto beans, so I substitue with chipotle beans instead.


This recipe is a copycat version of Wendy's Chili, which I found on RecipeLion.com. According to them, "As restaurant copycat recipes go, this version of Wendy's Chili is bang-on! We swear it, if you put it into one of those paper cups like they serve it in at Wendy's, you'd be hard-pressed to tell this was simply a restaurant coycat recipe. It tastes just like Wendy's Chili!." Well, I have not tried Wendy's Chili before, so I don't really know! 


What I know is this is quite delicious.  I only make half the recipe. My kids are very happy eating this with some corn chips. I even made a Mustard and Dill Bread to go with this.  I can see that I'll be making this again very soon for a get-together and serve it in paper cups with corn chips!  


 The bread is dense and soft, it is not fluffy soft, but it is soft and perfect for this chili.


Great with corn chips. My daughter insisted on this photo!  


There was some leftover and a packet of unopened chips, half  of which my daughter brought to school for her lunch and the other half was 'reserved' for my son. He wanted to eat the leftovers after he's back from school.  He reminded me a few times to keep it for him!  There! they really enjoyed this chili very much!


Guess what was the request from my daughter?  She asked me to make corn chips next!!!  


I am sharing this with these fabulous sites :
Copycat Club at Buttercream Barbie
Texas Star Chili Cook-Off at Miz Helen's Country Cottage
Recipe Swap Thursday at Prairie Story


Wendy's Chili
(source from RecipeLion.com)
Serves 8
Cooking Time : 3 hours
Ingredients 
2 pounds ground beef (I use ground pork)
1 (29-ounce) can tomato sauce
1 (29-ounce) kidney beans with liquid
1 (29-ounce) can pinto beans with liquid
1 medium onion, diced
2 green chillies, diced
1 rib  celery, diced
3 medium tomatoes, chopped
2 teaspoons cumin powder
3 tablespoons chili powder
1-1/2 teaspoons black pepper
2 teaspoons salt
2 cups water


Instructions :
  1. Brown the beef and drain the fat off.
  2. Crumble the cooked beef into pea size pieces.
  3. In a large pot, combine the beef with the remaining ingredients and bring to a simmer over low heat.
  4. Cook, stirring every 15 minutes, for 2-3 hours.


*********************************************

Happy Halloween everyone. Have a lovely spooky fun!


Wednesday, October 27, 2010

Indian Fish Curry

I have not cooked this dish in quite a while.  The usage of the fenugreek spice makes this curry dish tastes like an authentic Indian curry. My late mom used to say that fenugreek is the one that gives the true taste of Indian curry. The best fish to use for this dish is the spanish mackerel, but for today I'm using the black pomfret since I can't seem to find any mackerel from the market. Try to get some really fresh mackerel for this curry dish, it is really tasty. Sometimes I use big fish head chunks and really yummy when you eat and suck on the bones! Other suitable fish would be the red snapper, golden snapper and threadfin.

Are you familiar with the spice fenugreek?  Perhaps it is best described by this excerpt  taken from "660 Curries by Raghavan Iyer"

"Fenugreek (methi): Prized in India for both its cloverlike leaf and dark yellowish-brown, triangular, stone-hard seeds - that are very bitter when roasted or toasted - I regard the aroma and taste of fenugreek as "perfumed bitterness".  The seed, considered medicinal (some were found in Tutankhamen's tomb), provides commercial curry powders with that distinctive aroma.  Whenever I demonstrate recipes that incorporate fenugreek seed, students say. "Ooh, smells like curry."
Many sauces in southern India use toasted and oil-roasted seeds (and their ground versions, as in sambhar masala) to create bitter balance.  The eastern regions put the bitterness to work by stir-frying the seeds (they get more bitter when browned in oil).  Cooks along the northern regions cherish the grass-green leaves.  Because they have a short shelf life, the young leaves are dried and sold in packages labeled kasoori methi."


Even though the fenugreek may taste unpleasant when you happen to bite into one, I do not really mind, but kind of like it, as it will soften when boils and the taste of the curry gravy has been steeped into it. But if you do not like it, then just discard it when you find one in your mouth. Use this spice sparingly as instructed by any recipe that calls for it, too much of this can be just the opposite, very unpleasant on your tastebuds!

This curry is delicious eaten with plain white rice, or with our local roti canai, also known as roti paratha or the paratha bread.  If you do not want vegetables in your fish curry, just omit the ladies fingers and brinjals.  If you would like to give this a try, here's the recipe, the way my mom taught us.

Onions, ginger, garlic, curry leaves, tomato, fenugreek seeds, fish curry powder paste (you may use ordinary curry powder, if fish curry powder is not available)


Tamarind paste (on the left)

Ladies fingers (okra) and brinjals


Ladies fingers and tomatoes. Cut and discard both ends of ladies fingers.

Brinjals.  Cut and soak in salted water to prevent browning.


Black pomfret, halved.


Enjoy!

Indian Fish Curry
Ingredients :
3 to 4 pieces mackerel or 1 whole black pomfret, halved (or any other fish)
50gm ginger, sliced thinly and cut to julienne strips
5 cloves garlic, sliced
1 sprig curry leaves
1 onion, cut to six or eight sections
1-1/2 tsp fenugreek seeds
6 tbsp fish curry powder, mix with enough water to form a thick paste
1 tsp chilli powder (optional, if used, mix with the curry powder above)
1 tsp tamarind paste, dissolved with 2-1/2 cups of water
5 ladies fingers (okra)
1 brinjal
1 tomato, quartered
cooking oil
salt to taste

Method :

  1. Heat about 5 tbsps oil. Saute ginger and garlic till light brown and fragrant over medium heat.
  2. Add in curry leaves and onions, stir for about 1 minute. Add the fenugreek seeds, stir for about 10-15 seconds until fragrant (you can smell the aroma of the fenugreek). Add the curry paste and continue to stir for about 4-5 minues over medium-low heat till fragrant and dry.  If it gets too dry, one or two tablespoons of oil may be added.
  3. Pour in the tamarind and water mixture.  Stir till curry is evenly combined.  Cover and when curry starts to boil, add the ladies fingers, brinjals and salt to taste. Cover and simmer for about 5 to 8 minutes, stirring in between, until vegetables are cooked and just tender. If curry gets too thick, some water may be added.
  4. Add the tomatoes and the fish. Cover and simmer, turning fish once until fish is done. Dish out and enjoy!

Monday, October 25, 2010

Cherry Speckled Lemon and Almond Bars

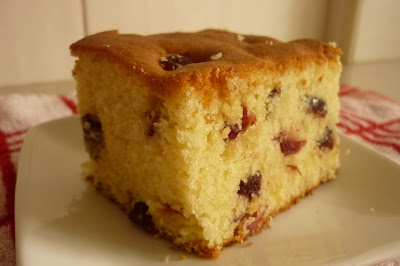
Cherry Speckled Lemon and Almond Bars. The name is very pretty, that's what I think when I first saw this recipe, there's no photo of this cake in the book. So I can only imagine it will look like speckled bits of cherries in the cake, very pretty indeed!  Do my cake looks like it has speckled bits of cherries?  Of course it does, the only thing is .....


.....I speckled it with dried cranberries instead! Did not have any dried cherries in my pantry. Have not seen any dried cherries being sold at the local bakery supplies stores before.  I am in the midst of clearing my pantry, so the last batch of cranberries goes into this cake.  This cake is not as moist as I expect it to be. It is not actually dry either, I think the amount of ground almonds plus the flour is maybe a little bit too much.  Or maybe when I reduce the sugar, it does have some affect on the moistness of this cake. The original amount of sugar is ridiculously at 500gm!


So conclusion : This is not a really bad cake actually, a little more moist to it would make it perfect! Perhaps extra butter can be added! But if you would like to give this a try, here's the recipe :

I'm sharing this at

Cherry Speckled Lemon and Almond Bars
(adapted from "brownies and bars" by Liz Franklin)
Makes 15
Preparation Time : 1 hour and 10 minutes
You will need a lightly buttered, deep roasting pan or cake tin measuring 20 x 30cm/8 x 12 inches

250gm/9 oz butter
500gm/1 lb 2 oz sugar ( I use 250gm)
4 eggs
200gm/7 oz self-raising flour
200gm/7 oz ground almonds
150gm/5 oz dried cherries
juice and zest of 1 lemon
1 tbsp caster sugar, for sprinkling

Method :
Preheat the oven to 180C/350F/gas mark 4.  
Cream the butter and sugar together until light and fluffy.  Add the eggs a little at a time, stirring in between each addition, until the mixture is smooth and all the eggs are incorporated.
Stir in the flour and the ground almonds, and then add the dried cherries, lemon zest and lemon juice, mixing well.  Spoon the mixture into the prepared tin and bake for 40-45 minutes until golden and firm to the touch.
Remove from the oven and allow to cool in the tin, sprinkle with caster sugar and then cut into bars.
Store in an airtight container.


Friday, October 22, 2010

Chile-Smothered Pork with Vinegar (Pork Vindaloo)

I have a new cookbook! Yes, one can never have enough of cookbooks! 660 Curries, that's the title, with outstanding reviews from amazon's customers. This is the first recipe that I tried and it is delicious!

When I first saw this book, I was hesitating to buy it. I do not know who Raghavan Iyer is, never heard of him before, but then again, I do not know of any Indian Food chef, come to think of it, except for Madhur Jaffrey! And worse of all, practically no pictures or photos, only about less than a dozen photos out of the 660 curries! I want pictures, everybody want pictures, the bigger and glossier the better! Right?  Are you with me in this? Anyway, on the front cover, it did indicate that he is an IACP Award-Winning Teacher of The Year. And Madhur Jaffrey did commented at the back of the book that "This Book is Nothing Short of A Treasure Chest", does this mean that this is a fantastic book? But then again, a remark like that from someone respectable in the cooking world should really mean something, right? Browsed through this book and put it down, walked around, browsed it again, walked around, and for my own piece of mind, I bought it! Phew! Wow, buying a book can be very mentally exhausting! Have you experience this before?

As soon as I reached home, I checked this book out from the web, and it is some sort of relief when I saw very good reviews at amazon.  That's a consolation! But I guess, the best is to try it yourself.  Rather pleased with the first recipe I picked.  Next, I will be trying out a chicken recipe. More about this book, on the next recipe that I intend to try! 


Chile-Smothered Pork with Vinegar (Pork Vindaloo Version 3) 
(adapted from "660 curries" by Raghavan Iyer)
(There are 3 versions of pork vindaloo, this is version no. 3, the chef's favourite)
1/2 cup cider vinegar or malt vinegar
1 tablespoons cumin seeds
8 lengthwise slices fresh ginger (each 2 inches long, 1 inch wide, and 1/2 inch thick)
8 medium-sized cloves garlic
8 dried red Thai or cayenne chillies, stem removed
1 cinnamon stick (3 inches long)
1 pound boneless pork loin chops, cut into 1 inch cubes
1 teaspoon coarse kosher or sea salt
1/2 teaspoon ground tumeric
2 tablespoons canola oil
2 tablespoons finely chopped fresh cilantro leaves and tender stems for garnishing

  1. Pour the vinegar into a  blender jar, and then add the cumin seeds, ginger, garlic, chiles and cinnamon stick.  Puree, scraping the inside of the jar as needed, to form a pulpy, gritty paste that smells potent-hot.
  2. Place the pork over in a bowl and pour the paste over it.  Sprinkle with the salt and turmeric, and stir it all together.  Refrigerate, covered, for at least 30 minutes or as long as overnight, to allow the flavors to mingle.
  3. Heat the oil in a medium-size skillet over medium high heat. Add the pork, marinade and all, and cook, uncovered, stirring occasionally, until it is browned, 10 to 12 minutes. (The meat will stew initially; then once the liquid evaporates, it will sear and brown).
  4. Pour in 1/2 cup water and scrape the bottom of the skillet to deglaze it.  Reduce the heat to medium-low, cover, and simmer, stirring occasionally, until the pork is tender, about 15 minutes.
  5. Stir in the cilantro, and serve.


Tuesday, October 19, 2010

Perfect Chocolate Cake

Is this really the "Perfect" chocolate cake?  Nick Malgieri named this cake "Perfect Chocolate Cake", where else can you find this recipe, except of course from his book "Perfect Cakes".  Yup, it is my latest addition in my ever increasing number of recipe books. One can never have enough of cookbooks, don't you agree??


This is the first recipe that I tried. Bought the book the day before and couldn't wait to try them out! Bake this chocolate cake the very next day. I have not baked a chocolate cake for ages and my kids are very happy with this! My daughter even told me to reserve a few slices for her to bring to school the next morning.


This cake is moist and soft with  delightful tender crumbs.  I would make this again, since my kids love this, and it is really good actually. But is this "the perfect chocolate cake"?,  Have you tried this recipe before? What do you think?  For me, the "THE perfect chocolate cake" is still out there, waiting to be discovered by the very patient and wonderful Brittany of les revesd'une boulangere , who is on the quest of searching the best chocolate cake.  This is one delicious search! 


Perfect Chocolate Cake
(adapted from "Perfect Cakes" by Nick Malgieri)
1-1/2 cups all-purpose flour (spoon flour into dry-measure cup and level off)
1/2 cup alkalized (Dutch-process) cocoa powder
1 teaspoon baking powder
1/4 teaspoon baking soda
1/2 pound (2 sticks) unsalted butter, softened
1-1/3 cups sugar (I use 1 cup only)
2 large eggs, at room temperature
One 8-ounce container sour cream
Confectioners' sugar for finishing
1 tsp vanilla essence (my add-on)

One 9 x 13 x 2 inch baking pan, buttered and bottom lined with parchment or buttered parchment
(I bake mine in a 9" round pan, as I think the batter is too little for the original 9x13x2 inch pan!)

Method :
  1. Position a rack in the middle of the oven and preheat to 350 degrees.
  2. In a bowl, stir together the flour, cocoa, baking powder and baking soda.  Sift the ingredients onto a piece of parchment or wax paper and set aside.
  3. In a large bowl with an electric mixer, beat the butter and sugar together at medium speed.  Beat in the eggs one at a time, beating until smooth after each addition.  Reduce the mixer speed to low and beat in half the dry ingredients.  Scrape down the bowl and beater well.  Beat in the sour cream, scrape again, and then beat in the remainder of the dry ingredients.
  4. Scrape the batter into the prepared pan.  Bake for 40 to 45 minutes,or until well risen and a toothpick inserted into the center of the cake emerges clean.
  5. Cool the cake in the pan on a rack for 5 minutes, then invert onto a rack and remove the paper.  Invert the cake onto a rack again to finish cooling right side up.
  6. Just before serving, sift a light dusting of confectioners' sugar over the cake.


Serving : Cut the cake into 3-inch squares.
Storage : Store covered at cool room temperature
Makes one 9x13 inch cake, about 12 servings


I have submitted my entry to "Culinary Smackdown Battle Chile October 2010" at At Home With Rebecka. Have you submit yours yet? Closing date is 29/10/2010. The winner will receive a beautiful hand-painted teapot and cup set and a tin of lovely Apple Spice Tea! .  Head down to Rebecka's and submit your entry!

Sunday, October 17, 2010

Caramel Apple Ice Cream


This is extremely delicious.Creamy caramel apple flavour! If you have more apples than you need, and already made your apple tart, apple pie, apple crumbles, then for a change, do a batch of this creamy delicious ice cream!   The weather has been extremely blazing hot this past week with no rain at all. I am getting a little cranky with the weather! My kids are asking for ice cream, not that I blame them.  Wanted to make the long-awaited chocolate ice cream, but then again, not this time too. Made this instead.   


I reduced the sugar from the original 3/4 cup to 1/3 cup, it is still a little sweet for me, but for those who like their ice cream sweet, then I think 1/3 cup would be great.  I think the original 3/4 cup would be extremely sweet!  All in all, this is simply delicious. The chopped apples are cooked in the sugar caramel till soft and brown, and coated with the caramel. Be careful not to burn the caramel, but cooked it to a nice brown colour before adding the apples. This is one ice cream that I would make again, only this time with a little more less sugar, maybe 1/4 cup.


As you put a scoop of this ice cream into your mouth, you can taste the creaminess and small delightful bites of the apples.  Yummy! This is a perfect afternoon treat on a hot day or indulge yourself with this wonderful dessert right after dinner!  Yummmmmy!
Caramel Apple Ice Cream
(adapted from "The Ice Cream Maker Companion" by Avner Laskin)
For the Caramel Apples
1/3 cup sugar
2 Granny Smith apples, peeled, cored, and finely chopped

For the Ice Cream
1 cup whole milk
1 cup whipping cream
1 vanilla bean, split in half lengthwise
3/4 cup sugar (I use 1/3 cup)
4 egg yolks 

Method :


  1. In a heavy skillet, place 1/3 cup sugar and cook on medium heat, without stirrring, until caramelised and light brown.
  2. Remove from the heat and stir in the chopped apples, mixing with a wooden spoon for about 2 minutes.
  3. Return to the heat and cook over low heat for 15 minutes, stirring constantly with the wooden spoon, until all the apples pieces have a caramel colour.
  4. Remove from the heat and set aside.
  5. Separately, in a saucepan, bring the milk, cream, vanilla bean and half the sugar to the scalding point over medium heat.
  6. In a bowl, beat the egg yolks and the remaining sugar with a wire whisk until smooth and uniform.
  7. When the mixture in the saucepan begins to foam, reduce the heat and quickly stir in the yolk mixture.  Remove the vanilla bean and scrape the seeds back into the saucepan.
  8. Using a wooden spoon, stir the custard constantly and cook over low heat until it reaches 175F.
  9. Remove immediately from the heat and continue stirring, so that the custard does not overcook.
  10. Pour the custard into a clean bowl through a fine mesh strainer, so that the liquid is smooth and lump-free.
  11. While the custard is warm, add the caramel apples and mix well.  It is important to do this while the custard is warm so that the flavour is fully absorbed.
  12. Cover the custard with plastic wrap and let cool slightly, then place in the refrigerator for at least 4 hours, until very cold.
  13. Transfer the cold custard to the bowl of your ice cream maker and process according to the manufacturer's instructions.


Thursday, October 14, 2010

Bitter Gourd with Chicken in Fermented Black Beans

Bitter gourd or bitter melon is delicious cooked in this simple Chinese dish. Bitter gourd is very low in calories but very high in nutrients.  It is an excellent source of vitamins B1, B2, and B3, C, magnesium, folic acid, zinc, phosphorus, manganese, and has high dietary fiber.  It is rich in iron, contains twice the beta-carotene of broccoli, twice the calcium of spinach, and twice the potassium of a banana.  Now that you know all the goodness of bitter gourd, give this a try if you have not tried it before. Luckily for me, my children love this veggie. There are other methods to cook this bitter melon, will post them when I cook them!


Fermented black beans


I'm sharing this at Recipe Swap Thursday at Prairie Story.  


Bitter Gourd with Chicken In Fermented Black Beans
Ingredients :
1 whole chicken thigh, remove skin and cut to small pieces
1 medium size bitter gourd melon
1 tbsp fermented black bean
1 tbsp oyster sauce
1 tsp sesame oil
2 clove garlic, minced
3 slices ginger, cut to julienne strips
1 tsp black soy sauce
1 tsp light soy sauce
2 tbsp cooking oil
1/4 cup water

Method :

  1. Marinate chicken pieces with the oyster sauce.  Stir in sesame oil.  Keep aside.
  2. How to cut bitter gourd : Slice half lengthwise, remove seeds. Cut crosswise to three sections, then cut each section lengthwise to thickness of about 1cm sticks.
  3. Heat oil. Saute minced garlic and ginger till fragrant.  Add fermented black beans and stir for half a minute. Add chicken pieces and stir for about  3 minutes. Add in the bitter gourd and stir for about 1 minute.  Add water, dark soy sauce and light soy sauce. Stir till evenly combined. Cover, simmer for about 10 minutes, stirring once or twice in between, till chicken is cooked and bitter gourd is tender.
  4. Dish out and serve hot. Enjoy!

Monday, October 11, 2010

Apple Cider Cupcake

Apple Cider Cupcake, just as the name itself, this cupcake is extremely soft and moist with the taste of the apple cider, delicious! This great recipe is from one of my favorite cupcake book, "Tempt Cupcakes To Excite by Betty Saw", one of our well-known local chef.  I have made at least 6 recipes from this book and all of them turned out moist and delicious. If you happen to have a bottle of apple cider vinegar in your pantry and some forgotten green apples in your refrigerator, then take them out and whip out this delicious cupcake. Take a break and enjoy it with a cup of hot tea.


I'm linking this to Cookbook Sundays at Brenda's Canadian Kitchen and Potluck Sunday at Mommy's Kitchen.

Apple Cider Cupcake
(adapted from "Tempt Cupcakes To Excite" by Betty Saw)
Ingredients :

25gm butter
50gm granulated sugar
2 small (125gm each) green apples, peeled, cored and diced into 0.5cm cubes
175gm self raising flour
1/2 tsp baking powder
1 tsp mixed spice
120gm butter, at room temperature
110gm brown sugar (I use 80gm)
grated lemon rind from 1 lemon
2 large eggs (70gm each)
3 tbsp cider vinegar
50gm sultanas

Topping :
grated fresh white coconut (I omitted this)

12 large paper cases

Method :
  1. Line muffin pan with paper cases.
  2. Heat butter and sugar in a non-stick saucepan. Stir until butter melts and sugar begins to brown. Add apples and stir until combined. Set aside to cool.
  3. Sift self raising flour, baking powder and mixed spice together.
  4. In bowl of electric mixer, cream butter, sugar and lemon rind until light and fluffy. Beat in eggs, one at a time.
  5. Fold in dry ingredients alternately with cider vinegar. Stir in apple butter mixture, one third at a time. Fold in sultanas.
  6. Spoon mixture evenly to fill paper cases. Level surfaces with a teaspoon. Sprinkle over some grated coconut.
  7. Bake in preheated oven at 175C for 20-23 minutes or until cooked through when tested with a wooden skewer.
Note : Do not over brown sugar with the melted butter or the caramel will harden into lumps when apples are added.

(my notes : I omitted the grated coconut topping, as I do not have any. I think it will taste really great with this cupcake)

Friday, October 8, 2010

What's For Dinner Tonight?

Yam Rice and Watercress Soup.  Comfort food that is simple, easy and extremely satisfying.  For a change from our regular standard dinner, usually a vegetable dish, a meat or fish dish, soup and of course, plain white rice, I decided to cook Yam Rice instead. Yam Rice has always been a favourite.  I love eating yam, delicious in both sweet and savory.  Watercress Soup is nutritious and delicious. Usually when the weather is hot, the Chinese would boil this soup as it helps to reduce heatiness  and detoxifies the body.   This is one of my family's favourite soup.


Here's the recipe for the rice :

Yam Rice
(serves 4 to 5)
Ingredients
2 cups basmathi rice
3 cups hot water
400gm yam, cubed (approx. 2 cups)
200gm lean pork meat
50gm dried prawns
2 clove garlic, chopped
1/4 tsp chinese five-spice powder
1/4 tsp white pepper powder
2 tsp chicken stock seasoning
1 tsp salt or more, to taste
3 to 4 tbsp cooking oil
crispy fried shallots for garnishing
chopped spring onions for garnishing

Method:
  1. Wash rice and soak in water for about 20 minutes. Drain.
  2. Wash dried prawns clean and soak in water for about 20 minutes.  Drain and pound coarsely, or chop to small pieces.  Retain water from soaked prawns.
  3. Clean yam and cut to small cubes. Keep aside.
  4. Slice pork meat to thin slices.
  5. Heat oil and saute chopped garlic until fragrant. Add in dried prawns and stir till dried prawns are crispy and fragrant. (It will start to crackle a little when crispy). Add in pork slices and stir for about 2 minutes. Stir in the yam, 5 spice powder, pepper and continue to fry for 2 minutes.  (It should smell aromatic by now). Add in the drained rice and stir for about 2 minutes. 
  6. Scoop the yam rice into a rice cooker. Place retained water from (2) above in a cup and add hot water to make a total of 3 cups. Pour into the rice cooker, add chicken stock seasoning and salt to taste (It should be slightly saltier than you would like it to be).  The rice would have absorbed some of the saltiness when it is done. 
  7. When rice is cooked and rice cooker switched to "Keep Warm", leave it for about 15 minutes for the rice to settle, then fluff it with a fork or spoon. 
  8. Spoon onto a plate and garnish with crispy fried shallots and chopped spring onion. (Crispy fried shallots and the chopped spring onions really do make a difference in this rice dish, it will taste so much tastier and more fragrant, so I would advise you not to skip these garnishings!).


Here's the recipe for Watercress Soup :

Watercress Soup
Ingredients :
600gm pork ribs
400gm watercress, cleaned and snap to large pieces
15-20 red dates
2 honey dates (optional)
40gm dried squid, washed and drain
salt to taste
3-1/2 litres water

Method :
  1. To get rid of the smell and scum from the pork ribs : Boil some water in a small pot.  Put the pork ribs and let it simmer for about 2-3 minutes. Drain. Discard water.
  2. Boil 3-1/2 litres water in a stockpot. (I use a big claypot for soups).  Add in pork ribs, red dates, dried squid and let it boil at medium heat for 30 minutes.
  3. Add in watercress and turn heat to low. Let it simmer for another 2 hours, stirring once or twice in between. If water evaporates, some hot water may be added.  Add salt to taste.
  4. Serve hot.

Wednesday, October 6, 2010

Corniest Corn Muffin

Corniest Corn Muffin. Dorie Greenspan sure picked a suitable name for this muffin. The best description of this muffin is from Dorie herself, "These muffins have an alluringly old-fashioned look.  They're flat, firm-topped and cheerfully yellow, with an equally old-fashioned texture - grainy with small holes running through the crumb - and a wholesome, straight-from-the-farm flavor.  They're tangy from the buttermilk and sweet from both the cornmeal (try to find some stone-ground) and the corn kernels.  You can make these muffins with canned or frozen corn kernels, but if you scrape fresh kernels off the cob, you'll have something even more delightful ; because the niblets will get only semisoft in the oven, every bite will offer just a little resistance, a little more "cornfulness" and a lot more pleasure".

Well, I couldn't agree with Dorie more!  Use the fresh corn kernels, just as she described it, you will bite into the crunchiness and then the soft sweetness of the kernels.  I ate two of these the minute they are out of the oven (well, about 5 minutes!).  Yum.... it is not overly sweet at all, it uses very little sugar, and  this is just right! The colour is a beautiful sunny yellow! It is very easy and quick to prepare, perfect as a weekend breakfast or as a tea-time snack in the late afternoon with a cup of tea. 


Corniest Corn Muffin
(adapted from "Baking From My Home To Yours" by Dorie Greeenspan)
Ingredients :
1 cup all purpose flour
1 cup yellow cornmeal, preferably stone-ground
6 tablespoons sugar
2-1/2 teaspoons baking powder
1/4 teaspoon baking soda
1/2 teaspoon salt
pinch of freshly grated nutmeg (optional)
1 cup buttermilk
3 tablespoons unsalted butter, melted and cooled
3 tablespoons corn oil
1 large egg
1 large egg yolk
1 cup corn kernels (add up to 1/3 cup more if you'd like) - fresh, frozen or canned (in which case, they should be drained and dry)

Getting Ready :
Center a rack in the oven and preheat the oven to 400 degrees F.  Butter or spray the 12 molds in a regular-size muffin pan or fit the molds with paper muffin cups.  Alternatively, use a silicone muffin pan, which needs neither greasing nor paper cups.  Place the muffin pan on a baking sheet.

In a large bowl, whisk together the flour, cornmeal, sugar, baking powder, baking soda, salt and nutmeg, if you're using it.  In a large glass measuring cup or another bowl, whisk the buttermilk, melted butter, oil, egg and yolk together until well blended.  Pour the liquid ingredients over the dry ingredients and, with the whisk or a rubber spatula, gently but quickly stir to blend.  Don't worry about being thorough - the batter will be lumpy, and that's just the way it should be.  Stir in the corn kernels.  Divide the batter evenly among the muffin cups.

Bake for 15 to 18 minutes, or until the tops are golden and a thin knife inserted into the center of the muffins comes out clean.  Transfer the pan to a rack and cool for 5 minutes before carefully removing each muffin from its mold.

Serving : The muffins are great warm or at room temperature and particularly great split, toasted and slathered with butter or jam or both.

Storing : Like all muffins, these are best eaten the day they are made.  If you want to keep them, wrap them airtight and pop them into the freezer, where they'll keep for about 2 months.  Rewarm in a 350 degree F oven, if you'd like, or split and toast them - do that, and they'll be that much more delicious with butter.

****************************

Special announcement : Please join in, the more the merrier!
There is a  "Culinary Smackdown Battle Chile October 2010" at "At Home With Rebecka", with a beautiful hand painted tea pot and cup together with a tin of Apple Spice Tea as the winning prize! Go on, get some hot stuff smoking and head on down to Rebecka's.  Please do drop by her wonderful blog for more info.  Have fun!


Monday, October 4, 2010

Mustard Prawns the Copycat Version / Garden

This will be my first entry to The Copycat Club's debut!. Have you heard of The Copycat Club? If not, then it is about time you do. The Copycat Club is a club that features copycat recipes from your favourite restaurant, favourite fast-food, famous bakeries, just about anything that can be eaten, as long as it is a copycat! The person behind this is Tia from Buttercream Barbie. For more details about this club and how to join in the fun please do visit Tia's fantastic blog.   My first entry will be Mustard Prawns from the Taj Group of Hotels.

Taj Group of Hotels is famous, right? This recipe is taken from the book, "The Best of Indian Cooking : A Selection of Recipes From The Taj Group of Hotels", edited by John Mitchell.  This book was published in the year 1994, oh gosh, I was just a sweet young twenty something at that time! Boy, time really flies in a blink of an eye! Well, I bought it maybe not in 1994, but certainly not far from that year! And all this while, I have only tried maybe two recipes from this book.

The recipes from this book, according to John Mitchell, was edited with some changes from the original ones, with approval from the chefs, to make the recipes practical for use in the domestic kitchen.  So this is the copycat versions from the originals! Perfect! And to think that I do not have any copycat recipe on hand, it has been sitting on my shelf for years!

This is a very tasty dish. I have not been to any of the Taj Group of Hotels, obviously have not tried any of their food, but this is delicious with plain white rice. (My hubby had second helpings!). This is very simple and easy, just get everything cut and ready before you start cooking. Give it a try. For an authentic Indian style of serving, serve it on a banana leaf, on a plate. 


I'm linking this to Cookbook Sundays at Brenda's Canadian Kitchen and Potluck Sunday at Mommy's Kitchen. 


Kaduku Eral (Mustard Prawns)
(adapted from "The Best of Indian Cooking - A Selection of Recipes From The Taj Group of Hotels" edited by John Mitchell)
600gm prawns
1 large onion
2 tomatoes
4 cloves garlic
2 tbsp oil
1 tbsp mustard seeds
8 curry leaves
1 heaped tbsp chilli powder
salt to taste
chopped coriander leaves

Shell and de-vein the prawns, then wash under running water, pat dry and set aside.  Chop finely the onion, tomatoes and garlic.  Heat the oil in a pan until very hot, then add the mustard seeds and curry leaves.  When they start to crackle,  immediately add the onion and garlic and saute until softened.  Next add the tomato and cook for 4-5 minutes, then add the chilli powder and stir well.  Lower the heat and add the prawns.  Cook for 10-12 minutes, stirring frequently, then season with salt to taste.  To serve : transfer to a large plate and garnish with chopped coriander leaves.

*******************************
A little post on my garden...... continuation from last post


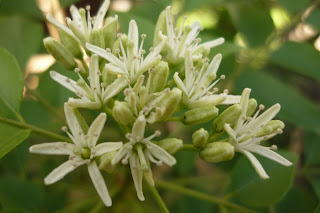
Ever seen this flower?  Can you name the plant of this flower?


Cannot guess the name of this plant with this pretty flower?  Not many people do!  These pretty flower belongs to the Curry Leaf Plant!  Are you surprised? The flowers has a light jasmine-like fragrance, it will turn to small round red berry-like fruits, which will eventually changed to black.  According to Wikipedia, the fruits can be eaten but the seeds inside are highly poisonous.  Would you dare to try the fruits? 


Curry leaves are very aromatic and extremely important in curry dishes.  It is used worldwide in various cuisine. Over in our multi-racial Malaysia here, it is used by all races, even the  Chinese restaurants use the leaves for extra aroma in many delicious fried dishes, not necessarily spicy.   But, not many of us have seen or even aware that the ever popular curry leaves has flowers just like any other plant. So the next time when you pick a bunch of these leaves from the store, think about the pretty flower! Hope you have enjoyed reading this little post!