Sunday, February 28, 2016

Best-Ever Bourbon Brownies

Cookbook Countdown is a monthly cooking/baking event, which I'm co-hosting with Emily's Cooking (Makan2) Foray.  Everyone is welcome to join us. How does it work? To summarize, you may select a cookbook from your own cookbook collection, to cook or bake from each month. That selected book shall be your cookbook of the month. You may cook any recipes and as many recipes as you want from your selected book of the month. This is a fabulous way of using your cookbooks at least once! For more information on how to join Cookbook Countdown, please click here


************************

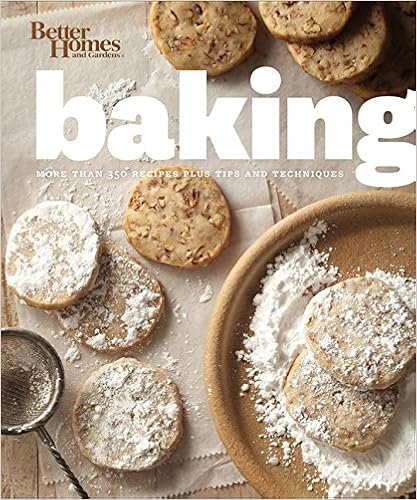
Cookbook Countdown #2 : Recipe No. 4 : Best-Ever Bourbon Brownies
from my selected cookbook for this month, Better Homes and Garden : Baking


Everyone needs a brownie every now and then! 


These brownies are not too sweet. I did not brush the top of the brownies with bourbon when the brownie has done baking. I've added 2 tablespoons of the bourbon into the batter instead. I've used dark chocolate and I can taste the slight bitterness of the chocolate with the aroma of the bourbon, very nice. The crumbs are soft and moist with a little cake-like texture. 


Bittersweet chocolaty brownies served with a  scoop of vanilla ice cream, so yummy!


Recipe comes with the Bourbon Frosting which is spread over the brownies. I have however, omitted the frosting, as we wanted to eat the brownies with vanilla ice cream. For the Bourbon Frosting recipe, please refer to the link (Better Homes and Garden website) provided in the recipe below. 


Best-Ever Bourbon Brownies
(adapted from "Better Homes and Garden : Baking", or here)
Makes 16 brownies
1/2 cup sugar
1/3 cup butter
2 tablespoons water
1 cup semisweet chocolate pieces
2 eggs
1 teaspoon vanilla
3/4 cup all-purpose flour
1/4 teaspoon baking soda
1/4 teaspoon salt
1/2 cup chopped pecans, toasted
2 to 3 tablespoons bourbon
1 recipe Bourbon Frosting
2 ounces semisweet chocolate, melted
pecan halves, toasted (optional)

  1. Preheat oven to 350F. Line an 8x8x2-inch baking pan with foil, extending foil about 1 inch over the edges of pan. Grease foil; set pan aside. In a medium saucepan combine sugar, butter, and the water. Cook and stir over medium heat just until boiling. Remove from heat.
  2. Stir in 1 cup chocolate pieces until melted. Add eggs and vanilla, beating with a wooden spoon just until combined. Stir in flour, baking soda, and salt. (Add in 2 tablespoons bourbon). Stir in chopped pecans. Pour batter into the prepared pan, spreading evenly.
  3. Bake about 25 minutes or until a wooden toothpick inserted near center comes out clean and edges start to pull away from sides of pan.
  4. Place pan on a wire rack. Brush top of hot brownies with bourbon. (I did not brush the top with bourbon). Cool in pan on rack.
  5. Spread brownies with bourbon Frosting. Cut into bars. Top each with some of the melted chocolate and, if desired, a pecan half.

"I'm linking this post with Cookbook Countdown hosted by 


p/s : I am having problems with wordpress blogs for the past two weeks. I am unable to open the link to the posts using wordpress. I apologize if you have not received any comments from me. This has never happen before, and I am wondering why. Whatever the issues are at wordpress, I hope they will resolve the problems soon. Do any of you have the same problems?

Friday, February 26, 2016

Pigs In Blanket

"February Potluck", theme for this week at I Heart Cooking Clubs (IHCC). For our potluck week, I've made a simple snack that I'm sure everyone is familiar with, Pigs In Blanket. The name is rather cute! I've made Pigs In Blanket before which I would usually serve with a combination of mayo and chilli or tomato sauce. This time, I've decided to make Nigella Lawson's version, served with mustard sauce.


I'm sure everyone knows how straightforward easy it is to make Pigs In Blanket. To save time, use store-bought frozen puff pastry. The mustard sauce is a mixture of Dijon mustard, whole-grain mustard and sour cream.


Roll out the pastry a little to make it a little bit thinner, cut to size, brush each pastry section with egg wash, place a frankfurter one side, and roll it up snugly, pressing the seams to seal. Cut the rolled frank to your desired length, place seam side down, on parchment lined baking sheet,  glaze with egg wash and ready to go into the oven. I've baked them for 22 minutes to get them all golden brown at 200C. 


These are the perfect snack, the adults would enjoy these as much as the kids! A great idea to stock up some frozen puff pastry and frankfurters in the freezer, and these can be made in a jiffy. Just make sure you thaw the frozen pastry and frankfurters first! These little "piggies" can be assembled, cut and keep covered in a tray in the fridge, to be baked later. Brush them with egg wash just before baking. These may be served with your favourite chili or tomato sauce, or my kids' favourite; a mixture of mayo, mustard and tomato/chilli sauce! Serve a plateful of these little Pigs In Blanket with the dipping sauce in the centre, and I'm sure everyone would reach out for them! Who can resist pastry and frankfurters!

You don't really need a recipe to make Pigs In Blanket, (it's just puff pastry and frankfurters!) But then, since I did make the mustard sauce from Nigella's book, so here it is :


Pigs In Blanket
(adapted from "Nigella Kitchen", Nigella Lawson)
1 x approx. 17.3-ounce package ready-rolled puff-pastry sheets
     (gives 2 sheets, each approx. 10x9-1/2 inches), thawed if frozen
1 egg
3 x 12 ounce packages frankfurters or hot dogs (gives 21, but you only need 16)

for the mustard dipping sauce :
scant 1/2 cup wholegrain mustard
scant 1/2 cup Dijon mustard
2 tablespoons sour cream

  1. Preheat the oven to 425F. Roll out one of the rectangular puff-pastry sheets to make it just a little bit thinner, stretching the long side rather than the short side as you roll. Cut the rectangle into quarters, then cut each rectangle in half lengthwise, to give 8 small pastry strips in total. You may need to roll each strip of pastry a little more to make sure it wraps snugly around your frankfurter.
  2. Beat the egg in a small bowl and paint each pastry section with the egg wash. Sit a frankfurter horizontally on the left-hand side of one of the pieces of pastry and roll it up until it just seals. Then do the same with the remaining 7 small pastry strips.
  3. Cut each rolled frank into 4 small pieces, pressing the pastry back around the sausage if it comes loose. Then place on a parchment paper-lined lipped baking sheet with the sealed bit down to prevent it springing open.
  4. Paint the franks in blankets with the egg wash, and put them in the oven for 15-20 minutes. The pastry should have puffed up a little and turned golden. You can get on with the other sheet of pastry while the first lot of franks are cooking and repeat the process with the remaining franks.
  5. Mix together the mustards and sour cream and put in little bowls.
  6. Put the cooked franks in blanks onto a plate and serve warm with the dipping sauce in the little bowls (for ease of eating and passing) on the side.
Make Ahead Note : The frankfurters in their pastry can be assembled 1 day in advance. Put cut-up pigs in blankets on lined lipped baking sheets but do not glaze the outside. Cover with plastic wrap and refrigerate until needed; store egg wash in a separate, covered container in the refrigerator. Glaze and bake, following instructions in recipe.


I'm linking this post to I Heart Cooking Clubs (IHCC), theme for this week "February Potluck"


Thursday, February 25, 2016

Chocolate Chip Cookies : Bake-Along #92

This week at Bake-Along, it's time for Chocolate Chip Cookies from Bake In The Day Bakery, selected by Lena.

I've read some really good reviews on this cookies when I googled for it, that I was looking forward to bake them. Are these cookies that good? Even the author of the book mentioned that "Cookie most likely to cause a riot if we run out"! Back In The Day Bakery is a bakery situated in Savannah, USA. Would love to visit the bakery one day!


There's two cups of sugar in the dough, one cup of white sugar, and one cup of brown sugar. I could never bring myself to use these amounts of sugar! I've reduced it to 1/4 cup of each, knowing very well that, these amount would bring just the right sweetness, as I have baked similar recipes to this, always with a lesser amount of sugar than the recipe calls for. I have used salted butter, thus have omitted the salt. Instead of chocolate chunks, I have used chocolate chips. Did not have Fleur de sel, It was suggested to use a big ice cream scoop to measure the dough before baking. I made the first tray (6 cookies) and they are really huge! So for the rest of the dough, I skipped the ice cream scoop, and use about 2 tablespoons of dough for each cookie. I've baked the cookies about 20 minutes, until golden brown around the edges. 


These cookies are very nice. Best eaten when they have just cooled or barely warm, when the edges are crispy and the center are a little chewy. These are good on the first day, though they lost some of that crispiness on the next day, but still tastes nice. I'm so glad I reduced the sugar, as the sweetness is just right. Delicious when eating while slightly warm and crispy with a glass of cold milk!


Chocolate Chip Cookies
(Bake In The Day Bakery Cookbook, by Cheryl and Griffith Day, or here)
Makes 24 cookies
2-1/2 cups unbleached all-purpose flour
1-1/4 teaspoons baking soda
1-1/4 teaspoons fine sea salt (omitted)
1/2 pound (2 sticks) unsalted butter, at room temperature (salted butter)
1 teaspoon pure vanilla extract
1 cup granulated sugar (1/4 cup)
1 cup packed light brown sugar (1/4 cup)
2 large eggs, at room temperature
2 cups semisweet chocolate chunks
Fleur de sel for sprinkling

Position a rack in the lower third of the oven and preheat the oven to 350°F. Line two cookie sheets with parchment.
Sift together the flour, baking soda, and sea salt; set aside.
In the bowl of a stand mixer fitted with the paddle attachment (or in a large mixing bowl, using a handheld mixer), cream together the butter, vanilla, and both sugars on medium speed until light and fluffy, 3 to 5 minutes.
Add the eggs and mix for no more than 1 minute; the eggs will not be fully incorporated. Turn the speed down to low and add the dry ingredients in thirds, beating until just combined, 1 to 2 minutes. With the mixer running, sprinkle in the chocolate chunks, beating until just combined, about 1 minute.
Use a large ice cream scoop or a ¼-cup measuring cup to form the cookies and place on the prepared cookie sheets, leaving 2 inches between the cookies to allow for spreading. Lightly tap each cookie with the palm of your hand and sprinkle the cookies with fleur de sel.
Bake the cookies, one sheet at a time, for 15 to 18 minutes, rotating the pan halfway through the baking time for even doneness. The cookies should be golden brown around the edges but still light in the centers. Let the cookies cool on a wire rack. Store the cookies in an airtight container for up to 3 days at room temperature.
TIP: If you can’t buy your milk in glass bottles anymore, sterilize old milk bottles and creamers and store them in the fridge, then pour your milk into the chilled bottles for serving. Milk tastes so much better served from a glass container!

********************************

Do stop by Lena of Frozen Wings and Zoe of Bake For Happy Kids, and all our friends who has baked along with us in the linky below :


For our next Bake-Along, we will be baking Theme : Bake/Roast Chicken (Part/Whole). Link your post to our linky which will open from 22nd to 31st March. Everyone is welcome to join us! Only current posts please.


Photobucket


A friendly reminder when linking to our linky :
1. Please mention Bake-Along event in your own post linking direct to any of the hosts' post (JoyceLena or Zoe)
2. Please link only new and current post, PLEASE FOLLOW THE BAKE OR THEME provided by us. Unrelated post will be deleted.
3. Feel free to display our Bake-Along badge in your post.


Tuesday, February 23, 2016

Hot Chocolate Panna Cotta

It's Tuesdays With Dorie (TWD) week, and I've made Hot Chocolate Panna Cotta, one out of two recipes scheduled for this month. I've missed on the first one as I was busy preparing for  Chinese New Year a couple of weeks ago. Looks like that one will have to go for one of these Rewind Weeks. For this Panna Cotta, Dorie has suggested some flavours that can be created using the chocolate base, but I've decided to make them as it is.

This panna cotta is pretty straightforward and very simple to make, does not takes up much time at all. It takes longer for the panna cotta to set than to make them!


I've made the Panna Cotta in little ramekins cups, and left them to set in the refrigerator overnight. The ingredients are mostly what you probably have in your pantry ; cocoa powder, bittersweet chocolate, sugar, gelatin, heavy cream and milk.


These are very yummy! Chocolaty, not too sweet, rich with melt-in-the-mouth smooth velvety texture. Love it! 

Do check out the other posts at TWD.


p/s : I have been having problems on leaving my comments at wordpress blogs. Unable to link my post at TWD site! Maybe my comments went into your spam folders. I would appreciate if you could check your spam folder, you might just find me there!


Sunday, February 21, 2016

Peppery White Cheddar Biscuits

Cookbook Countdown is a monthly cooking/baking event, which I'm co-hosting with Emily's Cooking (Makan2) Foray.  Everyone is welcome to join us. How does it work? To summarize, you may select a cookbook from your own cookbook collection, to cook or bake from each month. That selected book shall be your cookbook of the month. You may cook any recipes and as many recipes as you want from your selected book of the month. This is a fabulous way of using your cookbooks at least once! For more information on how to join Cookbook Countdown, please click here


************************

Cookbook Countdown #2 : Recipe No. 3
from my selected cookbook for this month, Better Homes and Garden : Baking


I've made Peppery White Cheddar Biscuits. I've made only half a recipe, which yield 9 biscuits. These are really similar to making scones, and when I googled for information on the difference between biscuits and scones, I came across some interesting info. Scones originated from Scotland and are associated with British high tea, which is usually served with jam, clotted cream or simply with a cup of tea of coffee. Scones are slightly sweeter and maybe plain flavoured with dried fruits and nuts. Biscuits on the other hand, are American made, and in the South, biscuits are considered a staple diet. They are served during mealtimes as part of a meal, with butter, soups, stews or gravy. 


These are very easy to make. There's white cheddar cheese and black pepper in these biscuits. Smells so cheezy nice when they are in baking in the oven. I love how the cheese bakes up so golden brown in some spots.


These biscuits are moist with a tender flakiness, and very tasty. We ate these while still warm with some mushroom soup to dunk in.


Peppery White Cheddar Biscuits
(adapted from "Better Homes and Garden Baking" or here)
Makes 18 biscuits
4 cups all-purpose flour
2 tablespoons baking powder
1/2 teaspoon salt
1/2 cup shortening
1/4 cup butter
1-1/2 cups finely crumbled or shredded sharp white cheddar cheese (6 ounces)
2 to 3 teaspoons coarsely ground black pepper
1-1/2 cups milk
1 egg, lightly beaten
1 teaspoon water
  1. Preheat oven to 400F. Lightly grease a large baking sheet; set aside. In a medium bowl, combine flour, baking powder, and salt. Cut in shortening and butter until mixture resembles coarse crumbs. Add cheese and pepper; mix well. Make a well in center of the flour mixture. Add milk all at once; stir just until moistened.
  2. Turn dough out onto a lightly floured surface. Knead dough by folding and gently pressing it for 10 to 12 strokes or just until dough holds together. Divide dough in half. Roll or pat each half into 6-inch square, about 1 inch thick. Using a sharp knife, cut dough into 2-inch squares. Combine egg and water; brush tops of biscuits. Place on prepared baking sheet.
  3. Bake for 13 to 15 minutes or until golden. Remove biscuits from baking sheet; serve warm.
To Store :
Place biscuits in an airtight container or resealable plastic bag; cover or seal. Store in the refrigerator for up to 2 days. To serve, preheat oven to 300F. Place scones on a baking sheet and bake for 5 to 6 minutes or until warm.

To Make Ahead :
Prepare and bake biscuits as directed; cool completely on a wire rack. Place biscuits in a freezer container or bag and freeze up to 3 months. To serve, wrap frozen biscuits in foil and bake in a 300F oven about 15 minutes or until warm.


"I'm linking this post with Cookbook Countdown hosted by 


Friday, February 19, 2016

Steak with Mustard Butter and French Fries

I've joined "Cook the Book Fridays", a group of lovely bloggers who are currently cooking from David Lebovitz's, My Paris Kitchen. Thanks to a sweet friend (with a million thanks!) who has gifted me with this fantastic book, I'm looking forward to try as many recipes as I can.

Cook the Book Fridays (CtBF), has just started on this book in February, today being the second recipe. We post twice a month on Fridays. I've missed on the first recipe, and thus, this is my first post with CtBF. This week, the selected recipe is Steak with Mustard Butter and French Fries (Steak Frites Au Beurre De Moutarde). Since not everyone in my house eat beef, I have made it with pork fillet instead. 

This is a pretty simple dish to prepare. The steak (or pork fillet), are marinated with salt, chipotle chili powder (did not have chipotle chili powder, I've used Mexican chili powder instead) and chopped cilantro, leave to refrigerate for at least 1 hour, or up to 8 hours. I left mine for about 3-4 hours. Meanwhile, make the mustard butter by mixing together butter, mustard powder and Dijon. Make into little mounds on a plate, cover and refrigerate.

The French Fries are baked in the oven instead of frying, which is a plus in my books! However, you would need to prepare the fries earlier, as the potato sticks need to be soaked in cold water for about an hour before baking them. I soaked the potato sticks in bowl covered with water, and left it in the fridge. About an hour before you start to fry the steaks, start by baking the potatoes as it takes about an hour for the potatoes to brown and crisp. A handful of fresh rosemary is added to the potatoes before baking.

Fry the steaks on both sides in a little oil. Place on a serving plate, top with one mound of the mustard butter, it will melt beautifully on the hot steak. Serve with the French fries and some greens.


I have used a little too much of mustard for the mustard butter. Next time, I will reduce the mustard powder a little. The french fries are taking quite sometime to brown, about an hour. They turned out very crispy on the outside, soft and fluffy inside. Along with some green lettuce, this makes a very nice dinner. 

We do not publish the recipe at CtBF, but you can get the recipe here. Better still, get the book, and join us at CtBF.


Wednesday, February 17, 2016

Hearty Pork Stew

"Bowled Over", the theme for this week at I Heart Cooking Clubs (IHCC). This week we are cooking bowls of either soup, stews or chilli. I've made Ellie's, Hearty Beef Stew, but I have replaced the beef with pork. The picture in the book looks really good, and it was one of the very first recipe that I've bookmarked to make when I first bought the book ages ago.


I've made a few minor changes. Did not have any rutabaga or turnip, so I have replaced with daikon. Recipe uses beef, but I have replaced with pork, as not everyone in my house eats beef. I used double the amount of tomato paste and about a quarter cup more of the red wine. You may need to add a little more salt and pepper to taste. As for the potatoes, I've added them in during the last 30 minutes of braising time, instead of adding them in at the beginning. I like them very soft but not so mushy that it makes the stew really thick. 


This stew is delicious. We love it. Thumbs up from the family, and a request to cook this again. The pork pieces are very tender, full of flavour from the red wine and all the other ingredients. The veggies are soft tender and I thought the green peas makes the bowl of stew looks even better with its fresh green colour. We had this stew with some homemade bread, and it was a satisfying dinner.


Hearty Beef Stew
(adapted from "Comfort Food Fix", Ellie Krieger)
Makes 4 servings
1/4 cup all-purpose flour
1/4 teaspoon salt
1/4 teaspoon freshly ground black pepper
1/4 teaspoon paprika
1 pound lean stew beef (round or chuck shoulder), cut into cubes (I use pork stewing meat)
3 tablespoons olive oil
1 medium onion, chopped
1 small rutabaga or turnip, peeled and cubed (about 10 ounces) (I use 1 medium daikon)
1 large carrot, chopped
1 large russet potato, cubed (about 12 ounces)
2 tablespoons tomato paste
1 cup dry red wine
2 cups reduced-sodium beef broth
2 cups green peas

Place the flour, salt, black pepper, and paprika in a large sealable plastic bag. Add the beef and shake to coat well. Heat 2 tablespoons of the oil in a large (at least 6-quart) saucepan or soup pot over medium-high heat. Add the beef and cook until browned on all sides, about 6 minutes total. Transfer the meat to a plate leaving the juices in the saucepan.

Add the remaining 1 tablespoon oil to the pot. Add the onion and cook over medium heat, stirring occasionally, until the onion is golden but not browned, about 10 minutes. Add the rutabaga, carrot, and potato and cook until the vegetables soften slightly, about 10 minutes. (I added the daikon and carrots but not the potatoes). Stir in the tomato paste and cook 1 minute more. Add the wine, bring to a boil, and reduce for 3 minutes. Add the beef broth (and the pork),  return to a boil, then reduce the heat to medium low. Cover and simmer until the meat is tender, about 1 hour  and 20 minutes (I added in the potatoes after the meat has simmered for one hour and continue to simmer until the potatoes are tender, about 30 minutes). Add the peas and cook 5 minutes more. Remove from the heat and allow to rest for at least 15 minutes before serving.


I'm linking this post with IHCC, theme for this week "Bowled Over".


and


Monday, February 15, 2016

Pan-Fried Fish With Vinegar

Over at I Heart Cooking Clubs (IHCC), this week's theme is "February Featured Chef : Tessa Kiros". I've made one of Tessa's fish recipe which I have been wanting to try for ages. 


Tessa's Pan-Fried Fish With Vinegar is a delicious dish. I've used golden pomfret, one of our favourite fish, good either steamed or fried. For this dish, the fish is rubbed with some salt and a little flour on both sides, pan-fry in olive oil on both sides till golden, adding the garlic, bay leave and half the chopped rosemary about halfway through. White wine vinegar is added the pan, it will sizzle, letting it boil for a few minutes, spooning some of the sauce over the fish a few times, until the sauce has reduced a little. Add the rest of the rosemary and some black pepper. Serve immediately.


Tessa says to serve the rosemary-garlic oil with bread. But we had it with rice. It was delicious.


Pan-Fried Fish With Vinegar
(adapted from "Piri piri Starfish", Tessa Kiros)
2 baby fish (each about 300gm/10oz), cleaned, gutted and scaled
a little flour
125ml (1/2 cup) olive oil
coarse salt
2 garlic cloves, peeled and squashed a bit
2 bay leaves
2-1/2 tablespoons chopped fresh rosemary leaves
125ml (1/2 cup) white wine vinegar

Pat the fish dry, salt well, then pat in flour on both sides. Heat the oil in a frying pan large enough to hold both fish. When hot, add the fish and cook for a few minutes over high heat until golden underneath. Turn over and salt.
Add the garlic and bay and throw in almost half the rosemary. Cook again until the fish is golden underneath. Turn over carefully, taking care not to break the fish, and salt the new topside. The heat should still be high, so sit the garlic and bay on top of the fish if necessary. Add the vinegar and let it bubble for 5 minutes or so until thickened a little. Add the rest of the rosemary and some black pepper and spoon the liquid over the fish a few times. There should be lots of sauce for serving and the fish will be cooked through.
Take the whole pan to the table (with a plate for the bones). The rosemary garlic oil is delicious scraped from the bottom of the pan with chips or bread.


I'm linking this post with IHCC, theme for this week, "February Featured Chef : Tessa Kiros"


Saturday, February 6, 2016

Gong Xi Fa Cai !!!

I'm wishing all my Chinese friends and those who celebrate Chinese New Year,


Gong Xi Fa Cai

Image result for gong xi fa cai 2016


May The Year of The Monkey brings you good health, prosperity, much joy, love and laughter!


It's a week long holiday for schools in Malaysia. Most of us will be travelling either back to our hometown, visiting families and old friends, or maybe a short vacation. Wherever your destination may be, have a safe journey! See you in a week's time!


Banana Bread

Cookbook Countdown is a monthly cooking/baking event, which I'm co-hosting with Emily's Cooking (Makan2) Foray.  Everyone is welcome to join us. How does it work? To summarize, you may select a cookbook from your own cookbook collection, to cook or bake from each month. That selected book shall be your cookbook of the month. You may cook any recipes and as many recipes as you want from your selected book of the month. This is a fabulous way of using your cookbooks at least once! For more information on how to join Cookbook Countdown, please click here


************************

Cookbook Countdown #2 : Recipe No. 2
from my selected cookbook for this month, Better Homes and Garden : Baking


Recipe No. 2 : Banana Bread


What do you do when you have more than a dozen ripe bananas sitting on your kitchen counter? Make Banana Smoothies, Banana Ice Cream and of course Banana Bread! 

The bananas I used were very sweet, so I have reduced the sugar by half, and the cake is still a little sweet for me. There's some spices used in the bread, but I've only used ground cinnamon. I've omitted the ground nutmeg and could not find my ground ginger spice jar, so I've omitted that too. I've used canola oil and have omitted the walnuts as my daughter is not fond of nuts.


Very easy to make, mix the dry ingredients in one bowl. Mix the wet ingredients in another bowl. Then pour the wet ingredients into the dry ingredients, mix to combine, then pour into a 9x5-inch loaf pan and bake as directed. It bakes up a lovely deep brown with some cracks on top, as pictured in the book. I baked the bread in the evening, and left it to cool overnight, as advised in the recipe. And I think banana bread always tastes so much better the next day.


The cake is moist, soft and very nice. Love both the flavour and fragrance from the ripe bananas. I would make this recipe again, though I would further reduce the sugar a little bit more. 


Banana Bread
(adapted from "Better Homes and Gardens Baking")
2 cups all-purpose flour
1-1/2 teaspoons baking powder
1/2 teaspoon baking soda
1/2 teaspoon ground cinnamon
1/4 teaspoon salt
1/4 teaspoon ground nutmeg (I omit this)
1/8 teaspoon ground ginger (I omit this, cannot find my ground ginger spice jar!)
2 eggs, lightly beaten
1-1/2 cups mashed bananas (4-5 medium)
1 cup sugar (I use 1/2 cup)
1/2 cup vegetable oil or melted butter (I use canola oil)
1/4 cup chopped walnuts (I omit this)

  1. Preheat oven to 350F. Grease and line a 9x5x3-inch loaf pan, or two 7-1/2x3-1/2x2-inch pans.
  2. In a large bowl combine flour, baking powder, baking soda, cinnamon, salt, nutmeg and ginger. Make a well in the center of the flour mixture, set aside.
  3. In a medium bowl, combine eggs, bananas, sugar, and oil. Add egg mixture all at once to flour mixture. Stir just until moistened (batter should be lumpy). Fold in walnuts. Spoon batter into prepared pan, spreading evenly.
  4. Bake for 55 to 60 minutes for 9x5x3-inch pan or 40 to 45 minutes for 7-1/2x3-1/2x2-inch pans or until a wooden toothpick inserted near center comes out clean. If necessary to prevent overbrowning, cover loosely with foil for the last 15 minutes of baking.
  5. Cool in pan on a wire rack for 10 minutes. Remove from pan. Cool completely on rack. Wrap and store overnight before slicing.
my notes : I use only 1/2 cup sugar and it is already sweet enough! If you prefer much less sweeter, especially if the bananas are very sweet, you can reduce another 2-3 tablespoons from that 1/2 cup. I used 4 bananas. For the spices I use only ground cinnamon and have omitted the walnuts. For the oil, preferably use flavourless cooking oil like canola.


"I'm linking this post with Cookbook Countdown hosted by 


Wednesday, February 3, 2016

Asian Noodle Bowl

"Oodles of Noodles", the theme for this week at I Heart Cooking Clubs (IHCC). It's noodles week! I've made Ellie's simple Asian Noodle Bowl. There's lots of veggies in the noodles, and that's how I love my noodles, with lots of vegetables. According to Ellie, "You can substitute whatever vegetables you have on hand to create this fabulous chicken, veggie, and noodle dish that is heady with Asian flavour and aroma". 

Recipe calls for either soba noodles or whole-wheat spaghetti, but I have a few packets of the regular spaghetti in my pantry, so I have used that instead. Veggies that I used are broccoli, fresh baby corns, carrots, red chillies and scallions. One thing that I did a little differently are the chicken breasts pieces. I marinated the thinly sliced chicken breast with some (about 2 teaspoons) cornflour and a dash of sesame oil for about 15 minutes before I proceed with the recipe. Chicken breast would usually be a little dry and sometimes gets a little tough when not eaten immediately after cooking. By marinating it with cornflour, the chicken breast pieces would stay moist and tender. The sesame oil (or any other oil) is to prevent the pieces from sticking together when stir-frying. 


I made this for our mid-morning lunch meal, and my son had a bowl of this "oodles of noodles" before he goes off to school, with a happy tummy! Simple, quick, easy, and very tasty. 


Asian Noodle Bowl
(adapted from "So Easy", Ellie Krieger, or here)
Makes 4 servings
8 ounces soba noodles or whole-wheat spaghetti
2 teaspoons canola oil
1 bunch scallions (white and green parts), sliced (1/4 cup reserved for garnish)
1 tablespoon minced peeled fresh ginger
1 tablespoon minced garlic (my addition)
1 pound skinless boneless chicken breasts, thinly sliced
1 15-ounce can baby corn, drained ( I use fresh baby corn)
1/2 pound broccoli florets (about 3 cups)
1/2 pound fresh shiitake mushrooms, stemmed and sliced
1 red bell pepper, seeded and thinly sliced
1/3 cup low-sodium chicken broth
1/4 cup low-sodium soy sauce
1 teaspoon toasted sesame oil

Bring a large pot of water to a boil. Add the noodles or pasta and cook according to the directions on the package.
Heat the canola oil in a wok or very large skillet over medium heat. Add the scallions and ginger and cook, stirring, until fragrant but not browned, about 30 seconds. Add the chicken and cook, stirring occasionally, until just cooked through, 4 to 5 minutes. Add the baby corn, broccoli, mushrooms, pepper slices, broth and soy sauce and cook, stirring occasionally, until the  broccoli is bright green and crisp-tender and the peppers are crisp-tender, 5 to 6 minutes. Add the noodles and sesame oil and toss to combine. Divide among 4 bowls and garnish with the reserved 1/4 cup of scallions.


I'm linking this post with I Heart Cooking Clubs (IHCC), theme for this week
"Oodles of Noodles"


Monday, February 1, 2016

Cookbook Countdown #2 - Homemade Checkerboard Rolls

Cookbook Countdown is a monthly cooking/baking event, which I'm co-hosting with Emily's Cooking (Makan2) Foray.  Everyone is welcome to join us. How does it work? To summarize, you may select a cookbook from your own cookbook collection, to cook or bake from each month. That selected book shall be your cookbook of the month. You may cook any recipes and as many recipes as you want from your selected book of the month. This is a fabulous way of using your cookbooks at least once! For more information on how to join Cookbook Countdown, please click here


************************

Cookbook Countdown #2 : Recipe No. 1
from my selected cookbook for this month, Better Homes and Garden : Baking

There are more than 350 recipes in this book! And each recipe comes with a photo. Now which recipe should I make first? Could not decide... just too many, but there's always some recipes that stands out among the many dozens in the book. Just like this one, Homemade Checkerboard Rolls. I keep going back to this particular page each time I browse thru the book. I finally tried out the recipe on one afternoon and here it is :


These are little bread rolls, made checkerboard style, by using a different topping (one light and one dark) and placing them next to each other. The dough is pretty easy to make. One thing to note is I did not use the 1/4 cup of warm water as stated in the recipe. Our weather is hot and humid, and we tend to use slightly less water. So I have omitted the water, thinking of adding it in by the tablespoons if needed during kneading. Turns out it did not need the water at all, the dough is soft, only slightly sticky and very easy to work with. The amount of flour I used is 3-3/4 cups and I have used bread flour instead of all-purpose flour. Depending on the environment and type of flour used, you may need to adjust the amount of flour and liquid accordingly.


There are two different toppings. One is a mixture of black poppy seeds and white sesame seeds. The other is a mixture of grated Parmesan cheese and fine cornmeal. When the dough is ready to be shaped, divide it into 24 rolls (about 36grams each), dip the rounded top into a small bowl of melted butter, then dipped the buttered part into one of the topping mixtures. Repeat with the other topping mixture. Place the rolls next to each other in a greased pan, alternately, into a checkerboard pattern. Cover with greased cling wrap and let to rise until double in size, about only 30 minutes. Bake as directed in the recipe.


The baked rolls.


With different toppings.


These rolls are soft and nice. I made them meant for breakfast the next morning, but in the end we had these with some homemade stew for dinner instead! There's only 6 left for the following morning's breakfast.


Homemade Checkerboard Rolls
(adapted from "Better Homes and Garden : Baking", or here)
Makes 24 small rolls
1 cup milk
1/4 cup sugar
1/4 cup butter
1 teaspoon salt
1 package active dry yeast (2 teaspoons)
1/4 cup warm water (105F to 115F) (omitted, refer instruction below *)
1 egg, lightly beaten
3-1/2 to 4 cups all-purpose flour (I use in total about 3-3/4 cups bread flour)
2 tablespoons sesame seeds
2 tablespoons poppy seeds
2 teaspoons dried minced onion or dried minced garlic (omit this)
2 tablespoons yellow cornmeal
2 tablespoons grated Romano or Parmesan cheese
1/4 cup butter, melted

  1. In a small saucepan, combine milk, sugar, 1/4 cup butter, and the salt; heat and stir over medium-low heat until warm (105F to 115F). Meanwhile, in a large bowl dissolve yeast in the warm water. (* I did not use the warm water since the dough is soft and slightly sticky, and since I'm using instant yeast, I added the instant yeast to the lukewarm milk mixture, stir with a whisk until dissolve, then add in the egg, and proceed with Step 2 below, adding the flour).
  2. Add the milk mixture and egg to yeast mixture. Gradually stir in enough flour to make a soft dough.
  3. Turn dough out onto a floured surface. Knead in enough of the remaining flour to make moderately soft dough that is smooth and elastic (about 3 minutes). Shape dough into ball. Place in a greased bowl, turning once. Cover; let rise in warm place until double in size (about 1 hour). (I use the stand mixer with the dough hook, to knead the dough, about 10 minutes).
  4. Grease a 15x10x1-inch baking pan; set aside. Punch dough down; turn out onto a lightly floured surface. Let rest for 10 minutes. Divide dough into 24 pieces. (I weighed the dough, and divide into 24 rounds of about 36 grams each). Gently shape into balls.
  5. In a shallow dish combine sesame seeds, poppy seeds, and dried minced onion. In another shallow dish combine cornmeal and cheese. Place 1/4 cup melted butter in a third dish. Working quickly, roll dough pieces in butter and in one of the seasoning mixtures to lightly coat. Coat half of the rolls with one seasoning mixture and the remaining rolls with the other seasoning mixture. Alternate rolls in prepared pan. Cover rolls with greased plastic wrap and a towel. Let rise in a warm place for 30 minutes.
  6. Preheat oven to 400F. Bake for 12 to 15 minutes or until golden. Remove from pan. Serve warm or at room temperature.
To Make Ahead :
Prepare as directed through Step 5. Chill for up to 24 hours. Let stand at room temperature for 30 minutes. Continue as directed in Step 6. Or prepare and bake rolls as directed. Wrap cooled rolls in plastic wrap; place in a resealable plastic freezer bag. Freeze for up to 2 months. To serve, heat rolls in a 375F oven for 5 to 8 minutes.


"I'm linking this post with Cookbook Countdown hosted by