Showing posts with label King Arthur Flour. Show all posts

Sunday, November 3, 2013

Cinnamon-Swirl Pumpkin Rolls : ABC Nov 2013

The bake at Avid Baker's Challenge (ABC) for this month is Cinnamon-Swirl Pumpkin Rolls, recipe is from King Arthur Flour.

There are many great reviews about these rolls, and I just could not wait to bake them. So much so that I've already baked these rolls more than a month ago.

The dough are really easy to work with, and the roll-up are a breeze. I have made my own pumpkin puree, added some dried cranberries in the filling and reduce the sugar filling to 1/2 cup from the original 3/4 cup. When the dough is rolled up to a long log, it is divided into 9 rolls (mine was thicker than the original 1-1/2", perhaps about 2" each). Instructions says to place the 9 rolls in a 9" square pan, but I find that size is a little too small for the huge rolls. So I have placed them in a slightly bigger pan of 10" square, maybe an 11" square would still be OK, because as they are left to rise in the pan, I find that they really puffed!


Bake the rolls until they are lightly brown and set. Leave them in the pan on a wire rack for 15 minutes and then remove the rolls to cool completely.


The recipe includes a glaze which is to be drizzled over the warm rolls, which I have omitted, as I do not like overly sweet breads. These rolls are sweet enough for me.


Overall review : The bread has a moist, soft dense texture. I was expecting a fluffier roll and would prefer it to be more fluffy soft. It does not keep well, and has gone a little drier and stale the next day, best reheated before serving. Even though, this is not in my list of favourite rolls, but it makes a nice breakfast over a cup of hot coffee. 

For the full recipe, please refer to King Arthur Flour website, here.

ABC source in 2013     Avid Baker's Challenge


To view the other members bake, please stop by Avid Baker's Challenge (ABC). We are currently baking from King Arthur Flour website, if you are interested to join in, please contact Hanaa.

Tuesday, October 1, 2013

Crusty Apple Pie : ABC October 2013

Avid Baker's Challenge (ABC)'s bake for this month is Crusty Apple Pie, recipe from King Arthur Flour (KAF), which we are baking the recipes from until end of the year. Most of KAF's recipes are fabulous, and this is another winner!


The dough is made up of flour, cream cheese, butter and cold water. There's an option to use 2 tablespoons of buttermilk powder, since we cannot get it here, I have omitted it. I mixed the flour and cold cream cheese in the food processor, about 3 pulses, and add in the cubed cold butter, pulse until crumbly with some visible pieces. Remove the mixture to a mixing bowl, add in ice cold water one tablespoon at a time, I used in total 3-1/2 tablespoons, until the dough can hold together. Divide into two pieces of 9 oz and 10 oz each, flatten to a disk, wrap well with cling wrap, and refrigerate for at least 30 minutes. 

Meanwhile, prepare the filling. Peel and core apples, halved and slice about 1/4-inch thick, put in a bowl, and squeeze some lemon juice over, mixing to combine gently. Prepare the cinnamon filling by mixing some sugar and cinnamon powder in a small bowl, which I have reduced the sugar from 1/2 cup to 1/4 cup, since the apples that I've used, Fuji apples are quite sweet.

Remove the bigger piece of dough from the fridge, roll it out to a 13" round (I use a 11" pizza pan, so I rolled it out to 12" round). Place the dough onto the prepared pan, you may view the step-by-step photos from KAF fantastic and helpful blog here, Bakers Banter. Sprinkle the cinnamon-sugar mixture all over the crust. Arrange the apples slices over the cinnamon-sugar layer. Dot the apples slices with some bits of butter.

Remove the other piece of dough from the fridge, roll it out to a 12" round. (mine was 11"). You may cut some some patterns or simply make some slits in the dough later. Place rolled out crust over the apple filling, bring the edge of the bottom crust over the top crust and press to seal. I have used a fork to tine the edges further. Make some slits on the crust if there are no cut-outs. Brush the crust with some milk, sprinkle with some coarse sugar, here I have used demerara sugar (which is not sweet), and bake at 425F for 15 minutes, reducing the temperature to 375F and bake for a further 25 to 35 minutes until golden brown and filling is bubbling through the slits in the top crust. 


Smells wonderfully good when this is baking! Advisable to wait for about an hour before slicing.
I made this in the afternoon during the weekend, and by the time it was ready, it was just the right time for "family tea-time treat"!


The family could not wait! I sliced it about 40 minutes after baking, the crust is so crispy and flaky. So delicious when eaten while still warm! The apple filling is not overly sweet, as I have reduced the sugar from 1/2 cup to 1/4 cup, and it was just right. The demerara sugar may look a lot, but this sugar is not sweet at all, and provides a nice light crunch to the crispy and flaky crust.


Five minutes later, everyone had a second piece! 


I really love the crust, it was flaky, crispy, buttery and so yummy! And the apples are tender and soft, tastes so good with the cinnamon-sugar.

For the full recipe, please refer to King Arthur Flour's website, here.
The changes I've made for my own record :
~ reduce the sugar for the cinnamon filling, from 1/2 cup to 1/4 cup. (Fuji apples are sweet)
~ used a 11" pizza pan.


ABC source in 2013     Avid Baker's Challenge


To view the other members bake, please stop by Avid Baker's Challenge (ABC). We are currently baking from King Arthur Flour website, if you are interested to join in, please contact Hanaa.


Wednesday, September 4, 2013

Double Chocolate Zucchini Bread : ABC September 2013

Our bake at Avid Baker's Challenge (ABC) for this month is Double Chocolate Zucchini Bread, recipe from King Arthur Flour. ABC is baking from the recipes of King Arthur Flour's website until December. 


This cake may not look very pretty, but it really is very good! It rises so well, I thought that the pan would be too small, but in the end, it turned out great.


It has all the goodness of zucchini, nobody would ever think there's zucchini in it! And the deliciousness of cocoa powder and chocolate chips. Can you see the grated zucchini peeping out from the slices, it looks yellow but I've used green zucchinis! This cake uses oil instead of butter and the sweetness is just right, though I did reduce about 2 tablespoons from the half cup of brown sugar. The only substitute I made was, to replace the honey with golden syrup, as I do not like to use honey in cakes. It works out great with the golden syrup.


A very moist, chocolaty and delicious cake/bread.

For the full recipe, please refer to King Arthur Flour's website, here.


ABC source in 2013     Avid Baker's Challenge


To view the other members bake, please stop by Avid Baker's Challenge (ABC). We are currently baking from King Arthur Flour website, if you are interested to join in, please contact Hanaa.

I'm also sharing this post with :

Saturday, July 20, 2013

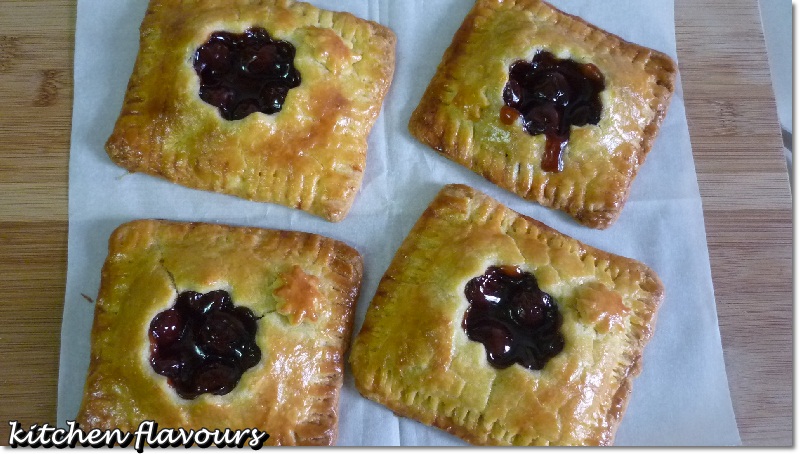
Cherry Hand Pies : ABC July 2013

I am so late with this month's bake at Avid Bakers Challenge (ABC)! Two days more before the linky closes. Well, I have a good reason for being late, my 18 year old oven finally gave up and I am without an oven for a couple of weeks. Yeah, it was torturing, out of baking action for a couple of weeks!! Now that I finally have my new oven, I am back with a baking vengeance! LOL! Looking at everyone's linky at ABC, I am practically drooling over their delicious pies. And with great reviews from everyone too, so I am definitely not going to miss this one, even if I should miss the deadline, I would still make this, sooner or later!

This month's bake, Blueberry Hand Pies is from King Arthur Flour website, here. I have some frozen blueberries in my freezer, but have used a can of cherry pie filling which I bought quite sometime ago. 


Just as the other ABC bakers' review on these pies, these are excellent! The pastry crust is so buttery, flaky, tender, crispy and delicious!


I used the food processor to mix the dough. The only changes I made was to substitute the sour cream with homemade yoghurt. When I mixed the butter into the flour, the mixture was crumbly with pea-sized crumbs just as the recipe says. It was when I mixed in the yoghurt, the mixture starts to turn very soft and sticky!! The dough was kinda soft and sticky, like the texture of a very thick batter when making cookies! I was really worried that it would turn out a total failure. Especially so when I've read from my fellow bakers at ABC, their dough was kinda dry! Mine was totally the opposite! Well, let's just hope for the best. I actually left the dough in the refrigerator overnight, did not plan to, but was not feeling well that day, and decided to bake the pies the next day.

The next afternoon, took the dough out and left it at room temperature for about 15 minutes to soften it slightly. I placed a big sheet of plastic over the dough to roll it out as it was sticking to the rolling pin as the dough was very soft. But with some light dusting of flour over the dough really helps. When the dough was cut to size, it was so soft and fragile that I was afraid that when I filled it up with the filling, I would have difficulty in transferring it to the baking pan. So I placed one piece of dough onto the baking pan and did the assembling of the pie directly on the pan. I made the rest of the pie this way and got to handle the dough very gently! However, I did not sprinkle any sanding sugar on the pies before baking, as I prefer them this way.

Brush the top with egg wash,  and off into the oven they went for 20-22 minutes, at 200C.


They bake up beautifully golden and looks so good! When I took the first bite, then the second, then the third, I was like thinking, all that extra "handle with care" seems to worth it! This is so delicious! The crust is so tender, buttery, flaky and crispy! A superb choice, Hanaa! 


For the full recipe, you may get it from KAF's website, here.


ABC source in 2013     Avid Baker's Challenge


To view the other members bake, please stop by Avid Baker's Challenge (ABC). We are currently baking from King Arthur Flour website, if you are interested to join in, please contact Hanaa.

Tuesday, June 4, 2013

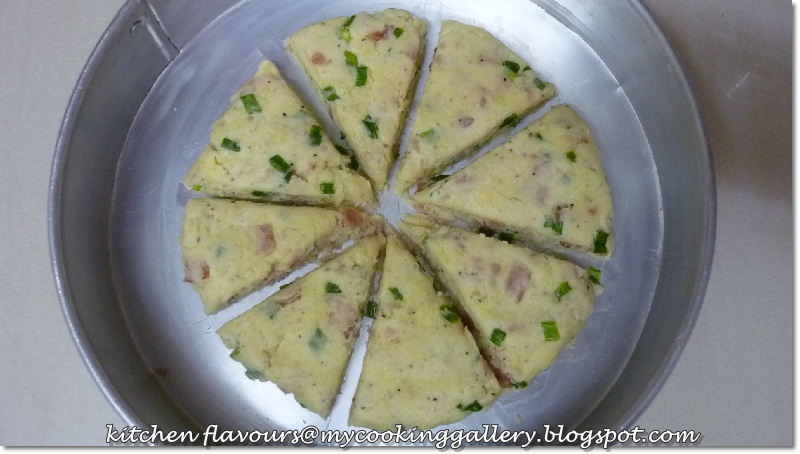
Bacon-Cheddar-Green Onions Scones : ABC June 2013

Our bake for this month at Avid Baker's Challenge (ABC) is Bacon-Cheddar-Chive Scones, a delicious savoury scones, recipe taken from King Arthur Flour's (KAF) website. We, at ABC is currently baking from KAF recipes until end December. 

When this recipe was chosen for our June bake, I thought that it sounded familiar. Checked from my file of printed recipes, and found it, I actually printed this recipe from KAF' website on 3rd Nov 2011!  It took a little push, and one and half years later, to make this savoury scone, thanks to ABC! And another recipe which I've printed at the same time, is our coming bake in August!


The original recipe uses chives, but I have replaced with green onions. I do have some chives growing in my backyard, but when I made the dough, it was already about 9.30pm, and it was a little too late to go round snipping herbs from my backyard. I do have some green onions in my fridge, so that was what I used. 


I made the dough and placed them in the baking pan, and kept it in the fridge. The next morning, at 4.45 am, (yes, it was that early!) I baked them for the kids' breakfast before school. So it was all nice, moist and tender when they had it for breakfast. 


I made only half a recipe, and got eight small scones, just perfect for breakfast. The only changes I've made was to substitute the chives with green onions, and to add some coarse black pepper powder. The salt was reduced by half, and it still turns out a little salty, next time I will not add any salt, because the cheese, bacon and butter are already salted.


Photo taken at about 5.30am, that explains the different colour lighting from the photo below...


....  taken at about 10.00 am when the sun is up! Haha! There's only one piece left for me! 
These scones are buttery, moist, tender and yummy! A breeze to make! Make the dough the night before, which is very quick to put together, place the dough in the fridge and bake the next morning for breakfast, fresh and delicious!

For the full recipe, you may get it from KAF's website, here.


ABC source in 2013     Avid Baker's Challenge


To view the other members bake, please stop by Avid Baker's Challenge (ABC). We are currently baking from King Arthur Flour website, if you are interested to join in, please contact Hanaa.


Tuesday, May 14, 2013

English Muffins : ABC May 2013

To submit your post to :
~ Little Thumbs Up, Mushroom event, click here.

************************


"English Muffins" is this month's bake at Avid Baker's Challenge (ABC). That is one more item off my list of to-do! I have always wanted to try English Muffins, but with so many bakes to try, somehow it has not reached  the top of my list, that is until ABC's chosen bake for May is English Muffins! ABC is currently baking from King Arthur Flour's website until December, where a different recipe will be chosen each month. 

I am a little late for this month's link at ABC. These muffins was made more than a month ago, and  only completed the post a couple of days ago (smiling sheepishly!!!). So here it is: 


  1. Make the dough. I used the stand mixer to knead the dough. Let it rise for 1-2 hours, deflate gently and divide dough into two equal portions. 
  2. Divide each portion into six equal pieces. Shape each piece into a ball, then flatten until they're about 3 to 3-1/2" in diameter. Cover and let rest for 20 minutes until they puffed a little.
  3. Sprinkle a saucepan with some cornmeal, place the muffins and sprinkle the top with more cornmeal. Cook the muffins over low heat for 7-15 minutes. 
  4. The muffins puffed up during cooking.
  5. Turn muffins over and cook the other side until light brown. To make sure the muffins are fully cooked inside, remove muffins to a baking sheet and continue to bake in the oven for about 10 minutes.
  6. Remove muffins and let cool on wire rack.


English Muffins are not supposed to look like buns, so if it is puffing up like a bun, you may want to weigh them down gently during cooking by placing a baking sheet over the top. But I did not bother to do that, I don't mind the very puffy muffins!


Split it the traditional way. English Muffins should not be sliced with a knife, rather split it open by using a fork, working it round the sides and split it open gently. Reason is fork-split muffins would have nooks and crannies, see above, while cut-muffins don't.


Eat it like the English would, toast the split muffins under the broiler for about 2 mins till brown and spread some butter over, it would melt deliciously on the hot muffins, and ....


.......  spread with your favourite jam. I've used my homemade Kumquat Marmalade, so good! Makes the perfect breakfast! 

Overall review : These English Muffins are really good! I love the soft chewiness of the outer crust, and the soft and tasty texture on the inside. I would definitely make this again! Having it split and broiled, and spread with a generous amount of butter and jam, is simply delightful!
It is even great made as a sandwich bread, which we had for our dinner with homemade meat patties.


For the full recipe for this English Muffins, you may refer to King Arthur Flour.


ABC source in 2013     Avid Baker's Challenge


To view the other members bake on this bread, please stop by Avid Baker's Challenge (ABC). We are currently baking from King Arthur Flour website, if you are interested to join in, please contact Hanaa.


Monday, April 1, 2013

Cheese-Stuffed Crusty Loaves : ABC April 2013

Time for Avid Baker's Challenge monthly bake! For this month, we, at Avid Baker's Challenge (ABC), are baking Cheese-Stuffed Crusty Loaves, recipe taken from King Arthur Flour. A bread recipe, I was all smiles!

Best described about this recipe, quoted from KAF, "A lava-flow of aromatic cheese melts down the sides of these chewy/crusty loaves." 


It really was a "lava-flow of aromatic cheese melts down the sides of these chewy/crusty loaves!" I was delighted! See the bottom of the loaves, the pool of melted cheese which has been baked to perfect crispiness, oh my, these are so yummy that my son and myself ate almost all of these crispy parts! The only thing I am not satisfied was, the colour of my rather pale-looking loaves.


First, you need to make the starter. I have used the whey from my Homemade Ricotta Cheese to replace the water required for the starter. Mix the bread flour, salt, instant yeast and whey. Cover and let rest overnight at room temperature. Mixture will be bubbly.


  1. The next day, mixture has doubled in size but I did not see any "bubbly" look! Too dry maybe?
  2. Again I have used the whey from my Homemade Ricotta Cheese. Mix the starter with the whey, salt, flour and yeast. 
  3. I used the bread machine to knead the dough. 
  4. Place the kneaded dough in an oiled bowl, cover and let rise for 1-1/2 to 2 hours until nearly doubled in bulk.

  1. Deflate the risen dough, roll it out into a 3/4-inch thick rectangle, about 9"x12", spray with water
  2. Sprinkle on with the grated cheese. I have used a mixture of cheddar and mozzarella.
  3. Roll it up into a log, pinching the seam to seal. Cover and let rise for 1 to 1-1/2 hours, till it is puffy but not doubled in bulk. I have unintentionally left it to rise for about 3 hours, went out for an errand and came back much later than my original plan of only an hour! 
  4. It has doubled in size!


  1. Gently cut the log into four for smaller loaves, or two for bigger loaves.
  2. Place them on a greased or lined baking sheet, cut side down.
  3. Spread them open a little, to more fully expose the cheese. Spray with warm water and immediately place in a preheated oven and bake for 20 minutes, or until the cheese has melted and the loaves are a very deep golden brown.


The top of the loaves are bubbling and the cheese are oozing out just like a volcano! I tent the top with foil as it is browning too fast and the sides are not brown yet! When the sides starts to brown a little, I checked one loaf and satisfied that they are fully done, took them out as I do not want the loaves to be over baked and dry, especially since I baked these about 5 minutes longer than the recipe states.


The best part is the cheezy top....


and the crispy bottom!!!


The cheezy centre, especially good when eaten warm.


The interior texture is moist and soft. The outer crust is rather chewy. Very tasty loaf. We enjoyed these loaves for our lazy weekend dinner with canned mushroom soup, served piping hot with these crusty loaves! These loaves are best eaten while still warm.


For the full recipe, you may refer to King Arthur Flour.

The only changes I've made was to reduce the salt to 1-1/4 teaspoon in total as the whey that I used was already slightly salted.


ABC source in 2013     Avid Baker's Challenge


To view the other members bake on this bread, please stop by Avid Baker's Challenge (ABC). We are currently baking from King Arthur Flour website, if you are interested to join in, please contact Hanaa.


Monday, March 11, 2013

No-Knead Raisins Cranberry Walnut Bread : ABC March 2013

This month's bake at Avid Baker's Challenge (ABC) is No-Knead Chocolate Cherry Pecan Bread. Oops... I have omitted the chocolate and added in golden raisins instead, replace the dried cherries with dried cranberries and walnuts for the pecans. So my bread is called "No-Knead Raisins Cranberry Walnut Bread".  Despite all the changes, minor changes actually, this bread is a total winner! This wonderful recipe is taken from King Arthur Flour, and there are two versions to it, here I have used the one from the blog at KAF.


I am late for this month's challenge, only made this over the weekend. Just as the name says, no kneading is required. So easy peasy! But you've got to plan a day ahead. Not to worry, it only takes a few minutes of mixing the dough and leave it to a slow rise overnight. Let's see how this bread is made :


Do the mixing the night before baking.

Bread flour, rye flour and whole-wheat flour are mixed together with a little amount of yeast, water and salt. Mix everything together using a spoon, use your hand to further mix the mixture into a soft dough. Cover with plastic wrap and leave to rise overnight. That's it, for the first day!  The second picture above, is taken the next morning, when the dough has risen, it would not rise as fluffy as other breads, as this is a slow and steady rise.

The next morning :

  1. Dough is very, very sticky! Just damp your hands with some water and it will be easier to handle. Mix in the additional yeast, and by using your hand, try to distribute the yeast all over. Next mix in the dried fruits and nuts. It will be a sticky mess! Not to worry, just mix the dried fruits and nuts right into the dough and dump the whole dough into a baking pan. Here I have used a greased and lined 7" baking pan since I've made only half a recipe. The original recipe is meant for the dough to be baked in a bread crock pot, but since I do not have that, I baked in a cake pan as shown in the blog over at KAF. As advised, try to push back the visible fruits and nuts into the dough, to avoid them being burnt during baking.
  2. The dried fruits and nuts are no longer visible, I've hidden them in the dough. Remember to damp your fingers as you do this, as the dough is very sticky. Cover with a greased plastic wrap and leave to rise for a few hours, according to the blog, it would take about 5 hours or so.
  3. The risen dough. Mine rose a little higher than the pan top level in just a matter of 1-1/2 hours.
  4. Remove the plastic wrap, cover the top with another baking pan of the same diameter, this is to trap the steam as the bread bakes, giving the loaf its signature shiny, chewy crust. Bake at a preheated oven of 450F for 25 minutes, remove the cover and continue baking for another 20 minutes.


Freshly baked!


Let the bread cool completely before cutting, as slicing it before it is completely cool, will result in a gummy slice. We don't want that, do we, especially since it takes almost two days to make this bread.
There, all my patience paid off, I was dying to slice and eat this bread! It has such a lovely texture. Just as described in the blog at KAF, this is a dense-artisan-style bread with incredible flavour from the slow rise. Especially if you love chewy crust.


It is dense and chewy, but yet kinda soft and moist. And very tasty! This bread can be eaten with soft cheese or butter, or your favourite jam and preserves. Or just eat it as it is, it is very good! The only thing is, the crust is not dark and shiny enough, the next time when I bake this, I'll just move the bread to a rack above, when  it is almost done, to get that nice dark crust. 


Dense yet soft, chewy, moist and tasty.  A healthy slice of goodness! There's no oil or added sugar!
Hubby ate two slices and I've finished the rest of the loaf myself! I find this bread quite addictive, as soon as I've finished a slice, I would reach for another slice! Best described as "chewy and addictive" ! 


ABC source in 2013     Avid Baker's Challenge


To view the other members bake on this bread, please stop by Avid Baker's Challenge (ABC). We are currently baking from King Arthur Flour website, if you are interested to join in, please contact Hanaa.

For the full recipe and instructions, please refer to King Arthur Flour.

Here, I am listing down my own measurements for my own record.
(for one 7" bread using a 7" round cake pan)
For the first rising:
1-1/2 cups bread flour
1/4 cup rye flour
1/4 cup whole-wheat flour
3/4 teaspoon salt
1/4 teaspoons instant yeast
3/4 cups cool water
1/4 teaspoon instant yeast
For the second rising :
1/2 cup dried cranberries
1/4 cup golden raisins
3/4 cup chopped walnuts, toasted
1/4 teaspoon instant yeast