Tuesday, August 30, 2016

Butterscotch Custards

Made a sweet and creamy custard dessert, with butterscotch flavour and added whisky. The whisky is optional, and of course, I could not let it be without! I've used bourbon.

This dessert is really pretty easy and simple to make. First of all, you would need to make the butterscotch by melting the butter over low heat and adding in the brown sugar, cook until the sugar starts to bubble, then the cream is added in. Stir until the mixture is smooth and slightly thickened, then pour in the milk. Stirring constantly, slowly pour in the lightly beaten egg yolks. Add in the vanilla extract, whisky and salt. Pour the custard mixture through a fine-mesh strainer into a pitcher.

Divide the mixture evenly among the custard cups, place in a baking tray, and fill the tray with hot water to reach halfway up the sides of the custard cups. Bake for 25-30 minutes, until the custard is set and will still jiggle slightly when the cups are lightly shaken. Let the custard cool slightly, remove the cups from the water bath, let cool on wire rack for about 20 minutes. Cover the top of each custard by pressing a piece of plastic directly on top of the custard to prevent a skin from forming. Chill the custards for a minimum of 4 hours or overnight. 


I chilled the custard overnight.


These custards are supposed to be served with dollops of whipped cream over the top. But I have served it plain!


Delightful custards. It is a little on the sweet side, but very creamy and smooth. I like the butterscotch flavour with a hint of the whisky. Very, very, nice!


Butterscotch Custards
(adapted from "Home Baked Comfort" by Kim Laidlaw)
Makes 6 custards
3 tbsp unsalted butter
3/4 cup (6oz/185gm) lightly packed dark brown sugar
1-1/2 cups (12fl oz/375ml) heavy cream
3/4 cup (6 fl oz/180ml) whole milk
5 large egg yolks, lightly beaten
1 tsp pure vanilla extract
1 tbsp whisky, preferably a sweet Scotch (optional)
1/4 tsp kosher salt
Whipped Cream for serving

Position a rack in the middle of the oven and preheat to 300F (150C). Have ready six 1/2-cup (4 fl oz/125ml) custard cups or ramekins and a shallow baking pan large enough to hold all the cups.
In a medium saucepan, melt the butter over medium-low heat. Add the brown sugar and, using a heatproof rubber spatula, stir to combine with the butter and cook until the sugar starts bubbling like molten lava, about 3 minutes. Stir in the cream, and let it bubble away, stirring with a big whisk until the mixture is smooth and slightly thickened, about 5 minutes. Stir in the milk.
Whisking constantly, slowly pour the egg yolks into the hot cream mixture. Stir in the vanilla, whisky, if using, and salt. Pour the custard through a fine-mesh sieve into a pitcher.
Divide the custard evenly among the custard cups. Place the cups in the baking pan and carefully pour hot water into the pan to reach halfway up the sides of the cups (I add the water once I place the pan on the oven rack). Bake until the custards are set but still jiggle slightly when shaken, 25-30 minutes.
Carefully transfer the baking pan to a wire rack and let the custards cool slightly, then carefully lift the cups out of the water bath. Let the custards cool on the wire rack for 20 minutes. Cover with plastic wrap pressed directly onto the surface of the custards to prevent a skin from forming. Refrigerate until the custards are well chilled, about 4 hours or up to overnight.
Serve cold with dollops of whipped cream.


Monday, August 29, 2016

Raisin Bread : Rose's Bread Bible Bakers

This month's selected recipe at Rose's Bread Bible Bakers, an online group of bloggers who are currently baking through Rose Levy Beranbaum's book, The Bread Bible, is Cinnamon Raisin Bread. A soft white raisin bread which is spiraled with cinnamon sugar. I have however decided to omit the cinnamon sugar, as I wanted a soft white bread, with just raisins all over. 

The recipe makes two loaves of bread, but I've halved it to make one loaf. The dough is a pleasure to work with, soft but not sticky. Starts with a dough starter, which is left to ferment for 1 to 4 hours at room temperature. There are a couple of resting times during the process of mixing the dough. After that the dough is left to rise until doubled, then form into a rectangle, give it one business letter turn, covered in a container and refrigerate for an hour for easier rolling. I left it in the refrigerator for about 3 hours.

Since I have omitted the spiral with the cinnamon-sugar, I shaped the dough into a loaf and place it in the greased loaf pan. Leave to rise until it has risen about 1/2 inch from the top of the pan. Bake as directed in the recipe.


Bakes up lovely. Freshly baked, cooling off on a rack. 


I baked the bread the night before, and sliced the loaf the next morning for breakfast. The bread is soft, moist and wonderful! 


The lovely soft interior. I love raisins in breads.


Toasted and spread with butter and my homemade Orange and Cardamom Jelly, for breakfast, with a mug of hot coffee. Wonderful! My hubby enjoyed his three slices, without any jam or butter, with thumbs up from him! 

Rose has given a variation for Herb Spiral Loaves, sounds like the perfect bread for a sandwich! I will be trying that soon! 

Up next in September, we will be baking Basic Hearth Bread, on page 305.

I'm also linking this post with Cookbook Countdown Specials : Bake


Saturday, August 27, 2016

Stir-fried Sugar Snaps with Garlic

This week, at I Heart Cooking Clubs (IHCC), the theme is "Express Meals : 30 Minutes Or Less!" Made a vegetable stir-fry dish that takes only 15 minutes, from start to finish! 


If you are in a hurry to get dinner ready, and wanted a plate of veggie stir-fry, sugar snap peas will be the "snappy" veggie to prepare! They take only minutes to wash and string. Then it takes just a few minutes to stir-fry them. In Curtis Stone's recipe, he uses finely chopped garlic which is sauteed together with the sugar snap peas, then add in the rice wine and salt, cook for 2 minutes more until the sugar snap peas are crisp-tender. I have however, sauteed the chopped garlic till light brown and fragrant, then add in the sugar snap peas, stir for a minute, then add the rice wine and salt. Cook till bright green and crisp-tender, then transfer to a serving plate. I have scattered over the cooked snap peas, a full tablespoon of crispy fried chopped garlic which I always keep in a jar in my pantry, as I use it quite frequently in other stir-fry dishes. The crispy fried chopped garlic is so easy and quick to make. Simply chopped a few cloves of garlic, then fry in some oil until brown and crispy, which takes only a few minutes to brown. Drain the crispy garlic on paper kitchen towel, leave to cool and store in a clean jar. Use the fragrant oil as you would in cooking. 


Stir-Fried Sugar Snaps with Garlic
(adapted from "Relaxed Cooking With Curtis Stone")
Serves 4
1 tablespoon olive oil
1 pound sugar snap peas, strings removed
2 garlic cloves, finely chopped
3 tablespoons Shaoxing rice wine (yellow rice wine)
salt

Place a wok or a saute pan over high heat. When it is hot, add the oil and heat until it is very hot. Add the sugar snap peas and garlic, and toss lightly for 30 seconds. Add the rice wine and salt, and stir-fry for 2 minutes, or until the sugar snap peas and bright green and crisp-tender. Tranfer them to a platter and serve immediately.

I'm linking this post with I Heart Cooking Clubs (IHCC), theme for this week,
"Express Meals : 30 Minutes Or Less!"


Wednesday, August 24, 2016

Shrimp Stir-Fried In Bean Sauce

Cookbook Countdown is a monthly cooking/baking event, which I'm co-hosting with Emily's Cooking (Makan2) Foray.  Everyone is welcome to join us. How does it work? To summarize, you may select a cookbook from your own cookbook collection, to cook or bake from each month. That selected book shall be your cookbook of the month. You may cook any recipes and as many recipes as you want from your selected book of the month. This is a fabulous way of using your cookbooks at least once! For more information on how to join Cookbook Countdown, please click here. 


To link to Cookbook Countdown #8, click here
To link to Cookbook Countdown Specials : BAKE, click here

************************

My selected cookbook for this month at Cookbook Countdown #8 is My Grandmother's Chinese Kitchen by Eileen Yin Fei-Lo. 

I've made Shrimp Stir-Fried In Bean Sauce. Medium to large sized prawns are best for this dish. Remove the heads, shells and deveined the prawns. However, I like to leave the tails on for dishes like this. 

As in stir-fry dishes, the cooking is done very quickly. Firstly the shrimps are marinated in the marinade ingredients, and left to stand for 30 minutes. Drain shrimps and reserve the marinade. The stir-fry is done by sauteing some ginger, bean sauce is added in, then the shrimps are added in, fry on both sides until almost cooked. Drizzle in the wine, and the reserved marinade.  Toss everything together and stir until prawns are cooked through. Turn off heat and stir in the chopped scallions. Serve hot.


Quick and simple stir-fry shrimp dish, and it is delicious! Great with rice, or even eat it on its own!


Shrimp Stir-Fried In Bean Sauce
(adapted from "My Grandmother's Chinese Kitchen", by Eileen Yin Fei-Lo)
Serves 4 to 6
Marinade
2 teaspoons dark soy sauce
2 tablespoons oyster sauce
1 teaspoon sesame oil
1-1/2 teaspoons sugar
1/2 teaspoon grated ginger
2 teaspoons Chinese white rice wine, or gin

1-1/4 pounds extra large (about 32 to 36 per pound) fresh shrimp, heads removed, shelled, deveined, washed, dried

2-1/2 tablespoons peanut oil
1-1/2 teaspoons minced ginger
1 tablespoon bean sauce
1 tablespoon Chinese white rice wine, or gin
2 scallions, finely sliced

Mix all ingredients for marinade in a large bowl. Add shrimp, mix to coat and allow to rest 30 minutes. Drain through a strainer, reserve marinade.
Heat wok over high heat for 45 seconds. Add peanut oil, coat wok with spatula. When a wisp of white smoke appears, add minced ginger and stir. Add bean sauce and stir. Add shrimp and spread in a thin layer, tipping wok from side to side to spread heat evenly. Turn over. Drizzle wine into wok around its edges. Toss mixture together. If the mix is too dry, add a bit of the reserved marinade. When shrimp turn pink, turn off heat, add scallions and toss to mix. Remove from wok, transfer to a heated dish and serve with cooked rice.


I'm linking this post with Cookbook Countdown #8 hosted by 


Monday, August 22, 2016

Sticky Caramel Buns : Rose's Bread Bible Bakers

I've added a few cookbooks to my collection recently, one of it is Rose Levy Beranbaum's book, The Bread Bible. This is  one book that I've wanted to buy for ages, and so glad that I've finally bought it. I have four of Rose's fantastic books, but this is the one that I love the most! Could not wait to try many, many recipes, (if not all!) from this book. Upon googling for some info on some of the recipes, I've discovered a group of bakers who are currently baking through this book, and they are into their fourth recipe with this bake. Of course I could not help myself from joining in! This lovely group is "Rose's Bread Bible Bakers", who are baking one recipe each month. And I like it that the list of the bakes are notified months in advance, something that works really well for me. Gives us ample time to source for ingredients and any advance preparation if needed. 

To make the Sticky Caramel Buns, you would need to prepare the basic brioche dough first. I made the dough the day before I plan to bake these buns.


The brioche dough starts with a sponge. Mix the sponge in a mixing bowl, and a mixture of flour, yeast and salt is then sprinkled over the sponge. Cover tightly with plastic wrap and left to stand for 1-1/2 to 2 hours at room temperature. The sponge will bubble through the flour mixture. I am rather intrigued with this method, as I have never done this before. In less than an hour the sponge has already puffed and pushing through the flour mixture. 

Proceed with the rest of the recipe  (4 pages of ingredients plus instructions) from the book. 

Raisins are soaked in rum, drained before use. The rum is reserved to make the glaze which is to be brushed over the buns before baking. 

Prepare the sticky topping in advance by mixing the butter, brown sugar, and Lyle's golden syrup, and simmer for a few minutes until it bubbles and form a dark brown caramel. Pour it into the prepared lightly greased baking pan. Let it cool completely.  

The dough is rolled out to a rectangle, scatter over it the mixture of toasted chopped pecans, cinnamon, brown sugar and granulated sugar, with the drained raisins. Roll it up and sliced into 1 inch slices. At this point, before I sliced the dough, I freeze the rolled up dough as advised, for about 5-10 minutes, for easier slicing. Place 3 pieces of pecan halves onto each cut sliced dough and place it onto the prepared baking pan with the pecan side down. Cover with cling wrap and let rise until double in size. Make the rum glaze and brush it over the buns just before baking.


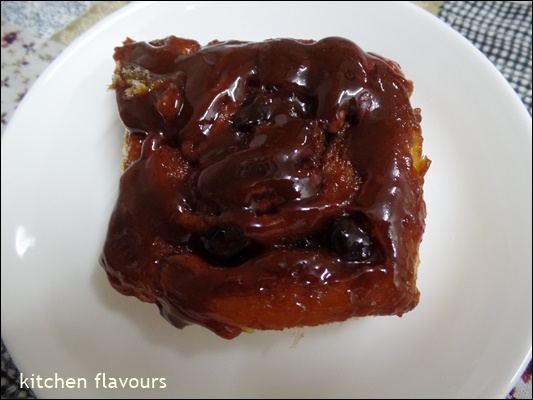
Freshly baked!


Unmould the buns onto a serving plate or  on foil-lined counter. With the sticky caramel on the top.


Look at the gooey sticky caramel! And the pecans! And the raisins peeking in between the swirls!


Eat while still warm.


Soft bread texture with gooey sweet caramel, moist plump raisins and nutty pecans, with the aroma of the cinnamon. Delicious!


I've also made the Blueberry Muffins, which was the first bake back in  May, for the group. Lovely muffins these are! Soft, tender crumbs, not too sweet, makes the perfect tea-time treat or a snack anytime of the day! 


Next on the list for August is Cinnamon Raisin Loaf. I'll be making the Flaky Scones which was the second bake, back in June, to catch up with everyone at Rose's Bread Bible Bakers!

Lemon Iced Tea

This week at I Heart Cooking Clubs (IHCC), it is "Special Edition : No Cook Challenge" theme. It is always hot and humid around here, so no cook challenge is a welcome theme indeed! For this special theme, we can use any recipes from any our previous featured chefs or our current featured chef. I've decided to use Curtis Stone's recipe, Lemon Iced Tea, which I've made a few times already.


The ingredients needed ; apple juice (no added sugar), herb tea bag, lemon juice and lemon wedge, and some water. No heat required! I've used mixed apple cranberry juice. For the tea bag, I've used lemon myrtle herb tea bag.  


So simple : mix everything in a glass, leave to infuse the tea bag for about 5 minutes or so.


Remove the tea bag and enjoy sips of this delightful tea drink. This is refreshing, makes a great thirst quencher on hot days!


 Sometimes I drink it warm, but most times times I've added ice cubes. And I've even added a tablespoon of honey on days that I want a sweet tea! 


Lemon Iced Tea
(adapted from coles.com, recipe by Curtis Stone)
100nml apple juice (with no added sugar)
100ml water
1 herbal tea bag (lemon soothers give a nice aroma)
1 squeeze lemon juice and lemon wedge

  1. Place all ingredients in glass, then let tea bag infuse.
  2. Serve immediately.
(p/s : recipe is no longer available at coles.com)


I'm linking this post with I Heart Cooking Clubs (IHCC), theme for this week,
"Special Edition : No Cook Challenge"


Friday, August 19, 2016

Cherry Tomato Crostini with Homemade Herbed Cheese

This week at Cook The Book Fridays (CtBF), the selected recipe from David Lebovitz's cookbook, My Paris Kitchen, is Cherry Tomato Crostini with Homemade Herbed Goat Cheese

To make the herbed cheese, either whole goats' milk or cows' milk yoghurt can be used. Since I always make my own yoghurt at home using whole cows' milk, that's what I used. 


Strain the yoghurt over a mesh strainer lined with a few layers of cheesecloth overnight in the refrigerator. What you get is really Greek Yoghurt, thick and creamy. Transfer the thick yoghurt into a bowl, and stir in finely chopped fresh herbs of your choice, though David did mention that be sure to include chives. So I snipped a few young stalks of chives, and basil leaves, both from my garden pot, and mix it with some fresh coriander. Chop them finely and mix into the yoghurt along with finely chopped shallot and garlic. Season with salt and pepper with a generous pinch of cayenne powder. 

Halved the cherry tomatoes, place on a baking tray, drizzle some olive oil, tuck in some fresh herbs, of which I've used basil and rosemary leaves, both from my garden pot. Sprinkle with some salt and pepper, stir to mix and bake in a preheated oven for about 40 minutes, stir once or twice in between. David suggested to bake these ahead of time, up to 8 hours in advance, so that the tomatoes have time to marinate in their own juices. 

For the bread, I've used my homemade sourdough bread. I've lightly sprayed the bread with olive oil and toast in the oven until light brown. As soon as they are out of the oven (even though it was suggested when just cool enough to handle), I rub the toasts with a garlic clove. Love it! I did not expect that the garlic would be like almost grated when rubbed onto the surface of the toasts, and find that I need another clove of garlic (for 6 slices of toasts). We are garlic lovers! And the aroma is just fantastic!


Time to assemble  (tummy growling!) ; the herbed cheese, roasted cherry tomatoes, slices of toasted sourdough bread and some fresh parsley for garnish.


Spread a generous amount of the herbed cheese on the toasts, top with a few of the roasted tomatoes, along with some drizzle of the wonderful juices from the tomatoes and garnish with some fresh herbs. 


 Bon appetit! Yummy!


I love the herbed cheese! We had the leftovers as a dip, with more sprinkling of cayenne powder, with some fresh celery and carrot sticks. So good! 

Do stop by CtBF to view everyone's take on this delicious crostini. If you have the book or thought of getting one, please do, and join us! Full details here.

Thursday, August 18, 2016

Salted Pork and Tianjin Bok Choy Soup

Cookbook Countdown is a monthly cooking/baking event, which I'm co-hosting with Emily's Cooking (Makan2) Foray.  Everyone is welcome to join us. How does it work? To summarize, you may select a cookbook from your own cookbook collection, to cook or bake from each month. That selected book shall be your cookbook of the month. You may cook any recipes and as many recipes as you want from your selected book of the month. This is a fabulous way of using your cookbooks at least once! For more information on how to join Cookbook Countdown, please click here. 


To link to Cookbook Countdown #8, click here
To link to Cookbook Countdown Specials : BAKE, click here

************************

My selected cookbook for this month at Cookbook Countdown #8 is My Grandmother's Chinese Kitchen by Eileen Yin Fei-Lo. 


One of the dishes that uses Salted Pork as one of its ingredients, a vegetable soup. Simple soup, yet very tasty and great as part of a meal at dinner time with the family. Tianjin Bok Choy (Napa Cabbage) is one of my favourite, love it in soups, stir-fries and makes fantastic kimchi.


Simple and nice! Instead of Napa Cabbage, other vegetables could be used instead.


Salted Pork and Tianjin Bok Choy Soup
(adapted from "My Grandmother's Chinese Kitchen", by Eileen Yin Fei-Lo)
4 cups chicken stock
1 slice ginger, 1/2 inch thick, lightly smashed
1 cup Salted Pork, cut into very thin 2-1/2 inch slices
1-1/4 pounds Tianjin bok choy (Napa cabbage) washed, drained and cut into 3/4-inch pieces on the diagonal, stalks and leaves separated

Place chicken stock and ginger in a large pot. Cover and bring to a boil over high heat. Add pork, stir and return to a boil. Add bok choy stalks, stir well and return again to a boil. Reduce heat to medium, cook for 1-1/2 minutes. Raise heat to high, return to a boil. Add bok choy leaves, stir well and cook for 2 minutes or until tender. Taste and add salt if necessary. Transfer to a heated tureen and serve immediately.


I'm linking this post with Cookbook Countdown #8 hosted by 


Wednesday, August 17, 2016

Lemon Cream Scones

Cookbook Countdown Specials : Bake is a baking event, which I'm co-hosting with Emily's Cooking (Makan2) Foray.  This is a "spin-off" from our on-going monthly Cookbook Countdown. Cookbook Countdown Specials : Bake is for baking desserts ; pastries, cakes, cookies, pies, tarts, breads. While the monthly Cookbook Countdown is to use from one selected cookbook each month, for CC Specials : Bake, you may use any baking cookbooks of your choice, either from one single cookbook or from numerous books. The link is open from July to end September. You may link your post here. Do join us, everyone is welcome!


To link to Cookbook Countdown Specials : BAKE, click here
To link to Cookbook Countdown #8, click here


*************************************


Made these buttery scones for afternoon tea time snack. Lovely scones! Buttery, tender, lemony and wonderful with a cup of warm tea.


I did not make the glaze which is optional, to be drizzled or brush over the scones before serving. 


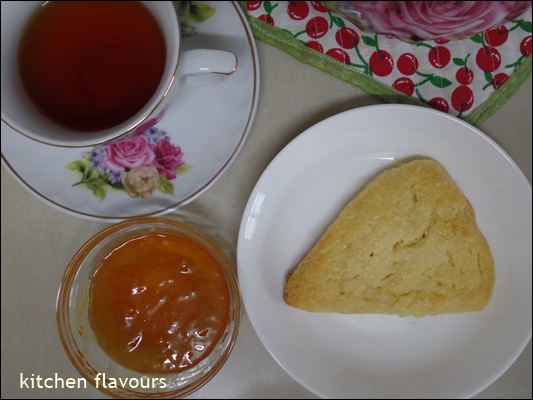
Tender Lemon Cream Scones with my homemade Orange Cardamom Jelly and a cup of warm Earl Grey tea. 


Lemon Cream Scones
(adapted from Home Baked Comfort, Kim Laidlaw)
makes 8 scones
3 tbsp granulated sugar
grated zest and juice of 2 lemons
2 cups (10oz/315gm) all-purpose flour
2 tsp baking powder
1/4 tsp kosher salt
1/2 cup (4oz/125gm) cold unsalted butter, cut into small chunks
3/4 cup (6 floz/180ml) heavy cream, plus extra for brushing
1/4 cup (1oz/30gm) confectioners' sugar, sifted
Raspberry jam or your favourite jam, for serving (optional)

Position a rack in the middle of the oven and preheat to 400F (200C). Line a baking sheet with parchment paper.
In the bowl of a mixer, stir together the granulated sugar and lemon zest. Sift the flour, baking powder, and salt into the bowl and stir together. Scatter the butter over the top. Using the paddle attachment, mix on low speed until the butter is about the size of small peas, about 3 minutes.
Strain the lemon juice into a small bowl and measure out 1/4 cup (2 fl oz/60ml), reserving the rest. Add the 1/4 cup lemon juice and 3/4 cup cream to the bowl and mix just until the dough comes together. The dough will be thick but moist.
Dump the dough onto a floured work surface and gently press into a disk about 3/4 inch (2cm) thick. Cut into 8 equal wedges (or cut into circles using a 2-inch/5-cm biscuit cutter). Place the wedges on the prepared baking sheet, spacing them apart. Brush with cream. Bake until the scones are golden brown, 15-17 minutes. Remove from the pan and set on a wire rack to cool slightly.
While the scones are cooling, in a small bowl, stir together the confectioners' sugar and 2 teaspoons of the reserved lemon juice. Brush or drizzle the glaze over the scones. Serve warm with jam, if desired.


Cookbook Countdown


Monday, August 15, 2016

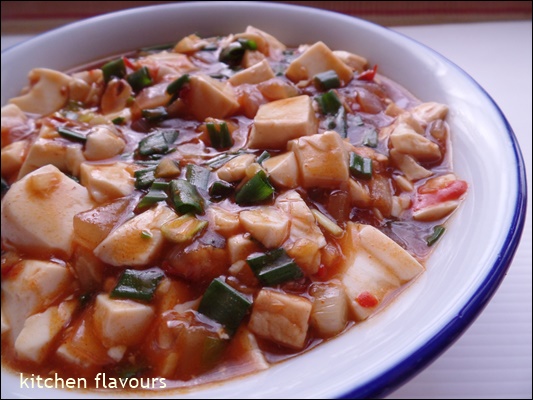
Salted Pork with Silken Bean Curd

Cookbook Countdown is a monthly cooking/baking event, which I'm co-hosting with Emily's Cooking (Makan2) Foray.  Everyone is welcome to join us. How does it work? To summarize, you may select a cookbook from your own cookbook collection, to cook or bake from each month. That selected book shall be your cookbook of the month. You may cook any recipes and as many recipes as you want from your selected book of the month. This is a fabulous way of using your cookbooks at least once! For more information on how to join Cookbook Countdown, please click here. 


To link to Cookbook Countdown #8, click here
To link to Cookbook Countdown Specials : BAKE, click here

************************

My selected cookbook for this month at Cookbook Countdown #8 is My Grandmother's Chinese Kitchen by Eileen Yin Fei-Lo. 


This simple, quick and easy tofu dish uses the salted pork which I've made a few days earlier.


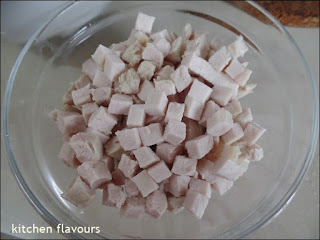
A few slices of the Salted pork, cut into small pieces.

This dish comes together very quickly, get everything ready beforehand. The ingredients for the sauce is mixed and keep aside. Ginger, garlic and white portion of scallions are first sauteed until the onions are soften. Add the salted pork, stir and cook for 2 minutes, then pour in the sauce, stir and bring to a boil. Add the chopped bean curd, mix and return to a boil. Turn off heat and stir in the green portions of the scallions. Transfer to a dish and serve immediately.


A quick dish to cook for a busy weekday dinner, very nice eaten with white rice. The family loves it.


Salted Pork with Silken Bean Curd
(adapted from "My Grandmother's Chinese Kitchen", by Eileen Yin Fei-Lo)
Sauce :
2 tablespoons hot bean sauce
1-1/2 tablespoons Chinkiang vinegar
1 tablespoon oyster sauce
1-1/2 tablespoons Shao-Hsing wine, or sherry
1/4 teaspoon salt
2 teaspoons light soy sauce
1 teaspoon sesame oil
pinch white pepper
1/2 cup chicken stock
1-1/2 tablespoons cornstarch

2 tablespoons peanut oil
2 teaspoons minced ginger
1 teaspoon minced garlic
1/2 cup onions, cut into 1/4-inch dice
1/4 cup scallions, white portions only, cut into 1/4-inch pieces
1/2 cup Salted Pork, cut into 1/8-inch dice
1 19-oz container soft bean curd, cut into 1/3-inch cubes
1/2 cup scallions, green portions only, finely sliced

Mix all ingredients for sauce, reserve.
Heat wok over high heat 30 seconds. Add peanut oil and coat wok with spatula. When a wisp of white smoke appears, add ginger and garlic, stir and cook 10 seconds. Add onions and white portions of scallions, mix and cook 3 minutes, until onions soften. Add pork, stir, cook for 2 minutes more. Make well in the mix, stir sauce, pour in, stir to mix, bring to a boil. Add bean curd, mix and return to a boil. Turn off heat immediately. Sprinkle with sliced green portions of scallions, mix well. Transfer to a heating dish and serve with cooked rice.


I'm linking this post with Cookbook Countdown #8 hosted by 


Sunday, August 14, 2016

Orange and Cardamom Jelly

This month's monthly featured chef at I Heart Cooking Clubs (IHCC) is Diana Henry. We have cooked with her two years ago, and now its time for a revisit. I have been thinking of making some orange jelly lately and found Diana Henry's, Orange Cardamom Jelly recipe from telegraph.com website.


Very easy and do not take that long to cook. Ingredients used are 2 cups of freshly squeezed orange juice, lemon juice, cardamom pods and sugar with added pectin. I have made some minor changes ; used only half of the lemon juice calls for as the oranges that I've used are sweet-sour. The sugar that was used in the recipe calls for sugar with pectin added. I don't have that, and doubt that I can find it here, and honestly I do not know exactly what that is, except that it is sugar with added pectin! A few weeks ago, I've bought a jar of Ball Real Fruit Classic Pectin, which I was so happy to find that it is now available here. Upon checking from the internet info on the usage of this pectin, I've read that to set 2 jars of half pints, the required amount is 1-1/2 tablespoons. Since this jelly recipe makes 2 half pints, I've used 1-1/2 tablespoons of the pectin mixed with about 200gm plus two tablespoons of sugar which I've reduced from the original 375gm. 


Orange juice, lemon juice, cardamom pods, sugar and pectin, mixed in a pot. 

Place pot over medium heat, stir to dissolve the sugar. Then increase the heat to high and let boil until setting point, 105C for jelly. I've used a candy thermometer and did the "wrinkle test" as well. Remove the cardamom pods and ladle the jelly into the prepared jars.

Instead of two full jars, I got one full jar of 250ml and about a third of a jar which is slightly smaller. I like that this recipe makes a small batch, which would be easier to finish up, otherwise there will be jars of jam cluttering up in the fridge! I love making jams and jellies, but it takes a while for us to finish it all up. 


Very nice! The fragrance of the cardamom is light and wonderful. This jelly is not too sweet, and sets up to the consistency that I like!  I would make this again, maybe next time I'll try with different spices, or even herbs. 


Made some Lemon Cream Scones, served with the Orange and Cardamom Jelly, with a cup of warm tea!


Orange and Cardamom Jelly
(adapted from telegraph, recipe by Diana Henry)
Makes 2 x 250ml jars
10 cardamom pods
500ml freshly squeezed orange or clementine juice
100ml lemon juice
375gm sugar with added pectin (jam sugar)

Put a small plate into the freezer (you'll need this later to test the set).
Sterilize two 250ml jars (wash in hot soapy water then put them in an oven preheated to 150C/gas mark 2 for a while, or put through a dishwasher and use when dry and still hot).
Crush the cardamom - you can keep it in the pods.
Put the juices, cardamom and sugar into a large pan and slowly bring to the boil. Stir a little to help the sugar dissolve, then whack the heat up and boil until it gets to setting point (105C on a sugar thermometer).
I do the "wrinkle test" as well as testing the temperature : when the mixture is very nearly at the right temperature take it off the heat and spoon a little on to the chilled plate.
Return it to the freezer for a few minutes. Push the mixture with your index finger. If it wrinkles, it is ready to pot; if it doesn't, put the pan back on the heat and bring to the boil again.
Skim the surface of the jam, remove the cardamom pods and ladle the jam into the warm jars.
Screw on the lids and label the jars.


I'm linking this post with I Heart Cooking Clubs (IHCC), theme for this week,
Monthly Featured Chef : Diana Henry


Friday, August 12, 2016

Salted Pork : Cookbook Countdown #8

Cookbook Countdown is a monthly cooking/baking event, which I'm co-hosting with Emily's Cooking (Makan2) Foray.  Everyone is welcome to join us. How does it work? To summarize, you may select a cookbook from your own cookbook collection, to cook or bake from each month. That selected book shall be your cookbook of the month. You may cook any recipes and as many recipes as you want from your selected book of the month. This is a fabulous way of using your cookbooks at least once! For more information on how to join Cookbook Countdown, please click here. 


To link to Cookbook Countdown #8, click here
To link to Cookbook Countdown Specials : BAKE, click here

************************


My selected cookbook for this month at Cookbook Countdown #8 is My Grandmother's Chinese Kitchen by Eileen Yin Fei-Lo.

Today I'm sharing a pork recipe which is not a dish by itself, but it is used as an ingredient in many ways. According to the author "Another of the significant foods that came from my grandmother's kitchen was preserved salted pork, which, like the preceding stocks and oils, was a food of necessity and versatility, its preparation the result of the lack of refrigeration".

There are a few recipes in the book that uses salted pork as one of its ingredients, so in order to try those recipes, I got to make the salted pork first. Usually, salted pork is made using slabs of fresh pork belly with fats and skin, but the author has utilize a good-sized pork loin, and has cure it exactly as it was done in her grandmother's kitchen.

This is very easy and simple to make, and the result is a fabulous chunk of salted pork. I've made half a recipe, about 1 kilo (2 pounds) of pork loin. 


Place the pork loin, 1 slice of fresh ginger lightly smashed, 4 peeled garlic cloves, and white portions of 6 scallions into a pot with enough water to cover pork loin. Let it come to a boil, then simmer with the lid slightly open, for 45 minutes to 1 hour. Remove pork loin and place in a bowl of ice water and let cool for about 5 minutes. Remove pork loin and place in a shallow bowl, sprinkle the salt all over, rubbing it well into the pork. Cover and refrigerate for at least one day before use. It can keep for about a week refrigerated, though it is not recommended to be frozen.


Use a few slices of the salted pork, cut into small cubes for a dish...coming up in next post.

I really like this salted pork. It is versatile, and very convenient to have in the refrigerator, as it can be used as an ingredient for many dishes! I like it so much, that I'm planning on making it again. I've used up all of the salted pork within a week, made a few dishes from it, all of which I will be sharing in my coming posts.


Salted Pork
(adapted from "My Grandmother's Chinese Kitchen", by Eileen Yin Fei-Lo)
4 pounds boneless pork loin
2 quarts cold water, or enough to cover pork
1 slice fresh ginger, 1 inch thick, lightly smashed
4 cloves garlic, peeled
6 scallions, white portions only
3-1/2 tablespoons salt

Place all ingredients, except salt, in a large pot. Cover and bring to a boil over high heat. Reduce heat, leave lid slightly open and simmer 45 minutes to 1 hour. Turn the pork halfway through simmer. Turn off heat. Remove pork from pot and place in a large bowl of ice water; allow pork loin to rest 5 minutes until it cools.
Remove pork from water. Place in a shallow dish and sprinkle salt over top, rubbing it well into the pork. Cover the pork and allow to refrigerate untouched for 1 day. It is now ready for use. The salted pork will keep refrigerated for at least a week.
In China, as I have noted, the heavy salting permitted us to keep the pork for at least a month. It should not be frozen because its fiber will soften and defrosting will cause the salting to run off.


I'm linking this post with Cookbook Countdown #8 hosted by 


Tuesday, August 9, 2016

Apricot Crumble Tart

This week's selected recipe at Cook The Book Fridays (CtBF), is Apricot Crumble Tart. CtBF is an online group of bloggers who are currently cooking through David Lebovitz's cookbook, My Paris Kitchen.

Apricot Crumble Tart is a delicious tart, which has a base made with buttery dough, the filling with fresh apricot slices and the top is a crumble made with whole almonds, sugar, flour, butter, vanilla extract and ground cinnamon.

For the dough, I have reduced the amount of sugar by half, as I prefer my tart bases to be less sweet. With the reduced amount of sugar, the dough turns out really well too. Secondly, I have used canned apricots for the filling instead of fresh. I did not reduce the sugar for the filling, using the full amount of 3 tablespoons as mentioned in the recipe. Even though the canned apricots are soaked in syrup, I was very surprised to find that the apricots are very tart and not sweet at all and have even sprinkled an extra tablespoon of sugar. I have omitted the almond extract for the filling. (my seldom used little bottle of almond extract has expired!  oops...)

The crumble topping is made by processing whole almonds in the food processor along with flour, brown sugar, vanilla extract, ground cinnamon until the almonds are broken up into very small pieces. Chopped cold butter is added in, and pulse until the mixture clumps together. Refrigerate until needed. 

I have omitted the salt for both the dough and the crumble topping since I've used salted butter.


The dough is press on the bottom of a greased 9" springform pan, covering a little less than halfway up the sides. Place the pan in the freezer for 30 minutes before blind bake by covering the dough with foil with pie weights for 20 minutes, then remove the foil and weights, then continue to bake for another 5-10 minutes until the dough is brown.

Add the filling to the baked shell evenly. Then crumble the topping over the apricots and continue to bake until the crumble topping is browned.


This tart smells incredibly delicious from the cinnamon, vanilla and the nutty almonds. I thought that this tart is really good! The base of the tart is buttery and tender. The apricot filling is tart and not too sweet, which is really nice. I love the crumble topping. It was fragrant from both the vanilla and cinnamon, buttery and nutty. The three layers are so perfect together! 


Served with a scoop (or two!) of vanilla ice cream! Yummilicious!

To view everyone's lovely tart at CtBF, the link is here. If you have the book or thought of getting one, please do, and join us! Full details here.