Thursday, September 11, 2014

Hungry Gopher's Delicious Kimchi

Do you like Kimchi? I do! Kimchi is one of my favourite! I love kimchi soups, and would usually have it at Korean restaurants. If you like pickles, chances are you are a fan of Kimchi.

I have been meaning to make Kimchi for ages, but could not find "gochugaru" (Korean chilli pepper flakes). When Hungry Gopher contacted me to inform about her Korean cooking blog, complete with videos on how to cook delicious Korean food, I wasted no time in visiting her blog right away! I saw her delicious Kimchi and knew then that I just have to make that! I then enquired about using "gochujang" (Korean Chilli Pepper Paste) instead of "gochugaru", and Hungry Gopher is so kind as to advise me that Kimchi is made using "gochugaru", instead of "gochujang" as the later is a chilli paste that is made with a mixture of ingredients, and it might affect the overall taste of the kimchi. "Gochugaru" is made from sundried Korean dried chilli peppers that has been milled into flakes or powder, and is an important ingredient in making Kimchi and other Korean dishes.

I have been looking for "gochugaru" for quite awhile, and finally found it at Aeon Big. Bought it and a few days later, after buying a large napa cabbage, I finally made my Kimchi!


"Gochugaru" (Korean Chilli Pepper Flakes). It is stated as powder on the pack...


but they are actually chilli flakes, bright red and vibrant! 


The napa cabbage. Did not take any photos on the making of the kimchi, as my hands are smudged with the kimchi paste! I wore a pair of disposable plastic gloves, as the kimchi paste is spicy hot. For the full tutorial on how to make your own kimchi, please do visit Hungry Gopher's delightful video from her blog, with step-by-step instructions and useful tips. She has other delicious Korean recipes, and I have already bookmarked her other recipes to try.


My first batch of kimchi... finished within two weeks, after giving some to my sisters.


My second batch which is fast finishing, am left with a small container. Going to make my third batch soon! Yum! Yum! My sister already made "bookings" for it! 


This Kimchi is really yummy! I have been nibbling pieces of it. Crunchy, spicy, a little sour, salty and just delicious! For the first batch, I left mine to ferment for 48 hours on my kitchen counter, until the sourish taste from the fermentation is to my liking. It was a long wait for me, as I was really eager to eat it! Well, I did taste a small piece on the first day, another piece after that, then one more piece! wink! Once the sourish is to my liking, I keep the kimchi in the refrigerator. You may however refrigerate it as soon as it is made, up to your preference. It will ferment further in the refrigerator, at a slower rate. I like mine a little sour, so I left it on my kitchen counter for two days before I refrigerated the whole container.

For the second batch, I fermented it for only one day, it all depends on the temperature and humidity of the day, how fast the fermentation takes place. As you know, our weather has been really blazing hot for the past few months!


I have been making some dishes using kimchi, and will be sharing those dishes in the coming weeks. And there's more recipes that uses kimchi on my list to try. Waiting for my third batch of kimchi making soon.

I'm only listing the list of ingredients needed for making the kimchi, for the full steps and directions and lots of useful tips, please visit Hungry Gopher and say hi! And if you have used this recipe (do try it, it's delicious!), please link it back to Hungry Gopher.


Kimchi
(source from hungrygopher.com)
1 medium napa cabbage (4-5 inch/10-13cm diameter of head)
coarse sea salt for brine

Starch Mixture :
1 cup water
3 tbsp all-purpose flour or sweet rice flour

Seasoning Mixture :
1-1/2 cups peeled, julienned Daikon radish (substitute with red radish if needed).
1/2 cup chopped green onion
1/2 cup gochugaru (Korean chilli pepper flakes)
* adjust amount to your preference of spicy level
1/4 medium onion
2-1/2 tbsp minced garlic
2-1/2 tbsp minced ginger
1 tbsp sugar
1 tbsp & 1/4 tsp fish sauce
(skip fish sauce if vegan recipe is required)
1 tbsp coarse sea salt
*use extra 2 tsp coarse sea salt if fish sauce is not used


Tuesday, September 9, 2014

Beans On Toast

"Lentils, Legumes & Pulses, Oh My", the theme for this week at I Heart Cooking Clubs (IHCC). 
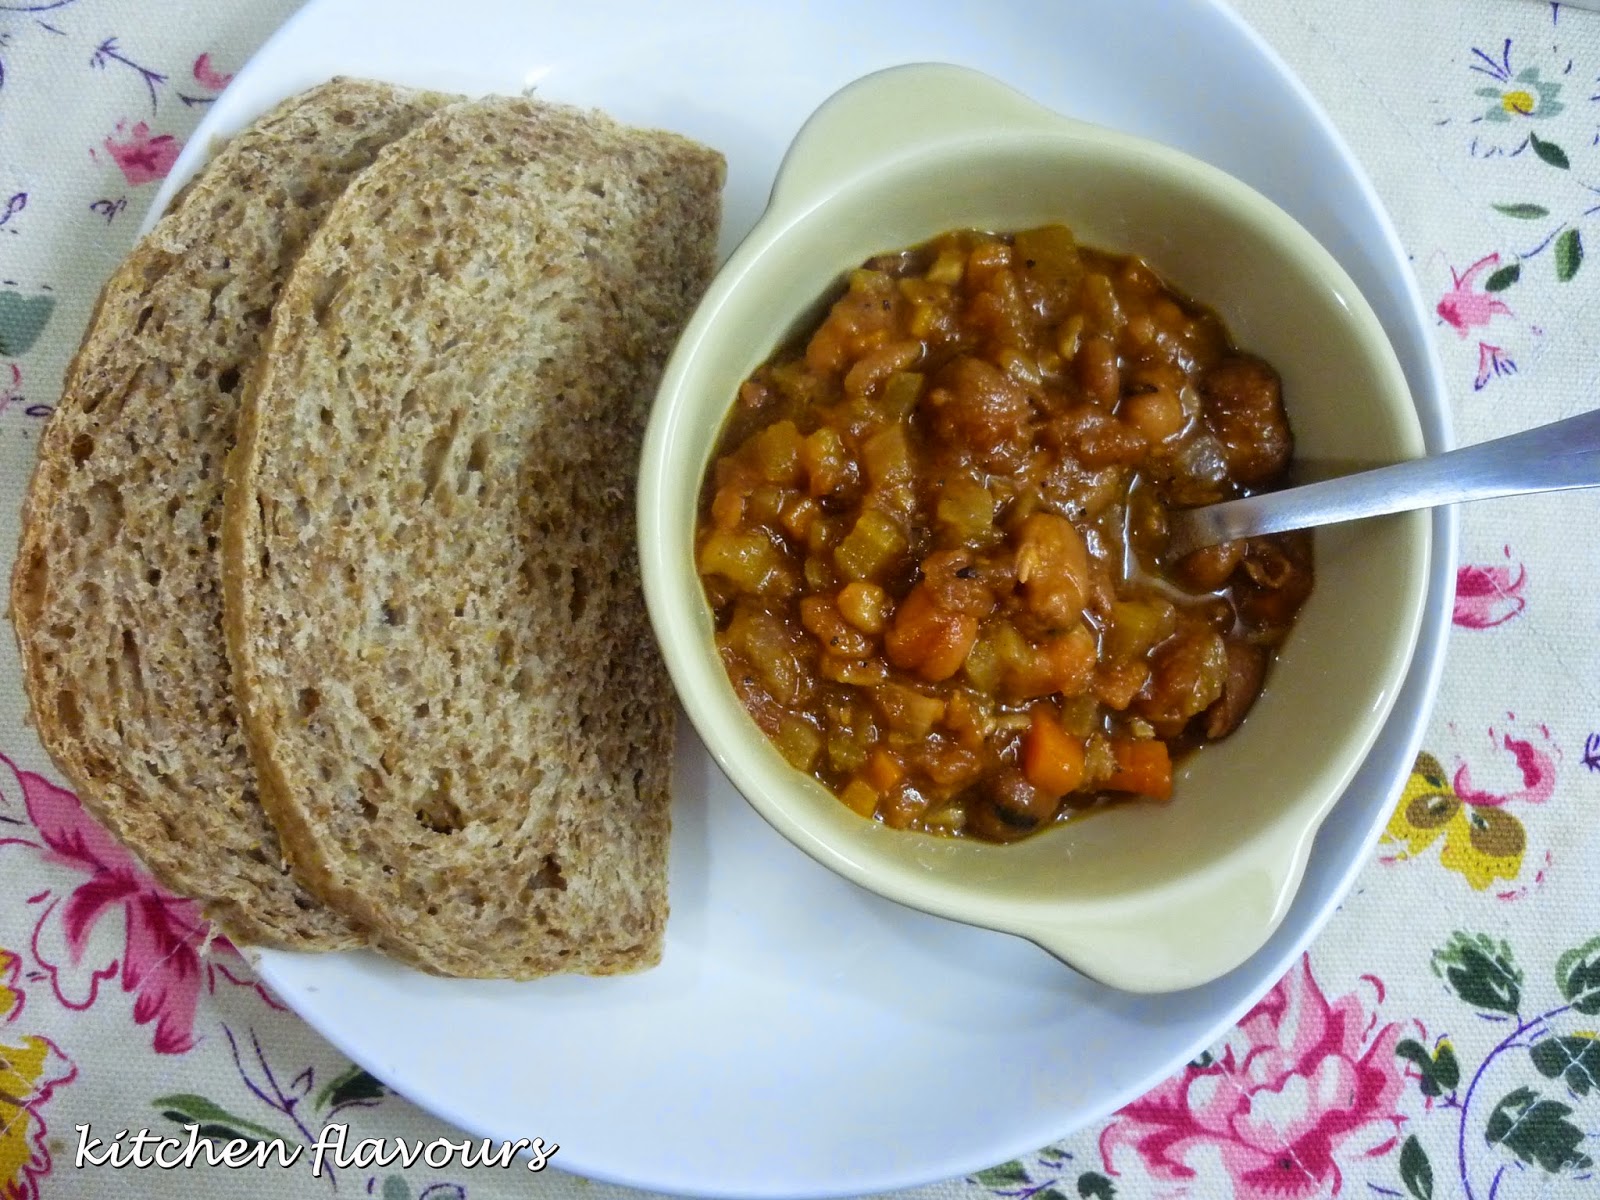
Made this simple bean dish, using canned fava beans. 


There's bacon, chopped celery, chopped carrots, onion and canned chopped tomatoes (I've used my last jar of homemade canned chopped tomatoes which I've made a couple of months ago). Nigel has used a teaspoon of black treacle for flavour, and since I do not have any, I have used black molasses instead, of which I've used about 2 teaspoons. I have used canned fava beans and made only half a recipe. This dish is done in 30 minutes. Fast, simple and tasty.


Nigel made this bean dish on a cold windy day, and served it with warm sourdough bread. But since I have some leftover homemade Part Whole Wheat Sandwich Bread from the day before (my previous post), I served it with this bean dish, for my lunch.


I can understand why Nigel is looking forward to have this "Beans On Toast" on a cold day. I served the beans piping hot with bread, and I had a very tasty and really nice lunch. I can just picture how cozy it is to have this hot steaming beans on a cold day!


Beans On Toast
(adapted from "The Kitchen Diaries II", Nigel Slater)
200gm lardons or cubed bacon or pancetta
an onion
a little rapeseed or olive oil
a rib of celery
2 small to medium carrots
two 400gm cans chopped tomatoes
two 400gm canned beans (pinto, haricot, butter beans etc)
1 teaspoon black treacle
a lump of sourdough loaf

Fry the lardons in a deep pan over a moderate heat. Peel and roughly chop the onion. When the lardons and their fat are golden, add the onion, together with a little rapeseed or olive oil if there seems too little fat in the pan. Chop the celery and carrots, add to the pan and leave to cook for a full five minutes, till fragrant and starting to soften. Add the tomatoes, simmer for ten minutes, then stir in the drained beans and simmer for another ten minutes. Season with the treacle, a little black pepper and some salt.
Warm the bread in the oven, tear into chunks and serve with the beans.
Enough for 2.

*********************

I'm linking this post to I Heart Cooking Clubs (IHCC), theme for this week "Lentils, Legumes & Pulses"

Grab button for IHCC


and

Cook-Your-Books


Sunday, September 7, 2014

Part Whole Wheat Sandwich Bread

This lovely bread from Nick Malgieri's book, "bread", is made with two different doughs, one with whole wheat flour and the other, plain dough. Each are mix separately and left to rest for one hour before they are kneaded together. According to him, "Getting the best texture possible in a whole wheat bread depends a lot on giving the ground bran in the flour time to absorb water and soften". His brilliant technique in letting both doughs rest separately, the whole wheat so that the brans have time to absorb the water, and the plain dough to ferment in that one hour, and by combining them together, the process is speeded up a little, there really is not much kneading at all.


Just a few minutes of kneading to mix the doughs together, until they are well mixed, it takes only 2 minutes when using the stand mixer attached with the dough hook. The dough is then left to rise. The risen dough is flattened to a disk, fold them as per the instructions in the recipe, and left to rise the second time. The dough is then pulled into an 8-inch square without deflating it too much, roll it jelly-roll style and placed in the prepared loaf pan for the final proofing. Bake as directed.


This bread is really nice. It has light dense crumbs, yet quite soft in texture. As you can see from the photo above, it bends easily when I hold it at one end. It makes a wonderful sandwich bread.


Part Whole Wheat Sandwich Bread
(adapted from "bread", Nick Malgieri)
Makes one 9-inch loaf
WHOLE WHEAT DOUGH :
2/3 cup/150gm warm tap water, about 100F
2 cups/270gm whole wheat flour (spoon into a dry-measure cup and level off)
2 tablespoons/30gm light brown sugar
1 tablespoon/15gm unsalted butter

WHITE DOUGH :
2/3 cup/150gm room-temperature tap water, about 75F
2-1/4 teaspoons/7gm fine granulated active dry or instant yeast
1-1/3 cups/180gm unbleached bread flour
1-1/2 teaspoons/9gm fine sea salt (I use 1 teaspoon)
One 9x5x3-inch loaf pan, buttered and the bottom lined with a rectangle of parchment paper
(oops... I did not line the bottom)

  1. For the whole wheat dough, pour the water into the bowl of an electric mixer fitted with the dough hook and add the whole wheat flour, sugar, and butter. Use a rubber spatula to stir the ingredients to a rough dough, then mix on the lowest speed until smooth, about 2 minutes. Remove the bowl from the mixer, cover it with plastic wrap, and rinse off the dough hook.
  2. For the white dough, mix the water and yeast in a medium bowl and use a rubber spatula to stir in the flour. The dough will be a little dry, but keep mixing until all the flour is absorbed. Cover with plastic wrap.
  3. Let both doughs rest for 1 hour.
  4. Scrape the white dough from its bowl over the whole wheat dough in the mixer bowl and mix on the lowest speed until the doughs are smoothly blended together, about 2 minutes. Sprinkle in the salt and increase the speed to low/medium and beat 2 minutes longer.
  5. Scrape the dough into a lightly oiled bowl and turn it over so that the top is oiled. Cover with plastic wrap and let rest for 30 minutes.
  6. Scrape the dough to a floured surface. Flatten the dough to a disk. Fold the two sides in to overlap at the middle, then roll the top toward you all the way to the end, jelly-roll style. Invert, flatten, and repeat. Return the dough to the bowl smooth (bottom) side upward, and let it rise until fully doubled, about 45 minutes longer, depending on the room temperature.
  7. Invert the dough to a floured surface and without deflating it too much, pull it into an 8-inch square. Tightly roll the dough toward you and place in the pan seam side down.
  8. Cover with oiled or sprayed plastic wrap and let the loaf proof until it has risen about 1/2 inch above the rim of the pan. Once it's close to the top of the pan, set a rack a notch below the middle level and preheat the oven to 400F.
  9. Place the loaf in the oven and immediately lower the temperature to 375F. Bake the loaf until well risen and deep golden and an internal temperature of at least 200F, 30 to 40 minutes.
  10. Unmould and cool on a rack on its side to prevent falling.

I'm linking this post with 

Cook-Your-Books