Showing posts with label Beth Hensperger. Show all posts

Tuesday, July 1, 2014

Old-Fashioned Potato Pancake

I made some "Old-Fashioned Potato Pancake" for one of our Sunday late morning breakfast. It was one of those lazy Sunday morning when everyone woke up late, and nobody wants to go out for breakfast in the hot weather! So guess who has to stand over the hot stove in this hot weather????   


Yummy Old-Fashioned Potato Pancakes


The russet potatoes are peeled and grated coarsely. Place them in a clean tea towel and wring out the excess moisture. I did not use any tea towel. I squeezed out the excess moisture using my hands, as I was lazy to wash my tea towel!  Wow, there's a lot of juice from the potatoes!
The squeezed potatoes are then mixed with eggs, bread crumbs (of which I have used up my leftover toasted homemade bread crumbs, about 3 tablespoons), onions, salt and pepper to taste. I have added in some fresh thyme leaves since I had some in my fridge which I wanted to clear. Mix them all up till evenly combined.
You could use some other herbs if you want to, like chopped fresh corianders, parsley, spring onions or even chives. If your kids do not like any herbs, then follow the original recipe, the pancakes would be just as good.


Heat up some oil in a frying pan, scoop about a heaping tablespoon of the potato mixture, place it in the pan, and use the back of the spoon to flatten it slightly,  and fry on both sides until golden brown.


Drain on kitchen paper towel to remove excess oil. This is the first one I fried, to check on the seasoning of salt and pepper. It was perfect, so mommy had the first pancake all to herself!

The pancakes I've made was about 3" across and yield about 15 pancakes.


These Old-Fashioned Potato Pancakes are really delicious.  Perfect for breakfast, lunch, or as a snack in a lunch box.


A simple breakfast but good! The next time when I make this again, I'll add in some chives or spring onions from the garden pot. And some chopped ham would be lovely too! :)


Old-Fashioned Potato Pancakes
(adapted from "The Bread Bible", Beth Hensperger)
makes eight 4-inch pancakes
2 tablespoons unsalted butter
2 medium shallots or tiny white boiling onions, finely chopped
3 large (about 1-1/2 pounds) russet potatoes
2 large eggs, lightly beaten
3 tablespoons matzo meal or fine dry bread crumbs
salt to taste
fresh thyme leaves, about 1 tbsp (my addition)
freshly ground black pepper, to taste
canola oil cooking spray

  1. In a large skillet, melt the butter over medium heat. Add the shallot and cook 1 minute to soften. Set aside.
  2. Peel and coarsely grate the potatoes for a total of 2-1/2 to 3cups. Place the grated potatoes in a tea towel and wring out the excess moisture. Place the grated potatoes in a large bowl and immediately add the eggs, matzo meal or bread crumbs, and onions, (and thyme leaves, if using). Stir to combine evenly. Season with salt and pepper.
  3. Wipe out the skillet with a paper towel and spray heavily with oil. Heat the skillet over medium-high heat. Using a heaping 1/4-cup measure for each pancake, pour the batter into the skillet and flatten each slightly with the back of a spoon. Cook about 5 minutes, turning once, until crisp and golden brown. Serve immediately.

***************************


1abbb-th_littlethumbups1-1

Wednesday, April 30, 2014

Squash Cloverleafs

I made this bread a few weeks ago and have forgotten to link to Little Thumbs Up event, ingredient for this month is Orange, and today is the last day for linking. I'm not late, not late, just on time! haha!


These are little rolls, baked in a muffin pan. They look really puffy cute to me!

Some of the ingredients used are pumpkin puree, orange zest and Grand Marnier. I've used my homemade pumpkin puree which I made a while back and kept them frozen in containers, really convenient to have some pumpkin puree around. The dough is easy to handle, soft but not at all sticky. 


When the dough has completed it's first rising, it is punched down and divided into 12 equal pieces. Each piece is then divided into three equal sized smaller pieces. Roll each small piece into a smooth round and place them in a greased muffin cup, 3 rounds to a cup, and allow to rise until doubled in size. I actually quite enjoy this step of popping the little rounds in the muffin cup. :)


They do not take long to rise, by the time I finished with the last one, the first few ones are already risen and puffy. 


Bake in a preheated oven at 400F, for 15 minutes until they are golden brown and the bottom sounds hollow when tapped with your finger.


It looks cute and puffy, and I like the golden yellow colour of these rolls.


Texture is soft, not the kind of fluffy soft, but they are soft. The taste of the orange really shines through, though it is a little too orangey for me! Haha! Maybe with a little bit less of Grand Marnier would be less orangey in taste.


These are nice when eaten warm with some salted butter, and the next day, they are good dunked in coffee! 


Squash Cloverleafs
(adapted from "The Bread Bible", Beth Hensperger)
Makes 12 cloverleaf rolls
1/4 cup warm water (105 to 115F)
1 tablespoon (1 package) active dry yeast
pinch of brown sugar
3/4 cup warm milk (105 to 115F)
1/4 cup orange liqueur, such as Grand Marnier
1 cup winter squash or pumpkin puree
3 tablespoons brown sugar
grated zest of 1 orange
2 teaspoons salt
6 tablespoons (3/4 stick) unsalted butter, melted
4 to 4-1/2 cups unbleached all-purpose flour or bread flour
melted butter for brushing (optional)

  1. Pour the warm water in a small bowl. Sprinkle the yeast and pinch of brown sugar over the surface of the water. Stir to dissolve and let stand at room temperature until foamy, about 10 minutes.
  2. In a large bowl using a whisk or in the work bowl of a heavy-duty electric mixer fitted with the paddle attachments, combine the milk, liqueur, squash, brown sugar, orange zest, salt, and butter. Add the yeast mixture and 2 cups of the flour. Beat until smooth and creamy, about 2 minutes. Gradually add the remaining flour, 1/2 cup at a time, until a soft dough that just clears the sides of the bowl is formed. Switch to a wooden spoon when necessary if mixing by hand.
  3. Turn the dough out onto a lightly floured work surface and knead until satiny and elastic, about 4 minutes, dusting with flour only 1 tablespoon at a time as needed to prevent sticking. This should be a very smooth dough.  If kneading by machine, switch from the paddle to the dough hook and knead for 3 to 4 minutes, or until the dough is smooth and springy and springs back when pressed. If desired, transfer the dough to a floured surface and knead briefly by hand.
  4. Place the dough in a greased deep container. Turn once to coat the top and cover with plastic wrap. Let rise at room temperature until doubled in bulk, about 1 hour.
  5. Gently deflate the dough. Turn the dough out onto the lightly floured work surface. Lightly grease twelve 1-5/8-inch round muffin cups. Divide the dough into 4 equal portions. Divide each of these portions into 3 equal portions, and shape these into small balls about the size of a walnut (about 1 inch in diameter). Arrange 3 balls of dough in each of the muffin cups. Cover loosely with plastic wrap and let rise until doubled in bulk, about 20 minutes.
  6. Twenty minutes before baking, preheat the oven to 400F. Place the muffin tins on a rack in the center of the oven and bake for 12 to 15 minutes, or until golden brown and the rolls sound hollow when tapped with your finger. Remove the rolls immediately from the muffin tins and transfer to cooling racks. Serve them warm.


*******************

This post is linked to the event, Little Thumbs up organised by Bake For Happy Kids, and My Little Favourite DIY, hosted by Ann of Anncoo Journal . 

Photobucket

and 

 photo 77951578-1914-4b72-8eda-9e40a91183ac_zps331eb4b4.jpg


Saturday, October 19, 2013

French Bread (Pain Ordinaire)

I love eating baguettes. Usually I would grab one or two when I do my grocery shopping at Tesco, as it was really cheap, at RM1.99 each. Those baguettes would usually end up as toasted garlic bread for the kids breakfast during the school week. 

The last time that I've made baguette was years ago. There are quite a number of recipes for baguettes from my cookbooks collection, and I've chosen this simple one first, hopefully will be trying out the others in due time.

Original instructions from the recipe below gave the option of either using the stand mixer to knead the dough or knead manually by hand. I have however, used the bread machine instead.

Place the ingredients in the bread machine pan (refer to my notes below). Select Quick Dough cycle. Press Start. This cycle does the kneading for 6 minutes. At the end of the cycle, press Start again, and repeat one more time. In total, the bread machine has done 18 minutes of kneading. Adjust accordingly to the condition of the dough, check to see if it requires to be kneaded longer.  Remove the dough , shape into a round and place in a greased bowl, turning it over once so the oiled side is at the top. Cover with greased plastic wrap and leave to rise until tripled in bulk. Proceed with step 5 as per the recipe below.


The baguette pan, which I bought almost two years ago and have never used it before! (smiling sheepishly!). I sprayed the pan with some oil and left the dough to rise (the second rising) on the pan, covered with greased plastic wrap until doubled in size. Make some scores on the risen dough. Recipe calls for the baguettes to be glazed with some egg wash, I have glazed one baguette (the top one) and leave the other unglazed, just wanted to see the difference after baking. Place the whole pan with the dough into the oven for baking, easy, peasy!

For the baking of these baguettes, I have preheated the oven with a roasting tray at the most bottom rack, and as soon as the dough was placed in the oven, I added about 1 cup of ice cubes into the roasting tray, and immediately close the oven door. The steam will make a crispy crust during baking.


The baked baguettes.
Which do you think looks better, the glazed one (left baguette) looks very nice and crusty with a golden brown crust while the unglazed baguette looks more natural and rustic.


These baguettes have a crusty crispy crust and soft bread texture. Very nice!  Especially good when eaten warm.


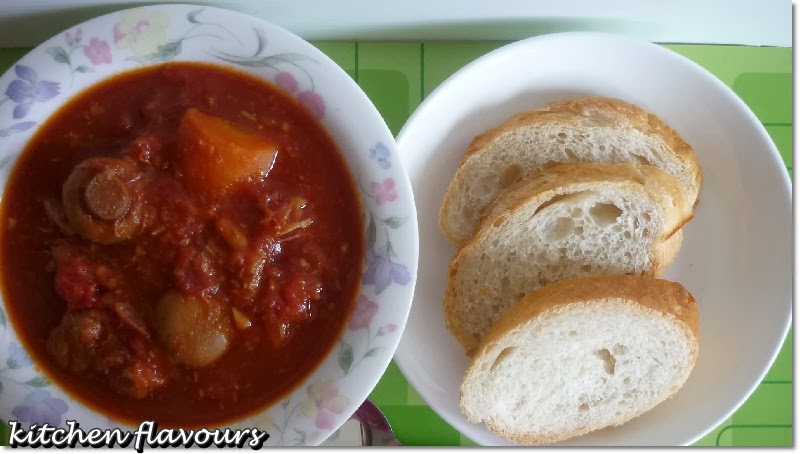
We ate these baguettes with some meat stew! Delicious!


Note : my changes in blue for making 2 baguettes and please refer to my notes at the bottom for my adaptation of kneading the dough in the bread machine.

Pain Ordinaire (French Bread)
(adapted from "The Bread Bible", Beth Hensperger)
Makes 3 long baguettes or round loaves
2 cups warm water (105 to 115F) (330 ml)
1-1/2 tablespoons (1-1/2 packages) active dry yeast (1 tbsp)
1 tablespoon sugar (2/3 tablespoons)
3 cups bread flour (2 cups)
1 tablespoon salt (scant 2 teaspoons)
about 3 cups unbleached all-purpose flour (I use 2 cups bread flour)
cornmeal, for sprinkling
1 large egg beaten with 2 teaspoons water, for glazing

  1. In a large bowl using a whisk or in the bowl of a heavy-duty mixer fitted with a paddle attachment; pour in the warm water and sprinkle the yeast and sugar over the surface of the water. Stir until combined. Let stand at room temperature until dissolved and foamy, about 10 minutes.
  2. Add 2 cups of the bread flour and the salt. Beat hard until smooth, about 3 minutes. Add the remaining 1 cup bread flour and most of the all-purpose flour, 1/2 cup at a time, until a shaggy dough that clears the sides of the bowl is formed.
  3. If kneading by hand, turn the dough out onto a lightly floured work surface and knead until soft, silky, and resilient, 5 to 8 minutes, dusting with flour only 1 tablespoon at a time as needed to prevent sticking. The dough should not be sticky. If kneading by machine, switch to the dough hook and knead for 1 to 3 minutes, or until dough is smooth and springy.
  4. Place the dough in a lightly greased deep bowl. Turn once to coat the top and cover with plastic wrap. Let rise in a cool area until tripled in bulk, 1-1/2 to 2 hours. If you have time, punch down the dough and allow it to rise again for about 1 hour. The dough may also rise in the refrigerator overnight.
  5. Gently deflate the dough. Turn it out onto a lightly floured work surface. Grease or parchment-line a baking sheet and sprinkle with cornmeal. Divide the dough into 3 equal portions. Knead in more flour now if the dough seems sticky. Shape the portions into tight round balls for boules. Or flatten each portion into a rectangle for baguettes. Roll each rectangle up tightly with your thumbs to form a long sausage shape ; roll back and forth with your palms to adjust the length. Place the loaves 4 inches apart on the baking sheet.
  6. Quick method : Directly after forming the loaves, slash the tops diagonally no deeper than 1/4 inch and brush the entire surface with the glaze. Place in a cold oven on the middle or lower rack. Turn the oven thermostat to 400F and bake for 35 to 40 minutes, or until crusty and the loaves sound hollow when tapped with your finger. Eat immediately or transfer the loaves to a cooling rack.
  7. Standard method : Preheat a baking stone at 450F for at least 20 minutes, if using ; otherwise, preheat the oven to 400F. Cover the loaves loosely with plastic wrap and let rise until puffy and doubled, about 30 to 40 minutes. Slash the tops of the loaves diagonally no more than 1/4 inch deep and brush the entire surface with the glaze. Spray a mist of water into the oven, or throw a few ice cubes onto a gas oven floor to crisp the crust, if desired. Turn the oven thermostat to 400F if using a stone and bake for 35 to 40 minutes, or until crusty and the loaves sound hollow when tapped with your finger. Eat immediately or transfer the loaves to cooling rack.
Kitchen Flavours notes:
To knead the dough using the bread machine
Place water in the bread pan, add flour (all 4 cups). Place salt in one corner, sugar in another corner and make an indentation in the center of the flour. Add the instant yeast in the indentation. Select Basic Dough. Bread machine will knead for 6 minutes. Press Start again, and repeat one more time, in total, 18 minutes of kneading. Remove dough, shape into a round, place in an oiled deep bowl, turn over to coat, cover with greased cling wrap and leave to rise until tripled in bulk. Proceed with the recipe as step 5 above.
#103/100

I'm linking this post with :

 photo 77951578-1914-4b72-8eda-9e40a91183ac_zps331eb4b4.jpg


Saturday, July 27, 2013

Onion Tart

This delicious Onion Tart recipe is from the book, "The Bread Bible" by Beth Hensperger. According to the author, this is a relative of quiche, an onion custard baked in yeasted bread dough. The topping is actually just like a quiche's with the base of a yeasted bread. I supposed it is called a tart because it is baked in a tart pan? 


Looks like a quiche, doesn't it?


How this is made :

  1. I used the bread machine to do the kneading. If you would like to knead by hand or by using the stand mixer, refer to the instructions in the recipe below. The dough was really wet, I was actually expecting that, and forgotten to reduce the amount of liquid when I mixed the dough. So I added in another 1/4 cup of bread flour during the kneading cycle, and ended up using 3/4 cup more than the recipe calls for, which total to 3-3/4 cups. It was still sticky but decided not to add anymore flour after that. I used the "Quick Dough" cycle in my bread machine, where the machine kneads the dough for 6 minutes, and I have repeated the cycle totalling 3 rounds, that comes to 18 minutes of kneading. I have reduced the salt from 1-1/2 tablespoons to 1-1/2 teaspoons and the yeast from 1 tablespoon to 3/4 tablespoon.
  2. Remove dough from bread machine pan, and flour your hands and work surface as the dough is soft and sticky. Shape into a round and place in greased large bowl, turning over once so the top of dough is oiled, cover bowl with greased cling wrap and leave to rise until tripled in size.
  3. Punch down dough gently, divide dough into two, freeze one for later use, and roll out the other half of the dough to fit a round tart pan or pizza pan. I have used a 11" pizza pan and only fill the base of the pan, not the sides. And also I have used slightly more than half of the total dough, as I wanted a thicker base.
  4. Prepare the onion filling as per instructions in the recipe below. I have added in 2 slices of bacon, chopped to pieces and fry lightly for a couple of minutes, add that to the onions with 1 teaspoon of dried oregano. Scatter the onion and bacon mixture over the rolled dough in the pan.
  5. I have made my own creme fraiche for the custard, mixed with some eggs, salt and black pepper. Pour this mixture over the onion filling.
  6. Bake in a preheated oven for 35 minutes at 375F.

The onion filling will puffed and turn golden brown when cooked. Just like a quiche.


Only difference is, the base is yeasted bread. And the bread is very soft, fluffy and so delicious with the onion filling. The onions which are fried until caramelized, brown and soft are very sweet and delicious, that is if you like onions.


These are so good eaten warm, about 10 minutes right after baking.


According to the book, this can be eaten hot, warm or at room temperature. I have no idea if these are as good at room temperature. We finished everything in less than 20 minutes, while it was still warm and delicious! This bread tart do reminds me of focaccia.


Two days later, I took the other frozen dough out from the freezer and was surprised that it was not completely frozen, maybe because I store it at the compartment of the freezer door and not cold enough? Left it on the kitchen counter for half an hour, pat it into a 8" tart pan, top with some cheese, and use some leftover spaghetti sauce as the topping, and scatter more cheese over. Bake for 35 minutes at 375F.


It was yummy! The bread is so soft! You can see how fluffy the bread is from the photo above. This is like eating pizza! Made this for the kids' after school lunch! It is definitely a winner! I'll be making the dough again to store in the freezer, simply a breeze for a quick meal. A definite keeper recipe, I can see lots of future baking from this book. 
Onion Tart
(adapted from "The Bread Bible", Beth Hensperger)
Tart Dough (enough for two 12" tarts or 1 shallow 11-by-17-inch sheet)
1 tablespoon (1 package active dry yeast) (I use 3/4 tbsp)
1 tablespoon sugar
1 cup warm water (105 to 115F)
2-3/4 to 3 cups unbleached all-purpose flour or bread flour (I used in total 3-3/4 cups bread flour)
1-1/2 tablespoons salt (I use 1-1/2 teaspoon salt)
2 tablespoons corn oil
1 large egg, at room temperature, slightly beaten

Onion Filling
4 large onions, thinly sliced
8 tablespoons (1 stick) unsalted butter (I use 2 tbsp canola oil)
1 cup sour cream or creme fraiche (I use 3/4 cup homemade creme fraiche)
3 large eggs, at room temperature
pinch of salt
1 teaspoon freshly ground black pepper
2 slices bacon (my addition)
1 tsp dried oregano (my addition)

  1. To make the tart dough : Put the yeast, a pinch of the sugar, and 1/2 cup warm water in a small bowl. Stir until dissolved and let stand at room temperature until foamy, about 10 minutes.
  2. In a large bowl using a whisk or in the work bowl of a heavy-duty electric mixer fitted with the paddle attachment, combine 1 cup flour, 1 tablespoon sugar, and the salt. Add the remaining water, oil, egg, and yeast mixture. Beat hard until smooth, about 3 minutes. Add the flour, 1/2 cup at a time, and beat with a wooden spoon until a shaggy dough that just clears the sides of the bowl is formed.
  3. Turn the dough out onto a lightly floured work surface and knead until smooth, resilient, and no longer sticky, about 5 minutes, dusitng with flour only 1 tablespoon at a time as needed to prevent sticking. Shape into a ball. (If kneading by machine, switch from the paddle to the dough hook and knead for 3 to 4 minutes, or until the dough is smooth and springy and springs back when pressed. If desired, transfer the dough to a floured surface and knead briefly by hand.
  4. Place the dough in a greased bowl. Turn once to grease the top and cover with plastic wrap. Let rise at room temperature until tripled in bulk, 1 to 1-1/2 hours.
  5. To make the onion filling : In a skillet saute pan over low heat, cook the sliced onions in butter until golden and soft, about 20 minutes. Let cool to room temperature. Just before shaping dough, combine sour cream, eggs, salt, and pepper in a bowl ; add onions.
  6. Gently deflate the dough. Turn out the dough onto a lightly floured work surface. Grease a springform pan or tart tin with a removable bottom. Divide dough into 2 equal portions; freeze 1 for later use. Roll out the remaining portion to fit the pan or tart in. Pat into the bottom and up the sides. Fold any extra dough down. Pour the onion mixture over the dough.
  7. Twenty minutes before baking, preheat the oven to 375F. Place the pan or tin on a rack in the center of the oven and bake for 35 minutes, or until crispy and golden. The onion filling will be delicate brown and puffy. Let stand 10 minutes before removing the sides of the pan to cool before cutting into wedges.


kitchen flavours notes :
My changes :
  • Use the bread machine to do the kneading for 18 minutes (3 cycles of 6 minutes of kneading, using function "Quick Dough"). Place the wet ingredients at bottom of bread pan, spoon the flour over and place salt, sugar at the corners and yeast in the centre. The dough mixture was very wet, added in 1/4 cup of bread flour at a time, total amount of flour used, 3-3/4 cups. Note to self : to reduce the amount of liquid the next time.
  • Reduced salt to 1-1/2 teaspoons for the dough and the yeast to 3/4 tablespoon. For the onion filling, added in 2 slices bacon, chopped and fry for a couple of minutes. Mix the cooked onions, bacon and 1 teaspoon of dried oregano. Just before baking, scatter the filling on the rolled dough in pan, and pour over the eggs and creme fraiche mixture. 
  • I wanted a thicker dough, so I have used slightly more than half of the kneaded dough for one round pan of 11", did not pat the dough to the sides of pan, I just filled the base of pan with the dough.
#66/100