Showing posts with label Vegetables. Show all posts

Tuesday, February 19, 2019

Stir-Fried Greens With Dried Shrimps

A simple, stir-fried greens using one of my favourite vegetable, cabbage. This is one of the stir-fry cabbage dishes that I sometimes cook at home and was pleasantly surprised to find this similar recipe in Every Grain of Rice cookbook.  


The dried shrimps added an umami fragrant taste to the dish. This stir-fried cabbage dish makes an excellent side dish to rice meal, and is great with plain congee.

Stir-Fried Greens With Dried Shrimps
(adapted from "Every Grain Of Rice" by Fuchsia Dunlop)
400gm spring greens, or cabbage of your choice
4 spring onions, green parts only
4 tbsp cooking oil or lard
6 tbsp thin dried shrimps
2 tbsp light soy sauce
salt

Discard any fibrous outer leaves and cut out and discard the thick stem of the greens. Shred the leaves. Cut the spring onion greens into thin slices.
Add 3 tbsp of the oil or lard to a seasoned wok over a high flame and swirl it around. Add the shrimps and stir-fry until crisp and fragrant. Remove the shrimps from the wok and set aside.
Return the wok to the stove with the remainder of the oil or lard, add the greens and stir-fry over a high flame until hot, barely cooked and still a little crisp. Return the shrimps, adding the soy sauce and salt to taste (you may not need any salt because of the saltiness of the shrimps and soy). Finally add the spring onions, stir a couple of times, then turn on to a dish and serve.


Cookbook Countdown


Monday, January 21, 2019

Rosemary-Roasted Carrots with Brown Sugar

A simple carrot side dish. Makes a delicious side to roasts. Try to get the smaller carrots about the same size. Peel and sliced them in half, coat with the mixture of chopped rosemary, butter, brown sugar, salt and chili powder. Roast in the oven under the carrots are tender, about 30 minutes.


Sweet, tender delicious carrots. I served it alongside some fried chicken and broccoli. Parsnips and sweet potatoes can be used instead of the carrots. 

Rosemary-Roasted Carrots with Brown Sugar
(Williams-Sonoma Chicken Night by Kate McMillan)
serves 4 :
2 tablespoons unsalted butter (at room temperature)
2 tablespoons dark brown sugar (I use 1 tablespoon)
1 tablespoon fresh rosemary leaves, chopped
1/2 teaspoon kosher salt
1/4 tsp chili powder
1 lb (500gm) carrots, peeled, trimmed and cut into 1/2-inch (12mm) pieces or halved lengthwise

Preheat the oven to 400F (200C).
In a small bowl, beat together the butter, brown sugar, rosemary, salt, and chili powder. Arrange the carrots in a single layer on a baking sheet. Using your hands, spread the butter mixture all over the carrots.
Roast the carrots, turning once about halfway through, until fork tender, 25-30 minutes. Serve right away.


I'm linking this post with Cookbook Countdown #37

Friday, November 9, 2018

Maple-Syrup-And-Mustard Brussels Sprouts

Recipe No.2 from Everyday Dorie, selected for this week at Cook the Book Fridays, Maple-Syrup-And-Mustard Brussels Sprouts.


I did not have any maple syrup, so I've used honey because Dorie says we can 😃. Instead of steaming the brussels sprouts, I microwaved them, with a tablespoon or two of water sprinkled over,  along with the sliced shallot, garlic, salt and black pepper, on high for 2 minutes. Meanwhile fry the bacon until crisp, remove and keep aside.  The brussels sprouts are then stir-fry in the bacon fat (I did not remove all of the fat! Ha!) until they are are charred and crisp-tender. I've used a mixture of both smooth Dijon and grainy mustard, mix-in with the honey. These are added to the brussels sprouts, stir until they are coated with the mustard-honey glaze. Stir in the crumpled crispy bacon. And as suggested by Dorie, I added a splash of balsamic vinegar in the final stir. 

This is delicious. Love the flavours of the honey, mustard, bacon and the crisp-tender texture of the brussels sprouts. I actually ate this for lunch on its own! And would definitely make this again as a side dish to a meal. Yums!

Please do visit my friends' links at CtBF and see what they think of "Maple-Syrup-And-Mustard Brussels Sprouts".


Monday, August 20, 2018

Zucchini-Cornmeal Cakes

These cake patties are originally served with Mint Chutney and Yoghurt, but I have taken the easier route of serving them with Thai Chilli Sauce instead.


The only spice used is a small amount of ground cumin (1/4 tsp) , but I have added more of it. Grated zucchini are mixed with some salt, then let sit for 10 minutes. Squeezed out the juice as much as possible, and there will be a lot of juice. Then mix the squeezed zucchini with the rest of the ingredients as per the recipe instruction. Make 2 tablespoons size balls, place in hot oil, flatten with the back of the ladle and fry until brown on both sides. Drain on absorbent paper towel.


I serve the Zucchini-Cornmeal Cakes with Thai Chilli Sauce and some fresh cilantro. The cornmeal adds an interesting texture. Nice cakes.

Zucchini-Cornmeal Cakes
(Dinner : Changing The Game, by Melissa Clark)
2 medium zucchini, grated (about 3 cups)
1 teaspoon kosher salt, plus more as needed
1/2 cup cornmeal
1/2 cup all-purpose flour
1 teaspoon baking powder
1/2 teaspoon baking soda
1/4 teaspoon ground cumin
2 large eggs
3 tablespoons unsalted butter, melted
3 large scallions (white and green part), minced
1 small garlic clove, grated on a microplane or minced
extra-virgin olive oil, for frying

  1. In a large colander, toss the grated zucchini with 1/2 teaspoon of the salt. Let it sit in the sink (or in a bowl) for 10 minutes to drain.
  2. In a large bowl, combine the cornmeal, flour, baking powder, baking soda, cumin, and remaining 1/2 teaspoon salt; mix to combine.
  3. In a separate bowl, whisk the eggs with the melted butter. Then add the egg mixture to the cornmeal mixture, whisking to make a thick batter. Squeeze as much of the remaining moisture out of the salted zucchini as possible, and then add the zucchini, scallions, and garlic to the batter; fold everything together gently.
  4. In a large skillet over medium heat, add just enough olive oil to coat the bottom of the skillet. When the oil is hot, drop as many 2-tablespoons-sized balls of the zucchini batter into the skillet as you can to form a single layer, without the balls touching. Flatten each one with the back of a metal spoon. Fry until they are deep golden brown, 3 to 4 minutes per side. Transfer the zucchini cakes to a paper-towel-lined plate to drain, sprinkling them with salt to taste while they're still hot. Repeat with remaining batter.


I'm linking this post with Cookbook Countdown #32 hosted by 
Kitchen Flavours and Emily's Cooking (Makan2) Foray
Theme for August 2018 : Cooking With Spice!


Wednesday, August 8, 2018

Simply Spiced Spring Cabbage

As it is called, this is an easy simply spiced spring cabbage dish. A side dish that is usually served as part of a meal with other main dishes. The author says that for a bit of variation, small cubes of potatoes can be added in. 


The author suggested that this dish is delicious when eaten with chapatti and yoghurt. I have however serve it alongside a dish of chicken curry, another recipe of hers, with basmathi rice. 

Simply Spiced Spring Cabbage
(Made In India, by Meera Sodha)
2 tablespoons rapeseed oil
2 teaspoons mustard seeds
1 large onion, finely sliced
1 white cabbage (around 700gm) finely shredded
1/2 teaspoon ground turmeric
1 teaspoon salt
1 teaspoon ground cumin
3/4 teaspoon chilli powder
1 tablespoon tomato puree

Put the oil into a wide-bottomed, lidded frying pan on a medium heat and, when it's hot, add the mustard seeds. When they start to pop, add the onion and fry for around 6 to 8 minutes, until it is nice and soft.
Add the shredded cabbage and 50ml of warm water, stir and pop the lid on. Allow to cook through for 5 minutes, then add the turmeric, salt, cumin, chilli powder and tomato puree. Stir, pop the lid on again and cook for another 6 to 8 minutes, until the cabbage is really soft without any crunch left in it.

I'm linking this post with Cookbook Countdown #32 hosted by 

Thursday, May 31, 2018

Okra with Garlic, Chilies, and Fermented Black Beans

A simple, very tasty Okra dish. I harvested some okras from my garden pots and found a recipe in this lovely book of Cathy Erway's, Food Of Taiwan, to use up those lovely okras.

This dish is best made with tender fresh okra. According to the author, instead of okra, crisp green beans can be used instead.


Very easy and quick stir-fry okra dish, and it is very tasty. A definite repeat!

Okra with Garlic, Chillies, and Fermented Black Beans
(The Food Of Taiwan, Cathy Erway)
2 tablespoons vegetable or peanut oil
2 garlic cloves, finely chopped
2 to 3 small fresh red chillies, finely sliced
1/2 pound okra pods
salt to taste
1 tablespoon fermented black beans
3/4 cup water

Heat the oil in a large skillet or wok with a lid over medium-high heat. Add the garlic and chillies and cook, stirring, just until fragrant, about 1 minute. Add the okra pods along with a pinch of salt and cook, stirring occasionally, until their colour just deepens, about 30 seconds. Stir in the black beans, Add the water and bring just to a boil. Cover and cook until the okra is tender, 3 to 4 minutes. (Taste the okra to test for doneness). Season with additional salt if desired and serve immediately.


I'm linking this post with Cookbook Countdown #29 hosted by 

Friday, May 25, 2018

Stuffed Bitter Melon

Bitter melon or bitter gourd is an acquired taste, either you love it or you hate it. In my house we love bitter melon except for my daughter, who does not like the bitter taste of the melon.


Bitter melon is sliced to about 1/2 inch thickness, remove the seeds and white pith in the centre, then blanched in salted water for 2 to 3 minutes, drain, let cool a little and stuffed with pork-dumpling style filling. Place on steaming tray and steam over high heat for 10 minutes or until the filling is cooked through. 


These are for my daughter, made with Fuzzy Melon or also known as Hairy Gourd, and it works well too. Both the stuffed bitter melon and fuzzy melon dish are very tasty. 


Stuffed Bitter Melon
(The Food of Taiwan, Cathy Erway)
for the stuffing
1/2 pound ground pork
2 whole scallions, trimmed and finely chopped
1 teaspoon light soy sauce
1 teaspoon sesame oil
1/2 teaspoon cornstarch
1/4 teaspoon salt
1/4 teaspoon ground white pepper

2 medium bitter melons
1 to 2 cups hot stock (optional)

For the stuffing :
In a large bowl, combine the pork, scallions, soy sauce, oil, cornstarch, salt, and white pepper. You can do this up to a day ahead and store, covered, in the refrigerator.

Trim the ends from the melons and slice into rounds about 1/2-inch thick. Entirely scoop out the seed pockets from the centres of the slices. Bring a large pot of salted water to a boil and submerge the slices. Blanch for 2 to 3 minutes, then drain.
Arrange the melon slices on a flat plate that fits inside a steamer (or directly onto a bamboo steamer rack lined with parchment paper). Fill each centre completely with a scoop of the filling mixture. Steam until the filling feels firm to the touch and is entirely cooked through, 8 to 10 minutes. Transfer carefully to a deep serving dish. If desired, lade the stock in a shallow pool at the bottom of the dish for serving.

I'm linking this post with Cookbook Countdown #29 hosted by 


Tuesday, May 22, 2018

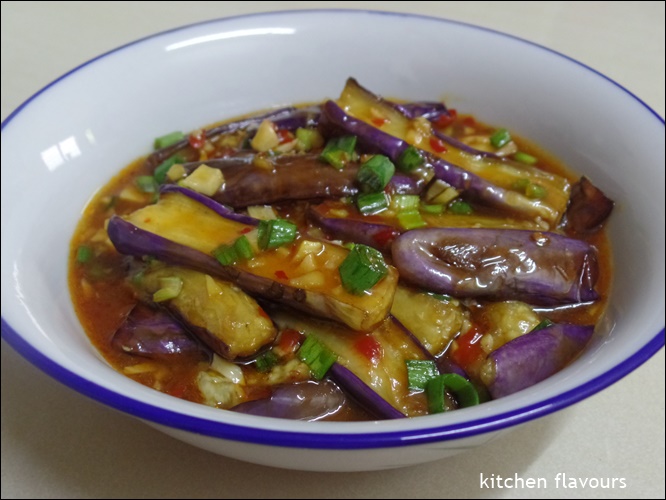
Fish-Fragrant Aubergines

A simple flavourful dish, what we would call, an "everyday dish". Best eaten with fluffy rice and great with plain congee too. 


The brinjals I used are from my garden pot, harvested when the brinjals are young and tender. I pan-fry the pieces of brinjals cut into batons, in a little oil on both sides. The sauce is then cooked and the brinjals are stirred in for a few minutes until the sauce thickens.

If you would like to give it a try, the recipe can be found here
(or from Every Grain of Rice by Fuchsia Dunlop)

I'm linking this post with Cookbook Countdown #29 hosted by 


Friday, March 16, 2018

A Stir-Fry of Greens and Mushrooms

This week at I Heart Cooking Clubs (IHCC), we are cooking Greens! 
I'm cooking with Nigel Slater for this week's theme. I have a few bunches of pak choy in my garden containers that are ready to be harvested and they are perfect for this simple stir-fry dish.


Is pak choy a spring green? No idea! Ha! Instead of shredding the greens finely, I've cut them to about 2" or so in lengths. I have used fresh shiitake mushrooms and have omitted the sugar and dark soy sauce.  The pak choy already tastes great without the sugar and they do not need the dark soy sauce to cover their fresh greenness! 😁 


A simple and tasty stir-fry greens. Makes a great side dish with some fried rice and of course, with a fried egg for a complete and filling meal!


A Stir-Fry of Greens and Mushrooms
(The Kitchen Diaries II, Nigel Slater)
serves 2
3 shallots
4 cloves garlic
2 red hot chillies
150gm small closed-cup mushrooms
2 heads spring greens
3 tablespoons rapeseed or other flavourless oil
2 teaspoons grated fresh ginger
2 tablespoons fish sauce
1 teaspoon caster sugar (omitted)
a little dark soy sauce (omitted)
a handful of roughly torn coriander leaves

Peel and finely shred the shallots. Peel the garlic and slice it finely. Halve the chillies, discard the seeds and cut the flesh into thin shreds. Cut the mushroom in half. Shred the greens finely. This is easier when the leaves are piled on top of one anotheer and rolled up like a cigar.
Get a wok or large, thin-bottomed pan really hot. Pour in the oil and then, just as it starts to smoke, add the shallots, garlic, chillies and ginger. Stir-fry them for thirty seconds or so, till they are fragrant and just beginning to colour. Add the mushrooms and let them colour appetizingly, moving them and the aromatics around the pan regularly. Add the shredded greens and continue cooking till they have softened but are still bright and vibrant in colour - a matter of two or three minutes. Add the fish sauce, caster sugar and soy. Wait till everything is sizzling, then throw in the coriander, toss and stir, and eat immediately.


I'm linking this post with I Heart Cooking Clubs, theme for this week
Monthly Featured Ingredient : Greens !

and 

I'm linking this post with Cookbook Countdown #27 hosted by 


Saturday, February 3, 2018

String Beans with Shallots

I Heart Cooking Clubs (IHCC), theme for this week is How Good Does That Look?, Ina's popular phrase in her cooking shows, when she has cooked a delicious recipe, and plated, she would say just that.

I've made one of her simple vegetable recipe for dinner. String Beans with Shallots. Ina has her string beans boiled briefly in salted boiling water. I have gone the microwave route. Placed the french beans in a microwave bowl, sprinkle with 2 tablespoons of water with a light pinch of salt, microwave on high for 1 minute, stir, repeat, stir and repeat again. Refresh under cold running water in a colander. Drain. I have used about 6 or 7 shallots, and have skipped the butter, using only vegetable oil. 

The chopped shallots are sauteed in oil until lightly brown and the french beans are added to the shallots, with some salt and lots of black pepper, tossing the beans until they are heated through.


How good does that look!
Simple, easy and taste nice too!

We had the french beans served alongside Madhur Jaffrey's Pork Vindaloo with Potatoes, and plain basmati rice. It was a lovely dinner.


String Beans with Shallots
(Ina Garten, foodnetwork.com)
1 pound French String Beans (haricots verts), ends removed
kosher salt
2 tablespoons unsalted butter
1 tablespoon good olive oil
3 large shallots, large diced
1/2 teaspoon freshly ground black pepper

Blanch the string beans in a large pot of boiling salted water for 1-1/2 minutes only. Drain immediately and immerse in a bowl of iced water.
Heat the butter and oil in a very large saute pan (12-inch diameter) or large pot and saute the shallots on medium heat for 5 to 10 minutes, tossing occasionally, until lightly browned. Drain the string beans and add to the shallots with 1/2 teaspoon salt and the pepper, tossing well. Heat only until the beans are hot.
If you're using regular string beans, blanch them for 3 minutes, until they're crisp-tender.

I'm linking this post with I Heart Cooking Clubs (IHCC), theme for this week
How Good Does That Look?


Friday, December 1, 2017

Zucchini Pancakes

It's Potluck week at I Heart Cooking Clubs (IHCC). We are free to choose any recipes from IHCC current or past featured chefs. And I've made Ina Garten's Zucchini Pancakes for our brunch snack. 


Zucchinis are grated using the coarse side of the box grater. Stir the grated zucchinis together with grated onion, eggs, flour, baking powder and salt. I've added red chillies to the batter, deseeded and thinly sliced.  I find that the batter is quite runny and have added a few extra tablespoons of flour. The next time I will squeeze out some of the juices from the zucchini. Scoop heaping tablespoons of the batter and pan-fry in hot oil on both sides until golden.

These may be eaten with sour cream, or with your favourite sauce. I've made one of our favourite and simple dipping sauce, a mixture of mayonnaise and Sriracha sauce, which we love to dip our fritters or savoury pancakes. These pancakes are delicious and makes a wonderful brunch snack.


Zucchini Pancakes
2 medium zucchini (about 3/4 pound)
2 red chillies, deseeded and sliced thinly
2 tablespoons grated red onion
2 extra-large eggs, lightly beaten
6 to 8 tablespoons all-purpose flour
1 teaspoon baking powder
1 teaspoon kosher salt
1/2 teaspoon freshly ground black pepper
unsalted butter and vegetable oil

Preheat the oven to 300 degrees F.
Grate the zucchini into a bowl using the large grating side of a box grater. Immediately stir in the onion and eggs. Stir in 6 tablespoons of the flour, the baking powder, salt, and pepper. (If the batter gets too thin from the liquid in the zucchini, add the remaining 2 tablespoons of flour.)
Heat a large (10 to 12-inch) saute pan over medium heat and melt 1/2 tablespoon butter and 1/2 tablespoon oil together in the pan. When the butter is hot but not smoking, lower the heat to medium-low and drop heaping soup spoons of batter into the pan. Cook the pancakes about 2 minutes on each side, until browned. Place the pancakes on a sheet pan and keep warm in the oven. Wipe out the pan with a dry paper towel, add more butter and oil to the pan, and continue to fry the pancakes until all the batter is used. The pancakes can stay warm in the oven for up to 30 minutes. Serve hot.

I'm linking this post with I Heart Cooking Clubs (IHCC), theme for this week
November 2017 Potluck


Monday, October 23, 2017

Slow-Cooked Garlic Courgettes

It's Potluck week at I Heart Cooking Clubs (IHCC). I've not made any of Diana Henry's recipes for quite a while, and it's time I revisit her book, Food From Plenty. I bought two zucchinis a few days before and was looking for recipes to use them up, found this delicious sounding dish, Slow-Cooked Garlic Courgettes. There's garlic, so it must be delicious!

The only ingredients required for this dish are just courgettes and garlic. Can never get simpler than this! Diana Henry uses 6 garlic cloves, but I have used 10 fat garlic cloves, might as well since it is all about the garlicky flavour! Peel and slice the garlic thinly, and the courgettes are sliced into thin rounds, the thickness of a coin. Heat some butter and olive oil, then saute the garlic slices until soft and fragrant, tip in the sliced courgettes, increase the heat so that the courgettes get a bit of colour, then reduce heat and continue to cook until the courgettes are soft and almost collapsing. Season with salt and pepper to taste.


The courgettes will release some its own water, so this dish is fairly moist.


Yum yum! The courgettes is very soft, tender and smells so nice from the garlic. I can understand why Diana Henry says she could eat a plateful on its own! I serverd this as a side dish with some stew and pilaf rice, sharing that in next post.


Slow-Cooked Garlic Courgettes
(adapted from Food From Plenty, Diana Henry)
"Heat 15gm (1/2oz) unsalted butter and 3 tbsp olive oil in a very large frying pan and gently cook 6 garlic cloves, very finely sliced, until soft but not coloured. Now add 500gm (1lb 2oz) courgettes sliced to the thickness of a pound coin, and turn over to coat. Increase the heat a bit so the courgettes get a little bit of colour, then reduce the heat, season and cook slowly (you almost "stew" them in the butter and oil) until completely soft, almost collapsing. This tastes purely of courgetts and doesn't need anything else. I can eat a plateful on their own."

I'm linking this post with I Heart Cooking Clubs IHCC), theme for this week
October 2017 Potluck


and

 I'm linking this post with Cookbook Countdown #22 hosted by 

Wednesday, October 11, 2017

Cabbage With Garlic And Shallots

My second post for I Heart Cooking Clubs (IHCC) theme for this week, October Monthly Featured Ingredient Challenge : Alliums !

I've made a simple, vegetable side dish, Cabbage with Garlic and Shallots, one of Madhur Jaffrey's recipes from her cookbook World Vegetarian, a thick book with 650 vegetarian recipes!


Ingredients used are cabbage, garlic, shallots, green chile, scallions and Chinese celery of which I have replaced with fresh cilantro. Recipe calls for 1/4 cup of water, the next time I will use only a tablespoon or two just to moisten the dish, since I've skipped the part where it says to cover and cook for 5 to 7 minutes. The cabbage is young and tender, so it takes just a few minutes of stir-frying to wilt it down and soften it a little. Instead of stock, I've used water, since the cabbage is sweet, the veggie stock is not really necessary. A simple lovely side dish, which I've served with Ina Garten's Scallion Basmati Rice and a curry dish, which I will be sharing in my next post.


Cabbage with Garlic and Shallots
(adapted from World Vegetarian, Madhur Jaffrey)
3 tablespoons peanut or canola oil
4 to 5 medium shallots, peeled and cut into long, fine slivers
2 garlic cloves, peeled and cut into long, thin slivers
1 fresh  hot green chile, cut into long, fine slivers
4 scallions, first cut into 2-inch lengths and then into long, fine strips
1-3/4 pounds fresh green cabbage (about 1/2 large head), with its hard core removed and then cut lengthwise into very fine strips
3 to 4 tablespoons chopped Chinese celery or plain celery leaves (fresh cilantro)
1/4 cup vegetable stock
1 teaspoon salt, or to taste

Put the oil in a large, wide pan or large wok and set over medium-high heat. When hot, put in the shallots and garlic. Stir and fry for a minute. Put in the green chile and stir for another 30 seconds. Now put in the scallions, cabbage, and celery. Cover, turn the heat to medium, and cook for 5 to 7 minutes, or until the cabbage has wilted completely. Uncover, turn the heat up a bit, and stir for another minute or two. Taste for salt and pepper.


I'm linking this post with I Heart Cooking Clubs (IHCC), theme for this week,
October Monthly Featured Ingredient Challenge : Alliums


and 

 I'm linking this post with Cookbook Countdown #22 hosted by 


Saturday, September 16, 2017

Green Bean and Potato Curry

This month's featured ingredient/dish at I Heart Cooking Clubs (IHCC) is Potatoes! I'm visiting the recipes from Madhur Jaffrey this week, and made her Green Bean and Potato Curry. Madhur Jaffrey describes this dish as "This is a simple curry to be served with rice, pickles and chutneys"

There's some Sri Lankan Raw Curry Powder used in the recipe, but not to worry, she has included how to make this curry powder at home. It is really simple and does not take up much time at all.


The toasted spices

The spices used : coriander seeds, fennel seeds, cumin seeds, fenugreek seeds, fresh curry leaves, desiccated coconut, raw rice and brown mustard seeds. I have all the ingredients in my pantry and the curry leaves from my garden pot. These spices are supposed to be put into the oven at low temperature for one hour. But I have toasted them in a saucepan over the stove until fragrant and the curry leaves are dry and crispy, which takes about five minutes. Let the spices cool, and grind as finely as possible in a dry mill. 


Grind as finely as possible. It smells really good.


To cook the curry, the cubed potatoes are first boiled in some water which is added a pinch of turmeric, for a few minutes until the potatoes are almost done. I have skipped this part, and added the potatoes along with the green beans during cooking. Also I have added some hard-boiled eggs, peel and add to the curry along with the veggies. Other ingredients used ; chopped onions, garlic, ginger, fresh green chillies, cinnamon stick, lime juice and coconut milk.

This is a simple and mild curry. Both the hubby and son thought that this curry is tasty. We ate this with rice, and I'm glad I've added the hard-boiled eggs. 


Green Bean and Potato Curry
(adapted from World Vegetarian by Madhur Jaffrey)
2 medium potatoes (about 1/2 pound), peeled and cut into 3/4-inch dice
1/2 teaspoon ground turmeric
3 tablespoons peanut or canola oil
15 fresh curry leaves (substitute fresh holy basil or basil leaves for a different but equally interesting flavour)
1 cup very finely chopped shallots or red onion
3 garlic cloves, peeled and very finely chopped
1/2 teaspoon very finely chopped peeled fresh ginger
3 small fresh hot green chillies, cut crosswise into fine rings
3/4 pound green beans, cut to 1" lengths
4 teaspoons Sri Lankan Raw Curry Powder **
1 cup canned coconut milk (shake the can before using)
1 (3-inch) cinnamon stick
1-1/4 to 1-1/2 teaspoon salt
2 tablespoons fresh lime juice (I use 1 teaspoon)
4 hard boiled eggs, peeled (my addition)

In a medium pot, combine the potatoes, enough water to cover them well, and 1/4 teaspoon turmeric. Bring to a boil. Cover partially, turn the heat down a bit, and cook until the potatoes are almost done but still hold their shape well. Drain. (I have skipped this step, adding the potatoes along with the green beans).
Put the oil in a large saute pan or frying pan and set over medium-high heat. When hot, put in the curry leaves. Ten seconds later, put in the shallots, garlic, ginger, and green chillies. Saute for 2 to 3 minutes. Put in the green beans (and potatoes) and saute for another minute. Put in the curry powder and stir once. Now put in the coconut, 1 cup of water, the remaining 1/4 teaspoon turmeric, cinnamon stick, salt and potatoes (and eggs). Stir and bring to a boil. Cover, turn the heat down to low, and cook about 15 minutes, or until the beans are just tender. Add the lime juice and stir it in.
Remove the cinnamon stick and serve.

Sri Lankan Raw Curry Powder
(This curry powder is perfect for all vegetable curries)
2 tablespoons whole coriander seeds
1 tablespoon whole fennel seeds
1-1/2 tablespoons whole cumin seeds
1 tablespoon whole fenugreek seeds
3 whole sprigs fresh curry leaves (about 60), if available (or a small handful of dried ones)
1 tablespoon desiccated coconut
1-1/2 teaspoons raw rice
1/2 teaspoon whole brown mustard seeds

Preheat the oven to 150F, or the lowest temperature setting.
Spread the seasonings out on a tray and put them into the oven for 1 hour. Cool. Transfer to a clean coffee grinder or other spice grinder and grind as finely as possible. Store in a tightly lidded jar away from heat and sunlight.
(I toasted the spices in a dry saucepan over the stove on a low heat until the spices are fragrant and the curry leaves are dry and crispy).


I'm linking this post to I Heart Cooking Clubs (IHCC), theme for this week
Potatoes !

and

I'm linking this post with Cookbook Countdown #21 hosted by 


Wednesday, September 6, 2017

Cabbage, Carrot and Caraway Broth

Theme for this week at I Heart Cooking Clubs (IHCC), is Slide Into September ! As our friends in the US and some other parts of the world is entering into fall, with the summer season ending soon, it is time to use up the extra produce from the summer harvest. I am not familiar with which veggies are grown in each season,  I googled for info and read that cabbage is a late summer-early fall harvest. As we are in the tropics, our cabbages and other veggies are grown whole year round, mostly in the highlands, where the weather is cooler. So our cabbages and other veggies are available throughout the year.


This is a simple, easy, affordable and quick soup to make. It is light and tasty. We do love veggie soups like this. I have cooked veggie soups like this often and most of the time with stock made from simmering dried anchovies. But for this, I have used Rapunzel organic veggie broth cubes. For the cabbage, I have used our local Chinese cabbage (Napa Cabbage), which is sweet and great in soups. I have never used caraway seeds in a soup before, and was surprised to see it being used in this recipe.  I find that I like it very much. The other ingredients are chopped onions and sliced carrots. 


I made this soup for dinner as part of a meal with white fluffy rice, a vegetable stir-fry and a chicken dish. We like to end our meal with a bowl of clear, light veggie soups such as this.


Cabbage, Carrot and Caraway Broth
(River Cottage Light & Easy, Hugh Fearnley-Whittingstall)
serves 4
1 tablespoon rapeseed or sunflower oil
1 large onion, chopped
2 medium carrots (about 150gm in total), peeled and sliced about 5mm thick
1 tablespoon caraway seeds
300gm cabbage, such as Savoy, core removed, leaves roughly chopped
1 litre hot vegetable stock
sea salt and freshly ground black pepper
extra virgin rapeseed or olive oil, to finish

Heat the oil in a large saucepan over a medium-low heat. Add the onion along with a pinch of salt, cover and sweat gently over a medium heat for 7-10 minutes or until translucent and softened.
Add the carrots and caraway seeds to the pan and stir until well combined. Cook, covered, for a further 3 minutes or so.
Add the cabbage, stir well and then pour over the veg stock and season with pepper. Bring to a gentle simmer and cook, uncovered, for about 15 minutes or until the carrots and cabbage are both tender. Taste and add more salt and pepper as necessary.
Ladle into warmed bowl, making sure everyone gets a share of the caraway seeds, which tend to drift to the bottom of the pan. Give each bowlful a swirl of extra virgin oil and serve.


I'm linking this post with I Heart Cooking Clubs (IHCC), theme for this week
Slide Into September!

and 

I'm linking this post with Cookbook Countdown #21 hosted by 


Saturday, August 19, 2017

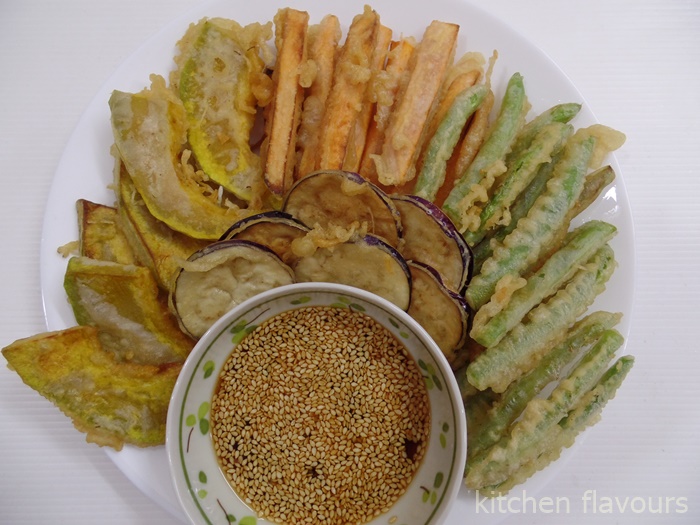
Tempura Spring Veg With Sesame Dipping Sauce

This week at I Heart Cooking Clubs (IHCC), the theme is Dippity Do Dah!, such a catchy theme! We are to make any dip or spread using any recipe from our current featured chef, Hugh Fearnley-Whittingstall.

I've made Tempura Spring Veg With Sesame Dipping Sauce, from HFW's fabulous book, River Cottage Light & Easy, a gift from a lovely friend.

HFW made the tempura using spring veg, I have however used our local veggies which are available the whole year round. 


The veggies I've used are pumpkin, sweet potatoes, French beans and brinjals. I have made some changes to the batter. In the recipe, Hugh has used only two ingredients ; white rice flour and chilled sparkling water. I do not have any sparkling water, so I have used ice cold water. And I have added one teaspoon of baking powder and a pinch of salt to taste. (thus, I have omitted the sprinkling of salt on the fried tempura at serving time). The batter was quite thin and did not really coat the veggie when I dipped some veggies into the batter for test-frying. So I have added another 2-3 tablespoons of rice flour. 

For the dipping sauce, mix the ingredients together ; toasted sesame seeds, grated ginger, grated garlic, tamari (or soy sauce), lime juice, and honey. I've used soy sauce, so I have added 1-2 tablespoons of water to dilute the taste of soy sauce a little, as the dipping sauce I've tasted at Japanese restaurants are always so light yet so tasty.


The batter coats the veggies beautifully without being too thick or too thin and fried to a light crispiness. The tempura veggies are delicious, crispy and tasty!

And we love the dipping sauce. So good with the crispy fried veggies! Yum!


I will definitely be making this again!


Tempura Spring Veg With Sesame Dipping Sauce
(River Cottage Light & Easy, Hugh Fearnley-Whittingstall)
Serves 2-4
a selection of vegetables, such as asparagus, small radishes, baby carrots
and spring onions (I've used pumpkin, sweet potato, French beans and brinjals)
sprigs of flat-leaf parsley
sunflower or groundnut oil, for frying
fine sea salt

For the batter :
100gm white rice flour
160ml chilled sparkling water (I've used chilled plain water)
1 teaspoon baking powder
added a large pinch of salt to taste

For the dipping sauce :
1/2 teaspoon freshly grated ginger
1 tablespoon tamari
1 tablespoon lime juice
1 teaspoon runny honey
2 teaspoons sesame seeds

For the sauce, mix all the ingredients together in a small bowl.
To prepare the vegetables :
Slice and cut the veggies to the same uniform thickness, making sure that they are not too thick so that they can cook quickly.
To prepare the batter :
Mix the ingredients together and used immediately.

Pour a 5cm depth of oil into a deep, heavy-based saucepan and heat to about 180C.
Use a cook's thermometer to check the temperature of the oil, or drop in 1/2 teaspoonful of batter - it should fizzle enthusiastically and just start to colour in about 1 minute.
Dip the vegetables, a few at a time, into the batter, dunking them down to the bottom of the bowl so they get a good coating. Then lift them out, briefly letting the excess batter drip back into the bowl, and swiftly drop them into the hot oil. Fry for about 2 minutes until crisp and very lightly golden. Don't let the vegetables clump together in the oil or the batter won't cook properly - it helps to drop them in one at a time.
Tansfer the cooked veg to a plate lined with kitchen paper, and, while still sizzling hot, sprinkle with a little salt. Serve as soon as they are all cooked, with the dipping sauce.


I'm linking this post with I Heart Cooking Clubs (IHCC), theme for this week,
Dippity Do Dah!


and 

I'm linking this post with Cookbook Countdown #20 hosted by 


Friday, August 11, 2017

French Beans With Tomatoes

I Heart Cooking Clubs (IHCC) is cooking with tomatoes this week, as the featured ingredient/dish for this month of August is Tomatoes! I've decided to cook with Hugh Fearnley-Whittingstall, our current featured chef at IHCC. Made his French Beans with Tomatoes.

A simple and easy dish to cook, with just minimal ingredients ; chopped onions, chopped garlic, canned chopped tomatoes and French beans. For the tomatoes, either canned or fresh tomatoes can be used. I have one last can of chopped tomatoes in my pantry which I wanted to clear, and seems perfect for this dish. 


Does not takes much effort at all to cook this dish, the only thing is to stir every now and then, to avoid the bottom from sticking to the pan. I did add a little water just to keep the sauce moist and nice. 

This is a delicious dish. There's the usual slight sourness from the canned tomatoes, but at the same time, you can taste the sweetness from both the onions and the French beans. Very tasty. My son seems to be taken with this dish, he loves it. At first, he thought that I have added some sugar to this dish. Well I did not, the sweetness are naturally from the onions and French beans! We had this dish with rice and a few other dishes. No leftovers!


French Beans With Tomatoes
(River Cottage Every Day, Hugh Fearnley-Whittingstall)
serves 4
1 tablespoon rapeseed or olive oil
1 onion, finely chopped
2 garlic cloves, finely chopped
400gm tin of chopped tomatoes, or 1 kg fresh tomatoes, blanched, skinned,
deseeded and roughly chopped
500gm French beans, topped, tailed and cut into 4-5cm lengths
sea salt and freshly ground black pepper

Heat the oil in a large saucepan or frying pan, add the onion and sweat for at least 10 minutes, until soft but not coloured. Add the garlic and cook gently for another minute or two, then add the tomatoes and stir well. Stir in the beans, bring the mixture to a gentle simmer and season well. Turn down the heat, partly cover the pan and cook very gently, stirring frequently, for about 30 minutes, until the beans are fully tender. If the mixture seems to be in danger of sticking, add a splash of water or stock. Serve warm or cold.

I'm linking this post with I Heart Cooking Clubs (IHCC), theme for this week
August Monthly Featured Ingredient/Dish Challenge : Tomatoes !


and 

I'm linking this post with Cookbook Countdown #20 hosted by