Showing posts with label David Lebovitz. Show all posts

Friday, March 31, 2017

Green Beans with Snail Butter

It's Cook the Book Fridays, and this week's selected recipe from My Paris Kitchen by David Lebovitz is Green Beans With Snail Butter (Haricots Verts Au Beurre D'Escargot). As David says in the book, "Don't worry, there are no snails in beurre d'escargot,  the name refers to butter mixed with a copious amount of garlic that is used for baking snails."

This is an easy dish with simple ingredients, yet so delicious. 


The green beans I bought were young, tender and very sweet. I removed the pointed ends of the beans, as we always eat them that way. David has left the green beans whole but I have snapped them in two, easier to eat that way! 

One thing I did not follow was to steam the green beans. Instead of steaming, I microwaved them with some sprinkling of water for 3 minutes on high. To cook the green beans, melt butter in a large skillet, add the garlic and cook until they begin to brown, stir in the parsley (I've used fresh coriander leaves), salt and black pepper. Add the green beans and stir until the beans are completely cooked and coated with the garlicky butter. 

One thing I have forgotten to add is the lemon juice! Only noticed the lemon sitting on my kitchen counter when I was clearing up after dinner! Oops... but even without the lemon juice, this dish is still delicious!


All my favourite ingredients in this stir-fry dish ; sweet green beans, garlic, coriander leaves. I could finish a plate all on its own, no kidding!


Friday, March 17, 2017

Caramel Pork Ribs

Cook the Book Fridays recipe pick for this week is Caramel Pork Ribs. CtBF is an online group of lovely bloggers who are currently cooking from David Lebovitz's cookbook, My Paris Kitchen.

To make this dish, the caramel must be prepared first. There's beer and bourbon in the caramel sauce, which already sounds so delicious! Granulated sugar is cooked in a large pot (one that can be used in the oven, with a cover) to a caramel, colour similar to dark maple syrup, and it will be smoking, but take care not to burnt it. My caramel turns out great. It was smoking, with the colour of dark maple syrup. I removed the pot from the heat, then add the brown sugar and beer. Mixture will sizzle, then harden. 

Let the mixture cool down a bit, then add the rest of the ingredients; bourbon, cider vinegar, ketchup, ginger, soy sauce, harissa, Dijon mustard, pepper and the ribs. Return the pot to the stove and let come to a boil, turning the ribs now and then to coat with the sauce. Cover and place in the oven to bake for about 1-1/2 to 2 hours. I baked the ribs for 1 hour 45 minutes, turning the ribs every half hour, then remove the cover and continue to bake for another 40 minutes, turning halfway.


The caramel sauce has thickened a bit, with the ribs coated gloriously with the sauce. The ribs are tender and soft, and have soaked up the flavours of the sauce. I thought that this dish is delicious, but it is a little too sweet for me. The next time I would probably either omit the brown sugar or go easy on it.


I served this Caramel Pork Ribs with rice and a green bean dish. The son loves it. There was some leftover, which reheated well the next day, and was finished off by the two men in my house.

The recipe can be found here, or from My Paris Kitchen, on page 187.

Friday, January 6, 2017

Fresh Herb Omelet

Cook The Book Fridays welcomes the new year with a simple, easy and delicious recipe from My Paris Kitchen by David Lebovitz, Fresh Herb Omelet (Omelette Aux Fines Herbes).


For the fresh herbs, I've used Chinese chives from my garden pot. There's eggs, a little milk, salt and pepper, with the finely chopped herbs beaten together. Some cheese, of which I've used Cheddar is sprinkled over the centre in a line while the egg is setting in the skillet. Fold the omelet in half and slide onto a plate to serve. I like my omelet to be a little brown on the outside, so I have cooked it a little longer till the bottom is lightly crisp brown while the top is just set to my liking.


The best part, is the oozy cheesy part! I shared this omelet with my son, we had it sandwiched between two slices of white breads. Makes a very nice meal for hungry tummy!

To see what other fresh herbs that was used for this omelet, stop by Cook The Book Fridays and visit those links.


Friday, December 16, 2016

Onion Tart

Cook The Book Fridays, a group of lovely foodie bloggers are cooking their way through David Lebovitz's cookbook, My Paris Kitchen. The selected recipe for this week is Onion Tart (Pissaladiere).

I've only made Pissaladiere once before. And remember that my kids were asking where is the cheese! My kids' idea that as long as it is some kind of pizza, or looks like it, it must have their favourite ingredient, Mozzarella cheese, and lots of it, the more the better! So this time, when I make David Lebovitz's Pissaladiere, I reminded them that I am making Pissaladiere, and traditionally it is made with NO cheese!

The caramelized onions took about 50 minutes to cook till dark golden brown. A few whole sprigs of thyme are cooked together with the onions. Remove the thyme sprigs before assembling the pissaladiere. 

I've made only two thirds of the recipe, to fit the size of the baking sheet I had. The dough was easy to handle. Pull and spread the dough to fill the base of the baking sheet. Spread the caramelized onions on the dough and arrange some olives and anchovies on the onions.


The pissaladiere is baked for about 20 minutes, though I baked mine for 25 minutes, until the crust is lightly browned. 


Delicious especially when eaten warm.


According to David, Pissaladiere should be crisp and very thin, not thick and bready. This is thin and crisp, and very delicious! Especially good eaten while still warm. My favourite part are the sides where you get to bite into the crispy edges and the crispy bottom of the crust. The caramelized onions are delicious and sweet,  match perfectly with the salty anchovies. 

This is a delicious onion tart. I love the crust, it would make a fabulous pizza base, and would be great with other pizza toppings, and of course, with lots of cheese too! 

Stop by Cook the Book Fridays to see what everyone thought about this Onion Tart.

Friday, December 2, 2016

Grated Carrot Salad

Cook The Book Fridays, a group of lovely foodie bloggers are cooking their way through David Lebovitz's cookbook, My Paris Kitchen. The selected recipe for this week is Grated Carrot Salad. According to David Lebovitz, Grated Carrot Salad is so commonplace in France, that you'll hardly find it mentioned in any of the books on traditional French cuisine. Everyone has their own version of making this salad.

I have never grated carrots for salads before. What I would usually do is to slice them either thinly in rounds or half-moons, or sometimes julienned them to matchsticks, but never grated, for a salad. One of the things that I dislike doing while preparing veggies for a dish, is grating root veggies! I do grate carrots when making carrot cakes, which I enjoy eating, but dislike grating the carrots. I prefer chopping my veggies over grating, as chopping can be a rather enjoyable task, rather therapeutic at times. 

Because this is a Grated Carrot Salad, I dutifully grate my carrots. 

The grated carrots and some fresh chopped cilantro greens from my garden pot. 

The dressing is a mixture of Dijon mustard, honey, olive oil, lemon juice and salt, whisk to combine. Toss the carrots and fresh herbs with the dressing and serve. 


Quite a nice salad. The sweetness of the carrots balances well with the lemony-mustard sweet dressing. My son likes this. 


Makes a nice side dish. I served it alongside some baked chicken breast with fresh crisp celery sticks.

Stop by Cook the Book Fridays to see what everyone thought about this salad.


Friday, November 18, 2016

Chocolate-Dulce de Leche Tart

This week at Cook The Book Fridays, the selected recipe from My Paris Kitchen cookbook, is Chocolate-Dulce de Leche Tart. A chocolaty dessert with dulce de leche sandwiched between a chocolate crust and dark chocolate filling on top.

Dulce de Leche is one ingredient that I have not seen over here before. So I have made my own by baking condensed milk in a water bath, using David Lebovitz oven method recipe, which I have posted here before, more than two years ago!


I've been making lots of baking lately and did not want to over indulge in desserts, so I've made only half a recipe, for two mini 4-inches tarts. Which is just nice for the four of us. 

Since it was only half a recipe, I've mixed the dough crust by hand, it was easy and takes only minutes. After filling up the base and sides of the mini tart pan with the chocolaty dough, they are blind bake, then spread with a layer of the dulce de leche and top with the chocolate filling. I've used dark chocolate for the filling, which is melted over the stove, then the cooked custard of eggs and milk is poured over the melted chocolate over a sieve, add some vanilla, whisk until smooth. Either vanilla extract or rum can be used here. Well, I've used my homemade vanilla-rum extract.


The tart is then baked in the oven for 20 minutes, and with the oven turned off, leave the tart for another 25 minutes, then remove from the oven. The chocolate filling sets up nicely. Once the tart comes to room temperature, I placed them in the refrigerator to chill.

There's some salt which is sprinkled over the chocolate filling before baking, but I skimped on the salt, as I was afraid that it might be too salty, as there's also some salt sprinkled on the base of the bottom crust. After baking, when I ate a slice later, I could not taste the salt (I've used kosher salt), and wish that I have sprinkled more! 


Two mini tarts. That's half a tart per person! How often did you serve a whole half tart for one? Haha! But I've sliced each mini tart into 8 little wedges. Makes very cute elegant dessert for entertaining! The chocolaty crust is lovely and the dark chocolate filling goes perfectly with the sweet dulce de leche. I was expecting a very sweet dessert, but I was pleasantly surprised that the sweetness was just right, a contrast with the bitter chocolate filling. A lovely desssert, but best served in small servings.

We are cooking through David Lebovitz's cookbook, My Paris Kitchen. If you have the book or thought of getting one, please do, and join us! Full details here.

Friday, November 4, 2016

Scalloped Potatoes with Feta and Roasted Garlic


At Cook the Book Fridays, recipe for this week is Scalloped Potatoes with Blue Cheese and Roasted Garlic. 

I have a pack of feta cheese which needed to be used up, so that goes into this dish, instead of buying a pack of blue cheese, as I'm trying to clear the "bits and pieces" stashed in my refrigerator and pantry. There's a lot of heavy cream used, all of 3 cups, but David Lebovitz has suggested that half and half can be used instead. I mixed an equal amount of heavy cream and milk to make 3 cups of half and half. 


Ingredients used are potatoes sliced into thin slices, chives of which I've used Chinese chives from my garden pot, blue cheese (I used feta), salt, pepper and the mixture of cream and roasted garlic.

Mine took about 1-1/2 hours to cook through as the potatoes was not done at 1 hour. The sauce was bubbling happily towards the last 45 minutes of cooking time. There's roasted garlic mixed into the sauce and it smells garlicky delicious. More roasted garlic the next time!


As suggested by David, we had the scalloped potatoes with some green salad, for lunch. My salad was plain, with no dressing, simply fresh green salad leaves and some sweet cherry tomatoes. The scalloped potatoes is delicious, both my son and daughter like it. 

Do stop by CtBF to view everyone's garlicky scalloped potatoes. We are cooking through David Lebovitz's cookbook, My Paris Kitchen. If you have the book or thought of getting one, please do, and join us! Full details here.


Friday, October 21, 2016

Baked Eggs With Kale and Ham

This week at Cook the Book Fridays, the selected recipe is Baked Eggs With Kale and Smoked Salmon. CtBF is currently cooking through David Lebovitz's cookbook, My Paris Kitchen.

I was looking forward to make this, as we love eggs around here, and also to use my homegrown kale, which I have been using in a number of recipes recently. 

David's recipe calls for smoked salmon but I've used one of the variations that David has suggested, slice of harm torn into pieces. According to him, bacon, crumbled cooked sausages or even sauteed mushrooms can be used instead.


I've used small ramekins for individual servings. Bottom layer is the sauteed kale, followed by a layer of the torn ham pieces. Crack an egg over the ham pieces, scatter some grated cheese over, of which I have used mozzarella. Dribble a tablespoon of heavy cream over the cheese, and sprinkle some bread crumbs over. The breadcrumbs is made by toasting in a skillet with butter, garlic, thyme and salt, until toasted.

Bake for 10 to 12 minutes or until the eggs are cooked to your liking. Serve immediately.


I baked these for 16 minutes, as the egg whites are not done yet at 12 minutes. Serve immediately, as up would want to eat this right after baking. You can get everything prepared and ready, then assemble and bake it later about 15 minutes or so,  before you intend to serve it.


A spoonful of deliciousness! 


The melty gooey mozzarella, my kids favourite cheese!  I've made this for lunch, and it was enjoyed by everyone. There's a request for a repeat! I would try with the other variations that David has suggested. 

Do stop by CtBF to view everyone's take on this delicious baked egg dish. If you have the book or thought of getting one, please do, and join us! Full details here.


Friday, October 7, 2016

Pumpkin Crumble

The selected recipe for this week at Cook The Book Fridays is Butternut Squash Crumble. I have used pumpkin instead of butternut as pumpkin is more readily available in the area where I live. Cook The Book Fridays, a group of bloggers, are currently cooking through David Lebovitz's cookbook, My Paris Kitchen.

Pumpkin is peeled and cut to 1/2 inch pieces, then sauteed in a little oil and butter, with some fresh thymes, season with salt and pepper, stir occasionally until the pumpkin begin to brown on several sides. I did not brown the pumpkin, (too lazy to wait!!). I stir-fry for a few minutes. Add some sliced shallots, cook until softened, add some chicken stock and cook until the stock reduce a bit. Transfer to a well-buttered shallow baking tray. Cover with foil and bake for 30 minutes until the squash are tender.

The crumble topping is made by processing in a food processor, the bread crumbs, cornmeal, Parmesan, sage (I use dried oregano), sugar and salt together until crumbly. Add the chilled and cubed butter, and lastly the egg, pulse until mixture starts to clump together in bits. Remove the tray from the oven, and scatter the crumble topping all over. Return the tray to the oven with a slight reduction in the oven temperature. Bake for about 20 minutes until the topping is golden brown.


This savoury crumble is quite nice. Crispy topping with soft tender squash. But the Parmesan cheese is a little too strong for my taste. I think that it would work better for me if I have used Cheddar instead as I originally intended. I have always prefer Cheddar over Parmesan, just my personal preference. This would make a nice side dish, but I would go for small portions, as it is quite filling. 

Do stop by CtBF to view everyone's take on this savoury crumble. If you have the book or thought of getting one, please do, and join us! Full details here.


Friday, September 30, 2016

Sardine Spread

Cook The Book Fridays is cooking through David Lebovitz's cookbook, My Paris Kitchen, and the selection for this week is Sardine Spread. We love sardine as a filling for sandwiches and I was really looking forward to make this. 


I use two cans of sardine packed in extra virgin olive oil.  Drain the sardines and discard the oil.


Remove the bones from each piece of sardine. Mix the cream cheese and butter in a bowl and add the sardine, mashing them to combine. Cream cheese is an interesting ingredient here. Add some chopped scallions, capers, lime juice, salt, black pepper, cayenne powder to taste. Mix everything together. That's it! This has got to be the most simplest recipe from this book, so far! Simple and delicious!


We had the Sardine Spread with my homemade Olive Oil Focaccia, made into a sandwich, with lettuce leaves and slices of cheese, for dinner. The family loved it. 


I have always used canned tuna for making similar sandwich spread like this, but instead of using cream cheese and butter, I have always used mayo. Now, this Sardine Spread, has a place along with my favourite tuna spread. I will definitely be making this again. 


Do stop by CtBF to view everyone's take on this delicious Sardine Spread. If you have the book or thought of getting one, please do, and join us! Full details here.


Friday, September 16, 2016

Gazpacho

This week at Cook the Book Fridays (CtBF), the selected recipe is Gazpacho with Herbed Goat Cheese Toasts. I have however only made the Gazpacho and have skipped the Herbed Goat Cheese Toasts. I have never made gazpacho before and was looking forward to try this cold soup.

A healthy raw soup, where ripe tomatoes are blanched in boiling water, remove the skins, cut into half, squeezed the seeds out and strain the seed over a strainer into a bowl to collect the juices. Discard the seeds. A piece of bread soaked in water for a minute or two, squeeze out the extra water. The tomatoes, the collected juices  and the bread are then processed in a food processor until almost liquefied, with some bits of tomato visible. Pour into a large bowl, mix in finely chopped cucumbers, finely chopped red pepper, finely chopped garlic, red wine vinegar, olive oil, smoked paprika salt and ground black pepper to taste. Add the vodka. Mix well and chill thoroughly before serving.


There are mixed reviews when I served this to the family. I thought that this soup was just OK for me. My daughter does not like this soup. But both my husband and son thought that, in their words, "quite nice". 

Do stop by CtBF to view everyone's take on this soup. If you have the book or thought of getting one, please do, and join us! Full details here.


Friday, September 2, 2016

Spiced Meatballs with Sriracha Sauce

The next recipe selected for this week at Cook the Book Fridays (CtBF) is Spiced Meatballs with Sriracha Sauce. These meatballs are David Lebovitz's take on the North African merguez sausages.


To make the meatballs, toast the coriander seeds, fennel seeds and cumin seeds in a small saucepan until fragrant. Leave to cool and grind to a powder in a spice mill. Mix the ground spices in a bowl with chopped cilantro, minced garlic, sweet paprika, harissa, salt, cinnamon, allspice and sumac. Add the ground meat, of which I have used ground pork, and mix well. I left the mixture in the refrigerator for a few hours for the flavours to blend. 

Pinch off some of the meat mixture about the size of an unshelled walnut, roll them into meatballs. These meatballs can either be fried over the stove or baked in the oven.


I baked the meatballs instead of cooking them over the stove. Put the meatballs in a greased baking tray and bake for about 15 minutes until cooked. The meatballs will release some of the oil and juices, and smells fantastic, aroma from all the combined spices!


The dipping sauce is made by mixing mayonnaise and sriracha sauce. Very nice!


The warm baked meatballs, very delicious! Love the spice taste and aroma in the meatballs.


These are very good! We actually had the meatballs with rice, and the tasty liquid from the baking tray is great spoon over the rice with the meatballs. My kids love the dipping sauce, but then they love anything with mayonnaise! 

Do stop by CtBF to view everyone's take on this delicious meatballs. If you have the book or thought of getting one, please do, and join us! Full details here.


Friday, August 19, 2016

Cherry Tomato Crostini with Homemade Herbed Cheese

This week at Cook The Book Fridays (CtBF), the selected recipe from David Lebovitz's cookbook, My Paris Kitchen, is Cherry Tomato Crostini with Homemade Herbed Goat Cheese

To make the herbed cheese, either whole goats' milk or cows' milk yoghurt can be used. Since I always make my own yoghurt at home using whole cows' milk, that's what I used. 


Strain the yoghurt over a mesh strainer lined with a few layers of cheesecloth overnight in the refrigerator. What you get is really Greek Yoghurt, thick and creamy. Transfer the thick yoghurt into a bowl, and stir in finely chopped fresh herbs of your choice, though David did mention that be sure to include chives. So I snipped a few young stalks of chives, and basil leaves, both from my garden pot, and mix it with some fresh coriander. Chop them finely and mix into the yoghurt along with finely chopped shallot and garlic. Season with salt and pepper with a generous pinch of cayenne powder. 

Halved the cherry tomatoes, place on a baking tray, drizzle some olive oil, tuck in some fresh herbs, of which I've used basil and rosemary leaves, both from my garden pot. Sprinkle with some salt and pepper, stir to mix and bake in a preheated oven for about 40 minutes, stir once or twice in between. David suggested to bake these ahead of time, up to 8 hours in advance, so that the tomatoes have time to marinate in their own juices. 

For the bread, I've used my homemade sourdough bread. I've lightly sprayed the bread with olive oil and toast in the oven until light brown. As soon as they are out of the oven (even though it was suggested when just cool enough to handle), I rub the toasts with a garlic clove. Love it! I did not expect that the garlic would be like almost grated when rubbed onto the surface of the toasts, and find that I need another clove of garlic (for 6 slices of toasts). We are garlic lovers! And the aroma is just fantastic!


Time to assemble  (tummy growling!) ; the herbed cheese, roasted cherry tomatoes, slices of toasted sourdough bread and some fresh parsley for garnish.


Spread a generous amount of the herbed cheese on the toasts, top with a few of the roasted tomatoes, along with some drizzle of the wonderful juices from the tomatoes and garnish with some fresh herbs. 


 Bon appetit! Yummy!


I love the herbed cheese! We had the leftovers as a dip, with more sprinkling of cayenne powder, with some fresh celery and carrot sticks. So good! 

Do stop by CtBF to view everyone's take on this delicious crostini. If you have the book or thought of getting one, please do, and join us! Full details here.

Tuesday, August 9, 2016

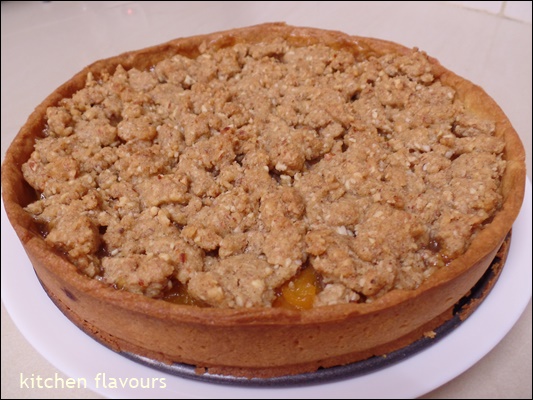
Apricot Crumble Tart

This week's selected recipe at Cook The Book Fridays (CtBF), is Apricot Crumble Tart. CtBF is an online group of bloggers who are currently cooking through David Lebovitz's cookbook, My Paris Kitchen.

Apricot Crumble Tart is a delicious tart, which has a base made with buttery dough, the filling with fresh apricot slices and the top is a crumble made with whole almonds, sugar, flour, butter, vanilla extract and ground cinnamon.

For the dough, I have reduced the amount of sugar by half, as I prefer my tart bases to be less sweet. With the reduced amount of sugar, the dough turns out really well too. Secondly, I have used canned apricots for the filling instead of fresh. I did not reduce the sugar for the filling, using the full amount of 3 tablespoons as mentioned in the recipe. Even though the canned apricots are soaked in syrup, I was very surprised to find that the apricots are very tart and not sweet at all and have even sprinkled an extra tablespoon of sugar. I have omitted the almond extract for the filling. (my seldom used little bottle of almond extract has expired!  oops...)

The crumble topping is made by processing whole almonds in the food processor along with flour, brown sugar, vanilla extract, ground cinnamon until the almonds are broken up into very small pieces. Chopped cold butter is added in, and pulse until the mixture clumps together. Refrigerate until needed. 

I have omitted the salt for both the dough and the crumble topping since I've used salted butter.


The dough is press on the bottom of a greased 9" springform pan, covering a little less than halfway up the sides. Place the pan in the freezer for 30 minutes before blind bake by covering the dough with foil with pie weights for 20 minutes, then remove the foil and weights, then continue to bake for another 5-10 minutes until the dough is brown.

Add the filling to the baked shell evenly. Then crumble the topping over the apricots and continue to bake until the crumble topping is browned.


This tart smells incredibly delicious from the cinnamon, vanilla and the nutty almonds. I thought that this tart is really good! The base of the tart is buttery and tender. The apricot filling is tart and not too sweet, which is really nice. I love the crumble topping. It was fragrant from both the vanilla and cinnamon, buttery and nutty. The three layers are so perfect together! 


Served with a scoop (or two!) of vanilla ice cream! Yummilicious!

To view everyone's lovely tart at CtBF, the link is here. If you have the book or thought of getting one, please do, and join us! Full details here.


Sunday, July 24, 2016

Chocolate Ice Cream

Cookbook Countdown is a monthly cooking/baking event, which I'm co-hosting with Emily's Cooking (Makan2) Foray.  Everyone is welcome to join us. How does it work? To summarize, you may select a cookbook from your own cookbook collection, to cook or bake from each month. That selected book shall be your cookbook of the month. You may cook any recipes and as many recipes as you want from your selected book of the month. This is a fabulous way of using your cookbooks at least once! For more information on how to join Cookbook Countdown, please click here. 

To link to Cookbook Countdown Specials : BAKE, click here
To link to Cookbook Countdown #7, click here


****************************


For this month's Cookbook Countdown #7, my selected cookbook is The Perfect Scoop, by David Lebovitz.  This week's treat is Chocolate Ice Cream. Nobody would turn down a scoop or two of chocolate ice cream, especially the kids!


Full of chocolate flavour! You would definitely want more than a scoop!


Chocolate Ice Cream
(adapted from "The Perfect Scoop", by David Lebovitz)
makes about 1 quart (1 liter)
2 cups (500ml) heavy cvream
3 tablespoons (21gm) unsweetened Dutch-process cocoa powder
5 ounces (140gm) bittersweet or semisweet chocolate, chopped
1 cup (250ml) whole milk
3/4 cup (150gm) sugar (I use 1/3 cup)
pinch of salt
5 large egg yolks (I use 4)
1/2 teaspoon vanilla extract

Warm 1 cup (250ml) of the cream with the cocoa powder in a medium saucepan, whisking to thoroughly blend the cocoa. Bring to a boil, then reduce the heat and simmer at a very low boil for 30 seconds, whisking constantly. Remove from the heat and add the chopped chocolate, stirring until smooth. Then stir in the remaining 1 cup (250ml) cream. Pour the mixture into a large bowl, scraping the saucepan as thoroughly as possible, and set a mesh strainer on top of the bowl.
Warm the milk, sugar, and salt in the same saucepan. In a separate medium bowl, whisk together the egg yolks. Slowly pour the warm milk into the egg yolks, whisking constantly, then scrape the warmed egg yolks back into the saucepan.
Stir the mixture constantly over medium heat with a heatproof spatula, scraping the bottom as you stir, until the mixture thickens and coats the spatula. Pour the custard through the strainer and stir it into the chocolate mixture until smooth, then stir in the vanilla. Stir until cool over an ice bath.
Chill the mixture thoroughly in the refrigerator, then freeze it in your ice cream maker according to the manufacturer's instructions. (If the cold mixture is too thick to pour into your machine, whisk it vigorously to thin it out).


I'm linking this post with Cookbook Countdown #7 hosted by 

Monday, July 18, 2016

Buckwheat Crepes with Ham, Cheese And Egg

This was supposed to be a Friday post for Cook The Books Friday (CtBF), an online group of bloggers, currently cooking from David Lebovitz's cookbook, My Paris Kitchen. I am late in making this crepe and thus late in posting.

The batter for the crepe is made up of buckwheat flour, eggs, water and salt. Whisk everything well, keep covered in the refrigerator for at least an hour and can be refrigerated overnight. I have kept mine for 3 days! I mixed the batter at night, intending to make the crepe for breakfast the next morning, but somehow that did not happen, and I've only managed to make the crepe on the 3rd morning. The batter is still fine even on the 3rd day. 


Just as David says, the first two crepes are usually "a dud, so don't worry"! haha! Those are my two "dud"! Above crepe was made with 1/4 cup of batter, which is rather difficult for me to make into a large thin crepe.


So, I have used 1/2 cup of batter! Well, this seems to work out for me. It may not be perfect, but it is thin and large!


A piece of the crepe is then placed in the saucepan in hot foaming butter, slices of ham is then placed in the center of the crepe, sprinkle with shredded cheese (I've used Mozzarella), and break an egg in the middle. Cover the pan and continue to cook on low heat until the cheese melts and the egg whites are set. Serve immediately. I did not fold the four sides of the crepes over. 


We love our egg yolks runny! We've enjoyed these buckwheat crepes very much. I like the wheatie aroma of the crepes while it is cooking. Smells really nice.

Please stop by CtBF to see this delicious crepe that everyone has made.


Sunday, July 10, 2016

Mojito Granita

Cookbook Countdown is a monthly cooking/baking event, which I'm co-hosting with Emily's Cooking (Makan2) Foray.  Everyone is welcome to join us. How does it work? To summarize, you may select a cookbook from your own cookbook collection, to cook or bake from each month. That selected book shall be your cookbook of the month. You may cook any recipes and as many recipes as you want from your selected book of the month. This is a fabulous way of using your cookbooks at least once! For more information on how to join Cookbook Countdown, please click here. 

To link to Cookbook Countdown Specials : BAKE, click here
To link to Cookbook Countdown #7, click here


****************************

For this month's Cookbook Countdown #7, my selected cookbook is The Perfect Scoop, by David Lebovitz. I've made Mojito Granita, and it was such a hit, that I've made it a few times already!


I've used my homegrown mint leaves. The first time when I made this, I've used the full amount of lime juice as stated in the recipe and it was too sour. So I've reduced the amount of lime juice to 1/4 cup the second time round, and it was just perfect. It all depends on the sourness of the limes that are used.


A refreshing, delightful granita, What's not to love, there's mint, lime juice and rum! You will love it too!


Mojito Granita
(adapted from "The Perfect Scoop", by David Lebovitz)
makes about 1 quart (1 liter)
2-1/2 cups (625ml) water
1/2 cup (100gm) sugar
2 limes, preferably unsprayed
1 cup (40gm) lightly packed fresh mint leaves
1/2 cup (125ml) freshly squeezed lime juice (from about 6 limes) (I use only 1/4 cup)
3 tablespoons (45ml) white or light rum

Add the water and sugar to a small, non-reactive saucepan, then grate the zest from the 2 limes directly into the saucepan. Bring the mixture to a boil and cook, stirring occasionally, until the sugar is dissolved. Reverse 5 of the mint leaves, add the remaining mint to the saucepan, and remove from the heat. Cover and let stand for 8 minutes, then remove the cover and let cool to room temperature,
Once cool, strain the mixture into the container you plan to freeze the granita in, pressing firmly on the leaves to extract all the flavourful liquid. Discard the mint leaves. Stir in the lime juice and rum, then finely chop the reserved 5 mint leaves and add them as well. 
Place the dish in the freezer. Begin checking it after about 1 hour. Once it begins to freeze around the edges, take a fork and stir the mixture, breaking up the frozen parts near the edges into smaller chunks and raking them toward the centre.
Return the dish to the freezer, then check the mixture every 30 minutes afterward, stirring each time and breaking up any large chunks into small pieces with a fork, until you have beautiful, fine crystals of homemade granita. If at any time the granita freezes too hard, simply leave it out at room temperature for a few minutes until it softens enough to be stirred again with a fork, and rake it back into crystals. Then return to the freezer.


I'm linking this post with Cookbook Countdown #7 hosted by