Showing posts with label Bernard Clayton. Show all posts

Tuesday, July 11, 2017

Honey-Lemon Whole-Wheat Bread

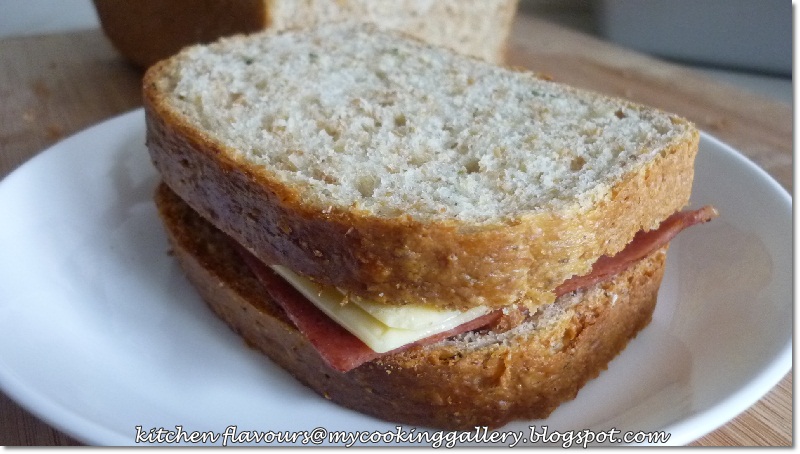
Bernard Clayton's New Complete Book of Breads is one of my favourite bread books, but I have been neglecting it for quite a while, and it's time to revisit this book and bake something from it again. From the many label stickers that are sticking out from the pages of the book, I chose this recipe, Honey-Lemon Whole-Wheat Bread, one that I have been wanting to make for ages.

Originally, the dough is left to rise in the refrigerator overnight, or for at least 2 hours, until the dough has risen to double its size. But I have made the usual way, and left the dough to rise at room temperature for the final rising, and bake it on the same day.


I've made only one loaf. In the recipe below, listed in blue, I have given the measurements for one loaf of bread. Please note that the amount of flour and water that I've used may not work for you, as it depends on the moistness of the dough. Feel free to adjust accordingly.

The changes I've made is to substitute the shortening with butter. I have reduced the salt slightly, using only 3/4 teaspoon. The dough was rather sticky at the initial stage, so I've added a quarter cup of bread flour at a time until the dough no longer sticks at the side of the bowl. The amount of additional bread flour that I've used was 3/4 cup, making it a  total of 2-1/4 cups in all. For the whole-wheat flour, I've used 1 cup in total.

The dough rises beautifully and bakes into a lovely brown loaf. I tent the loaf with foil at 30 minutes baking time, as the dough is getting really brown. I baked the loaf for 40 minutes.


This is one lovely, fabulous bread. Very soft, light and tasty with fabulous crumbs. I love it spread with cold salted butter. Definitely one bread that is worth making again.


Measurements listed in blue in the recipe below, is my own measurements, to make one loaf of bread, with adjustments of my own. Feel free to add more or use less flour as needed. 

Honey-Lemon Whole-Wheat Bread
(Bernard Claytons's New Complete Book of Breads)
makes 2 loaves
3 cups bread or all-purpose flour (1-1/2 cups + 3/4 cups bread flour)
2 packages dry yeast (2 teaspoons)
2 teaspoons salt (3/4 teaspoon)
2-1/2 cups hot water (120° - 130°) (1 cup)
1/4 cup honey (2 tbsp)
3 tablespoons shortening, room temperature (1-1/2 tbsp, about 30gm, butter)
1 tablespoon grated or diced lemon peel (1/2 tbsp lemon zest)
2 to 3 cups whole-wheat flour, approximately  (1 cup)
vegetable oil

Baking pans : 2 large (9"x5") baking pans, greased or Teflon

In a large mixer bowl, combine the white flour, yeast, and salt. Pour in the hot water. Add the honey, shortening, and lemon peel. Stir briskly with a wooden spoon to blend, or for 2 minutes at medium speed with the mixer flat beater. Scrape the bowl occasionally. (I use the dough hook).
Add one cup (half cup if making one loaf) whole-wheat flour.  Beat at high speed for 1 minute. The batter will be thick and rubberlike, and pull away from the bowl in strands.
Stop beating. Stir in an additional 1 to 2 cups (half cup if making one loaf) whole-wheat flour, depending on the moistness of the developing dough. The dough should be elastic, soft, and, at this stage, not overly sticky. If the dough continues to be slack and moist, add sprinkles of white flour. Knead for 10 minutes, adding sprinkles of flour is the dough sticks to the sides of the bowl.
(The dough was really sticky, I've added a quarter cup of bread flour at a time, using a total of 3/4 cup. Dough will leave the sides of the bowl, but is still just slightly sticky).
Cover the dough with a towel or a length of wax paper and allow it to rest for 20 minutes. (I transfer the dough onto a lightly floured work surface, shape into a ball, and place in an oiled mixing bowl. Turn dough over so the oiled side is up. Cover bowl loosely with greased cling wrap, and allow dough to rise until doubled, about 30 minutes).
Knead the dough for 30 seconds to press out the bubbles, and divide into 2 pieces (no need to divide if making only one loaf). Shape into balls and let rest for 3 to 4 minutes.
Form each loaf by pressing a ball under your palms or with a rolling pin into a flat oval, roughly the length of the baking pan. Fold the oval in half, pinch the seam tightly to seal, tuck under the ends, and place in the pan, seam down.
Brush the surface of the dough with vegetable oil. Cover the pans loosely with wax paper. and then with plastic wrap. The loose covering allows the dough to rise above the level of the pan. Place the pan in the refrigerator for 2 to 24 hours to double the volume. (I did not place the dough in the refrigerator. I left the dough to rise on my kitchen counter, cover loosely with oiled cling wrap, until doubled in size and bake as directed below).
Remove the pan from the refrigerator and let stand while the oven heat to 400°, about 20 minutes.
Uncover the loaves. Prick any surface bubbles with a toothpick just before slipping the loaves into the oven. (My risen dough has no surface bubbles). Bake on the lower rack of the hot oven for 30 to 40 minutes. When the loaves are brown and tapping the bottom crust yields a hard, hollow sound, they are done. If not, return them in their pans to the oven for up to an additional 10 minutes.  (If the bread gets too brown before they are done, cover the top with foil).
(If using a convection oven, reduce heat 50° and bake for 40 minutes, or until the loaves test done, as above).
Remove the bread from the oven, turn from the pan immediately, and place on a metal rack to cool.
Note : for a soft crust, brush with melted butter or margarine as soon as bread comes out of the oven.


I'm linking this post with Cookbook Countdown #19 hosted by 


Wednesday, September 24, 2014

White Bread with Chocolate

Fancy a bread with half a bar of melting oozing chocolate right in the middle? Well, you can have it, in this lovely bread. It is really a white bread, stuffed with half a bar of chocolate right in the middle, well, the recipe uses only 120gm of chocolate bar in total for two loaves, but I have used 100gm for each loaf, totalling 200gm in all. I divided the 200gm bar into two and used it all up. Hey, nobody's gonna complain about the extra chocolate, at least not in my house!  


Here's how the bread is made :
For a start, this bread is made with an overnight sponge.
(This recipe makes two small loaves. I've used two loaf pans sized 7"x4")

The night before, prepare the sponge by stirring together 3/4 cup hot water (120-130F), yeast, and ginger powder. I have however used cinnamon powder as I did not realize I have ran out of ginger powder! Stir the mixture well, add in 1 cup flour with a wooden spoon to make a thin batter. Cover with plastic wrap and set aside to work overnight.

The next morning, stir down the sponge (it would have risen and fallen by then), see the second photo above, the sides of the bowl are traces of the batter that has risen and fallen by next morning.
Add hot water, dry milk, sugar, salt and butter, and stir in the flour, 1/4 cup at a time until dough is a rough, shaggy mass. I transferred the dough to the bowl of the stand mixer and used the dough hook to knead the dough about 15 minutes until smooth. In total I've used 3-1/2 cups of bread flour. Place the dough in a greased bowl, turn to coat, and cover with greased cling wrap, keep aside to proof for 1 hour or until doubled in bulk.


Punch down the risen dough, knead gently for a few minutes, divide into two balls, cover with kitchen towel and let rest for 5 minutes. Working one ball at a time, press dough down and shape into a flat oval, roughly the length of the baking pan. Lay half the chocolate pieces down the center of the dough. Fold the oval in half, pinch the seam to seal, tuck under the ends, and place in the greased pan, seam side down. Cover with greased cling wrap and leave to rise until the dough has risen 1/2" to 1" above the rim of the pan, about 40 minutes.

Preheat the oven about 20 minutes before baking.


Bake the loaves for about 35 minutes until golden brown and the bottom of the loaves should yield a hard, hollow sound when tapped.


Remove loaves from pans and let cool on wire rack. Serve warm if you like oozing chocolates!


According to Bernard Clayton, slicing into the bread with a bread knife would smear the chocolate, and best way is to tear the bread by hand! I sliced the bread!  Texture of the bread is soft and with the melting oozing chocolate, yummilicious! We finished one loaf on the day itself, and I reheated the second bread by wrapping the loaf in foil for our breakfast the next morning, because we want oozing chocolate! Chocolate for breakfast, now you know what you are missing! 
I would suggest using semi-sweet chocolate, as you want it a little sweet but not too bitter. 

If you want a plain white bread as a toast for breakfast, simply omit the chocolate, as mentioned in the book "These loaves are small so they may be torn apart with forks or by hand rather than cut (which smears the chocolate). Without the chocolate, this is a fine bread for toasting. Perhaps bake one loaf with and one without".


White Bread with Chocolate
(adapted from "Bernard Clayton's New Complete Book Of Breads", Bernard Clayton)
1-1/4 cups hot water (120-130F)
1 package dry yeast (I use 2 teaspoons)
1/4 teaspoon ground ginger (1/2 tsp ground cinnamon)
3-1/2 to 4 cups bread or all-purpose flour, approximately (I use in total 3-1/2 cups bread flour)
1/4 cup nonfat dry milk
1 tablespoon sugar
2 teaspoons salt (1-1/2 teaspoon)
2 tablespoons shortening (I use butter)
4 1-ounce sweet or semisweet chocolate squares, broken in half

Baking Pans : 2 small (7-1/2" x 3-1/2") loaf pans, greased or Teflon

Preparation - Overnight :
The night before, prepare the sponge. In a medium bowl measure 3/4 cup hot water, the yeast, and ginger. Stir well. Blend in 1 cup flour with a wooden spoon to make a thin batter. Cover with plastic wrap and set aside to work overnight.

In the morning turn back the plastic wrap and stir down the sponge, which will have risen and fallen during the night. Add 1/2 cup hot water, the dry milk, sugar, salt, and shortening. Stir in the balance of the flour, 1/4 cup at a time, first with the spoon and then by hand or mixer, until the dough is a rough, shaggy mass that cleans the sides of the bowl. If the dough is slack and moisture breaks through, add sprinkles of flour.

Put the dough under a mixer dough hook, or turn onto a lightly floured work surface and knead by hand with the rhythmic motion of push-turn-fold. Add sprinkles of flour if needed. The dough will become smooth and elastic. Continue kneading for 8 minutes by hand or with the dough hook.

Place the dough in a greased bowl and cover tightly. Leave at room temperature until the dough doubles in bulk and is puffy, about 1 hour.

Now the chocolate is added :
First, punch down the dough and knead for a moment to press out the bubbles. With a sharp knife, divide the loaf. Shape into balls, and let rest under a towel for 5 minutes.
Form each loaf by pressing a ball under the palms into a flat oval, roughly the length of the baking pan. Lay half the chocolate pieces down the center of the oval. Fold the oval in half, pinch the seam tightly to seal, tuck under the ends, and place in the pan, seam down. Repeat with the second ball of dough.
Cover the pans with wax paper and leave until the center of the dough has risen 1/2" to 1" above the edge, about 40 minutes.

Preheat the oven to 375F, 20 minutes before baking.

Bake the laoves for about 35 minutes, until the loaves are a golden brown. Tapping the bottom of each loaf should yield a hard, hollow sound when done. If not done, return to the oven in their pans for up to an additional 10 minutes. Midway during baking and again near the end of it, shift the loaves so they are exposed equally to the oven's temperature variations.
(If using convection oven, reduce heat 40 degrees).

Remove the bread from the oven. Turn the loaves onto a metal rack to cool.
This bread is absolutely delicious served warm, but expect to smear the chocolate if you cut the slices with a knife. To tear by hand is best.


********************************

I'm linking this post to "My Treasured Recipes #2 - Dough Starter Breads (Aug/Sept 2014)" hosted by Miss B of Everybody Eats Well In Flanders and co-hosted by Charmaine of Mimi Bakery House.


and
Cook-Your-Books


Sunday, July 13, 2014

Sister Jennie's Potato Bread (Bernard Clayton)

This is such a lovely bread. I like it's soft and moist texture, thanks to the star of the ingredient, mashed potatoes. I used 2 medium-sized Russet Potatoes, which makes slightly more than a cup of mashed potatoes. If you have some potatoes in your pantry and have some spare time on a weekend, make this bread, it is really nice!


The full recipe makes two really nice loaves.


The star of the ingredient : Mashed Potatoes.

And do not throw away the water from boiling the potatoes, use it to replace the water in the recipe. I used in total 4-1/2 cups of flour and used the stand mixer to do the kneading, which took about 15-20 minutes. The dough is a little sticky, so a light sprinkling of flour is needed to prevent sticking. After the first rise, the dough is bearable to work with, as it is no longer sticky but soft. 


During baking, keep a close watch, as it will turn brown quite quickly before the bread is done baking. I tent the bread with foil at about 25 minutes after it went into the oven, and continue baking for another 20 minutes until the bread is done. I like the nice golden colour of the crust.


Lovely bread with wonderful moist texture.


And soft!


Makes the perfect sandwich bread. And great with just a spread of salted butter, don't forget that cup of coffee or tea!


Our breakfast sandwich, with ham, slices of cheese and lettuce green! Yummilicious! We even had it with Sunny Side-up Eggs made into sandwich with lettuce green and our favourite mayonnaise-mustard-tomato sauce. 


Sister Jennie's Potato Bread
(adapted from "Bernard Clayton's New Complete Book of Breads")
1 cup plain mashed potatoes (instant flakes and water are fine)
2 eggs, beaten
1/2 cup sugar
1 teaspoon salt (I use 1/3 teaspoon, as butter is salted)
1 package dry yeast (2-1/4 tsp)
1/2  cup hot water (120F -130F) (I use water from boiling the potatoes)
4 to 5 cups bread or all-purpose flour, approximately (I use in total 4-1/2 cups)
1/2 cup (1 stick) butter, room temperature

Baking pans : 2 medium (8" x 4") baking pans, greased or Teflon

In a large mixer or mixing bowl combine the potatoes, eggs, 1/4 cup sugar, salt, yeast, warm water, and 2 cups flour. Stir into a rough batter. Kneading will come later.
Cover the bowl tightly with plastic wrap and set aside until the batter doubles in volume, 1-1/2 hours.
Meanwhile, cream the butter with the remaining 1/4 cup sugar. Set aside
Remove the plastic wrap and beat down the batter. Stir in the creamed butter and sugar. Add the balance of the flour, 1/2 cup at a time, using a wooden spoon or a mixer flat beater. When the batter gets heavy, replace the beater with a dough hook. The dough will be a rough, shaggy mass that will clean the sides of the bowl. If the dough continues to be moist and sticky, sprinkle with small amounts of flour.
Place the dough in a mixing bowl and pat with buttered or greased fingers. Cover the bowl with plastic wrap and leave until the dough has risen to above twice its original volume, about 1-1/2 hours. You can test if it has risen by poking a finger into it; the dent will remain if it is ready.
Punch down the dough, turn it out onto the work surface again, and knead for 30 seconds to press out the bubbles. With a sharp knife, divide the dough in half. Shape into balls. Let rest under a towel for 3 to 4 minutes.
Form the loaves by pressing each ball into a flat oval, roughly the length of the buttered pan. Fold the oval in half, pinch the seam tightly to seal, tuck under the ends, and place in the pan, seam down.
Place the loaves in a warm place, cover with wax or parchment paper, and let rise to double in volume, above the edge of the pans, 40 minutes.
Preheat the oven to 375F, 20 minutes before baking.
Bake the loaves until they are golden brown, about 40 minutes. Turn the loaf out of its pan and tap the bottom crust with a forefinger. A hard, hollow sound means the bread is baked. If not, return to the oven for an additional 10 minutes. If the tops of the loaves appear to be browning too quickly, cover with a piece of foil or brown sack paper. Midway during baking and again near the end of it, shift the pans so the loaves are exposed equally to temperature variations in the oven.
(If using a convection oven, reduce heat 50 degrees).

Remove the bread from the oven. Turn out from the pans and place on a metal rack to cool before slicing.
This loaf will keep well for several days at room temperature. It will keep for 4 to 5 months at 0 degrees in the freezer.
It makes fine toast.

*************************


Wednesday, November 20, 2013

Honey Oatmeal Bread

This is another lovely bread from Bernard Clayton's New Complete Book of Bread. Originally, this bread is called Maple Oatmeal Bread, and it uses maple syrup, all 3/4 cup for two loaves of bread. Since I do not have any maple syrup, I have used honey instead, and reduced the amount slightly. I've made only half a recipe for 1 loaf of bread.


A soft bread with light golden crust, with just a hint of sweetness from the honey.


Rolled oats is soaked in some boiling water for an hour. The softened roll oats are then mixed with the rest of the ingredients, honey, salt, cooking oil and some flour, mixed to a stiff batter.  Cover with cling wrap and leave until doubled in size, about 1 hour.

Add the rest of the flour, 1/2 cup at a time to the risen doughy batter and knead until the dough leaves the sides of the mixing bowl. In total I have used about 3 cups of bread flour. Shape the dough into a loaf and placed in a greased loaf pan, 8" x 4-1/2", covered with greased cling wrap and leave to rise until it reaches the rim of the loaf pan. Preheat the oven about 15 minutes before baking, at 350F. 


This bread is baked in  a moderately low temperature oven for 40-50 minutes to allow the bread to rise further into a light brown loaf. It rises really well during the first 20 minutes of baking.


It bakes up beautifully with a light golden crust. The bread has a light sweetness in taste from the honey and the oats are blended into the dough, which gives a soft and nice bread texture. Just as the author says, "An admirable loaf"!

Maple Oatmeal Bread
makes 2 loaves (8"x4") (my measurements in blue is for one loaf)
2-1/2 cups boiling water  (1-1/4 cups)
1 cup quick or regular rolled oats (1/2 cup)
1 package dry yeast (1 tsp plus 1/8 tsp)
3/4 cup maple syrup (1/4 cup honey)
2 teaspoons salt (1/2 tsp)
1 tablespoon cooking oil (1/2 tbsp)
5 cups bread or all-purpose flour, approximately (3 cups)

Baking pans : 2 medium (8" x 4") loaf pans, greased or Teflon
  1. In a large bowl, pour the boiling water over the oatmeal and set aside to soak for 1 hour. Sprinkle the yeast over the cooled oatmeal and stir to mix. Add the maple syrup (honey), salt, cooking oil and 3 cups (1-1/2 cups) of flour. Blend all the ingredients. It will have the consistency of a heavy batter.
  2. Cover the bowl with plastic wrap and set aside to rise for about 1 hour.
  3. Add additional flour, 1/2 cup at a time, to form a dough that can be lifted from the bowl and placed on the surface to knead until the dough is smooth and elastic, about 10 minutes. Add more flour if the ball of dough is sticky. The dough may also be placed under a dough hook in a mixer for an equal length of time. The dough should clean the bowl in the final stages of kneading. (I use the stand mixer to knead the dough until smooth, about 20 minutes, with an additional 1-1/2 cups of flour, about 3 cups in total).
  4. Divide the dough into 2 pieces and shape into loaves. Drop each into a prepared pan. Push the dough into the corners.
  5. Cover the pans with wax or parchment paper and leave at room temperature until the dough reaches the edge of the pan, about 45 minutes.
  6. Preheat the oven to 350F, about 15 minutes before baking.
  7. This is a fairly slow oven, so allow 40 to 50 minutes for the bread to bake into a light brown loaf. Midway through baking, turn the pans end for end to balance the heat on the loaves. Turn one loaf out of its pan and tap the bottom crust with a forefinger. A hard, hollow sound means the bread is baked. If not, return to the oven for an additional 5 or 10 minutes. (If using a convection oven, reduce heat 50 degrees).
  8. Remove the bread from the oven and turn the loaves from the pans. Place the loaves on a metal rack to cool before serving. The bread toasts beautifully. It can be kept frozen for an indefinite period at 0 degrees. An admirable loaf.

This post is linked to the event, Little Thumbs Up, organized by Zoe from Bake For Happy Kids and Doreen from My Little Favourite D.I.Y, hosted by Vivian from Vivian Pang's Kitchen

Photobucket


I'm sharing this post with :

 photo 77951578-1914-4b72-8eda-9e40a91183ac_zps331eb4b4.jpg


Tuesday, April 30, 2013

Jalapeno Corn Bread

I love cornbread. This is the fourth cornbread recipe that I've posted and probably would not be the last! Today's recipe is taken from "Bernard Clayton's New Complete Book Of Breads" where he described this bread as the best cornbread in his book. That gave me reason enough to try!


This recipe uses cream-style sweet corn, cornmeal, canned jalapeno which I have replaced with fresh jalapenos, onions, flour, eggs, water, dry milk powder, a small amount of sugar, salt, oil, baking powder and cheddar cheese. CHEESE?  Where's the cheese??  OH NO!!  I have totally forgotten to add the cheese!!!


Only realised that the cheese is not in the batter, about 10 minutes later when the pan was already in the oven, when I sat down, going through the recipe from the book. I should have gone through the ingredients before I poured the batter into the baking pan, not when the pan is already in the oven! But then I guess the cornbread would still turn out fine, even without the cheese.


The cornbread bakes up good, with very nice golden crust.


It has a very moist, tender texture and so tasty! There's a little heat from the Jalapenos, the cream corn adds some creamy sweetness and together with the softened onions, makes this a delicious savoury bread to have with some soup or chilli.  I can imagine how much more tastier the cornbread would be if I have not forgotten to add in the Cheddar cheese. 


But even without the cheese, it is a very good cornbread! I had this for my lunch with a cup of tea. 


You may like to view my other cornbread posts :
Green Chile and Cheese Cornbread
Jalapeno Cheddar Cornbread
Chilli Corn Bread


I'm linking this post with Little Thumbs Up, where the ingredient for this month is Corn, hosted by Esther from Copycake Kitchen and organised by Zoe from Bake For Happy Kids and Doreen from my little favourite DIY.


A little announcement :
The next host for Little Thumbs Up in the month of May, shall be hosted by me! And the chosen ingredient is Mushroom.  Little Thumbs Up is organized by my baking buddy, Zoe from Bake For Happy Kids, and Doreen from my favourite DIY and each month a participating host will nominate an ingredient, and everyone is welcome to cook or bake using the selected ingredient of the month. Everyone is welcome to join in, no matter where you are from. A thumb-nail linky will be provided on the host's blog post at the start of event, which is the first Tuesday of the month and it will stay open right up to the last day of that month. You can read all about Little Thumbs Up event from here.
Hope everyone can join in this fun event. The next Little Thumbs Up, selected ingredient, Mushroom shall start on 7th May, I'm looking forward to your support and see all of your delicious mushrooms yummies!

Please link up all your delicious Corn recipes with the host of this month, Esther from Copycake Kitchen.


Note : I have made 1/3 from the original recipe, my measurments listed in blue. Baked in a 8" square baking pan, greased and lined.
Jalapeno Corn Bread
(adapted from "Bernard Clayton's New Complete Book of Breads")
2-1/2 cups yellow cornmeal (3/4 cup + 1 tbsp)
1 cup bread or all-purpose flour (1/3 cup)
2 tablespoons sugar (2 tsp)
1 tablespoon salt (1/3 tbsp)
4 teaspoons baking powder (scant 1-1/2 tsp)
1/2 cup nonfat dry milk (3 tbsp)
3 eggs, room temperature (1 egg)
1-1/2 cups warm water (105F-115F) (1/2 cup)
1/2 cup cooking oil (40 ml)
1 (16oz-can) cream-style corn (160gm)
6 to 8 jalapeno canned chili peppers, chopped (2 fresh jalapeno)
2 cups grated sharp Cheddar cheese (1/2 cup)
1 large onion, grated (1 small, quartered and finely sliced)

Two 9"x11" or 9"x9" baking pans, greased or Teflon.

Preheat the oven to 425F.
In a large bowl, stir together the cornmeal, flour, sugar, salt, baking powder and milk.
In a smaller bowl lightly beat the eggs and stir in the warm water and oil. Pour the liquid mixture into the cornmeal mix and stir in the corn, chopped peppers, cheese, and grated onion.
Pour the batter into the baking pans and spread evenly with a rubber scraper or a wooden spoon.
Bake until the bread tests done, about 30 minutes, and a wooden toothpick or metal skewer inserted in the center comes out clean. (If using convection oven, reduce heat 50 degrees).
Remove the bread from the oven. Let the pans cool somewhat on metal racks before cutting the bread into serving pieces.
This bread keeps well for several days, thanks to the oil and cheese, and may be frozen for months at 0 degrees.

#39/100


Wednesday, January 16, 2013

Rosemary-Garlic Bread

Made another lovely bread from Bernard Clayton's New Complete Book of Breads. I have not baked any bread in December, as it was a busy month for me. But that did not stop me from thinking about baking a bread, any bread! So when the new school terms started in early January, and I was alone in the house in the mornings with the kids at school, my yearning for some homemade yeasted bread took over! I took out one of my favourite bread book, and decided on Rosemary-Garlic Bread, from the chapter on "Herb And Spice Bread". 


I made the full recipe which yields two medium sized loaves. Herbs and spices used are dried parsley, dried rosemary, ground black pepper and fresh chopped garlic.


This  bread is dense but soft, moist and very tasty from the garlic and herbs. I did reduced the salt slightly and I still find it a tiny tad salty, it may be OK for some, but I would prefer to reduce by another 1/4 teaspoon or so. The black pepper taste is a little strong, even though I've reduced the amount slightly, but I like it. For a milder taste, use half the amount called for.


Savory bread like this is great with soups. We had this with some canned mushroom soup.  Very nice too, just spread with some butter, or just eat it on its own. This is a nice bread but between this bread and another herb bread that I've made a couple of months ago, Briarpatch Herb Bread, I prefer the later. Briarpatch Herb Bread has a softer texture and  makes such a perfect sandwich bread. You might want to give that a try!

I'm sharing this post with :

Rosemary-Garlic Bread
(adapted from "Bernard Clayton's New Complete Book of Breads")
3 cups whole-wheat flour
2-1/2 cups bread or unbleached flour, approximately
2 packages dry yeast
2 teaspoons salt (I use 1-1/2 tsp)
2 teaspoons freshly ground black pepper (I use 1-1/2 tsp)
2 cups hot water (120 degrees -130 degrees) (I use about 1-3/4 cups)
1/4 cup olive oil
3 garlic cloves, finely minced
1/4 cup finely chopped fresh parsley (I use 2 tbsp dried parsley)
3 tablespoons minced fresh rosemary (or 1 tablespoon dried)

Baking pans : 2 medium (8"x4") bread pans, greased.

  1. In a mixing bowl measure 1 cup each whole-wheat and white flours. Stir in the yeast, salt, and black pepper and blend. Add the hot water and olive oil, and beat for 2 minutes with the mixer flat beater, until the batter is smooth.
  2. Stir in the herbs. Mix well. Measure in 2 cups whole-wheat flour, and add the balance of the white flour, 1/4 cup at a time, until the batter becomes dough and forms a rough, shaggy mass.
  3. Knead the dough with a mixer dough hook, for about 8 minutes.
  4. Drop the dough into a greased bowl and cover tightly with plastic wrap. Put either in a warm place for 30 minutes, until doubled in bulk, or leave at room temperature for about 1 hour.
  5. Punch down the dough. Divide in half. Roll each half into a ball and put aside to rest for 5 minutes.
  6. Press each ball into an oval, roughly the length of the pan. Fold lengthwise, press the seams together, and place in the prepared pan, seam down.
  7. Cover the pans with wax paper and leave to rise until double in bulk, about 1 hour. The dough will reach the height of the pan.
  8. Preheat the oven to 400 degrees 20 minutes before baking.
  9. Uncover and place on the middle shelf of the oven. Bake until the loaf is a deep brown and crusty, 35 to 40 minutes. Turn one loaf from its pan and tap the bottom crust with your forefinger. The bread is done if sounds hollow and hard. (If using a convection oven, reduce heat 50 degrees).
  10. Turn the loaves onto a metal rack to cool before slicing. The bread is delicious toasted, keeps well at room temperature for several days, and can be held frozen for a year at 0 degrees.
#6/100


Saturday, November 17, 2012

Onion Lover's Bread

This is one of the yummiest, softest and fluffiest bread! A truly delicious bread, if you are an onion lover, you will most definitely fall for this bread, as did my family! Give this a try, highly recommended! The good thing is, this bread stays as soft on the next day too!


Here are some photos on how the bread was made :

  • The onion mixture : melt the butter, remove from heat and mix in the finely chopped onions, paprika, cheese, pepper, garlic salt and poppy seeds. Mix to combine and set aside. (I do not have garlic salt, I use 3/4 tsp garlic powder with 1/8 tsp of salt)
  • Make the dough as per instructions below, roll it out to the required size. Here I have made one big loaf, and have divided the dough into three parts to make one big braid. My advise is to make into two smaller braids instead, as the big loaf is extremely huge! Refer to the measurement in the recipe below for smaller braids.
  • Place some onion filling, leaving the border 1/2" all around.


  • Roll up dough from the long end close to you, but stop at about 1" from the border, otherwise the fillings would be pushed out. 
  • Lift the dough from the other side towards the center to meet the other end of the dough.
  • Seal the dough together tightly. Repeat with the other two parts of cut dough.


Place the three rolled filled dough onto the baking sheet, greased or lined with silicone baking mat. Braid the three rolls together, pinching the ends to seal and tuck them under firmly. Leave to rise until puffy about 45 minutes. Bake at 375F about 40 minutes. I took a step further by glazing the top with egg wash and sprinkle with lots of sesame seeds before baking.


This is one huge loaf! By the time the dough has risen it can barely fit into my oven. I've got to adjust the loaf by tucking in the ends gently to fit into my oven. So if would be advisable to make two smaller braids instead. Or half a recipe for one smaller loaf.  It smells so deliciously good while it is baking. My hubby was a little shocked when he walked into the kitchen. He has never seen a bread this huge before! And it was huge! Hahaha! The size of my cooling rack is a square 14", the bread is definitely longer than that, as I've got to place it across the centre!


Look at the texture of the bread. It is so, so, fluffy soft and very delicious! When I was holding the bread in place while slicing it, I can really feel the softness under my fingers, and I knew that this bread is a winner. The onions filling is really good, and I'm glad that I've added the sesame seeds on top. This is one delicious bread, very tasty enough to eat it on its own.


And the great thing is, this bread is as soft on the second day! This is one bread that I'll be making again in my kitchen, I hope that you give this a try. Don't miss out on this bread!


I am having a good time making different kinds of breads from this fantastic book "Bernard Clayton's New Complete Book of Breads", the Briarpatch Herb Bread and this Onion Lover's Bread are both winners! However I am at first, rather annoyed about the way the instructions are laid out for each recipe. The late Mr Bernard Clayton, (bless him), has given three methods of making, that is by hand, by stand mixer and by using the food processor. But the style of laying out the instructions are pretty confusing, I've got to underline the sentences that are meant for the method which I have chosen, the stand mixer, before I start with the making of the bread. Especially when I first got the book, it was really confusing. It does take a little time to read and understand his style of writing and getting used to. But do not be alarmed by this, once you have understood his style of writing, you are on your way to lots of delicious breads. I'm not annoyed anymore, in fact I'm beginning to appreciate and looking forward to bake from this book even more!


Since I have used the stand mixer to mix the dough for this bread, I'm giving the method below for using the stand mixer :

Onion Lover's Bread
(adapted from "Bernard Clayton's New Complete Book of Breads")
Dough :
1 package dry yeast (2-1/4 teaspoon)
4 cups bread or all-purpose flour, approximately (I use in total about 4-3/4 cups bread flour)
1-1/4 cups water
1/4 cup sugar
1-1/2 teaspoons salt (I use 1-1/8 tsp salt)
1/3 cup nonfat dry milk
1/2 cup (1 stick) butter, softened (I use 120gm)
1 egg, room temperature, lightly beaten

Filling :
1/4 cup (1/2 stick) butter, melted (I use 60gm)
1 cup finely chopped onions, or 1/4 cup onion flakes
1 tablespoon grated Parmesan cheese
1 tablespoon poppy seeds
1 teaspoon garlic salt (I use 3/4 tsp garlic powder + 1/8 tsp salt)
1 teaspoon paprika

Baking Sheet :
1 baking sheet, greased or Teflon (or 1 loaf pan)

Note : The filling is prepared after the dough has been made and set aside to rise.

To make the dough :

  • In mixer bowl, stir the yeast and 2 cups flour together.
  • In a saucepan, heat the water, sugar, salt, dry milk and butter (about 125 degrees). When the butter is quite soft, but not necessarily melted, add the egg and pour all the liquid into the flour. 
  • Mix at low speed until moistened. Increase the speed to medium and beat for 2 minutes with the mixer flat beater.
  • Stop the mixer, attach the dough hook, and add flour,  1/4 cup at a time, to make a soft dough that forms a ball around the hook as it revolves and cleans the sides of the bowl. This dough must rise before kneading.
  • Cover the bowl tightly with plastic wrap and let the dough rise at room temperature until light and doubled in volume, 1 hour.

To make the filling :
  • Meanwhile, make the filling : Melt the butter in a medium saucepan. Remove from heat and stir in the remaining ingredients. Mix thoroughly and set aside until ready to form the braids.


Kneading the dough :
  • Knead using the mixer, add flour, if necessary, to form a soft, elastic ball around the dough hook as it resolves. It will clean the sides of the bowl. Knead for 10 minutes.


Shaping
  • Allow the dough to relax for 5 minutes and then roll the piece into a 12"x18" rectangle. For one loaf, cut into three 4"-wide strips, or, for two loaves, six 9" -x- 4" strips. If the strips pull back and shrink when they are cut, let them rest for 3 or 4 minutes - and roll to size. Carefully spread the filling on the pieces, leaving a 1/2" margin around the edge. This permits a good bond that will hold and not open when the braids rise.
  • Roll each piece from the long side. Stop the roll 1" from the edge. Lift the edge up to the roll and pinch together. Don't roll to the edge, for this will push the filling onto the clear margin and make it difficult to get a firm seal.
  • Lift the rolls onto the baking sheet and braid 3 rolls together, pinching the ends together tightly.


Second Rising :
Cover with a length of wax paper and leave at room temperature until the braids have doubled in bulk, about 45 minutes.

Preheat :
Preheat the oven to 350F, 20 minutes before baking.

Baking 
Bake on the middle shelf of the moderate oven. When the loaves are a golden brown and tapping the bottom crust yields a hard, hollow sound, they are done, about 40 minutes. (If using a convection oven, reduce heat 25degrees and bake for 35 minutes).

Final Step
Remove bread from the oven. As will all braided loaves, handle the hot bread with care. Move with the help of a spatula to cool.


kitchen flavour's note :
~ used a total of 4-3/4 cups bread flour
~ egg wash the top and sprinkle with sesame seeds just before baking.


Thursday, November 15, 2012

Orange Oatmeal Bread

This is one lovely bread, well, not quite a bread, it is a cross between a bread and a cake. But since this recipe is from a book on breads, then I suppose, it is to be called a bread! Whatever name it is called, this is one healthy and yummy bread. It only uses 2 tablespoons of butter, and I just cannot believe just how moist the bread is. 


All the healthy goodness of oats and fresh orange (zest and flesh), goes into this lovely bread. Instead of milk, this recipe uses warm water, and when I cut the orange, I collected all the juices from the orange and used that too. I did not use the extra 2 tablespoons of sugar (for the orange) as indicated in the recipe, I took the 2 tablespoons of sugar from the 3/4 cup meant for the batter. Even then, this bread is a little too sweet for me. When I make this again, I will definitely reduce the sugar.


I use one large orange, so fragrant and juicy. The zest, flesh and juices from the oranges are mixed together with 2 tablespoons of sugar and left for awhile to macerate so that the orange get soaked in its own juices, before they are mixed with the rest of the wet ingredients.


The wet ingredients are then mixed into the dry ingredients and stir to combine. Bake for about an hour. Smells incredibly nice while baking!


I sliced the bread while it is still warm, and it is a little crumbly, so very moist, and soft. The oats makes the bread a little chewy with interesting texture and the oranges is just delightful. 


Look at the bits of oranges and oats in it! A slice of this moist bread is perfect with a cup of tea.


I'm sharing this with :
BYOB, Bake Your Own Bread hosted by Girlichef
Quick Bread Monday hosted by Cake Duchess
Recipe Box hosted by Bizzy Bakes
Full Plate Thursday hosted by Miz Helen's Country Cottage
See Ya In The Gumbo hosted by Ms. enPlace


Orange Oatmeal Bread
(adapted from "Bernard Clayton's New Complete Book of Breads")
1 orange
2 tablespoons plus 3/4 cup sugar (I use 3/4 cup only, 2 tablespoons taken from the 3/4 cup)**
1-1/2 cups all-purpose flour
1 tablespoons baking powder
1/2 teaspoon salt
1/4 teaspoon baking soda
1 cup rolled oats
2 eggs
2 tablespoons butter, melted
2/3 cup warm water (105-115 degrees)

Baking Pan : 1 large (9"x5") or 2 small (7"x3") baking pans, buttered, then lined with buttered wax paper along sides and bottom.

Grate the orange for its zest, then peel. Reserve zest. Cut off the outer white membrane and, with a sharp knife, cut the meat out of each section, leaving the tough sectional membranes intact. Discard the membranes and seeds. Cut the flesh into small pieces and add the orange zest. Sprinkle with the 2 tablespoons sugar and mix well. Set aside.

In a large bowl measure the flour, 3/4 cup sugar, baking powder, salt and baking soda. Stir in the rolled oats. In a separate bowl lightly beat the eggs and mix with the melted butter, reserved orange mixture, and water. Blend the liquid into the dry ingredients. Pour the batter into the prepared loaf pan.

Preheat the oven to 350 degrees while letting the pan(s) rest for 10 minutes.

Bake the loaf or loaves in the oven until a wooden toothpick or cake testing pin inserted in the center of the loaf comes out clean and dry, 1 hour. The baking time will be about 15 minutes less for small loaves.
(If using convection oven, reduce heat 50 degrees and bake the large loaves for 50 minutes and the smaller ones for 35 minutes).

Remove the bread from the oven. Carefully remove the bread from the pan(s), tugging gently on the wax paper to loosen it. Allow to cool slightly on a metal rack before serving.
Delicious served warm, spread with sweet butter.


kitchen flavour's notes :
** to reduce the amount of sugar, as it is still very sweet


Saturday, November 10, 2012

Briarpatch Herb Bread

This is one amazing bread! This amazing recipe is from Bernard Clayton's New Complete Book of Breads, and Mr Clayton originally got this recipe from a herbalists, Pearl Lloyd who grew more than 150 types of herbs in her private herb garden. This bread uses four types of herbs, oregano, chives, basil and parsley. According to the book, ideally the herbs should be fresh, but dried can  be substituted. I used fresh chives and fresh basil from my garden, and dried parsley and oregano.


It was one of those Sunday late morning, where the family went out for a late breakfast and naturally we skipped lunch. So I made this bread as a late afternoon tea time snack. The full recipe makes two loaves, but since I do not want to keep any leftovers as I am pretty sure that we cannot finish two loaves, I made half the recipe for one loaf. I used the stand mixer to mix the dough, and the dough was pretty sticky. Sprinkle some flour over the dough when shaping the bread and it is much easier to handle with dry clean hands. I made it sightly lighter by replacing some of the whole-wheat flour with white bread flour.


The bread is simply amazing. Smells incredible with the herbs and it has a soft texture, and very tasty. I sliced it about 40 minutes after I took it out from the oven, while it is still slightly warm and delicious!


This is not a very tall bread, and it did not look very impressive, but it is wonderfully soft and moist. Makes  a perfect sandwich bread. According to the book, this bread freezes well.


We had the bread with some slices of ham and cheese. I do not have any veggies in my fridge at that time, though with some cut slices of tomatoes, cucumber and lettuces would be lovely. Thumbs up from the family, everyone loves the bread. It was very good too spread with some salted butter, yum! I have no idea how this bread would fare on the second day, as we finished the whole loaf that very day! Definitely will be making this wonderful healthy bread again, for one of our "sandwich days"!


I'm sharing this with :


Here is the full recipe for two loaves, and my adjustments for one loaf is indicated at the bottom of the recipe :
Briarpatch Herb Bread
(adapted from Bernad Clayton's New Complete Book of Breads)
2 cups bread flour or all-purpose flour, approximately
1 package dry yeast
2 tablespoons sugar
1/3 cup nonfat dry milk
1-3/4 cups hot water (120degrees-130degrees)
1 egg
3 tablespoons finely chopped fresh parsley, or 1 tablespoon dried
1 teaspoon chopped fresh oregano, or 1/3 teaspoon dried
1/2 teaspoon grated nutmeg
1-1/2 tablespoons finely chopped fresh chives, or 1/2 tablespoon dried
1 tablespoon finely chopped fresh basil
2 tablespoons cooking oil
2 teaspoons salt
3 cups whole-wheat flour
1 tablespoon butter, melted

Baking pans :
2 medium (8-1/2"x4-1/2") loaf pans, greased or Teflon.

  1. Measure 1-1/2 cups flour into a mixing or mixer bowl and stir in the yeast, sugar, and dry milk. Pour in the hot water. Blend into a thin batter. Break in the egg and add the parsley, oregano, nutmeg, chives and basil. Beat this mixture in a mixer for 2 minutes. Allow the mixture to ferment and become bubbly, about 15 minutes. There is no need to cover it for this short period.
  2. Add cooking oil, salt, and 2 cups whole-wheat flour to the mixture and beat with a wooden spoon or with the mixer flat beater until the flour has been worked into the batter. Let stand for 3 minutes to allow the whole-wheat particles to fully absorb the moisture before adding more flour. Alternate between the white and whole-wheat when adding small portions of flour to form a rough shaggy ball of dough. Knead with the dough hook for 8 minutes.
  3. Grease the mixing bowl, drop in the dough, cover tightly with plastic wrap, and leave at room temperature to rise until double in bulk, about 40 minutes.
  4. Divide the dough into 2 pieces and shape each into a ball. Press each ball into an oval roughly the length of a bread pan and fold in half lengthwise. Pinch the seam to seal, and place in the baking pan with the seam under. Cover the pans with wax paper and leave to rise until the dough reaches the height of the pan, about 35 minutes.
  5. Preheat the oven to 400 degrees, 20 minutes before baking.
  6. Place the pans in the oven and bake until golden brown with flecks of herbs over the crust, about 35 minutes. Turn one loaf from its pan and test for doneness by tapping the bottom with a forefinger. If it is hard and sounds hollow, the loaves are done. If not, return them to the oven for an additional 8 to 10 minutes. (If using a convection oven, reduce heat 50degrees).
  7. Turn the loaves out onto a metal rack to cool before slicing. While still hot, brush the bread with the melted butter.


kitchen flavour's notes :
for half a recipe, I made the following adjustments -
  • use in total, 2 cups bread flour and 1 cup whole-wheat flour
  • reduce salt slightly to 3/4 teaspoon
  • the rest of the ingredients, use only half of the amount from the original full recipe


Monday, July 2, 2012

Thirty-Minute White Bread

This bread is called Thirty-Minute White Bread because it is left to rise in the oven for thirty minutes and then bake in a cold oven. If you're looking for a quick white bread to make, you might want to give this a try. I like this bread as it makes a great toast! This recipe is from Bernard Clayton's "New Complete Book of Breads", a wonderful book with lots of recipes on various types of bread.


A very easy and quick bread to make if you want some bread to have later in the day. Options are given in the book on methods of making this bread, either by hand, the stand mixer or the food processor. I chose the stand mixer to mix the dough. I made half a recipe for a small loaf. Due to our hot humid weather over here, I have reduced the amount of water slightly as I do not want to end up adding in more flour. I have noticed that most of the breads in this book uses a fair amount of salt, so I've reduced the salt by half, which turns out just right. After the dough is formed, as above, it is shaped into a round, and let rest for 5 minutes, covered with a piece of cloth.


The dough is then shaped into an oval, to the length of the loaf pan,  fold in half, pinch the seams tightly, tuck under the ends on both sides and place it in the greased loaf pan, seam side down.


Place the pan in the oven, switch it on at 200C for exactly 1 minute. Turn off oven and leave the pan undisturbed in the oven for 30 minutes. Refer the first picture above when it was placed in the oven and the second picture after 30 minutes, it has risen beautifully.


After 30 minutes of rising, turn on oven once again at 200C and bake for 40-45 minutes until bread is done. Immediately remove from pan and leave to cool on wire rack.


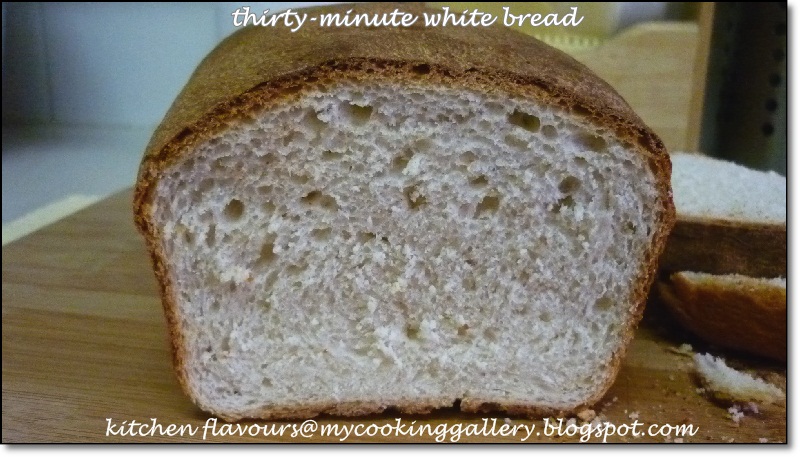
This is a lovely and tasty bread. It does not have the fluffiness like some white breads do, but it is still soft with crispy crust. And it is tasty enough to be eaten a slice on its own with just a cup of tea. This is not a good keeper, as it gets stale rather quick. But I do not mind, as this bread is excellent toasted. It gets incredibly crispy when toasted and so delicious with a spread of butter and kaya (our local egg jam) or any of your favourite jam. A bread that I would not mind making again, just to toast for breakfast.


BYOB Badge


I'm sharing this with BYOB, Bake Your Own Bread, hosted by Girlichef. BYOB is a monthly bread baking event that is open to anyone who loves baking bread. Whether you are baking bread once a month or very often, link your bread to BYOB! And whether you are making yeasted breads or breads without yeast, or if you have anything informative about bread that you would like to share, it's all happening at BYOB. Link your post to BYOB! Two exciting news is, Girlichef will have two new co-hosts of BYOB starting from this month, and the second news is BYOB will implement an Optional Featured Bread Blog. For more information about Bake Your Own Bread (BYOB) and how to link up, drop by Girlichef for the full details. 


And I'm sharing this too with :
Recipe Box 3 hosted by Bizzy Bakes
Cookbook Sundays hosted by Couscous & Consciousness


Thirty-Minute White Bread
(adapted from "New Complete Book of Breads" by Bernard Clayton)
Makes two loaves
1 cup milk
2 tablespoons vegetable shortening or butter
3 teaspoons salt'
1 cup lukewarm water (105F-115F)
2 packages dry yeast
2 tablespoons sugar
6 to 7 cups bread or all-purpose flour, approximately
1 tablespoon butter, melted


Baking pans
2 medium (8-1/2" x 4-1/2") loaf pans, greased or Teflon


By hand or mixer (8 mins)
Warm the milk in a saucepan to soften the shortening or butter for a few moments. Add the salt and the lukewarm water. Add the yeast and sugar and stir to dissolve.
Stir in 2 cups flour and beat for 3 minutes at medium speed in an electric mixer or 150 strong strokes with a wooden spoon. Gradually add 2 more cups flour, and continue beating for 3 minutes, or 150 strokes.
Turn off the mixer and add about 2 more cups flour. Work it in with a spoon, and when it becomes stiff, with your hands. When the dough has a rough form and is cleaning the sides of the mixing bowl, turn it out on the floured work surface.


Kneading (8 mins)
Knead for about 8 minutes with a strong push-turn-fold motion. Occasionally throw the dough hard against the work surface (stimulates the gluten). Or replace the dough in the mixer bowl and put under the dough hook for an equal length of time.


Shaping (10 mins)
Divide the dough in half, and shape the balls. Let rest under a cloth for 5 minutes.
Form the loaves by pressing each (with your palm or rolling pin) into an oval, roughly the length of the baking pan. Fold the oval in half, pinch the seam tightly to seal, tuck under the ends, and place seam down in the pan. Brush the loaves with the melted butter.


Rising (30 mins)
Place the pans in a cold oven and turn heat to 400F for 60 seconds (1 min), no more. Turn it off!


Baking (400F - 45 mins)
About 30 minutes later, turn the oven to 400C and bake for 45 minutes or until the loaves are brown. When done, they will sound hollow when tapped on the bottom crust with the forefinger. If the crust is soft, return to the oven, without the pans, for 10 minutes.
(If using a convection oven, reduce heat 50F).


Final Step
Place the loaves on a metal rack to cool.
The bread is fine for sandwiches and toast. It also freezes very well.


kitchen flavours notes :
I made half a recipe with the following adjustments :
~ use only 1/2 teaspoon of salt (original 1 tsp), which turns out just the right taste of saltiness.
~ due to our hot and humid weather, I have reduced the amount of water to only 1/3 cup (original 1/2 cup)