Showing posts with label Ellie Krieger. Show all posts

Sunday, December 18, 2016

Cranberry-Almond-Chocolate Clusters

This week at I Heart Cooking Clubs (IHCC), it is December's Monthly Featured Dish/Ingredient Challenge : Sweet Treats!.  I've made Ellie Krieger's sweet treat, Cranberry-Almond-Chocolate Clusters. Easy, simple and delightful. 


These chocolaty nutty sweet treat needs no baking at all. Simply toast the almonds and coarsely chop. Place in a bowl and mix with dried cranberries. Ellie's recipe uses dried cherries, but they are not available and even if I can find them, they are very costly. Dark chocolate is then melted, then mix the almond-cranberry into the melted chocolate, mix till well combine. Scoop heaping tablespoonfuls of the chocolaty mixture and place on baking sheet lined with parchment paper. Refrigerate for about 20 minutes until set. 


These are delightful to eat! 


Place each cluster on cupcake liners, would make a pretty plate on your dessert or snack table for the festive season. If I were to serve to guests, I would make them a little smaller, maybe a heaping teaspoon instead. These little sweet treats are a definite repeat!


Cherry-Almond-Chocolate Clusters
(So Easy by Ellie Krieger)
1 cup whole roasted almonds, coarsely chopped
1/2 cup dried cherries, coarsely chopped
6 ounces dark or bittersweet chocolate (60% to 70% cocoa solids), finely chopped

In a medium bowl, toss together the almonds and cherries. Line a baking sheet with wax paper.
Melt half of the chocolate in the top of a double boiler over slightly simmering water, over the lowest possible heat, stirring frequently, make sure the water is not touching the top pan. Remove the double boiler from the heat, and stir in the rest of the chocolate until melted. Remove the top pan with the chocolate in it, gently wipe the bottom of it, and set it aside for a moment. Replace the simmering water in the bottom pan with warm tap water. Put the pan of melted chocolate on top of the warm water. This will keep the chocolate at the right temperature while you make the clusters. 
(My note : I melted the chocolate in the microwave oven, and skip the step on placing the bowl of melted chocolate over a pan of warm water).
Stir in the fruit/nut mixture into the chocolate. Spoon out heaping tablepsoon-size clusters of the chocolate mixture onto the baking sheet about 1 inch apart. Put them in the refrigerator to cool and set for about 20 minutes. Store and serve at room temperature.


I'm linking this post with I Heart Cooking Clubs, theme for this week
Sweet Treats!

Friday, October 14, 2016

Energy Bars

This week at I Heart Cooking Clubs (IHCC), the theme, Monthly Featured Chef : Ellie Krieger, is the last one in line for the monthly featured chef theme. Starting from next month, the theme will be changed to a featured ingredient or dish, and we shall have the option to choose to cook with any of our past and present featured chefs at IHCC.

It has been awhile since I've cook with Ellie Krieger, and I have been thinking of making some snacks, especially on the afternoons that I want something light yet healthy to nibble on. Of course, you can count on Ellie Krieger for her fabulous healthy recipes and found just the right snack to make, Energy Bars. 


Half of the baked bars with sesame seeds spread over the top, leaving the other half as it is.


These bars are pretty easy to make, it comes together pretty quickly. What you need is a food processor to pulse all the ingredients (except maple syrup and eggs), until finely chopped. Then pour in the eggs and maple syrup and pulse  to a thick paste. Spread onto a very well greased baking tray, bake for 20 minutes until golden brown. Easy peasy! I did not have any dates, so I used dried cranberries. Also did not have any maple syrup, so I've used honey.

My food processor could not pulse all the ingredients at once, so I have divided into two and pulse each half separately, mixing them together before adding the eggs and honey. One thing to note is, to cut each dried apricots into three so that it is easier to pulse in the food processor into smaller pieces. (The whole apricot got stuck in between the blades, so I got to remove them and cut into three pieces each, before proceeding to pulse them together with the other ingredients. This was done pretty quickly as there was only half a cup of whole dried apricots).

As I was spreading the thick paste into the baking tray, I was thinking of a layer of sesame seeds coating the top of the bars. I happened to have some toasted sesame seeds in a jar, so I spread them over half of the bar, leaving the other half as it is. I baked the bars for 22 minutes.


These bars cut pretty easily. It stays together and not crumbly when cut. Which one would you prefer? With or without the sesame seeds?


I like them both. Just the right amount of sweetness. The ones with sesame seeds has an extra nutty seedy bite. The ones without is equally good. The family are not fond of energy bars like this, so I knew that when I make this, I am going to be the one that is going to finish most of it. No complaints from me! I like to munch on bars and flapjacks with a cup of warm tea in the afternoon. I packed some pieces for my nephew and the rest are for me to enjoy for a few afternoons, and in between!


Energy Bars
(adapted from "The Food You Crave", Ellie Krieger)
makes 24 bars (3 x 1-/2 inch)
cooking spray
1 cup quick-cooking rolled oats
1/2 cup shelled unsalted raw sunflower seeds
1/2 cup roasted wheat germ
1/4 cup whole-grain pastry flour or whole-wheat flour
1/2 cup dried apricots (each piece cut into 3)
1/2 cup raw almonds
1/2 cup raisins
1/2 cup pitted dried dates (dried cranberries)
1/2 cup nonfat dry milk
1/2 teaspoon ground cinnamon
1/3 cup pure maple syrup
2 large eggs

Preheat the oven to 350F. Coat a 9 x 13-inch baking pan with cooking spray.
Place all the ingredients, except the maple syrup and eggs, in a food processor and pulse until everything is finely chopped. Add the syrup and eggs and pulse until the mixture is well combined. It will resemble a coarse paste.
Transfer to the baking pan and spread evenly to cover the bottom. Bake until lightly browned, about 20 minutes. Allow to cool for 15 minutes, then cut into 24 bars. Store in an airtight container at room temperature for about 3 days or wrap individually and freeze for up to 3 months.


I'm linking this post with I Heart Cooking Clubs (IHCC), theme for this week, 
Monthly Featured Chef : Ellie Krieger

and

Cookbook Countdown


Friday, May 27, 2016

Chocolate Chunk Cookies

This week at I Heart Cooking Clubs (IHCC), the theme is "May Potluck". Sometimes potluck week can be the most challenging, at least for me.  Why, you may be wondering! Because fickle-minded me can't decide which IHCC's featured chefs' recipes that I want to make, I have so many on my list!

For this week's Potluck theme, my kids sort of took care of that for me, no need to change my mind many times. They requested for Ellie Krieger's, Chocolate Chunk Cookies, which I have made before when Ellie Krieger was the featured chef at IHCC a couple of months ago. I did not post about it, as I did not have a chance to take any photos, the cookies were all gone by the next day. 


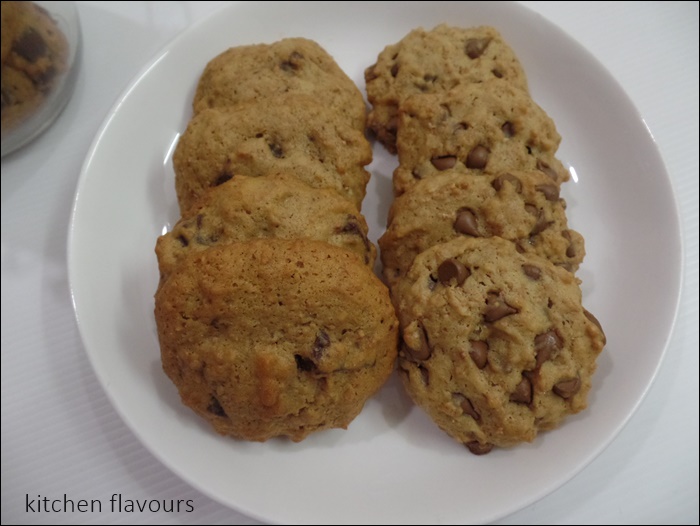
Cookies with chocolate chunks on the left and with coffee choc chips on the right.

So these cookies are back by popular demand! Really super easy to put together. And they are a little healthier than most cookies. It has whole-wheat flour, with a small amount of butter (only 3 tablespoons!), and a little canola oil (2 tablespoons). You do not even need the stand mixer to mix the dough. I made two batches. The first batch, I've used dark chocolate chopped to chunks. And the second batch I've made with coffee chips. The only changes I've made, was to reduce both the sugars to half, even healthier, we do not need all that extra sugar! I baked them for 3-4 minutes longer than the recipe states, as we love  crispier cookies. 


These cookies are lightly crisp on the outside and soft and chewy in the centre. 
As Ellie says "Eaten them while they are still warm for their full gooey, melted impact".  They make the perfect snack with a glass of cold milk. I like having the one with coffee chips with a mug of hot coffee. 


Chocolate Chunk Cookies
(adapted from "Comfort Food Fix", Ellie Krieger)
Makes about 20 cookies
3 tablespoons unsalted butter, softened
1/2 cup packed light brown sugar (loosely packed 1/4 cup)
1/4 cup granulated sugar (1/8 cup)
2 tablespoons canola oil
1 large egg, lightly beaten
1 teaspoon vanilla extract
1/2 cup all-purpose flour
1/2 cup whole-wheat pastry flour or whole-wheat flour
1/2 teaspoon baking soda
1/4 teaspoon salt
3 ounces dark chocolate (60 to 70% cocoa solids), chopped into chunks

Preheat the oven to 350F. Line two baking sheets with parchment paper. 
In a large bowl, mash together the butter and sugars with a fork until well combined. Add the oil and egg and beat until creamy. Stir in the vanilla.
In a medium bowl, whisk together the flours, baking soda, and salt. Add the flour mixture to the butter mixture and mix well. Gently fold in the chocolate.
Scoop rounded tablespoons of the dough onto the prepared cookie sheets, leaving at least 1-1/2 inches between cookies to allow for spreading. Bake until the cookies are just set, about 12 minutes. Transfer the cookies on parchment to a rack and allow to cool. The cookies will crisp as they cool. Store at room temperature in an airtight container, where they will keep for up to 4 days.


I'm linking this post with I Heart Cooking Clubs, theme for this week,
May Potluck


Tuesday, March 29, 2016

Mini Frittata with Leeks and Broccoli

"Goodbye Ellie", we are saying goodbye to Ellie Krieger, whose recipes we have cooked from, for the last six months. But like all the featured chefs at I Heart Cooking Clubs (IHCC), we will be seeing Ellie again in our potluck months. So to wish Ellie goodbye for now, and to thank you for all the delicious healthy recipes that she has shared, I've made one of her recipe from her latest cookbook "You Have It Made", which I have not yet own, (it's on my wishlist!), for our weekday lunch.


Originally, the recipe is called Mini Frittata with Leeks and Asparagus, but I have replaced the asparagus with broccoli instead. 


These are baked in muffin pans, be sure to grease your pans really well.  Leek, mushroom and broccoli are sauteed in a little oil until softened, about 5 minutes, then keep aside to cool slightly. Meanwhile mix the eggs and milk in a large bowl, then mix in the vegetables, cheese, salt and pepper to taste. (I fry about 1 tablespoon of the mixture to check on the seasoning, adding more salt or pepper if necessary). Divide evenly among the muffin pans, ( I got only 11). Bake in a preheated oven for 20 minutes at 375F.


These are delicious! Egg, cheese and veggies, what's not to like about these mini frittata! The great thing is, the leftovers can be kept covered in the refrigerator for 3 days. Simply reheat before serving.


We had the mini frittata for lunch with some green frisee and sliced tomatoes. Yum! And I had the leftovers again for breakfast the next day with a slice of toasted bread. Nice!

Mini Frittata with Leeks and Asparagus
(adapted from here, You Have It Made, Ellie Krieger)
Serves 6
1 tbsp olive oil
2 cups chopped leeks, white and light green parts only
1 bunch asparagus (1 lb), sliced on the bias into 1/2" pieces (2 cups) (I replaced with broccoli)
6 medium white button mushrooms, sliced (4oz)
7 large eggs
1/4 cup 1% milk
1/4 cup grated Parmesan cheese
1/2 tsp salt
1/8 tsp freshly ground black pepper

  1. Preheat the oven to 375F. Spray a muffin pan with cooking spray.
  2. Heat the oil in a medium skillet over medium heat. Add the leek, asparagus, and mushrooms and cook, stirring occasionally, until the vegetables have softened, about 6 minutes. Allow to cool slightly.
  3. Whisk the eggs and milk together in a medium bowl. Stir in the cooked vegetables, cheese, salt, and pepper.
  4. Distribute the mixture evenly into the muffin pan. Bake until set in the center, 18 to 20 minutes. Serve warm or at room temperature.
To Refrigerate and Reheat :
Allow to cool in the refrigerator, uncovered, for 30 minutes. Then transfer the frittatas to an airtight container and refrigerate for up to 3 days. Frittatas may be served at room temperature or reheated. To reheat, place on a foil-lined baking tray and warm in a 350F oven, uncovered, for 5 to 8 minutes, or place in a microwave-safe plate, cover with a splatter guard, and microwave for 30 seconds for a single portion.


Freezing is not recommended.


******************************

Here's some of our favourite recipes from Ellie that I've made over the last six months.


I'm linking this post with I Heart Cooking Clubs (IHCC), theme for this week,
Goodbye Ellie


We will be cooking from the recipes of our new selected featured chef for the next six months, Curtis Stone. If you would like to join us, please stop by I Heart Cooking Clubs (IHCC) for more details.


Saturday, March 5, 2016

Wheat Berry Salad with Lemon-Cumin Grilled Chicken

"Ancient Grains", the theme for this week at I Heart Cooking Clubs (IHCC). I know of whole grains but Ancient Grains, hmmm what is that? Upon finding out more info from the various websites, I go "oohhh!, now I got it!" If you are not sure what Ancient Grains are, you may read about it from here and here


I bought these organic wheat berries quite a while back for some bread rolls that I made. Since this week is all about ancient grains at IHCC, I googled for info and was pleased to see that it is on the list of ancient grains, here. And Ellie has just the recipe for it in one of her books.


Used the wheat berries to make a Wheat Berry Salad from Ellie Krieger's book "So Easy". This salad is so healthy and nutritious, packed with vitamins and fibres from the ingredients that makes this salad. The main star attraction is the Wheat Berry which is boiled till tender (about an hour), drain before use. Other ingredients are ; celery, parsley leaves (I use coriander leaves), scallions, dried cherries (I use dried cranberries), toasted walnuts, lemon juice, 


This Wheat Berry Salad is served with some slices of Lemon-Cumin Grilled Chicken.

Serve the wheat berry by placing some spinach leaves on each plate, mound some Wheat Berry Salad on the leaves and top with slices of Lemon-Cumin Grilled Chicken, with a slice of lemon to squeeze over just before eating. I did not have any spinach leaves, so I've harvested some baby lettuce leaves from my garden pot. 

The salad is chewy with very interesting crunchy bites from the celery and walnuts. And the cranberries added a tangy sweetness to it, which this salad needs. Overall, this salad is OK, but I'm not too crazy over it either. Instead of making the wheat berry the main character in the salad,  the next time I will just throw in a handful as a mix-in into a bowl of salad so that it mingles at the background with all the other ingredients! I think I would enjoy it better that way.  I did enjoy the Lemon-Cumin Grilled Chicken which is delicious! 


Wheat Berry Salad with Lemon-Cumin Grilled Chicken
(adapted from "So Easy", by Ellie Krieger)
Makes 4 servings
1 cup hard wheat berries
1/2 cup chopped walnuts
2 stalks celery, finely chopped
1/3 cup finely chopped parsley
1/3 cup tart dried cherries, chopped
1 small scallion (white and green parts, chopped
2 tablespoons olive oil
1 tablespoon plus 1 teaspoon fresh lemon juice, plus 4 lemon wedges for serving
Salt and freshly ground black pepper to taste
4 cups lightly packed baby spinach leaves
1 recipe Lemon-Cumin Grilled Chicken Breast (recipe follows)

In a medium-size pot, combine the wheat berries and enough water to come 2 inches above the wheat berries. Bring to a boil, then reduce the heat to a simmer. Cook, uncovered, until tender, about 1 hour. Drain and let cool.
Meanwhile, toast the walnuts in a medium-size dry skillet over medium-high beat, stirring occasionally, until fragrant, 2 to 3 minutes.
In a large bowl, combine the wheat berries, toasted walnuts, celery, parsley, dried cherries, scallions, olive oil, and lemon juice. Season with salt and pepper. This salad will keep up to 5 days in an airtight container in the refrigerator.

To serve, place 1 cup of spinach leaves on each plate or in to-go containers. Mound 3/4 cup of the wheat berry salad on top of each serving and top that with slices of the Lemon-Cumin Grilled 
Chicken. Place a lemon wedge on the side of each serving. Right before eating, squeeze the lemon wedges on top.


Lemon-Cumin Grilled Chicken
1-1/4 pounds skinless boneless chicken breasts
1 teaspoon ground cumin
1/2 teaspoon salt
1/4 teaspoon freshly ground black pepper
2 teaspoons olive oil
Cooking spray
2 tablespoons fresh lemon juice

Put the chicken between 2 pieces of plastic wrap and pound it slightly with a mallet or rolling pin so it is an even thickness of about 1/2 inch.
In a small bowl, combine the cumin, salt, and pepper. Rub the chicken breasts on both sides with olive oil and then rub the spice mixture on both sides.
Spray a grill or nonstick grill pan with cooking spray and heat over medium-high heat. Grill the chicken until grill marks have formed and the chicken is cooked through, 3 to 4 minutes per side. Remove from the heat, let rest for 5 minutes, then slice into 1/2-inch-thick slices and drizzle with the lemon juice. The chicken will keep for up to 3 days in an airtight container in the refrigerator.


I'm linking this post with I Heart Cooking Clubs (IHCC), theme for this week,
Ancient Grains


Wednesday, February 17, 2016

Hearty Pork Stew

"Bowled Over", the theme for this week at I Heart Cooking Clubs (IHCC). This week we are cooking bowls of either soup, stews or chilli. I've made Ellie's, Hearty Beef Stew, but I have replaced the beef with pork. The picture in the book looks really good, and it was one of the very first recipe that I've bookmarked to make when I first bought the book ages ago.


I've made a few minor changes. Did not have any rutabaga or turnip, so I have replaced with daikon. Recipe uses beef, but I have replaced with pork, as not everyone in my house eats beef. I used double the amount of tomato paste and about a quarter cup more of the red wine. You may need to add a little more salt and pepper to taste. As for the potatoes, I've added them in during the last 30 minutes of braising time, instead of adding them in at the beginning. I like them very soft but not so mushy that it makes the stew really thick. 


This stew is delicious. We love it. Thumbs up from the family, and a request to cook this again. The pork pieces are very tender, full of flavour from the red wine and all the other ingredients. The veggies are soft tender and I thought the green peas makes the bowl of stew looks even better with its fresh green colour. We had this stew with some homemade bread, and it was a satisfying dinner.


Hearty Beef Stew
(adapted from "Comfort Food Fix", Ellie Krieger)
Makes 4 servings
1/4 cup all-purpose flour
1/4 teaspoon salt
1/4 teaspoon freshly ground black pepper
1/4 teaspoon paprika
1 pound lean stew beef (round or chuck shoulder), cut into cubes (I use pork stewing meat)
3 tablespoons olive oil
1 medium onion, chopped
1 small rutabaga or turnip, peeled and cubed (about 10 ounces) (I use 1 medium daikon)
1 large carrot, chopped
1 large russet potato, cubed (about 12 ounces)
2 tablespoons tomato paste
1 cup dry red wine
2 cups reduced-sodium beef broth
2 cups green peas

Place the flour, salt, black pepper, and paprika in a large sealable plastic bag. Add the beef and shake to coat well. Heat 2 tablespoons of the oil in a large (at least 6-quart) saucepan or soup pot over medium-high heat. Add the beef and cook until browned on all sides, about 6 minutes total. Transfer the meat to a plate leaving the juices in the saucepan.

Add the remaining 1 tablespoon oil to the pot. Add the onion and cook over medium heat, stirring occasionally, until the onion is golden but not browned, about 10 minutes. Add the rutabaga, carrot, and potato and cook until the vegetables soften slightly, about 10 minutes. (I added the daikon and carrots but not the potatoes). Stir in the tomato paste and cook 1 minute more. Add the wine, bring to a boil, and reduce for 3 minutes. Add the beef broth (and the pork),  return to a boil, then reduce the heat to medium low. Cover and simmer until the meat is tender, about 1 hour  and 20 minutes (I added in the potatoes after the meat has simmered for one hour and continue to simmer until the potatoes are tender, about 30 minutes). Add the peas and cook 5 minutes more. Remove from the heat and allow to rest for at least 15 minutes before serving.


I'm linking this post with IHCC, theme for this week "Bowled Over".


and


Wednesday, February 3, 2016

Asian Noodle Bowl

"Oodles of Noodles", the theme for this week at I Heart Cooking Clubs (IHCC). It's noodles week! I've made Ellie's simple Asian Noodle Bowl. There's lots of veggies in the noodles, and that's how I love my noodles, with lots of vegetables. According to Ellie, "You can substitute whatever vegetables you have on hand to create this fabulous chicken, veggie, and noodle dish that is heady with Asian flavour and aroma". 

Recipe calls for either soba noodles or whole-wheat spaghetti, but I have a few packets of the regular spaghetti in my pantry, so I have used that instead. Veggies that I used are broccoli, fresh baby corns, carrots, red chillies and scallions. One thing that I did a little differently are the chicken breasts pieces. I marinated the thinly sliced chicken breast with some (about 2 teaspoons) cornflour and a dash of sesame oil for about 15 minutes before I proceed with the recipe. Chicken breast would usually be a little dry and sometimes gets a little tough when not eaten immediately after cooking. By marinating it with cornflour, the chicken breast pieces would stay moist and tender. The sesame oil (or any other oil) is to prevent the pieces from sticking together when stir-frying. 


I made this for our mid-morning lunch meal, and my son had a bowl of this "oodles of noodles" before he goes off to school, with a happy tummy! Simple, quick, easy, and very tasty. 


Asian Noodle Bowl
(adapted from "So Easy", Ellie Krieger, or here)
Makes 4 servings
8 ounces soba noodles or whole-wheat spaghetti
2 teaspoons canola oil
1 bunch scallions (white and green parts), sliced (1/4 cup reserved for garnish)
1 tablespoon minced peeled fresh ginger
1 tablespoon minced garlic (my addition)
1 pound skinless boneless chicken breasts, thinly sliced
1 15-ounce can baby corn, drained ( I use fresh baby corn)
1/2 pound broccoli florets (about 3 cups)
1/2 pound fresh shiitake mushrooms, stemmed and sliced
1 red bell pepper, seeded and thinly sliced
1/3 cup low-sodium chicken broth
1/4 cup low-sodium soy sauce
1 teaspoon toasted sesame oil

Bring a large pot of water to a boil. Add the noodles or pasta and cook according to the directions on the package.
Heat the canola oil in a wok or very large skillet over medium heat. Add the scallions and ginger and cook, stirring, until fragrant but not browned, about 30 seconds. Add the chicken and cook, stirring occasionally, until just cooked through, 4 to 5 minutes. Add the baby corn, broccoli, mushrooms, pepper slices, broth and soy sauce and cook, stirring occasionally, until the  broccoli is bright green and crisp-tender and the peppers are crisp-tender, 5 to 6 minutes. Add the noodles and sesame oil and toss to combine. Divide among 4 bowls and garnish with the reserved 1/4 cup of scallions.


I'm linking this post with I Heart Cooking Clubs (IHCC), theme for this week
"Oodles of Noodles"


Thursday, January 28, 2016

Toasted Pita and Herb Salad

"January Potluck", the theme at I Heart Cooking Clubs (IHCC). For this week, we get to cook with any of IHCC's past and present featured chefs. I've made Ellie Krieger's simple salad using toasted pita and fresh herbs.


I love this simple salad. The salad dressing is a mixture of lemon juice, lemon zest, olive oil and seasoned with salt and pepper. The scallions and fresh mint are from my garden pot, along with the fresh cucumber which I've freshly harvested that morning. What I like about this salad is the combination of the fresh herbs with the lemony dressing, very refreshing. The crisp leafy greens and the crunch of the toasted pitas with my addition of hard-boiled eggs makes this a satisfying plate for a light lunch. 


Toasted Pita and Herb Salad
(adapted from "The Food You Crave", Ellie Krieger)
One 6-inch whole-wheat pita bread with pocket
2 tablespoons lemon juice
1/2 teaspoon finely grated lemon zest
salt and freshly ground black pepper to taste
2 tablespoons extra-virgin olive oil
1/2 large head romaine lettuce, leaves torn into bite-size pieces (about 5 cups lightly packed)
1/2 cup chopped fresh flat-leaf parsley
1 scallion (white and green parts), thinly sliced
1/4 cup chopped fresh mint
1/2 large English cucumber, cut in half lengthwise, seeded, and thinly sliced into half-moons
1/2 pint grape tomatoes, cut in half
2 hard-boiled eggs, peeled and quartered (my addition)

Preheat the oven to 375F.
Split the pita into 2 rounds and toast on a baking sheet on the middle rack of the oven until golden brown, about 10 minutes. Allow the pita to cool and break into bite-size pieces. Set aside.
In a small bowl, whisk together the lemon juice, lemon zest, salt and pepper. Add the oil and whisk to incorporate.
Toss the lettuce, parsley, scallion, mint, cucumber and tomatoes together in a large serving bowl. Right before serving, add the pita and dressing to the salad. Toss well to coat and serve.


I'm linking this post with I Heart Cooking Clubs (IHCC), theme for this week
Potluck


Sunday, January 24, 2016

Better Blueberry Muffins

"You Have It Made", the theme for this week at I Heart Cooking Clubs (IHCC).  You Have It Made is Ellie Krieger's latest cookbook recently released in January 2016. This latest book is all about making meals ahead of time, which can be refrigerated or freeze to be reheated and serve when needed. This week's theme is to make any make ahead meals from Ellie Krieger's recipes. Now, since I do not have Ellie's latest cookbook (it's on my wishlist!!), I turned to her other books which I already have and found this delightful muffins.


According to the recipe, these muffins can be refrigerated for 3 days, or wrap individually and freeze for up to 3 months. Why are these called Better Blueberry Muffins? Because it uses applesauce and a small amount of canola oil instead of butter. The sugar is very much less than other muffin recipes. And it has yoghurt and milk, both low fat. But both my yoghurt and milk that I used are full-cream! oops....!! On top of that, there's whole meal flour with an equal amount of plain flour.


Like most muffin recipes, these are pretty easy and quick to make. Mix the dry ingredients in a bowl. Mix the wet ingredients in another bowl. Add the dry ingredients to the wet ingredients, stir to combine, do not overmix. Add the blueberries and stir to combine. Then scoop onto the prepared muffin pans and bake until golden.

These muffins are soft, moist and not too sweet. Perfect for breakfast, tea-time or just something to snack on when you are feeling a little hungry. I freeze a few by individually wrapping them in foil, and I thaw them completely before reheating them in a 375F oven for 12-15 minutes still wrapped for breakfast a few days later. They are just as soft and moist, very nice.


Better Blueberry Muffins
(adapted from "Comfort Food Fix" by Ellie Krieger)
Makes 12 muffins
Nonstick cooking spray
1 cup all-purpose flour
1 cup whole-grain pastry flour or whole-wheat flour
2 teaspoons baking powder
1/4 teaspoon baking soda
1/2 teaspoon salt
3/4 cup sugar
1/4 cup canola oil
2 large eggs
1 cup natural unsweetened applesauce
1/2 cup plain low-fat yoghurt
1/4 cup nonfat milk
1 teaspoon vanilla extract
1-1/2 teaspoons finely grated lemon zest
1-1/2 cups fresh or frozen (unsweetened and unthawed) blueberries

Preheat the oven to 400F. Coat a 12-cup muffin pan with cooking spray. 
In a medium bowl, whisk together the flours, baking powder, baking soda, and salt.
In a large bowl, beat together the sugar, oil, and eggs, until the mixture is light yellow and slightly frothy. Whisk in the applesauce, yoghurt, milk, vanilla and lemon zest. Stir the dry ingredients into the wet, mixing just enough to combine them. Do not overmix. Gently stir in the blueberries.
Pour the batter into the prepared muffin pan. Tap the pan on the counter a few times to remove any air bubbles. Bake until a wooden toothpick inserted into the center of one of the muffins comes out clean, about 20 minutes.
Allow to cool on a wire rack for 15 minutes. Run a knife around them to loosen and unmold. Enjoy warm or let cool completely before storing in an airtight container in the refrigerator for up to 3 days or wrap individually and freeze for up to 3 months.


I'm linking this post with I Heart Cooking Clubs (IHCC), theme for this week,
You Have It Made


Monday, January 11, 2016

Blueberry Blast Smoothie

"Fresh Start", the theme at I Heart Cooking Clubs  (IHCC), where we are currently cooking from Ellie Krieger's recipes. I've made one of Ellie's healthy smoothies which makes a healthy and satisfying start to any day!


Blueberry Blast Smoothie


This is so easy to make. Blend everything together and enjoy! Start your morning with something as healthy as this, made even better with your own homemade yoghurt, like I did! 


Blueberry Blast Smoothie
(adapted from "The Food You Crave", Ellie Krieger)
1/2 cup nonfat milk
1/2 cup plain nonfat yoghurt
1 cup frozen unsweetened blueberries
1 teaspoon honey

Put all the ingredients into a blender and process until smooth.


I'm linking this post with I Heart Cooking Clubs (IHCC), theme for this week,
Fresh Starts

Monday, December 28, 2015

Cheddar-Apple Quesadilla

"It's In Your Hands", the theme for this week at I Heart Cooking Clubs (IHCC). It's about "food you can hold and/or eat with your hands". Ellie has lots of recipes that fits this theme. The challenge is to pick which one! I've selected her super easy Cheddar-Apple Quesadilla for the kids' brunch. They woke up late and should I make them breakfast or lunch? Quick and easy snack for brunch it is, and found this simple recipe from Ellie's book "So Easy". And I have all the ingredients!


"It's In Your Hands" Cheddar-Apple Quesadilla


This is really so simple, so easy and makes such a healthy brunch snack. One thing to note that if you are making with four tortillas, one Granny Smith apple is definitely not enough. I've used about 2-1/2 apples for 4 tortillas, and the apples are large. The apples are cored, sliced and arrange on one half of the tortilla. Scatter some shredded Cheddar cheese on top, fold over the tortilla and place in a hot large skillet, weigh the tortilla down with a heavy pan, and cook each side about 1-1/2 to 2 minutes until golden brown. 


Sliced into half and serve immediately. Both my daughter and son, thought that the combination of apples with cheese is a little weird, but they asked for another one as soon as they've finished the first piece! I thought this was really nice and really like it. If you want a healthy snack, but really rushing for time, this would be great. It comes together in a just a few minutes.


Cheddar-Apple Quesadilla
(adapted from "So Easy", Ellie Krieger)
1 Granny Smith apple, cored, thinly sliced
4 whole-wheat flour tortillas (9 inches in diameter)
1 cup shredded sharp cheddar cheese (4 ounces)

Preheat a large nonstick skillet over medium-high heat.
Fan out the apple slices over the bottom half of the tortilla and top with the cheddar cheese. Fold the tortillas in half. Working in batches, place the quesadillas in the skillet and weigh them down with a smaller heavy skillet or an ovenproof plate topped with a heavy can. Cook until the cheese is melted and the tortillas are golden brown, about 1-1/2 minutes per side. Cut in half and eat warm.


I'm linking this post with I Heart Cooking Clubs (IHCC), theme for this week,
"It's In Your Hands"

and

Cook-Your-Books

Wednesday, December 16, 2015

Honey Whole-Wheat Cinnamon Raisin Bread

"Cinnamon & Sugar", the theme for this week at I Heart Cooking Clubs (IHCC). Cinnamon and sugar, a perfect combination. And Ellie's Krieger's Honey Whole-Wheat Cinnamon Raisin Bread fits that perfect combination perfectly.


Ellie's recipe uses an equal amount of bread flour and wholewheat flour, but I wanted a lighter bread, so I've reduced the wholewheat flour slightly and increase the amount of bread flour. I've made half a recipe for one loaf of bread. The bread is very easy to make, instructions are straight-forward. While the the bread is baking, it smells so "cinnamony" nice. For the filling, I've used slightly more of the ground cinnamon than listed in the recipe.


This is a lovely and delicious loaf of bread. The bread is soft and smells so good with the cinnamon, sugar and the raisins. It stays soft on the next day too. I had slices of this bread with a cup of coffee, so nice!  This recipe is a keeper.


**my measurement for half a recipe to make one loaf, listed in blue
Honey Whole-Wheat Cinnamon Raisin Bread
(adapted from "Comfort Food Fix", Ellie Krieger)
Makes 16 servings
2 cups bread flour (1-1/2 cup)
2 cups wholewheat flour (3/4 cup)
1/4 cup nonfat dry milk (2 tablespoons)
1-1/4 cups very warm water (120F to 130F) (use slightly less than 1/2 cup)
1 large egg (lightly beaten, then use half the amount)
3 tablespoons canola oil (1-1/2 tablespoons)
3 tablespoons honey (1-1/2 tablespoons)
1 teaspoon salt (1/2 teaspoon)
1-1/2 teaspoon instant dry yeast (3/4 teaspoon)
Nonstick cooking spray
1/4 cup packed dark brown sugar (2 tablespoons)
1 tablespoon plus 1 teaspoon ground cinnamon (1 tablespoon)
1/2 cup golden raisins, soaked in boiling water for 30 minutes, drained and patted dry (1/4 cup)

Place the flours, dry milk, water, egg, 2 tablespoons of  the oil, honey, salt, and yeast into the bowl of a stand mixer. Using the dough hook attachment, mix on the lowest setting ("stir") for 3 minutes, then increase to the next highest setting ("2") and mix 5 minutes more. The dough should be soft and fairly sticky. (I knead the dough in the stand mixer with the dough hook attachment for about 12-15 minutes).
Place the dough in a bowl sprayed with cooking spray, cover tightly with plastic wrap, and let stand at room temperature until its size has nearly doubled, about 1-1/2 hours.
Spray two 9x5x3-inch baking pans with baking spray.
Transfer the dough to a well-floured work surface. Pick up one side of the dough, lifting about a third of the bulk and fold it across. With spread fingers, pat down on the dough to remove most of the trapped gases. Repeat with the remaining three sides of the dough.
Divide the dough in half and roll each half into a flat square, about 8x8 inches. Brush each square with some of the remaining oil. Sprinkle 2 tablespoons sugar, 2 teaspoons cinnamon, and 1/4 cup raisins over each square. Roll each square into a tight cylinder and place each one, seam side down, into one of the prepared pans. Cover tightly with plastic wrap and allow to sit at room temperature for 1-1/2 hours, until the dough fills the pan and springs back slowly when touched.
After the dough has been sitting for about 1 hour, preheat the oven to 375F. Uncover the pans and brush the tops of each loaf with oil. Bake until the bread is golden brown and the sides spring back when pressed, 25 to 30 minutes. Transfer the breads to a wire rack and allow to cool completely.


I'm linking this post with I Heart Cooking Clubs (IHCC), theme for this week,
Cinnamon & Sugar


and
 photo 77951578-1914-4b72-8eda-9e40a91183ac_zps331eb4b4.jpg


Monday, November 30, 2015

Spiced Mixed Nuts

"Nibbles & Noshes", the theme for this week at I Heart Cooking Clubs (IHCC). I'm going "hot and nutty" this week with Spiced Mixed Nuts.


There's pumpkin seeds, peanuts, almonds, pistachios, cashew and I've thrown in some hazelnuts as well. Flavoured with the sweetness of honey (did not have maple syrup), spiced with curry powder, cayenne powder with dried rosemary and salt. Just mixed and bake until the nuts are fully toasted and crispy. They will be sticky from the honey. Some of the nuts will clump together when left to cool, no problem, just separate them later. But I find that I have to bake them about 10 minutes longer than the recipe states. 

I've used more cayenne powder, about 1/2 teaspoon and they have just the right kick in the spiciness, which I really, really like. Sweet and spicy, and very, very addictive. This is great for munching alongside a cold glass of beer!


Spiced Mixed Nuts
(adapted from "The Food You Crave" Ellie Krieger)
1/2 cup raw peanuts
1/2 cup raw almonds
1/3 cup shelled raw pistachios
1/3 cup raw cashews
1/3 cup shelled raw pumpkin seeds
1 tablespoon pure maple syrup
1/2 teaspoon curry powder
1/8 teaspoon cayenne powder, or more to taste
1/2 teaspoon dried rosemary
1/4 teaspoon salt
cooking spray

Preheat the oven to 325F. 
Combine the nuts and seeds in a medium bowl. Add the maple syrup, spices, rosemary, and salt and toss to combine,
Coat a baking sheet with cooking spray, then transfer the coated nuts to the sheet and spread evenly in a single layer. Bake, stirring once, until the nuts are fragrant and lightly toasted, 15 to 20 minutes. Remove from the oven and let cool. The nuts will keep in an airtight container in the refrigerator for up to 2 weeks.


I'm linking this post with I Heart Cooking Clubs (IHCC), theme for this week
"Nibbles and Noshes"


and 
 photo 77951578-1914-4b72-8eda-9e40a91183ac_zps331eb4b4.jpg