Wednesday, October 30, 2013

Ham and Green Coral Blini Sandwiches : IHCC

"Sandwich Sensations!", our theme for this week at I Heart Cooking Clubs (IHCC). I think most of us love sandwiches, burgers or wraps. They make a great meal for breakfast, lunch, and even dinner. I was looking through Donna Hay's website, and found this wonderful blini recipe that makes a delicious sandwich.

The original name of this sandwich is Smoked Chicken and Fennel Blini Sandwiches, which uses smoked chicken slices and young baby fennel. I do not have both these ingredients and have replaced with sandwich ham and green coral leaves instead. 


First, make the blinis. Very simple and easy, these are actually a thicker and bigger version of pancakes. The recipes uses plain flour with a little amount of buckwheat flour, but I have used all plain flour instead. Mix the dry ingredients, flour, salt, yeast in a large mixing bowl. In a small saucepan, heat the milk and sour cream (I used homemade yoghurt) until lukewarm and whisk in the egg yolks. Stir into the dry ingredients, and keep covered with a damp tea towel in a warm place for 30 minuts until bubbles appear on the surface. The egg whites are then whisked to soft peaks and stirred into the mixture to combine. Grate two garlic cloves and add that to the mixture, mixing it well. Heat a saucepan, lightly greased, and scoop about 1/3 cup, spreading the batter into a round. Cook until bubbles appear on surface, flip blini over, and cook the other side. Remove to a wire rack to cool.

I have made double the amount of recipe for the blinis, and got me 5 large blinis (about 18cm diameter).


Prepare the mayonnaise spread. Mix the mayonnaise (I use the regular mayonnaise) with grated lemon zest in a bowl. Both my kids and myself, love this mayonnaise-lemon zest mixture! It is so good, I would use this combination when I use mayonnaise for sandwich the next time! Smells so lemony nice!


To assemble the blini sandwiches : Spread a generous amount of the mayo-lemon mixture on one blini, place some salad greens over, top with some sliced deli ham, and sprinkle some shredded basil leaves over. Top with another piece of blini over.


Ham and Green Coral Blini Sandwiches


Slice to quarters and serve. This is so delicious! If you have not tried the combination of mayo-lemon zest, do give it a try. The blinis are soft-tender, very tasty and has a light fragrance from the garlic, which is really very pleasant, a great addition for a savoury touch. Though I have not used any fresh fennel, as it is not always available here, the green coral works very well, I guess, any green veggies that works in a salad would be great. I wanted to add some sliced cucumbers, but I have forgotten to buy them, only realised that when I reached home from the supermarket!


Overall review : A delicious blini sandwich. My kids and myself, we had a most delicious lunch! Yum!

note : my changes in blue
Smoked Chicken and Fennel Blini Sandwiches
(adapted from Donnahay.com)
1 clove garlic, crushed
1 quantity basic blini mixture, (see basic blini recipe)
1/4 cup (75gm) whole-egg mayonnaise
2 teaspoons finely grated lemon rind
1 baby fennel, thinly sliced (green coral leaves)
1/2 cup basil leaves
1x160gm smoked chicken breast fillet, sliced (sandwich ham slices)
1/4 cup chopped chives
lemon wedges, to serve

Fold the garlic through the blini mixture. Heat a lightly greased non-stick 18cm-frying pan over medium heat. Spoon half of the blini mixture into the pan and spread to cover the base. Cook for 3-4 minutes or until bubbles appear on the surface. Flip and cook for a further 3-4 minutes or until golden. Repeat with remaining blini mixture. Allow to cool.

Place the mayonnaise and lemon rind in a bowl and stir to combine. Spread one of the blinis with the mayonnaise mixture and top with fennel, basil, chicken and chives. Sandwich with the remaining blini, cut into wedges and serve with lemon. Serves 4.


Basic Blini
(adapted from Donnahay.com)
2/3 cups (100gm) plain (all-purpose) flour, sifted
1/4 cup (35gm) buckwheat flour, sifted (plain flour)
1/2 teaspoon table salt
1 teaspoon active dry yeast
1/2 cup (125ml) milk
1/3 cup (80gm) sour cream (homemade yoghurt)
1 egg, separated

Place the plain and buckwheat flours, salt and yeast in a bowl and stir to combine. Place the milk and sour cream in a saucepan over low heat and cook, stirring, for 2 minutes or until lukewarm. Add the egg yolk and whisk to combine. Gradually add the milk mixture to the flour mixture, stirring until smooth. Cover with a clean, damp cloth and set aside in a warm place for 30 minutes or until bubbles appear on the surface.

Whisk the egg white until soft peaks form, add to the mixture and stir well to combine. Heat a lightly greased, large non-stick frying pan over medium heat. Cook teaspoonfuls of the mixture for 1-2 minutes or until bubbles appear on the surface. Flip and cook for 1-2 minutes or until golden. Allow to cool. Makes 30.


To see what everyone are having for breakfast, drop by IHCC. You might just be inspired to join us! For more details about joining in, click here.


Monday, October 28, 2013

Vanilla Honey Tuiles : Bake Along 54

The theme for our Bake-Along #54, is Tuiles. I have always wanted to bake Tuiles and never got round to give these cookies a try, so I have selected Tuiles as our theme baking for this week at Bake-Along together with my baking buddies Lena and Zoe

There are a few recipes of tuiles from some of my cookbooks, and most of them requires the batter to be refrigerated for a couple of hours before baking. Since I was rushing for time, (yes, I've made this at the last minute!!), I have chosen this recipe, Vanilla Honey Tuiles from Tish Boyle's cookbook, The Good Cookie, as the batter do not need refrigeration and can be used and bake straightaway right about mixing. 

From Tish Boyle : "Tuiles (pronounced "tweel"), is a delicate, crisp cookie popular in Europe, often used to garnish desserts."  These cookies, originally from France, tuile means tiles in French, and it is named after the shape of French roof tiles it is supposed to resemble.


These looks like plain French tiles? Unlike some of the tuiles which I've seen with some holes in the cookies that makes a nice pattern, maybe those pattern do resembles the French tiles, I have no idea!  A good example is the recipe from Dorie Greenspan, which looks very nice.


The batter is made, really easy and simple, refer to the recipe below. Tish Boyle has suggested using a template by cutting out the cover of a coffee can or cottage cheese container, spread the batter within the template to get a constant size of the cookies. I have however, just used about 1 teaspoon of the batter, plop it on the lined baking tray, and use the back of the teaspoon, slowly spread out the batter in a circle to about 3" diameter. It works out just fine.

Bake the tuiles one tray at a time, about 10 minutes, until golden brown. Immediately remove the tray, use a metal offset spatula to remove the tuiles from the baking tray and placed it on a rolling pin, pressing it down gently to shape the cookies into a curve. You have to do it really, really quick as it sets and hardens and crisp very fast. It cools very fast too, store in airtight containers.
Should the tuiles start to set before they are placed on the rolling pin, simply place the tray back in the oven for a minute to soften the tuiles again. 


These cookies are delightful! Very crispy and yummy, though it is a little too sweet for me.


It takes sometime to complete baking the cookies, as I was baking six tuiles to a tray. And I actually enjoyed making these cookies.


Maybe if I have some time, I'll try some other tuiles cookies, maybe Dorie's, the ones which bakes out to a lacey pattern, which I find very interesting!


Vanilla Honey Tuiles
(adapted from "The Good Cookie", Tish Boyle)
1/2 cup confectioners' sugar, plus extra for dusting
1/2 cup all-purpose flour
pinch of salt
4 tablespoons (1/2 stick) unsalted butter, softened (60gm)
1 tablespooon plus 1 teaspoon honey
3/4 teaspoon vanilla extract
1 large egg white

Special equipment
Large plastic top (such as one from a coffee can or cottage cheese container)

Make a round template :
Cut a 3-inch circle out of the center of a large plastic top, such as one from a coffee can or cottage cheese container; leaving the rim intact. (An X-acto knife is handy for this task).

  1. Position a rack in the center of the oven and preheat the oven to 300F. Line two baking sheets with parchment paper.
  2. Sift the confectioners' sugar, flour, and salt into a medium bowl. Gently stir until blended. Set aside.
  3. In the bowl of an electric mixer, using the paddle attachment, beat the butter and honey at medium speed until creamy, about 1 minute. Beat in the vanilla extract. Add the dry ingredients in two additions, alternating with the egg white, and beat until combined. Scrape down the sides of the bowl. Increase the speed to medium-high and beat the batter until very smooth and lighter in colour; about 1 minute.
  4. Shape and bake the tuiles : Place the template flat side down on one of the baking sheets. Drop about 1 teaspoon of the batter into the center of the template and, using a small metal offset spatula, spread the batter evenly across the template. When the interior of the circle is covered, remove the template. (Scrape any excess batter from the template back into the bowl of batter). (I have however, just used about 1 teaspoon of the batter, plop it on the lined baking tray, and use the back of the teaspoon, slowly spread out the batter in a circle to about 3" diameter). Repeat to form as many tuiles as possible. Bake the tuiles, one sheet at a time, for 9 to 11 minutes, just until they are golden brown and set.
  5. Have a rolling pin ready. Using an offset metal spatula or pancake turner, immediately and carefully remove the tuiles one at a time from the sheet and press each one over the rolling pin to give it a curved shape (they will cool very quickly). Transfer the tuiles to a plate. Repeat with the remaining batter.
  6. Dust the tuiles with sifted confectioners' sugar before serving.
***************

To join our blog hop, bake any Tuiles recipe and link your post to our Bake-Along linky.
Please visit my baking buddies, Lena from Frozen Wings and Zoe from Bake For Happy Kids, and all our friends who has baked along with us in the linky below :

For our next Bake-Along, we will be baking Italian Almond Tart from The Williams-Sonoma Baking Book, page 265, or you may get the recipe here. Link your post to the our blog-hop linky which will start on 25th November right up to 4th December. Everyone is welcome! 


Photobucket


A friendly reminder when linking to our blog hop :
1. Please mention Bake-Along event in your own post linking direct to any of the hosts' post (JoyceLena or Zoe)
2. Please link only new and current post, related to the current bake or theme provided by us. Unrelated post will be deleted.
3. Feel free to display our Bake-Along badge in your post.

I'm sharing this post with :

 photo 77951578-1914-4b72-8eda-9e40a91183ac_zps331eb4b4.jpg


To join our blog hop, click on the link to get the codes :
get the InLinkz code

Friday, October 25, 2013

French Macaron with Nutella Filling

When it comes to Macaron, I'm a late starter! Making macaron has been all around bloggerland about two years ago, and I have never attempted to make any, until now. My daughter has been asking me to make macarons for ages, and she especially reminded me dozens of times and requested it again for her birthday last month. How could I delay it any longer. 

I am not fully confident of making Macarons, as I have read lots of unsuccessful attempts and really am doubtful that I would succeed. Since it was a birthday request (an overdue one from last year, brought forward to this year!), I decided to try my hands at making these famous French cookies, and also to stop my daughter from reminding me again and again! :)

I read up on some troubleshooting and problems on baking macaron from the internet before I start with anything! And decided to use the recipe from Joy of Baking, one of my favourite website. Stephanie Jaworski has made a video on how to make French Macarons. I watched the video twice and then crossed my fingers before I began! haha!.


It was advised to use "aged" egg whites, that is not a problem, I have dozens in my freezer. During the beating of the egg whites and the mixing of the ingredients, I was keeping "my fingers crossed" throughout and hoping that they would turned out OK. I have added in half teaspoon of vanilla extract and added some pink gel food colour, other than these I have followed the recipe closely.

When the mixture is ready, it is piped into rounds (I used a template just as Stephanie advised), leave the pan uncovered for about 30-45 minutes so that a "skin" has formed on the top. Using a silicone baking mat is most suitable as the cookies will be easily removed later on. Bake for about 12-15 minutes at 160 degrees C. My first tray was a total letdown, the macarons has cracked all over the surface and no sign of any "feet"! I was totally disappointed. Remembering the troubleshooting with cracked tops, the bottom heat must have been too hot and the advise is to slot another baking pan underneath before baking. So I did that to the next two trays, kept checking them almost every minute and keeping my fingers crossed, hoping that they will have "feet"! And they baked up perfectly, with feet! I was very happy, almost danced with joy! Haha! Though it took about 15-16 minutes for the macarons to bake till lightly brown. I have read from here that it is advisable to over-bake it a little rather than under-baked with the insides still not cooked.

All I can say is, no other cookies has made me this excited before! Hahaha!


Let the macaron cool completely on the baking pan and remove them gently when cooled. I did not make any filling as I wasn't sure how my macarons would turn out. So good old Nutella to the "rescue". I filled them with nutella and kept the macarons in the fridge for two days as advised, according to Stephanie and other websites that I've read from, the flavours from the filling will soften the cookies a little and it will tastes much better. Of course, I ate one first, and it was so good!


These macarons have a crispy skin crust and the inside is a little sticky and chewy. Best described it as such, "imagine eating a candy floss, sticky and chewy as it is melting in your mouth"! I have not eaten a Macaron before and perhaps I should buy one just to compare, is it supposed to be like this? I like it that this recipe is not too sweet, I find the sweetness is just right.


Now, I can understand what the fuss is all about! We really like eating these French cookies. I am very happy with my first attempt! Well, did I manage to keep my daughter from asking me for macarons again, now that I have finally made some for her? No! Now she is bugging me to make more to share with her close friends at school! 


French Macarons
(source from : Joy of Baking)
100 gm ground blanched almonds or almond meal
180 gm confectioner (powdered or icing) sugar
100 gm "aged" egg whites, at room temperature
1/4 teaspoon cream of tartar (optional)
35 gm superfine or caster white sugar
1/2 tsp vanilla extract (my addition)
some pink gel food colour (my addition)

Note : Weight measurements (grams, use a digital scale) are only given for this recipe. Volume mesurement (cups) are not recommended.

Have ready three baking sheets (make sure they have flat bottoms (no warping) lined with parchment paper. To make all the Macarons the same size, I like to make a template. Take a piece of parchment paper and draw 20 of 1-1/2 inch (3-4cm) circles, spacing the circles about 2 inches (5 cm) apart. (Mine was 12 to a tray). Place the template under your parchment paper so you can use it as a guide.

Place the ground almonds and confectioners sugar in a food processor and process until finely ground (about 1 - 2 minutes). Sift the mixture to remove any lumps.

In the bowl of your electric mixer, fitted with the whisk attachment (can use a hand mixer), beat the egg whites and cream of tartar, if using, on medium speed until foamy. Gradually add the sugar, and continue to beat, on medium-high speed, until the meringue just holds stiff peaks (when you slowly raise the whisk the meringue is straight up, no drooping, called a "beak") (but do not over mix the meringue or it will "break"). Then in three additions, sift the ground almond/sugar mixture over the meringue. When folding, cut through the meringue and fold up and over, making sure to scrape the bottom and sides of the bowl. Once the almond mixture is completely folded (called macaronage) into the meringue (the batter will fall back into the bowl in a thick ribbon) it is time to pipe the Macarons.


I'm sharing this post with :


Thursday, October 24, 2013

THB : Cranberry-Oatmeal-Walnut Cake

The Home Bakers (THB) bake #26, Cranberry-Oatmeal-Walnut Cake is chosen by the lovely Kit of I-Lost In Austen

This cake is originally baked in a 9x13-inch baking pan, but I have made it into muffins instead, a variation mentioned in the book. Made half a recipe and got 8 muffins.


These muffins are the healthier choice for those who are looking for something healthier than the regular muffins. It has rolled oats, wholemeal flour, plain flour, canola oil, dark molasses, ground cinnamon, fresh cranberries, nuts, yoghurt, and with just a small amount of sugar. Usually I would reduce the sugar in all of my bakes, but for this, I followed the original amount as stated in the recipe.


I used frozen cranberries and instead of adding them to the batter, I placed two berries on each muffins, as they are rather sour. 


While these are baking, I can smell the fragrance of the oats and the cinnamon, very nice.


Ate one white still warm, and it was just OK for me, the first thing that came to mind was, it needed a little more sugar, and that almost never cross my mind with other bakes!


These muffins flavours seems to improve overnight! They tasted much yummier and actually was quite nice on the next day, and a little sweeter than on the first day, but it still could do with a little more sugar. Guess this is one of the bakes that actually benefit in terms of flavours when left overnight for the flavours to mingle together. Texture is moist and soft, great with a cup of warm tea. But I would probably not bake this cake again as the family do not seem to favour it.


For the full recipe, please visit Kit of I-Lost In Austen and to view other members' bake, drop by The Home Bakers (THB).


Welcome to The Home Bakers


We are a group of home bakers who are currently baking from "Coffee Cakes" by Lou Seibert Pappas, until each recipe from this book has been baked. This is our bake no. 26 and we have 34 recipes more to go. If you are interested to be a member and join in our bakes, you may drop me an email at kitchenflavours@yahoo.com.


Tuesday, October 22, 2013

Spicy Edamame Dip

I'm submitting this post to two events, firstly, Little Thumbs Up, hosted by Mich from Piece of Cake, where the ingredient for this month is Soya Beans. The second event is with I Heart Cooking Clubs, the theme for this week is October Potluck, where we can make any recipe from any of our previous featured chefs. And this Spicy Edamame Dip recipe is from one of our previous featured chef, Rick Bayless. This is my second link with IHCC this week! 

Usually when Edamame Beans are mentioned, the first thing that came to mind are the beans still in their pods, steamed and seasoned, served at Japanese restaurants. Edamame beans are young soya beans usually still in their pods, the beans are soft and edible, unlike the mature beans which are hard and dry, used to make soy milk and tofu. These young pods are usually sold frozen and all you have to do is thaw them, either steam or boiled in hot water still in their pods or remove the pods, for  a few minutes until tender. 

Edamame beans are great in stir-fries and can be added to fried rice. And it is delicious cooked with tofu, which I have posted in my older post, Spicy Tofu and Edamame Beans

If you love eating hummus, and have not tried making one with edamame beans before, then I urge you to try it! It is delicious!

Edamame Beans


Ingredients for the dip; olive oil, fresh cilantro, cayenne powder, cumin powder, coriander powder, salt, lime juice, toasted garlic, edamame beans (remove the pods, boil the beans in salted boiling water until tender, about 5 minutes), retain some water to be used later.

Process all the ingredients in the food processor, adding some water from the boiled edamame beans until you get the consistency you like. I have added in about a pinch more of the spices, salt and lime juice, and about 1/3 cup of cilantro leaves, adjust according to taste.


Look at the lovely Edamame Dip. It is not spicy at all! Just plain delicious! And a healthy snack!


I have two pieces of Wholemeal Tortilla Wraps which I wanted to clear. I toasted them in a dry pan over low heat on both sides until crispy. Cut them to triangles and serve with the Spicy Edamame Dip. You can serve the dip with fresh cut vegetables. 


This is really good! I was standing and enjoying myself eating a few pieces of the tortilla crisp dipped in the yummy hummus (very addictive!), until I remember...


.......  the Edamame beans which I've reserved earlier. I always forget my garnishes!


Note : Recipe says this serves 10!  Maybe, if you are serving as a starter! To me it serves two! Or one, if you are eating this as a meal for lunch, like me! wink!

Spicy Edamame Dip
(adapted from Rick Bayless, here)
2 garlic cloves, unpeeled
1 cup shelled edamame beans (fresh green soy beans)
1/2 teaspoon salt
1/4 teaspoon ground coriander
1/4 teaspoon cayenne powder
1/8 teaspoon ground cumin
3 tablespoons olive oil
1/8 cup fresh lime juice
1/8 cup chopped fresh cilantro
fresh cut vegetable, for dipping
pita bread, cut in wedges, for dipping

  1. In a dry skillet over medium heat and turning frequently, roast the garlic until softened, about 15 minutes, they will be dark in some spots; let them cool and remove the skins.
  2. In salted water to cover, simmer the edamame until they are tender, about 5 minutes; drain, reserving 1/3 cup of the boiling water, and set aside to cool.
  3. In a food processor or blender, coarsely chop the peeled garlic.
  4. Add the drained edamame, salt, coriander, cayenne, and cumin, and process until smooth, adding as much of the reserved cooking water as necessary to make a puree.
  5. Add the oil, lime juice, and cilantro, and pulse to combine.
  6. Place the dip in a serving dish, and serve with vegetable and pita wedge dippers.


This post is linked to :
This post is linked to the event, Little Thumbs up organised by Doreen from my little favourite DIY and Zoe of Bake for Happy Kids, hosted by Mich of Piece of Cake at this post.


Ingredient for this month is Soy Beans


and to I Heart Cooking Clubs (IHCC), for the theme of this week "October Potluck"

IHCC Potluck Badge


and I'm sharing this post with :

Monday, October 21, 2013

Chicken Teriyaki : IHCC (October Potluck)

"October Potluck", is this week's theme at I Heart Cooking Clubs (IHCC), where we are a given a choice to select from any of our previous featured chefs recipes or the current featured chef, Donna Hay. This week, I'm sharing one of Nigella Lawson's chicken recipe.

This is a simple and quick dish to cook, great for a weekday night if you are rushing for time.


Chicken fillet pieces are marinated with sake (I have replaced with Chinese rice wine), mirin, soy sauce, sugar, ginger and sesame oil. The chicken pieces are then fried in a little oil, and the marinating liquid is then poured over the chicken. Once the chicken are cooked, they are taken out and the sauce is boiled down to a thick syrup. The chicken pieces are stirred in so that they are coated with the syrup. Serve with  rice and some veggies.


A dish suitable for kids, eaten with rice.


Chicken Teriyaki
(adapted from "Nigella Kitchen" by Nigella Lawson)
serves 4-6
2 tablespoons sake (Japanese rice wine) (I use Chinese rice wine)
1/4 cup mirin (sweet Japanese rice wine)
1/4 cup soy sauce
1/2 tsp black soy sauce (my addition)
2 tablespoons light brown sugar
2 teaspoons grated fresh gingerroot
splash of sesame oil
1-3/4 pounds chicken thigh fillets (no skin or bones), preferably organic, cut or scissored into bite-sized pieces
1 teaspoon peanut oil
1-3/4 to 2-1/2 cups sushi rice, cooked following package instructions
  1. Mix the sake, mirin, soy sauce, sugar, ginger and sesame oil in a dish that you can steep the chicken in. I use an 8-inch square Pyrex, but anything similar would do.
  2. Add the prepared chicken pieces and leave for 15 minutes.
  3. Heat the peanut oil in a large, shallow frying pan or Dutch oven (that has a lid) and, using a perforate spoon, transfer the chicken pieces from their dark marinating liquid to the pan, and saute until they look cooked on the outside.
  4. Pour the marinade over the chicken pieces in the pan and bring to a bubble, then turn down the heat to a gentle simmer, put the lid on and cook for about 5 minutes - cut into a piece of chicken to make sure it's cooked through.
  5. Remove the cooked pieces with a perforated spoon (you could keep them warm in a bowl covered in aluminium foil) and turn the heat up under the pan to let the liquid boil down to a thick, dark syrup.
  6. Return the chicken pieces to the pan, stir well so that they are all coated in the sticky, savory syrup, then serve with a comforting pile of sushi rice and perhaps some steamed baby bok choy or green veggies of your choice.
#104/100

This post is linked to I Heart Cooking Clubs (IHCC), for the theme of this week "October Potluck"

IHCC Potluck Badge


And I'm sharing this post with :
This post is linked to the event, Little Thumbs up organised by Doreen from my little favourite DIY and Zoe of Bake for Happy Kids, hosted by Mich of Piece of Cake at this post.


Ingredient for this month is Soy Beans


Cook-Your-Books #5 hosted by Kitchen Flavours

 photo 77951578-1914-4b72-8eda-9e40a91183ac_zps331eb4b4.jpg


See Ya In The Gumbo @ Ms. enPlace

Saturday, October 19, 2013

French Bread (Pain Ordinaire)

I love eating baguettes. Usually I would grab one or two when I do my grocery shopping at Tesco, as it was really cheap, at RM1.99 each. Those baguettes would usually end up as toasted garlic bread for the kids breakfast during the school week. 

The last time that I've made baguette was years ago. There are quite a number of recipes for baguettes from my cookbooks collection, and I've chosen this simple one first, hopefully will be trying out the others in due time.

Original instructions from the recipe below gave the option of either using the stand mixer to knead the dough or knead manually by hand. I have however, used the bread machine instead.

Place the ingredients in the bread machine pan (refer to my notes below). Select Quick Dough cycle. Press Start. This cycle does the kneading for 6 minutes. At the end of the cycle, press Start again, and repeat one more time. In total, the bread machine has done 18 minutes of kneading. Adjust accordingly to the condition of the dough, check to see if it requires to be kneaded longer.  Remove the dough , shape into a round and place in a greased bowl, turning it over once so the oiled side is at the top. Cover with greased plastic wrap and leave to rise until tripled in bulk. Proceed with step 5 as per the recipe below.


The baguette pan, which I bought almost two years ago and have never used it before! (smiling sheepishly!). I sprayed the pan with some oil and left the dough to rise (the second rising) on the pan, covered with greased plastic wrap until doubled in size. Make some scores on the risen dough. Recipe calls for the baguettes to be glazed with some egg wash, I have glazed one baguette (the top one) and leave the other unglazed, just wanted to see the difference after baking. Place the whole pan with the dough into the oven for baking, easy, peasy!

For the baking of these baguettes, I have preheated the oven with a roasting tray at the most bottom rack, and as soon as the dough was placed in the oven, I added about 1 cup of ice cubes into the roasting tray, and immediately close the oven door. The steam will make a crispy crust during baking.


The baked baguettes.
Which do you think looks better, the glazed one (left baguette) looks very nice and crusty with a golden brown crust while the unglazed baguette looks more natural and rustic.


These baguettes have a crusty crispy crust and soft bread texture. Very nice!  Especially good when eaten warm.


We ate these baguettes with some meat stew! Delicious!


Note : my changes in blue for making 2 baguettes and please refer to my notes at the bottom for my adaptation of kneading the dough in the bread machine.

Pain Ordinaire (French Bread)
(adapted from "The Bread Bible", Beth Hensperger)
Makes 3 long baguettes or round loaves
2 cups warm water (105 to 115F) (330 ml)
1-1/2 tablespoons (1-1/2 packages) active dry yeast (1 tbsp)
1 tablespoon sugar (2/3 tablespoons)
3 cups bread flour (2 cups)
1 tablespoon salt (scant 2 teaspoons)
about 3 cups unbleached all-purpose flour (I use 2 cups bread flour)
cornmeal, for sprinkling
1 large egg beaten with 2 teaspoons water, for glazing

  1. In a large bowl using a whisk or in the bowl of a heavy-duty mixer fitted with a paddle attachment; pour in the warm water and sprinkle the yeast and sugar over the surface of the water. Stir until combined. Let stand at room temperature until dissolved and foamy, about 10 minutes.
  2. Add 2 cups of the bread flour and the salt. Beat hard until smooth, about 3 minutes. Add the remaining 1 cup bread flour and most of the all-purpose flour, 1/2 cup at a time, until a shaggy dough that clears the sides of the bowl is formed.
  3. If kneading by hand, turn the dough out onto a lightly floured work surface and knead until soft, silky, and resilient, 5 to 8 minutes, dusting with flour only 1 tablespoon at a time as needed to prevent sticking. The dough should not be sticky. If kneading by machine, switch to the dough hook and knead for 1 to 3 minutes, or until dough is smooth and springy.
  4. Place the dough in a lightly greased deep bowl. Turn once to coat the top and cover with plastic wrap. Let rise in a cool area until tripled in bulk, 1-1/2 to 2 hours. If you have time, punch down the dough and allow it to rise again for about 1 hour. The dough may also rise in the refrigerator overnight.
  5. Gently deflate the dough. Turn it out onto a lightly floured work surface. Grease or parchment-line a baking sheet and sprinkle with cornmeal. Divide the dough into 3 equal portions. Knead in more flour now if the dough seems sticky. Shape the portions into tight round balls for boules. Or flatten each portion into a rectangle for baguettes. Roll each rectangle up tightly with your thumbs to form a long sausage shape ; roll back and forth with your palms to adjust the length. Place the loaves 4 inches apart on the baking sheet.
  6. Quick method : Directly after forming the loaves, slash the tops diagonally no deeper than 1/4 inch and brush the entire surface with the glaze. Place in a cold oven on the middle or lower rack. Turn the oven thermostat to 400F and bake for 35 to 40 minutes, or until crusty and the loaves sound hollow when tapped with your finger. Eat immediately or transfer the loaves to a cooling rack.
  7. Standard method : Preheat a baking stone at 450F for at least 20 minutes, if using ; otherwise, preheat the oven to 400F. Cover the loaves loosely with plastic wrap and let rise until puffy and doubled, about 30 to 40 minutes. Slash the tops of the loaves diagonally no more than 1/4 inch deep and brush the entire surface with the glaze. Spray a mist of water into the oven, or throw a few ice cubes onto a gas oven floor to crisp the crust, if desired. Turn the oven thermostat to 400F if using a stone and bake for 35 to 40 minutes, or until crusty and the loaves sound hollow when tapped with your finger. Eat immediately or transfer the loaves to cooling rack.
Kitchen Flavours notes:
To knead the dough using the bread machine
Place water in the bread pan, add flour (all 4 cups). Place salt in one corner, sugar in another corner and make an indentation in the center of the flour. Add the instant yeast in the indentation. Select Basic Dough. Bread machine will knead for 6 minutes. Press Start again, and repeat one more time, in total, 18 minutes of kneading. Remove dough, shape into a round, place in an oiled deep bowl, turn over to coat, cover with greased cling wrap and leave to rise until tripled in bulk. Proceed with the recipe as step 5 above.
#103/100

I'm linking this post with :

 photo 77951578-1914-4b72-8eda-9e40a91183ac_zps331eb4b4.jpg


Thursday, October 17, 2013

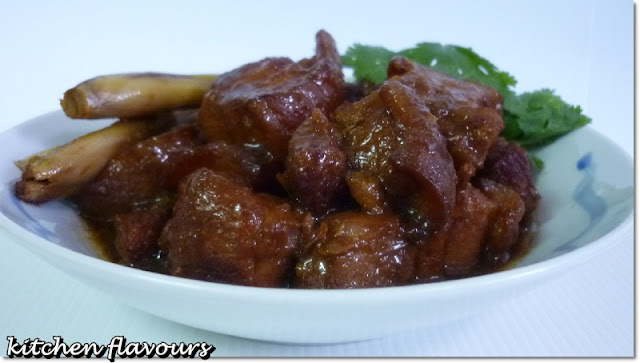
Braised Pork Belly with Lemongrass

My sister gave me a bunch of lemongrass, harvested from her garden. I was browsing thru a local magazine, looking for some ideas for dinner, when this recipe caught my attention. It looks delicious, and decided to try this dish.

Really simple and easy, with very few ingredients. The pork belly are cut to bite-sized chunks and marinated with some light soy sauce, salt and cornstarch. These are then deep-fried in hot oil until brown on all sides. Drain and keep aside. 

Peeled whole shallots are sauteed in hot oil until fragrant and blistered a little, then the bruised lemon grass are added in and stir-fry until fragrant. Add in the fried pork belly, add some water, light soy sauce, dark soy sauce, and some sugar to taste. Cover and simmer over low heat for about 1 hour or until the meat is tender. You may need to add additional water if it gets too dry. I have used a minimum of sugar as I do not like very sweet dishes. Adjust to your own taste.


This dish is very delicious and tasty. The family love it!


The fragrance and taste of the lemon grass really is wonderful. Very delicious eaten with plain white rice, the meat is soft tender and full of flavour and fragrance from the lemon grass. After the long braising, the shallots has been mashed into the sauce. Do not be too tempted to add on the lemon grass as too strong a taste and smell can overpower a dish. This dish is family approved!


(My adjustments are in blue. Adjust the soya sauce, both light and dark, according to taste)
Braised Pork Belly with Lemon Grass
(adapted from "Yum Yum Magazine, issue no. 79)
1 kg pork belly, cut into pieces (medium-sized pieces)
1 cup oil for deep-frying
6 shallots, peeled
6 stalks lemongrass, crushed

Marinade :
1/2 tsp salt
1 tbsp light soya sauce (I use 3 tbsps)
2 tbsp cornstarch (I use 3 tbsps)

Seasoning :
4 tbsp light soya sauce
1 tbsp sugar (I use 1 tsp)
1 tbsp dark soya sauce (I use 2 tbsp)
600ml water

  1. Mix pork belly with marinade and deep-fry in hot oil until golden brown. Dish and drain.
  2. Leave 1 tbsp oil in wok and saute shallots until aromatic. Add lemongrass and stir-fry until fragrant.
  3. Add in pork belly, seasoning and bring to boil. Lower the heat and simmer for 1 hour or until pork is tender. Dish and serve.
#102/100

This post is linked to the event, Little Thumbs up organised by Doreen from my little favourite DIY and Zoe of Bake for Happy Kids, hosted by Mich of Piece of Cake at this post.


Ingredient for this month is Soy Beans

I'm sharing this post with :

 photo 77951578-1914-4b72-8eda-9e40a91183ac_zps331eb4b4.jpg


Wednesday, October 16, 2013

Blueberry Pancake : IHCC

"Up & At 'Em", our theme for this week at I Heart Cooking Clubs (IHCC), it's breakfast time, the most important meal of the day, the one that sets you up and about! It was a public holiday yesterday, the family woke up later than usual, it was a lazy morning, and these Blueberry Pancakes makes a lovely breakfast on such mornings. These are great eaten warm for those who are up and about to start the day, and are just as delicious when eaten later, at room temperature, for those who want to sleep in a little longer!


These pancakes uses the basic ingredients, flour, baking powder, milk, sugar, melted butter and frozen blueberries, but these simple ingredients makes really good pancakes!
The original recipe calls for some icing sugar to be sprinkled over the top before serving with a drizzling of maple syrup. My family had this with some honey drizzled over instead. They have always love pancakes with honey!


I prefer eating the pancakes as it is, it already is very good on its own, with a mug of hot coffee.


These pancakes are just so delicious. They are tender, not-too-sweet, and the sweet blueberries are just bursting with juice. Recipes calls for 3/4 cup of frozen blueberries, but I have used more than that, perhaps double that amount. Family approved! One that I would make again! Yums!


Blueberry Pancake
(source from donnahay.com)
2 cups (300gm) plain (all-purpose) flour, sifted
3 teaspoons baking powder, sifted
1/2 cup (110g) caster (superfine) sugar
2 eggs
2-1/4 cups (560ml) milk
75gm unsalted butter, melted
3/4 cup (115gm) frozen blueberries
fresh blueberries, to serve
maple syrup, to serve
icing (confectioner's) sugar, for dusting

Place the flour, baking powder and sugar in a bowl and make a well in the centre. Combine the eggs, milk and butter, gradually pour into the well and whisk until smooth. Stir in the frozen blueberries. Heat a lightly greased non-stick frying pan over low heat. Cook 1/4 cups of the pancake mixture for 2 minutes or until bubbles appear on the surface. Flip and cook for a further 1-2 minutes or until light golden. Repeat with the remaining mixture. Stack the pancakes, top with the fresh blueberries, pour over the maple syrup and dust with icing sugar to serve. Makes 16.


To see what everyone are having for breakfast, drop by IHCC. You might just be inspired to join us! For more details about joining in, click here.