Thursday, February 27, 2014

Coffee Bread

A few months ago, I've bought a bread cookbook from one of our local bookstore, "Natural Breads Made Easy" by Kin Chan and was pleasantly surprised to find that it is in bilingual (Chinese/English). Other baking books from Taiwan or Hong Kong are mostly in Chinese language. There are only about 30 bread recipes, and the interesting thing is, this book uses the 17-hour-low temperature fermentation process for all the breads in the book.

As mentioned in the book, "70% of the dough is kneaded and stored in the fridge at 0-5C for 17 hours. As most of the dough has been proved once under low temperature, the final proving time is greatly reduced and the final proving gives a major rise in the dough. Yet, you need to bake the bread for a longer period".

The ingredients for the pre-ferment dough is kneaded and left in the refrigerator to ferment for 17 hours. It is then cut to small pieces and mix into the rest of the bread ingredients the next day, then proceed with the usual process of bread making. Fresh yeast is used for all the recipes, but the author has given a measurement of using instant yeast, use only 1/3 of the amount listed for the fresh yeast.

According to the author, breads made with pre-ferment dough has a moist and chewy texture and a yeasty fragrance. It can keep well without turning hard or getting dry. Sounds good to me!


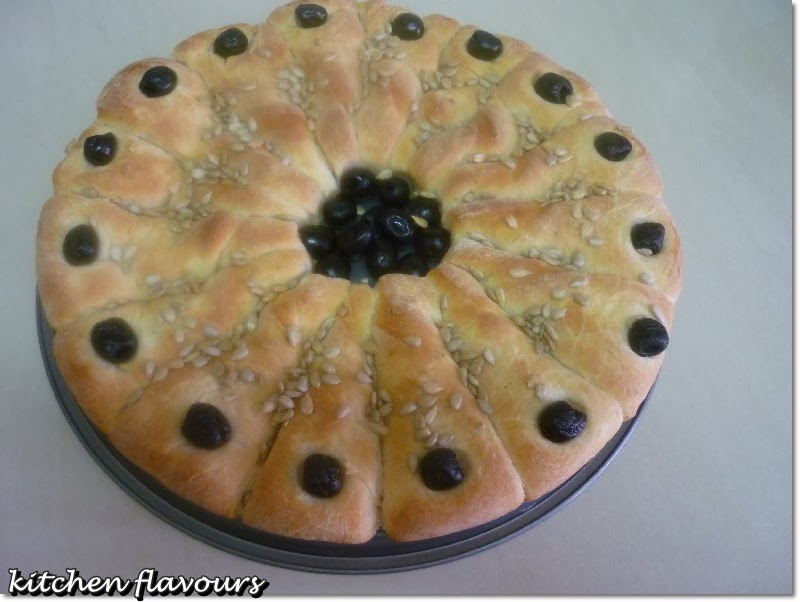
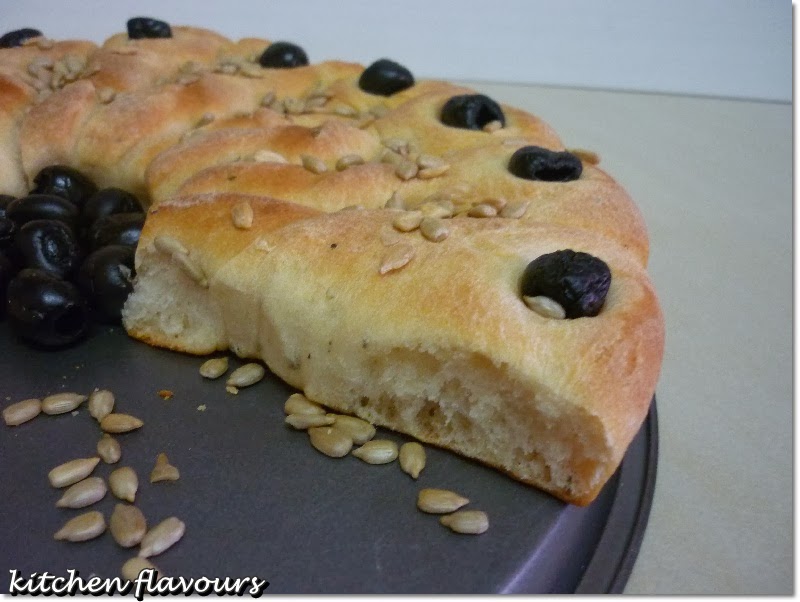
So far, this Coffee Bread is the first recipe that I've tried, and it turns out really soft and fluffy. The coffee taste is however a little too strong, which can easily be adjusted by reducing the amount of espresso coffee powder slightly. 

The only setback that I've noticed from this book even before I started to bake this bread is, there is no mention of the size of loaf pan that is used for each bread. To me, size matters! Especially when it comes to bread making. The best that I can do is to calculate the amount of the ingredients in weight and estimate which loaf pan size to use. 


This bread has such a lovely soft crust.


With moist, soft and fluffy texture inside.


And it keep for days without getting any harder or dry! It was still soft and fluffy on the third day! 

Do not be put off by the 17-hour fermentation, it sounds like it is taking forever, but it really is so simple. The pre-ferment dough is mixed and kneaded to a soft dough, placed in a large bowl, then cover with cling wrap and keep in the refrigerator to rise in a low temperature for 17 hours, then proceed with the instructions on the making of the bread the next day. Plan your baking time accordingly before you start with the pre-ferment dough the day before, that's all!


Coffee Bread
(adapted from "Natural Breads Made Easy" by Kin Chan)
Ingredients
Pre-ferment Dough :
469gm bread flour
268gm water
13gm fresh yeast (if using instant yeast, use only 1/3 of the amount listed, I use about 5gm) 
7gm sea salt
13gm skim milk powder

Dissolve the yeast in water. Add bread flour, sea salt, skim milk powder and knead until soft. Cover the dough in cling wrap. Refrigerate to let it prove for 17 hours.

For the Bread :
201gm bread flour
13gm espresso coffee powder
7gm sea salt
67gm sugar
54gm honey
54gm milk
80gm egg
7gm fresh yeast (if using instant yeast, use only 1/3 of the amount listed, I use about 3gm)
67gm unsalted butter

Preparation :
Cut the pre-ferment dough into small pieces.

  1. Knead all the ingredients of dough together (except the butter). Add pre-ferment dough piece by piece. Knead after each addition until soft and smooth. Add butter. Knead until stretchable consistency.
  2. Put the dough into a big bowl. Cover with a cling wrap. Let it prove for about 25-30 minutes.
  3. Divide the dough into sixteen equal portions. Flatten each piece of dough with your hands to drive the air out and then round it. Cover in cling wrap. Set aside to rest for about 20 minutes.
  4. Flatten the dough with your hands to drive the air out. Round each piece again. Put eight pieces of dough into the loaf tin and cover with cling wrap.
  5. Let it prove again for about 40-45 minutes or until the dough has risen to 80% of the depth of the mould. Brush egg wash on top. Bake in a preheated oven at 170-180C for about 30-35 minutes until golden brown.

My notes :

  •  I have used two loaf pans measuring 9" x 4-1/2" x 4-1/2"
  • To reduce the amount of espresso coffee powder as it is a little too strong
** You may wish to visit the authors facebook at http://www.facebook.com/thebluegate


**************
I'm linking this post to :

 photo 77951578-1914-4b72-8eda-9e40a91183ac_zps331eb4b4.jpg


*******************

Upcoming Event !!!

Cook Like A Star will be entering it's third year this March! How time flies! To celebrate Cook Like A Star's 2nd anniversary, for the months of March and April, Cook Like A Star is having an All Star Anniversary Party! Isn't this exciting? We have the choice to cook or bake from any of the previous featured chefs recipes, and they are :

Ina Garten
Jamie Oliver
Nigella Lawson
Curtis Stone
Ree Drummond
Bill Granger
Masterchefs
Martha Steward
Delia Smith
Donna Hay


The hosts for All-Stars Anniversary Party are, Zoe of Bake For Happy KidsMich of Piece of Cake and Joyce of Kitchen Flavours


Everyone is welcome to join us, cook or bake from any of the above chefs' recipes and link your posts to the linky which will be provided at the hosts' page. Your post must be current. Feel free to use the above logo in your blog post. Please mention the following :

I'm linking this post to Cook Like A Star, All-Stars Anniversary Party, hosted by Zoe of Bake For Happy KidsMich of Piece of Cake and Joyce of Kitchen Flavours.

See you at the Party!
From 1st March to 30th April!

Tuesday, February 25, 2014

Mango and Banana Yoghurt Gelato

"Tropical Delights", is our theme for this week at I Heart Cooking Clubs (IHCC), where we are currently cooking with Donna Hay. Choosing what I'm going to make for this theme is easy, as I was going for something cool! With our extremely hot and dry weather which we are having right now, and with no rain, ice creams and cold drinks are welcome anytime of the day! 

After going thru Donna Hay's recipes, I've decided to make Mango and Banana Yoghurt Gelato, which uses only three ingredients, mango, banana and yoghurt. The family loves mangoes and bananas, so I knew that this would be perfect. I've used my own homemade yoghurt. And the plus about this gelato is, there is no sugar at all!


 The gelato is just so creamy and delicious!

Very easy and simple to make. Peel and chop the bananas and mangoes, place in a container and freeze until frozen, for a few hours or overnight. Remove the frozen fruits and pureed them in the blender together with the yoghurt. The gelato will be really thick and creamy, and can be eaten immediately or keep frozen in the refrigerator. Although the gelato will harden slightly when frozen, it can be scooped very easily, so there's no need to wait for it to soften.


If you are on a diet or trying to (like me!) haha!, this would be the perfect indulgence. There's no sugar, eggs or cream at all. Generally, gelato has less fats and less air churned into it during the freezing process, compared to ice cream.

Using homemade yoghurt is an added plus. Use really ripe bananas and mangoes for full flavour. The mangoes that I've used are really, really sweet, so they are perfect for making this gelato. This delicious gelato has the natural sweetness from both the fruits.


Really yummy! It melts real fast, in our super hot weather! 
I will definitely make this again!


Mango and Banana Yoghurt Gelato
(adapted from donnahay.com)
2 bananas, peeled and chopped
3 mangoes, peeled and chopped
1 cup (280gm) thick natural or vanilla yoghurt

  1. Place the banana and mango in a sealed container and freeze for 2-3 hours or until frozen.
  2. Place the frozen fruit and yoghurt in a blender of food processor and blend until smooth.
  3. Serve immediately or place in a sealed container and freeze.
  4. After freezing allow to soften for 5 minutes before serving.

To view what other Tropical Delights that my friends made, hop on over to I Heart Cooking Clubs (IHCC)

IHCC Donna Hay Badge resized


Sunday, February 23, 2014

Lemony Madeleines

I've bought a few baking books from the recent BBW sale, two of those are, John Barricelli's, "The Seasonal Baker" and "The Sono Baking Company Cookbook". These are beautiful cookbooks, and of course, as soon as I've browsed thru them, many recipes are bookmarked! So for a start, I've decided to make these easy madeleines from "The Seasonal Baker".


According to the author, these French little cakes are traditionally made with melted butter, and must be eaten the day they are baked or they lose their airy softness. So to make it practical for the home kitchens, his recipe is a mixture of melted butter and oil, to extend their shelf life to a couple of days.

Just like most other madeleines, the batter is refrigerated for at least 2 hours before baking. I have reduced the amount of sugar to 1/4 cup (original is 3/4 cup plus 2 tablespoons), which turns out just right.


These madeleines are soft and lemony. Perfect as an afternoon treat with a cup of warm tea. Best eaten, especially warm, fresh from the oven!


Lemony Madeleines
(adapted from "The Seasonal Baker", John Barricelli)
3/4 cup plus 2 tablespoons sugar (I use 1/4 cup)
2/3 cup cake flour
3/4 teaspoon baking powder
3 tablespoons vegetable oil
3 tablespoons unsalted butter, melted, plus more for the pan
2 teaspoons lemon extract
grated zest of 1 lemon
2 large eggs
1 large egg yolk
1/8 teaspoon coarse salt (omit this, use salted butter)

  1. In a medium bowl, whisk together the sugar, flour, and baking powder ; set aside. In a small bowl, combine the oil, melted butter, lemon extract, and lemon zest; set aside.
  2. In another medium bowl, whisk the 2 whole eggs plus the egg yolk with the salt until frothy. Whisk in the sugar-and-flour mixture until the dry ingredients are combined and the batter is smooth. Fold in the oil-and-butter mixture with the whisk. Cover and refrigerate for at least 2 hours, or overnight.
  3. Set a rack in the lower third of the oven. Preheat the oven to 350F. Brush a 12-mold madeleine pan well with melted butter or spray with nonstick spray. Dust the molds with flour and tap out the excess.
  4. Fill the molds about two-thirds full, about 1 tablespoon in a standard mold; do not overfill. Bake until golden brown and rise, 14 to 16 minutes, rotating the pan two-thirds of the way through the baking time.
  5. Immediately invert the madeleines onto a wire rack and let cool completely. Let the mold cool completely. Then butter and flour 8 of the molds, fill with the remaining batter, bake, and cool.

************

I'm linking this post to :

Little Thumbs Up, ingredient for this month is Lemons, an event organized by Zoe of Bake For Happy Kids and Doreen of My Little Favourite D.I.Y. and hosted by Grace of Life Can Be Simple.


 photo 77951578-1914-4b72-8eda-9e40a91183ac_zps331eb4b4.jpg


*******************

Upcoming Event !!!

Cook Like A Star will be entering it's third year this March! How time flies! To celebrate Cook Like A Star's 2nd anniversary, for the months of March and April, Cook Like A Star is having an All Star Anniversary Party! Isn't this exciting? We have the choice to cook or bake from any of the previous featured chefs recipes, and they are :

Ina Garten
Jamie Oliver
Nigella Lawson
Curtis Stone
Ree Drummond
Bill Granger
Masterchefs
Martha Steward
Delia Smith
Donna Hay


The hosts for All-Stars Anniversary Party are, Zoe of Bake For Happy Kids, Mich of Piece of Cake and Joyce of Kitchen Flavours


Everyone is welcome to join us, cook or bake from any of the above chefs' recipes and link your posts to the linky which will be provided at the hosts' page. Your post must be current. Feel free to use the above logo in your blog post. Please mention the following :

I'm linking this post to Cook Like A Star, All-Stars Anniversary Party, hosted by Zoe of Bake For Happy Kids, Mich of Piece of Cake and Joyce of Kitchen Flavours.

See you at the Party!
From 1st March to 30th April!

Friday, February 21, 2014

Loh Shi Fun (Pin Noodles) with Minced Meat

We eat noodles very often, a few times a month, and yet I seldom post about it in my blog. We have a few family favourites and this is one of them. My  kids love eating konlo loh shi fun (pin noodles), and they especially love the minced meat topping. The other thing that is a MUST have in my house when having noodles or pan meen, are fried crispy shallots! So I always have a jar ready in my kitchen, so much so that sometimes I've got to stop my kids from putting heaps of it onto their noodles, they just love crispy fried shallots. And I do agree, that crispy fried shallots makes a difference to a bowl of noodles, try it and see.


This is great as a weekend lunch for the family.


I sometimes cook this for dinner. Easy, and everyone's favourite!


Konlo Loh Shi Fun with Minced Meat (Pin Noodles)
(serves 4)
600gm lo shi fun (pin noodles)
200gm choy sum (Chinese mustard greens)
12 fish balls (optional)

For the minced meat
300gm minced pork
5 dried shiitake mushrooms (soaked till soften)
2 garlic cloves, minced
2 shallots, minced
1 tsp cornflour
1 tsp water

Sauce for the minced meat
1 tbsp fried shallots oil
1 tbsp oyster sauce
1 tbsp fish sauce
1-1/2 tbsp light soy sauce
3/4 tsp dark soy sauce
1/4 tsp white pepper powder
1/2 cup water

To serve :
a few tablespoons light soy sauce
a few tablespoons fried shallots oil
some fried shallots for garnishing
some chopped spring onions (scallions) for garnishing
dash of white pepper powder (optional)

  1. To cook the minced meat. Marinate minced pork with cornflour and water, mix well and keep aside for 10 minutes. Cut off and discard stems from shittake mushrooms. Slice and chop the caps to small pieces, keep aside. Mix the ingredients for the sauce, in a medium bowl until well combined. Keep aside. Heat 1 tbsp oil in saucepan or wok, when oil is hot, saute minced cloves and shallots till fragrant. Add in minced pork, stir and break up pieces. Fry until meat is no longer pink. Add in the chopped mushroom and stir for 2-3 minutes more. Pour in the sauce mixture, stir, let it come to a boil, reduce heat to low, cover and let it simmer for about 10 minutes. If it appears dry, some water may be added. Allow for some gravy to pour over the noodles later. Adjust seasoning if necessary. Dish up and keep warm, covered.
  2. Put a pot of water to boil. Cook fish ball (if using), in boiling water for 2-3 minutes until cooked. Remove and drain. In the same pot, blanch the mustard greens for a minute or two, remove and drain. And in the same pot, blanch noodles in hot boiling water about 1-2 minutes. Remove noodles and drain. 
  3. To serve : Place some noodles in a bowl. Add a half teaspoon of fried shallots oil, 1/2 teaspoon of light soy sauce, toss noodles to combine. Scoop about 2-3 tablespoons of the cooked minced meat onto the noodles with some of the gravy, place some mustard greens and fish ball at the side. Garnish with generous amount of crispy fried shallots, some chopped spring onions and a dash of white pepper powder. Serve hot. Toss the noodles and the minced meat together before eating. Serve with a condiment, mixture of sliced red chillies and light soy sauce. Enjoy!


Wednesday, February 19, 2014

Fish In A Green Sauce & Tomato and Onion Relish

I'm sharing today, Madhur Jaffrey's Fish In A Green Sauce and Tomato and Onion Relish which I served with Lemon Rice, from my previous post.

For the fish dish, according to the MJ, firm-fleshed fish like king fish or salmon are ideal. I have however used stingray instead, since I have some pieces in my freezer which I bought just a couple of days earlier. Stingray is pretty common over here in Malaysia, the most popular method of cooking it, is to marinate it with spices and grill it over a hot fire, and enjoy it with a delicious chilli and lime condiment. We love eating stingray, which I often use for a Nyonya dish. The flesh is firm enough and yet tender and extremely tasty, so I thought I used it for this dish.


The fish is marinated with some spices and then fry on both sides. Remove and keep aside. The sauce is made up of chopped tomatoes, chopped fresh coriander, onion, green chillies, ginger, chilli powder and garam masala, and is seasoned with lemon juice, salt and pepper. For the spices, I have used slightly more than the amount mentioned in the recipe. Madhur Jaffrey has an interesting measurement for the chopped fresh coriander, amount is 1 teacup! I've used a full measurement cup, perhaps a little bit more, as I love fresh coriander. When the sauce is halfway thru cooking, the fish pieces is placed in the sauce, with the sauce spooned over,  cover, and simmer for a few minutes. This is a fairly dry dish, as there is not a drop of water being used. The chopped tomatoes would release its juices and by the time the dish is done, it will be almost dry. A very tasty dish, and an interesting way to cook stingray. There were a few pieces leftover and the next day, instead of reheating it over the stove, since it is already quite dry, I heated it by steaming for a few minutes. The flavours actually improve overnight.


This Tomato and Onion Relish is just so easy, it was done in minutes. A wonderful relish that is just great with any Indian curries.


My weeknight dinner, Lemon Rice, Fish In A Green Sauce, Tomato and Onion Relish.


Fish In A Green Sauce
(adapted from "100 Essential Curries", Madhur Jaffrey)
Serves 2
for the fish
2 good-sized salmon or king fish steaks (about 675gm/1-1/2lb)
salt and freshly ground black pepper
1/8 tsp ground turmeric
1/8 tsp chilli powder (1/4 tsp)

for the green sauce
vegetable oil
85gm (3oz) onions, peeled and finely chopped
2 garlic cloves, peeled and finely chopped
1 teacup finely chopped coriander
1 medium tomato, finely chopped
2-3 fresh hot green chillies
1 tsp peeled, finely grated fresh ginger
1 tbsp lemon juice
1/8 tsp salt
1/8 tsp chilli powder (1/2 tsp)
1/2 tsp garam masala (1 tsp)

Step One
Rub the fish on both sides with a generous sprinkling of salt, lots of freshly ground pepper and the turmeric and chilli powder. Rub well and set aside.

Step Two
Put 3 tablespoons oil in a non-stick frying pan and set over high heat. When hot, put in the fish and brown quickly on both sides without letting it cook through. Remove with a slotted spoon and set aside. Add the onion and garlic to the pan. Stir and fry until the onion browns a bit. Add the green coriander, tomato, green chillies, ginger, lemon juice and salt. Stir and cook over medium-high heat until the coriander and tomato have completely wilted. Spread the green sauce around in the frying pan and check the salt.

Step Three
Lay the fish over the top. Now spoon some green sauce over the fish. Sprinkle the chilli powder and garam masala over the top. Biring to a simmer. Cover, lower the heat and simmer gently for about 10 minutes.


Tomato and Onion Relish
(Timatar Aur Pyaz Ka Cachumbar India)
(adapted from "100 Essential Curries", Madhur Jaffrey)
Serves 4
2-3 medium tomatoes
1 medium onion
1 teaspoon roasted, ground cumin seeds
1 tablespoon lemon juice
salt
freshly ground black pepper
1/8-1/4 tsp cayenne pepper

Step One
Cut the tomatoes into 5mm (1/4in) cubes. Peel and finely chop the onion. Combine the tomato and onion in a serving bowl.

Step Two
Add the roasted cumin, lemon juice and salt, pepper and cayenne to taste. Toss to mix. Cover with cling film and refrigerate for 30 minutes.

************

I am linking this post to  :

I Heart Cooking Clubs (IHCC),  for February Potluck


************

Little Thumbs Up, ingredient for this month is Lemons, an event organized by Zoe of Bake For Happy Kids and Doreen of My Little Favourite D.I.Y. and hosted by Grace of Life Can Be Simple.


************


 photo 77951578-1914-4b72-8eda-9e40a91183ac_zps331eb4b4.jpg


Tuesday, February 18, 2014

Lemon Rice

This week is February Potluck Week at I Heart Cooking Clubs (IHCC), and we are free to cook from any of our previous featured chefs' recipes. And I've chosen to cook with Madhur Jaffrey.

I love rice! So I am always on the lookout for easy rice recipes that goes well with curries, especially basmati rice. And I like the simplicity and the fresh taste of this Lemon Rice. I have cooked a few of Madhur Jaffrey's rice recipes and I like all of them. For this Lemon Rice, the rice is cooked first, and then tempered spices and herbs, are added in. Tempering is a cooking technique used in Indian cuisines, which is a process where, whole spices are first sauteed in a little oil and the whole mixture is poured into the cooked dish, in this case, the cooked rice, then stir to combine before serving. This tempered process really brings out the maximum fragrance from the spices and herbs. The only spice used for this rice dish is brown mustard seeds, which I have replaced with black mustard seeds. And the herb used, is fresh curry leaves.


Lemon Rice ; simple and easy. Makes a lovely meal with any curries and side vegetables. I have used the rice cooker to cook the rice, and it helps to keep the rice warm until its time for dinner. We had the Lemon Rice with some fish and  relish, both recipes coming up next.

And I am really excited, as I got myself two new books of Madhur Jaffrey, World Vegetarian and Curry Nation from the book sale last weekend! In total, I have four of her books! Big smile!


Lemon Rice
(adapted from "100 Essential Curries", Madhur Jaffrey)
475ml (16fl oz) measure basmati rice, washed and drained
1 teaspoon salt
2 tablespoons vegetable oil
1 teaspoon brown mustard seeds
15 fresh curry leaves (use fresh basil or holy basil leaves as an interesting substitute)
2-3 teaspoons fresh lemon juice
2 teaspoons finely grated lemon rind

Step One :
Combine the rice, salt and 700ml (1-1/4 pints) of water in a medium saucepan and bring to the boil. Cover tightly, turn the heat to very low and cook for 25 minutes.
(I used 2 cups of rice, wash and soaked in clean water for 20 minutes, drain, transfer to the rice cooker, add in 3-1/4 cups of water with 1 tsp of salt and cook as per rice cooker instructions).

Step Two :
Put the oil into a large frying pan and set over medium-high heat. When hot, add the mustard seeds. As soon as the seeds begin to pop - a matter of seconds - put in the curry leaves. Stir once, then empty the contents of the frying pan over the rice. Add the lemon juice and rind. Mix gently with a fork or slotted spoon. Mix once again when turning into a serving dish.


I am linking this post to  :

I Heart Cooking Clubs (IHCC),  for February Potluck


************

Little Thumbs Up, ingredient for this month is Lemons, an event organized by Zoe of Bake For Happy Kids and Doreen of My Little Favourite D.I.Y. and hosted by Grace of Life Can Be Simple.


************


 photo 77951578-1914-4b72-8eda-9e40a91183ac_zps331eb4b4.jpg


Monday, February 17, 2014

THB : Sunflower Seed Pull-Apart Focaccia

It's our bake #31, at The Home Bakers (THB). An interesting shaped focaccia which looks rather pretty with the strips of dough twisted and shaped like a big flower, with black olives studded at the end of each strip and in the center, and sunflower seeds scattered all over.

Mich has informed me that her dough was rather wet and it was difficult to work with. Thanks to Mich, I have reduced the amount of water than the recipe calls for. I started off with 3/4 cup and add on a tablespoon at a time, until the dough feels right. Total amount of water used was 3/4 cup plus 3 tablespoons. The dough was still slightly sticky, and from my previous bakes with other foccacia, most of the dough tend to be on the sticky side. But with a light sprinkling of flour, it helps to handle the dough easily.

The recipe has given the option of using either aniseed or rosemary. Since I have a pot of rosemary plant in my garden, I have used that instead.


This foccacia is baked in a 14-inch pizza pan. Once the dough has risen for the first time, it is rolled out to a 14-inch round. I have however used a 12-inch pizza pan since I do not have a 14-inch size.  Place the dough into the pizza pan, use a 3-inch glass to cut out a piece at the center of the dough. Using a pastry cutter, divide the dough into fourths, and into fourths again, making a total of 16 slices. Twist each strip and lay it flat. 


Brush the strips with olive oil and sprinkle some sunflower seeds all over, pressing them in lightly. Place a black olive at the end of each strip, pressing the olives down gently. Place some extra olives in the center, (to avoid the dough from being closed up during rising and baking, my guess). Cover with greased cling wrap, and leave to rise until doubled in size.

Bake in a preheated oven at 425F for 20-25 minutes or until golden brown. Remove pan from oven, and with the help of a spatula, slide the bread gently onto a wire rack to cool. 


The sunflower seeds did not stay on the focaccia, most of them dropped off rather easily!


This focaccia is nice when eaten warm, with light crispy crust and soft crumbs on the inside, quite tasty eaten on its own with a cup of warm tea. But as soon as it cools down, it is not so soft anymore.


Overall, this is not the best focaccia I have made and eaten, but it is still yummy dipped in hot mushroom soup.


Sunflower Seed Pull-Apart Focaccia
(adapted from "Coffee Cakes" by Lou Seibert Pappas)
makes 1 large loaf, serves 12
1 package active dry yeast (2 tsp)
1/4 cup warm water (105 to 115F)
pinch of sugar or drop of honey
1-1/4 cups water at room temperature
1 tablespoon honey
2 tablespoons extra-virgin olive oil, plus more for brushing
3-1/4 cups unbleached all-purpose flour ( I use bread flour)
1-1/2 teaspoon salt
1 tablespoon aniseed or minced fresh rosemary
1/4 cup sunflower seeds
2 dozen oil-cured black olives, pitted, or 1/4 cup seedless red grapes

In a large bowl, sprinkle the yeast over the warm water. Add the sugar or honey, stir to dissolve, and let stand until foamy, about 10 minutes.

Stir in the room-temperature water, the 1 tablespoon honey, and the 2 tablespoon olive oil. Using a wooden spoon or a heavy-duty mixer, add 1 cup of the flour and the salt and mix until smooth. Grind the aniseed in a mortar to release the flavours, if using. Beat the aniseed or rosemary into the mixture. Beat in the remaining 2-1/4 cups flour, 1/2 cup at a time, until the dough comes together in a loose ball.

Using a heavy-duty mixer fitted with the dough hook, or by hand on a lightly floured board, knead the dough until smooth and elastic, 8 to 10 minutes. Put the dough in a lightly oiled bowl, turn to coat, and cover with plastic wrap or a damp tea towel. Let rise in a warm place until doubled, about 1-1/2 hours.

Lightly oil a 14-inch pizza pan. Punch down the dough, turn out on a lightly floured board, and knead until smooth, 1 or 2 minutes. Roll the dough out into a 14-inch round and place on the pizza pan. With a glass turned upside down, cut out a 3-inch round in the center of the dough, then with a pastry scraper or knife, divide the outer circle of dough into fourths. Cut each piece into fourths again to make 16 slices. Twist each cut strip over and lay it flat. Brush the dough with olive oil and sprinkle with the sunflower seeds. Stud the end of each strip with an olive or grape and place several in the center. Cover with a tea towel and let rise until doubled, about 45 minutes.

Preheat the oven to 425F. Bake the bread for 20 to 25 minutes, or until golden brown. Transfer the bread from the pan to a wire rack to cool. Serve warm or at room temperature. Pull apart to serve.

**************

To view other members' bake, please visit The Home Bakers (THB).

Welcome to The Home Bakers


We are a group of home bakers who are currently baking from "Coffee Cakes" by Lou Seibert Pappas, until each recipe from this book has been baked. This is our bake no. 31 and we have 29 recipes more to go. If you are interested to be a member and join in our bakes, you may drop me an email at kitchenflavours@yahoo.com.


Friday, February 14, 2014

Passionfruit Cordial

Happy Valentine's Day everyone! Any plans for Valentine tonight? Co-incidentally, for this year, the last day of Chinese New Year also known as the Chinese Valentine Day (Chap Goh Mei)  falls on the same day as the western's Valentine's Day, that is today! Young maidens and those who are still single would toss mandarin oranges with good wishes written on the oranges, in the sea or lake with the hope of finding a life partner. Some may perform prayers and set adrift lanterns, bearing good wishes and young men would find the opportunity to get to know them.

I was planning on baking something for today, but the laziness got the better of me! Haha! But that does not mean that I am not making anything for Valentine today. I am celebrating Valentine with sweet passion, that is, with Passionfruit Cordial! 


Over at I Heart Cooking Clubs (IHCC), it is "Raise Your Glass" week, and I'm raising mine to celebrate Valentine's Day today with a glass of refreshing, extremely delicious Passionfruit Cordial. We are currently cooking from Donna Hay's recipes and as soon as I saw this recipe from her website, I knew that I will be making this.


Passionfruit are always available at the market in the area where I live. Bought about 1 kg this morning and made only half a recipe. This recipe requires citric acid, which is available at the local bakery ingredients supplier store. The changes I've made for half a recipe was to use the full cup of passionfruit pulp which was meant for a full recipe. You would need about 7 medium sized fruits. I'm glad I did not reduce the amount as it was so full of "passion-ny" taste and fragrance. And I have read the recipe by mistake for the water, and only used half a cup, which really is OK as the cordial becomes more syrupy as it cools down. The next time when I make this, I'm going to stick to my changes.

Very easy, peasy to make. Mix all the ingredients, sugar, water, citric acid and passionfruit pulp in a medium saucepan and let it come to a boil, making sure the sugar are totally dissolved. Remove from heat and let cool.


Store in jars or bottles, seal, and can be kept for weeks in the refrigerator, though I'm sure it would not last that long!


To make a glass of this delicious drink, simply measure about 3 tablespoons (more or less, to taste) of the Passionfruit Cordial, top with Soda Water and add in some ice chunks. Drink and enjoy! So good and refreshing, a definite welcome drink in our extremely hot "rainless" weather which we are experiencing right now.


A sweet passion, so perfect for Valentine's Day! 
I'm raising my glass tonight with my family, wishing everyone Happy Valentine's Day!


(note : my changes in blue for half a recipe)
Passionfruit Cordial
(source from donnahay.com)
4 cups (880gm) caster (superfine) sugar (2 cups = 400gm)
2 cups (500ml) water (1/2 cup)
1 cup (250ml) passionfruit pulp (I used the full amount of 1 cup)
1 teaspoon citric acid * (1/2 tsp)

Place sugar, water, passionfruit pulp and citric acid in a medium saucepan over medium heat and stir until sugar is dissolved.
Bring to the boil, remove from heat and allow to cool. Store in the fridge for up to 4 weeks.
To serve, pour over crushed ice and top with water or soda water to taste. Makes 5 cups.

* Citric acid is a natural preservative and is found in the baking aisle in most supermarkets.


Please do hop over to I Heart Cooking Clubs (IHCC), to see what the others are making for "Raise Your Class".

IHCC Donna Hay Badge resized


Wednesday, February 12, 2014

Cheesecake Brownies

It has been quite a while since I last made any brownies. I made these brownies a few weeks ago, during that time, I have been baking lots of breads, and the kids are delighted with these brownies, seems like a real treat after all those bread-baking! LOL! This wonderful brownies is from "Cake" by Rachel Allen, her latest book on cakes baking. It is a beautiful book with lots of photos and recipes that are easy to follow.


The brownie base is topped with a mixture of cream cheese, egg yolks and sugar, which are beaten till smooth, then drop by the teaspoonfuls on the brownie batter in the prepared pan. Using a knife, swirl both mixtures together for a marbling effect. Bake for 30-35 minutes and let cool in pan on rack.


Cut into 16 squares to serve.


I love swirls in bakes, do you?


These Cheesecake Brownies has a lovely moist texture. Yummy!


(my changes in blue)
Cheesecake Brownies
(adapted from "Cake", Rachel Allen)
makes 16 brownies
100 gm (3-1/2 oz) butter, cut into cubes
100 gm (3-1/2 oz) dark chocolate, in drops or broken into pieces
125gm (4-1/2 oz) caster sugar (90 gm)
pinch of salt (omit, since I've used salted butter)
3 eggs, beaten
75 gm (3 oz) self-raising flour
1 tbsp cocoa powder
100 gm (3-1/2 oz) dark chocolate, in chips or chopped into pieces

For the cheesecake mixture :
200 gm (7 oz) cream cheese
2 egg yolks
75 gm (3 oz) caster sugar (50 gm)

20cm (8 in) square cake tin with 5cm (2in) sides

Preheat the oven to 180C (350F), Gas Mark 4. If the cake tin has a removable base, butter the sides and line the base with a square of baking parchment, otherwise line the base and sides of the tin.

Place the butter and chocolate in a saucepan and melt over a low heat. Stir just until smooth, then remove from the heat and beat in the sugar and salt, followed by the eggs. Sift in the flour and cocoa powder, add the chocolate chips and stir in. Tip the batter into the prepared tin and spread out using a spatula.

In a clean bowl, beat all the ingredients for the cheesecake mixture together until smooth. Dot heaped teaspoonfuls of this mixture across the top of the brownie batter in the tin, then use a skewer or knife to swirl the two mixtures together, right across the tin and up to the edges.

Bake for 30-35 minutes or until the middle of the cake still wobbles slightly when you gently shake the tin - a skewer inserted into the centre should come out with a little moisture on it. Remove from the oven, place on a wire rack and allow to cool completely in the tin before carefully removing the cake and cutting into squares to serve.

***************

I'm linking this post to :

 photo 77951578-1914-4b72-8eda-9e40a91183ac_zps331eb4b4.jpg

Monday, February 10, 2014

Lemon & Honey Meaty Spare Ribs

This dish is one which we frequently order whenever we eat out at Chinese restaurants, as it is one of the kids' favourites, though most times we would request for chicken instead of pork. I was browsing thru my collection of local cookbooks, looking for ideas for dinner, and found this recipe, and decided to give it a try.

Meaty spare ribs are first marinated with some ingredients, and I have omitted the Maggi seasoning and added in some salt. I've noticed that the bicarbonate of soda, which acts as a tenderizer for the meat, is used rather too much at 2 teaspoons! I have reduced the amount to 1/2 tsp, as I do not want the overpowering taste of bicarbonate of soda which can be rather unpleasant to the taste buds!


I have used much more honey than it calls for in the recipe, as 2 tablespoons honey is not enough. Adjust according to taste. A nice dish to eat with plain steamed rice.

(my changes in blue)
Lemon & Honey Meaty Spare Ribs
(adapted from "Hawker's Fair Simplified")
1 kg meaty spare ribs, cut into pieces
oil for deep-frying

Marinade :
1 tbsp Maggi seasoning (omit this)
2 tbsp lemon juice
1 tbsp sugar
1 tbsp rose wine
1 egg
1 tsp sesame oil
1/2 tsp pepper
1/4 tsp salt (my addition)
2 tbsp corn flour
2 tsp bicarbonate of soda (1/2 tsp)
100ml water

Sauce :
2 tbsp lemon flesh (squeeze out juice of 1/2 lemon and scoop out the flesh)
2 tbsp honey (I use much more than this, adjust to taste)
1 tsp salt
200ml water

  1. Mix marinade ingredients in a bowl till well combined. Add the spare ribs and mix till evenly coated, covered, and keep in refrigerator for 3 hours.
  2. Heat up some oil for deep-frying. Fry spare ribs until golden brown all over. Dish and drain.
  3. Pour sauce into a clean wok and let boil until it turns a little syrupy. Add in the fried spare ribs and mix well till well coated with the sauce. Dish up and serve hot.


I'm linking this post to Little Thumbs Up, ingredient for this month is Lemons, an event organized by Zoe of Bake For Happy Kids and Doreen of My Little Favourite D.I.Y. and hosted by Grace of Life Can Be Simple.


and


 photo 77951578-1914-4b72-8eda-9e40a91183ac_zps331eb4b4.jpg


Friday, February 7, 2014

Chicken Cubes In Black Bean Sauce

Hi everyone, how was your Chinese New Year? Mine was great, had a great time with my sisters and families at my dad's place and we had a blasting beautiful fireworks display! And of course, lots of eating!

I would like to thank everyone for the recent Bake-Along's theme, Chinese New Year Cookies. There was a total of 211 submissions and clearly Pineapple Tarts is the top favourite. To view all the wonderful cookies that everyone has shared, please click here.  Even though we still have another week to go before Chinese New Year is over, it is back to daily routine for most of us.

Today, I'm sharing a simple stir-fry chicken dish that is suitable for "everyday dish", very nice eaten with plain cooked jasmine rice.


This is a simple recipe taken from one of our local cooking books. I have replaced the green capsicum with spring onions, simply because I have harvested a large bunch of spring onions from my garden.


Enjoy!


Chicken Cubes In Black Bean Sauce
(adapted from "Hawkers' Fair Simplified")
1 piece boneless chicken breast, about 300gm, cubed
1/2 tbsp sliced garlic
5 slices ginger
2 tbsp fermented black bean, soaked, chopped
1 green capsicum, sliced (replaced with a bunch spring onions, separating the whites and the green parts, cut into 1-1/2 inch sections)
1 onion, sliced
1 red chilli, sliced

Marinade :
1 egg white
1/2 tsp salt
1 tsp light soy sauce
1/4 tsp pepper
1 tbsp water
1 tbsp corn flour

Seasoning :
1/2 tbsp oyster sauce
1 tsp light soy sauce
1 tsp dark soy sauce
1 tsp sugar (1/2 tsp)
1/2 tsp sesame oil
1 tsp Shaoxing wine
2 tbsp water
1 tsp corn flour mixed with 2 tbsp water, for thickening

  1. Combine chicken breast with marinade and season for 30 minutes. Deep-fry in hot oil until golden brown. Dish and drain.
  2. In a clean wok, heat up 1 tbsp oil, sauce garlic and ginger until fragrant. Add in fermented black beans and stir-fry until aromatic.
  3. Add in green capsicum (white part of spring onions), onion, red chilli and stir well. Add in seasoning, chicken cubes and mix well. Add in green spring onions. Thicken with corn flour solution and dish up.

I am linking this post to :

 photo 77951578-1914-4b72-8eda-9e40a91183ac_zps331eb4b4.jpg