Friday, February 27, 2015

Fenugreek Chicken (Methi Chicken)

"February Potluck", the theme for this week at I Heart Cooking Clubs (IHCC). For our potluck week, we are free to cook with our current or previous featured chefs. I've decided to cook with Madhur Jaffrey for our Potluck week, with one of her many dishes that I've bookmarked to try (one off the list now!), Fenugreek Chicken.


Fenugreek Chicken is a dish that I've been wanting to cook for ages. This lovely recipe is from her book "Curry Nation" and can also be found here. The recipe uses chicken thighs, but I''ve used chicken breast meat instead as that was what I had. And I've used a small tomato instead of chopped canned tomatoes, as I've ran out of canned tomatoes and only have one small tomato in my fridge. I've added a tablespoon of tomato paste to make up for it. The next time I would make sure that I have some canned chopped tomatoes ready or at least a few fresh ripe tomatoes available, as this dish is really nice, and I'm sure that the gravy would taste even better with more chopped tomatoes. The other changes I've made was to add a little more of chilli powder and garam masala and an additional tablespoon of dried fenugreek leaves, than the recipe calls for, as I'm all for bold flavours in a curry or spicy dish.


Dried Fenugreek Leaves (Kasuri Methi)

Have you used dried fenugreek leaves before? They are called as Kasuri Methi and are the dried leaves of the fenugreek plants. These dried leaves are really nice, they have a strong herby aroma with a distinctive taste, and provides delicious flavour to the gravy, hence the extra tablespoon!  This dish is easy to cook, and delicious! I love the taste of the dried fenugreek leaves in the gravy. The distinctive taste and aroma of the leaves really stands out, but in a very delicious way. This chicken dish is very good eaten with plain white rice and some side veggies. Yum!


Fenugreek Chicken (Methi Chicken)
(adapted from "Madhur Jaffrey's Curry Nation")
serves 4-6
4 tablespoons olive or sunflower oil
1 medium onion, finely chopped
1 teaspoon finely grated or crushed garlic
1 teaspoon peeled, finely grated root ginger
700gm (1 lb 9oz) boneless, skinless chicken thighs, cut into 2-1/2 centimetres (1 inch) chunks
4 tablespoons roughly chopped canned tomatoes
3-4 hot green chillies, finely chopped
1/2 teaspoon salt
1 teaspoon turmeric
1/4 teaspoon chilli powder
1 teaspoon garam masala
1-1/2 tablespoons dried fenugreek leaves (kasuri methi)

Set a 25 centimetre (10 inch) pan over a medium heat. Add the oil and, when it's hot, tip in the onion. Stir and fry for 10 minutes, or until it is light brown, then add the garlic and ginger. Stir and fry for two minutes.

Now add the chicken and brown for two minutes. Put in the tomatoes and green chillie. Stir for two minutes, then add the salt and turmeric. Mix well for five minutes before adding the chilli powder and garam masala. Stir and crumble in the dried fenugreek leaves. Mix in 360ml (13fl oz) of hot water, or enough just to cover the chicken, and bring to a simmer. Cover and cook over a low heat for 20 minutes, then serve.


I'm linking this post with I Heart Cooking Clubs (IHCC), theme for this week "February Potluck"

Pot Luck Badge

Wednesday, February 25, 2015

Sek Bak (Nyonya Braised Pork Belly)

Gong Xi Fa Cai!  I'm back from my Chinese New Year break. Thank you for your CNY greetings! Hope that everyone had a good and wonderful re-union with family and friends during this festive celebration. 

Today, I'm sharing one of the dishes that my beloved late mom used to cook during Chinese New Year. Though I sometimes cook it at home anytime we feel like eating it, this Nyonya dish is usually "reserved" during Chinese New Year and special occasions during family get-together. 


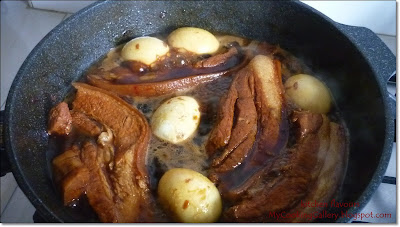
Big pieces of pork belly are braised with spices, seasoned with black and light soy sauce and a small amount of sugar. We love to add peeled hard-boiled eggs, which are braised along with the pork belly, until the egg has turned brown all over from the long braising in the simmering sauce. 


One of the ingredients that is for this fragrant dish is, galangal. Peel the galangal and mash it lightly using a mortar and pestle. Do not replace this with ginger, the taste is not the same!


Sliced shallots and the lightly bruised galangal. 


The spices that gives a wonderful aroma to the dish ; cinnamon stick, cloves, star anise. 


Pieces of pork belly and hard-boiled eggs braising in the fragrant sauce. At the end of cooking time, slow-braising for about 1-1/2 hours, the pork belly will be tender and the sauce would have reduced and thickened.


Just before serving, slice the pork belly to thin slices and serve with the hard boiled eggs, with some of the delicious fragrant sauce poured over. The kids love to have the extra gravy over white rice. We would sometimes serve this dish with sliced fresh cucumbers and homemade chilli sauce, though most of the time we ate this without any chilli sauce. Either way, this dish is delicious!


Sek Bak
(by kitchen flavours)
2-3 pieces pork belly (about 1-1/2 kg)
4-6 hard boiled eggs, peeled
2 cinnamon stick (about 3" long)
5 star anise
10 cloves
8 shallots, peeled and sliced thinly
1 piece galangal, about the size of a small tomato
2 tablespoons cooking oil
3 cups water
2-3 tablespoon dark soy sauce
1/4 cup light soy sauce (to taste)
1 tablespoon sugar (to taste)

  1. Heat cooking oil in a wok or a large saucepan. Fry the shallots over medium heat till light brown. Turn down heat to low, add in the cinnamon stick, star anise, cloves and galangal. Stir for a about a minute till the spices are fragrant, taking care not to burn them. Add in water, bring to a boil.
  2. When the sauce has come to a boil, add in the dark soy sauce, light soy sauce and sugar. Stir and add in the pork belly pieces. Cover, bring to a boil, reduce heat and let it simmer, turning the pork belly every 20 minutes or so. After the first 30-40 minutes, add in the peeled hard-boiled eggs. Turn the eggs every now and then, taking care not break them. Add some warm water if the gravy appears dry. Taste and adjust accordingly, you may need a little more soy sauce or sugar. 
  3. Simmer till the pork belly is tender and the gravy has reduced and thickened, about 1-1/2 hours.
  4. Let pork belly cool to room temperature, slice to thin pieces and pour some of the lovely thickened sauce over the sliced pork belly, with the eggs at the side. Sliced fresh cucumbers and some chili sauce is lovely with this dish. Delicious over white rice. (The whole spices and galangal pieces are not meant to be eaten). 

I'm linking this post to Cook and Celebrate: CNY 2015 organised by Yen of Eat Your Heart Out, Diana of Domestic Goddess Wannabe and Zoe of Bake for Happy Kids.


Tuesday, February 17, 2015

Gong Xi Fa Cai !!


I would like to wish all my Chinese friends and readers 

Gong Xi Fa Cai

2015-happy-new-year-card-in-chinese-iprm


Have a healthy and prosperous year!


Monday, February 16, 2015

Feta and Orange Salad With Honeyed Almonds

"Curds and Whey" is the theme for this week at I Heart Cooking Clubs (IHCC). It's a week for yoghurt and cheeses. I've made one of Diana Henry's salad with Feta cheese, though it does not look at all like her gorgeous salad (here), since I've made some changes.


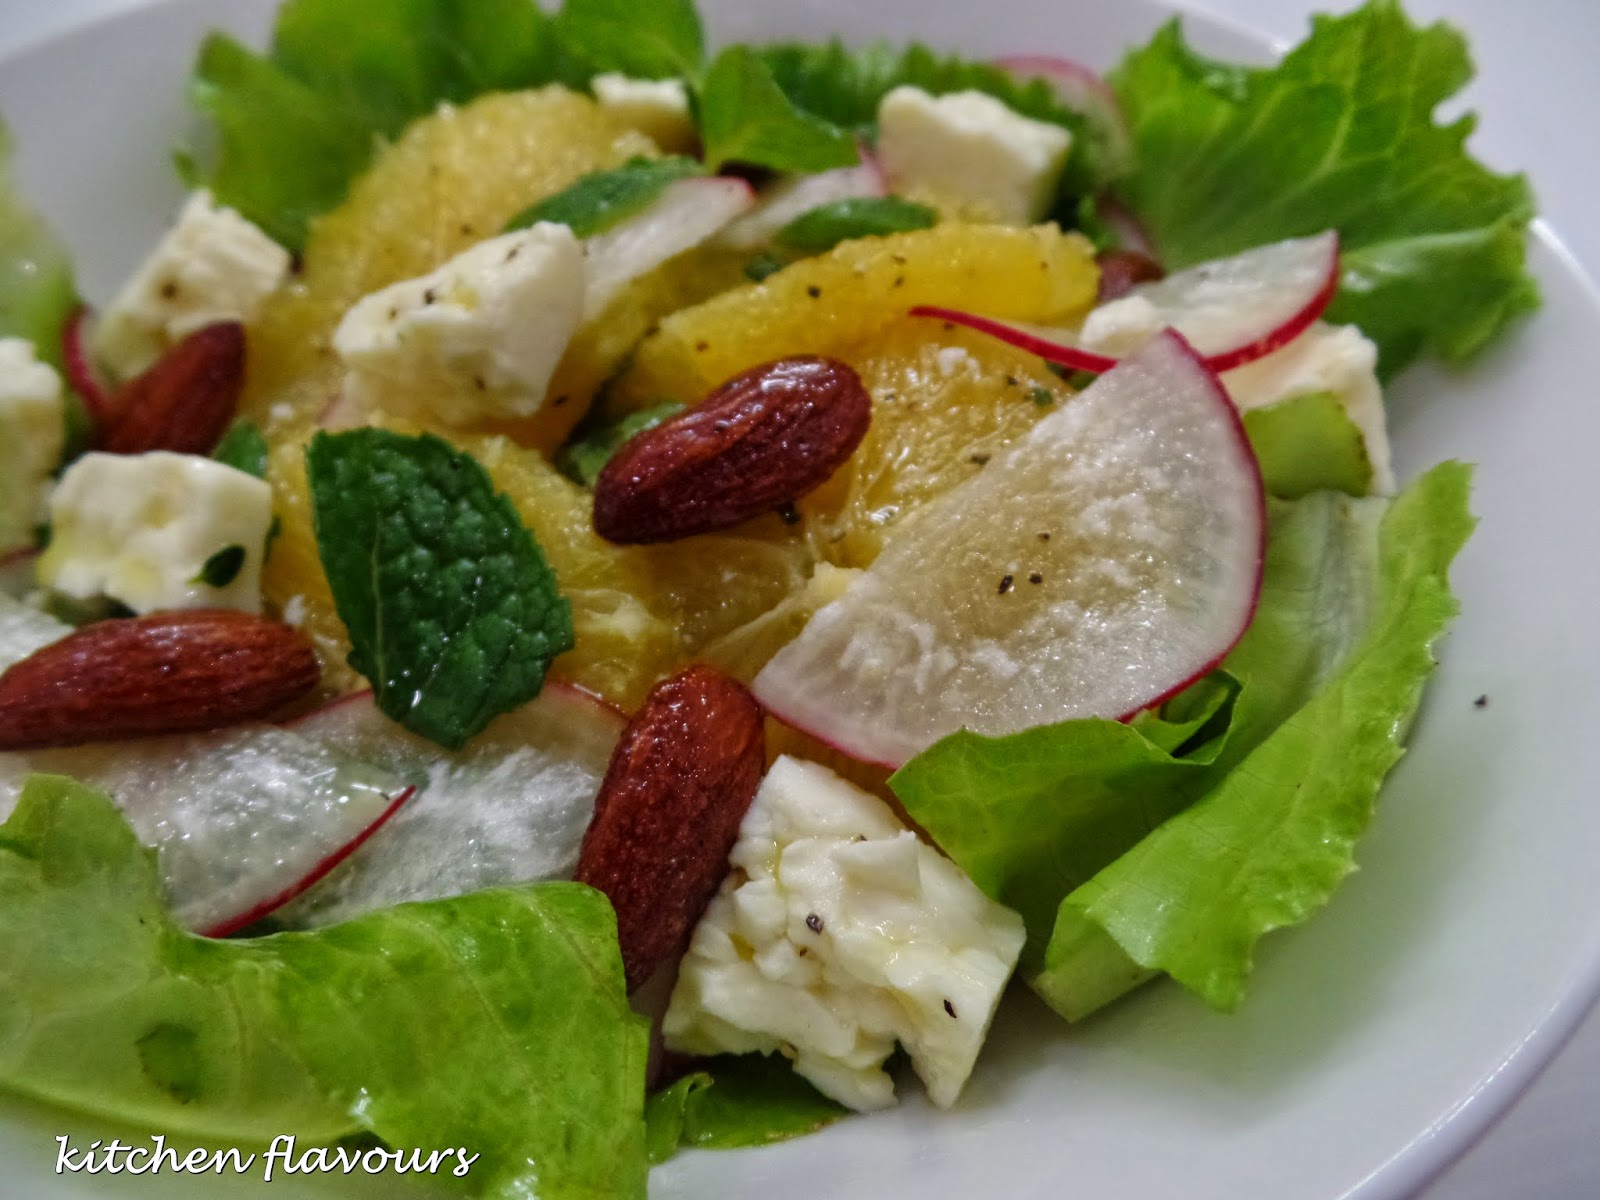
Firstly, one of the ingredients is fennel bulb and I did not use it, as the supermarket near my house do not carry any fennel bulb. I need to go to another supermarket which is a little distance away and I was rushing for time, so I've used a lovely radish which I bought days earlier (meant for a pickle!). Simply halved the radish and slice into thin slices. 
And I cheated on the homemade honeyed almonds! I used store-bought ones! Diana Henry's homemade honeyed almonds sounds so good with paprika and cumin, but I was really rushing for time, so I used a small pack of store-bought honeyed almonds instead. 

I did not have any watercress, but used what I had, fresh lettuce salad leaves from my garden pot.


One of my Lettuce Salad plants growing in a pot.


As for the dressing, I've only used 2 tablespoons of olive oil, instead of the original 5 tablespoons calls for in the recipe. I've also added a little more honey to balance off the sourness from the white wine vinegar. Some orange juice, thyme leaves, and a seasoning of salt and black pepper to taste, to complete the dressing. 


A light and refreshing salad. The oranges I used was rather sweet and juicy. This lovely salad is a mixture of sweet (from the oranges and honey), salty (from the feta), and crunchy (from the almonds), a little sourish from the vinegar, with the crispiness and peppery taste from the radish. Of course, my homegrown lettuce salad leaves are really fresh and crisp. A lovely salad indeed!


Feta and Orange Salad With Honeyed Almonds
(adapted from "A Change of Appetite", Diana Henry, or can be found here)
Serves 4 as a starter or 2 as a light meal
For the dressing :
1 tbsp white wine vinegar
1/2 tbsp orange juice
salt and pepper
5 tbsp extra virgin olive oil (I use 2 tbsp)
about 1/2 tsp runny honey (I use 1 tsp)
leaves from 1 sprig of thyme

For the almonds :
1/2 tbsp olive oil
50gm (1-3/4 oz) blanched almonds
1 tbsp runny honey
1/8 tsp smoked paprika
1/8 tsp ground cumin

For the salad :
3 oranges
1 small or 1/2 large fennel bulb (I use radish)
60gm (2oz) watercress (I use lettuce salad leaves)
100gm (3-1/2 oz) feta (preferably barrel-aged), broken into chunks
10gm (1/4 oz) mint leaves, torn

Make the dressing by whisking all the ingredients together. Taste to check the seasoning, then pour into a broad shallow bowl.

To make the almonds, heat the olive oil in a small frying pan and add the almonds. Fry them over a medium heat until they are toasted - keep an eye on them to make sure they don't burn - then add the honey and spices and cook until the honey is bubbling and almost caramelized. Spoon the hot honeyed almonds on to a non-stick baking sheet or some baking parchment. Leave to cool a little. You can chop these very roughly or leave them whole.

Cut a slice off the bottom and top of each orange so they have a flat base on which to sit. Using a very sharp knife, cut the peel and pith off each orange, working around the fruit and cutting the peel away in broad strips from top to bottom. Slice the oranges into rounds and flick out any seeds you see. Set aside.

Trim the fennel, reserving any feathery bits, and remove the tough outer leaves. Quater the bulb lengthways (or cut the half bulb in half) and cut out the core. Slice very finely (a mandoline is best) and throw into the dressing. Finely chop any feathery bits you pulled off and add them, too. Discard any coarse watercress stalks.

Put the oranges, watercress, feta and mint into the bowl as well and toss gently. Add the almonds and serve immediately.


I'm linking this post with I Heart Cooking Clubs (IHCC), theme for this week "Curds and Whey"

grab button for I Heart Cooking Clubs

Couscous & Consciousness


Thursday, February 12, 2015

Za'atar Chicken with Fattoush

"February Mystery Box Madness" challenge, the theme for this week at I Heart Cooking Clubs (IHCC). We are required to select at least three out these ten ingredients in this month's mystery box ; cabbage, mustard, yoghurt, freekeh or bulgur wheat, za'atar, tomatoes, sausage, carrots, basil, almonds. And we are free to cook from any of the previous featured chefs or the current chef. For this month, I've made one of Nigella Lawson's roasted chicken.


I've used three of the February's Mystery Box Madness challenge ; carrot, tomato and za'atar. I've bought the spice Za'atar ages ago and have not used it before. I could not find Za'atar during our time with Ottolenghi, and only found it months after that. Pretty excited when I found it, but it has been sitting in my pantry since then! 

Za'atar is a Middle Eastern spice mixture. It is a mixture of sumac, herbs, salt and sesame seeds, and is used in many meat and vegetable dishes in Middle East. This lovely spice can also be added to olive oil and use as a dip to flatbreads. 


Nigella Lawon's "Za'atar Chicken with Fattoush" is simply delicious. It is simple, and yet so flavourful. Chicken pieces, of which I have used 4 whole chicken legs and separated into thighs and drumsticks, are marinated with just this lovely spice Za'atar, some olive oil and season with some salt,  for a few hours before roasting. 

This simple salad  "Fattoush" makes the perfect side dish to this Za'atar Chicken, they are really good together. I have added some chopped carrots to the salad, to complement this month's Mystery Madness Ingredients, since I have a couple of carrots in my fridge, and it was sweet and crunchy, a lovely addition. The recipe calls for pita bread which I have substituted with a piece of wholemeal tortilla wraps since that was what I had. I cut the tortilla wrap into bite-sized pieces and toasted them over the stove in a dry saucepan until crispy and brown. It's crispy and tasty bite makes such a wonderful addition to the salad. Also I've used fresh coriander leaves instead of parsley and have omitted the mint leaves because I could not find any at the market that morning. I would love to make this salad again with mint leaves! And because I love eating raw onions in salads, I have added one medium onion, cut into rings. The Fattoush is seasoned with salt and lemon juice to taste. I've used less than 2 tablespoons of olive oil instead of the original 6 to 8 tablespoons. To me, this fresh and lovely salad do not need all that extra oil. Just before serving, sprinkle the  Fattoush with some lovely Sumac. 


This Za'atar Chicken is a winner! The chicken is tender and tastes really delicious with the Za'atar spice. Funny thing is, I did not really notice, there are so much of sesame seeds in the Za'atar spice, but they stands out really clear after roasting the chicken. And I love the flavour of the spice, with a light tangy taste of lemon, which is really, really good!  This is one chicken meal that I would cook again. It really is fuss-free and easy. The chicken can be marinated in the morning, leave it in the fridge until it's time to roast in the evening. And when the chicken is almost done (I roasted the chicken pieces at 200C, for about an hour), prepare the salad. Easy-peasy (almost effortless!) and delicious!


Za'atar Chicken with Fattoush
(adapted from "Nigella Fresh", Nigella Lawson)
for the chicken :
1/2 cup olive oil (not extra-virgin)
1 chicken (approx. 3-1/2 to 4 pounds), cut into 8 pieces
2 tablespoons za'atar (I use about 4 tablespoons)
Maldon or other sea salt

for the fattoush :
2 pita breads (I use wholemeal tortilla wrap)
3 fat scallions, halved and sliced (omitted)
1 cucumber, peeled, quartered lengthwise and chopped
3 tomatoes, diced
1 carrot, diced (my addition)
1 medium onion, cut into rings (my addition)
bunch fresh flat-leaf parsley, chopped (I use coriander)
bunch fresh mint, chopped (omitted)
1 clove garlic, minced
6-8 tablespoons extra-virgin olive oil (I use about 2 tbsps)
juice of 1 lemon (half a lemon)
Maldon or other sea salt
1/2 teaspoon sumac

Pour the oil into a large roasting pan, big enough to fit all the chicken portions in a single layer, and then put in these very chicken portions, rubbing them about in the oil to give them a glossy coating. Sprinkle over the za'atar, and then work into the oily skin of the chicken so that each piece is well covered with the bosky, well-colored spices. Leave the meat to marinate for a couple of hours in the refrigerator. Or you can do all the marinating in a plastic bag; which is certainly easier if you plan to marinate these much in advance - a day or two would be fine.

Meanwhile, preheat the oven to 425F and, when the chicken's had its aromatic steeping time, transfer the pan, making sure all the chicken pieces are skin-side up, to the oven. If you've marinated the chicken in a freezer bag, just tumble them out, pushing them skin-side up, into a roasting pan, making absolutely sure you've squeezed over every last drop of the oily spice mixture they've been sitting in.

Roast the chicken portions for about 45 minutes or slightly longer, by which time they should be well cooked, which is how we want them here, and their spice-sprinkled skin burnished and crisp and baked to a fabulous burnt umber. Pile the pieces up, or arrange them as you like on a large flat plate and sprinkle over a little sea salt.

When the chicken's nearly cooked, you can get on with the fattoush. So, cut the pita breads open lengthwise so that you have four very thin halves, and lay them on a baking sheet. Toast them in the oven with the chicken for about 5 minutes to give them a bit of crunch then take them out and leave them somewhere to cool.

In a bowl, combine the scallions, cucumber, tomatoes, parsley and mint and mince in the garlic. With a pair of kitchen scissors, cut the pita into pieces over the bowl of salad - I tend to snip them into rough triangles - and drop them in, leaving a few back for the top. Toss the salad then dress it with the oil and lemon juice, tossing it again. Add some salt, and have a quick taste to see if the ratio of oil and lemon is right, adding more of either if necessary. Sprinkle over the reserved toasted pita triangles and the lovely dark red, deeply bitter sumac, and serve the fattoush right alongside the za'atar chicken.


I'm linking this post with I Heart Cooking Clubs (IHCC), theme for this week "Mystery Box Madness"

grab button for I Heart Cooking Clubs

Tuesday, February 10, 2015

Marquise au Chocolat : TWD

This week at Tuesdays With Dorie (TWD), we are making a French chocolate dessert, Marquise au Chocolat. According to Dorie, traditionally the marquise is packed into a loaf pan, frozen and then slice just before serving. Or can even be made in mini loaf pans or small ramekins. A practical dessert to make, which can be made weeks in advance, keeps well in the freezer.

This recipe uses egg yolks that are not cooked, Dorie has advised that it's important to use very fresh eggs, preferably organic and/or from a trusted local source. I do not like to use raw eggs in desserts, and was wondering on a good substitute for that. I've decided to use cream cheese, as that was what I have used before for making ice cream, and this marquise is a frozen chocolate mousse dessert, pretty close to ice cream to me!  

I made half a recipe as I wasn't sure how it would turn out by using cream cheese, and do not want to waste an expensive bar of dark chocolate, just in case it did not turn out well at all. I use four mini ramekins and ended up using an extra medium ramekin. 


This is how I made the Marquise au Chocolat :
Firstly, I line the base of the ramekins with cut-out plastic sheet, leaving the sides bare. 
Melt the chocolate with butter in a bowl over simmering water, just until both the butter and chocolate has melted and the mixture is thick and velvety. Transfer bowl to counter and let cool for 15 minutes.


Meanwhile, beat the cream cheese (at room temperature) with the sugar until light and fluffy. I use 20 gram of cream cheese to substitute for each egg yolk. 
Stir the cream cheese mixture into the melted chocolate.
Stir to combine gently.


Whip the heavy cream with sugar until it holds firm soft peak. Spoon it into the choclate mixture and stir gently to combine. Spoon the mousse into the ramekins and cover the ramekins with plastic wrap. Freeze for at least 6 hours.


The frozen Marquise au Chocolat. It is very easy to unmould. Simply place the ramekin into a bowl of warm water for a few seconds, and turn the marquise out onto a serving plate. 


I tested one on the next day, and it was hard frozen solid! So I remove all the marquise out from the freezer and place them in the refrigerator to soften them a little. About forty minutes later, I tested one which seems to have softened slightly, but I would prefer them to be a little softer. I left the rest in the refrigerator overnight and the next day, the marquise has softened but this time with a soft but firm texture. 


My daughter loves it! It is a little too rich for me, and could only finished a small serving. It is very rich (butter, chocolate, cream and cream cheese!!!), and really, really chocolaty! The taste of the dark chocolate really shines through. This dessert keeps really well, chilled in the refrigerator for a few days. 

Drop by TWD to see other bakers take on this French frozen chocolate mousse.


***********************

I'm sharing this post with Little Thumbs Up February 2015 : Cocoa, organized by Zoe of Bake For Happy Kids and Doreen of my little favourite D.I.Y and hosted by Grace of Life Can Be Simple.


Thursday, February 5, 2015

Grissini with Rosemary, Cheddar and Garlic : Bake-Along #75

The theme for our Bake-Along #75 is Grissini. I have always wanted to make Grissini but I guess I needed that push to do just that! So I selected Grissini as our theme bake-along with Lena and Zoe

Grissini are pencil thin, crisp breadsticks and originally from Northern Italy, and is a popular accompaniment to many Italian meals. They make simple, tasty snacks and are often served as an appetizer with pre-dinner drinks. There are many variations with different flavours ; cheeses, herbs, spices, as your creativity seems fit.

Most of the cookbooks on my bookshelf, have a Grissini recipe, and with different variations. I picked two recipes to try, and this is one of them. Even before I make this Grissini, I already knew that I would love it. Thin, crispy and savoury, already sounds good in my books! 


This recipe requires a few extra steps, comparing to other recipes that I've read. The dough needs to be made the day before, as it is required to be refrigerated for at least 8 hours or overnight. 
I've used fresh rosemary leaves from my garden pot, and instead of Asiago cheese (not available in the area where I live), I have used Cheddar. And I have added in 1 teaspoon of garlic powder (I love this stuff!), for that added garlic kick and fragrance. 
The dough is mixed in the stand mixer with the dough hook. Divide the dough into four round balls, the dough are really doughy (gummy) at this point, and I could not make them in smooth round balls. Place them in a container which is sprinkled with flour (photo above), cover, let rest for 15 minutes, and refrigerate the dough for at least 8 hours or overnight.

A note on the malt syrup : I have omitted it, as the book did indicate that malt syrup can be omitted for the recipes in the book, but would be a great addition if it is available. 


The next day, the container of dough is removed from the refrigerator and left on the kitchen counter for an hour or so, so that they loose their chill. But I have actually left them on my kitchen counter for about 3 hours, as I was pretty busy at that time! (yeah, should have made better plans on my baking day!).  Look at how they have doubled up. The dough have gone softer and very easy to work with.

I divided each round into two (recipe does not require this step), as I find it easier to roll it through the pasta machine with a smaller ball of dough. Flatten the dough, sprinkle some flour on both sides, and put them through the pasta machine at the highest setting. And place it once more at the pasta machine, this time using the setting for fettuccine at setting #5. 


There, my pasta machine finally gets to see the light of day! LOL! It has been hibernating in my kitchen cabinet for years! Now that it is finally out, I'll be using it for other "KIV projects", fingers crossed! 

Separate the strands and place them on lined-baking sheet, cutting them to fit the size of the tray, (and keeping in mind, about the size of the container that you are going to store them, even though you could break them up before storing, but it would be nice to have them as one whole piece!). Lightly brush the top of the strands with some olive oil, cover the tray with plastic wrap and keep aside for 30 minutes while you preheat the oven. Bake as directed.


I baked the grissini at 375F for 15-18 minutes, rotating the trays after the first 10 minutes of baking. They baked up really golden and crispy, and I can smell the aroma of the garlic! Very much like baking garlic bread!


These are really good and addictive! Really, really crispy and light, and fragrant from the garlic powder. Makes a wonderful, healthy snack to munch on, anytime of the day! Great with a glass of cold beer! Yes!

Grissini 
(adapted from "Artisan Breads", At Home with The Culinary Institute of America, Eric W. Kastel)
7gm fresh rosemary leaves
3/4 cup (187gm) milk, 78 degrees F
1 tbsp (14gm) olive oil
2 tsp (14gm) malt syrup (omitted)
3 cups (411gm) high-gluten flour
1-1/2 tsp (6gm) instant dry yeast
1-1/4 tsp (9gm) salt (a pinch of salt, as butter and cheese are already salty)
1/4 cup (62gm) butter, soft
1/4 cup (28gm) Asiago cheese, finely grated (I use grated Cheddar)
1-1/2 tsp garlic powder (my addition)

Garnishes :
olive oil, as needed
salt, as needed

  1. Make the dough the day before you want to serve the grissini. Pick the rosemary leaves off the stems and roughly chop them.
  2. Combine the milk, oil and malt in the bowl of a mixer. Combine the flour with the yeast, and then add them to the milk mixture. Next add the salt and butter. Place the bowl on a mixer fitted with a dough hook and mix for 4 minutes on low speed, making sure to scrape down and flip the dough over twice during the mixing time. Increase the speed to medium and mix for an additional 3 minutes. At this point, the dough will be strong, with good gluten structure. Add the rosemary and cheese, and mix for 1 more minute on medium speed, making sure to scrape down and flip the dough over during this process.
  3. Remove the dough from the mixer and place it on a lightly floured work surface. Divide it into 6.5-oz pieces and round the pieces against the tabletop. Place each piece in a floured container and cover the container with plastic wrap.
  4. Leave the dough at room temperature for 15 minutes, and then refrigerate it for a minimum of 8 hours or overnight.
  5. Remove the dough from the refrigerator and leave it at room temperature for 60 minutes, until it has lost its chill.
  6. Lightly flour and flatten each piece and place it in a pasta machine set at its widest setting. Roll the dough through and, lowering the setting in small increments, continue this process until the dough is as wide as the opening on the pasta machine. Then turn the dough a quarter turn and lightly flour and roll the piece through the machine in the opposite direction until it is 1/4 inch thick (setting #5). Lightly flour the dough, trim the edges with a pastry wheel to make a straight edge, and pass it through the pasta machine's fettuccini cutter. Lay the pieces of dough on parchment paper-lined baking trays, making sure to lay them out straight and separate (you can cut the ends if the pieces do not fit the tray). Lightly brush the dough pieces with oil, then cover the trays with plastic wrap and allow the dough to rest for 30 minutes at room temperature, to relax.
  7. Preheat the oven to 400F.
  8. Uncover the dough, brush it again with oil, and lightly sprinkle it with salt.
  9. Place the trays in the oven and immediately reduce the temperature to 375F. Bake for 10 minutes, then rotate the trays when the pieces start to take on colour, and turn the oven down to 350F. Continue to bake an additional 4-6 minutes, until the bread is a light golden brown and appears dried out.
  10. Remove the baking trays from the oven and place them on a cooling rack. When completely cool, store in an airtight container.

********************************

Do stop by Lena of Frozen Wings and Zoe of Bake For Happy Kids, and all our friends who has baked along with us in the linky below :

For our next Bake-Along, we will be baking "Salted Caramel Apple Pie", from Bake In The Day Bakery Cookbook, pg 118, or here. Please do join us, bake this selected apple pie, and link your post to our linky which will start on 5th till 14th March. Everyone is welcome to join us! Only current post please.


Photobucket

A friendly reminder when linking to our blog hop :
1. Please mention Bake-Along event in your own post linking direct to any of the hosts' post (JoyceLena or Zoe)
2. Please link only new and current post, PLEASE FOLLOW THE BAKE OR THEME provided by us. Unrelated post will be deleted.
3. Feel free to display our Bake-Along badge in your post.

*********************
I'm linking this post to :
Cook-Your-Books #21 @ kitchen flavours

Cook-Your-Books

To join our blog hop, click on the link to get the codes :
get the InLinkz code

Tuesday, February 3, 2015

Succulent Pork Belly With Soy And Star Anise

"East Meets West", this week's theme at I Heart Cooking Clubs (IHCC). This week we are to cook one of Diana Henry's dishes with a global influence. I was looking through her cookbook, "Food From Plenty", as was surprised to find this Chinese recipe of braised pork. According to her, "A pot of eastern deliciousness that is irresistibly more-rish. It also takes very little effort. Mushrooms make a good addition if you want to extend the dish with vegetables. You can obviously tailor this to suit your palate; not everyone is a big fan of star anise, for example, but stick to eastern flavours." 

Where does '"East Meets West" fits in this dish? Eastern ingredients ; star anise, rice wine, rice vinegar, soy sauce. And for West....well, I'm picturing this pot is braising in Henry's western kitchen! Just realized when I was writing this post, that this is not a western dish with eastern influence, but a full eastern dish instead! 


Succulent Pork Belly with Soy and Star Anise

I cook this dish with some little changes. I've added mushrooms as Henry suggested, and also because we love mushrooms in braised meat dishes such as this. Dry shiitake mushrooms are soaked till soften, discard the stems and cut the caps into half if the mushrooms are big, leave them whole if they are small. 

Confusion comes in when it comes to soy sauce! Henry's recipe calls for 120ml of dark soy sauce. I have never used so much of dark soy sauce in a dish. Generally there are two types of soy sauce, which are dark soy sauce and light soy sauce. I was wondering whether she really meant light soy sauce, as dark soy sauce is not as salty as light soy sauce, and there's no salt used at all in her dish. Dark soy sauce is thicker and darker, with caramel or cornstarch added, and frequently used in marinades and sauces to add more flavour and colour. It is very much less salty than light soy sauce. Furthermore, in her recipe instructions, the pork is removed at the end of cooking time, and the braising sauce is further boiled until thickened but she advised that don't take it so far that it is unpalatably salty (but there's nothing in her ingredients that suggest anything salty!). I've decided to use light soy sauce, as it is one of the main ingredients I always used for Chinese braised meat dishes. And I do not use salt for my dishes either. (I really think she meant light soy sauce in the recipe and not dark soy sauce!)

I have only used about 1 tsp of sugar, as I prefer salty braised dishes to sweet. And have used only a teaspoon of vinegar too, as I do not like too much of vinegar in dishes like this. Taste as you cook, adjust to your preference. I have skipped the last part of thickening the braising sauce, as we like to have more gravy to eat with rice.


A tasty and nice dish. Fragrant from the star anise and the pork belly is really tender soft. Mushrooms always adds a wonderful flavour to braised dishes like this, and gets deliciously soft when braised for a couple of hours. Nice dish to eat with white rice, and a green stir-fried veggie on the side.


Succulent Pork Belly With Soy And Star Anise
(adapted from "Food From Plenty", Diana Henry)
Serves 6-8
1.5kg (3lb 5oz) pork belly, bones removed, rind left on
120ml (4fl oz) dark soy sauce (I use light soy sauce)
I use about 1 tbsp dark soy sauce
75ml (2-1/2fl oz) Chinese rice wine or dry sherry
25ml (spare 1fl oz) rice vinegar
2-1/2 tbsp soft light brown sugar (I use 1 tsp)
5cm (2in) square of fresh root ginger, peeled and finely sliced
3 star anise
10 dried shiitake mushrooms (my addition, soaked until softened, discard stems, cut caps into half)
3 garlic cloves, finely sliced
1 red chilli, deseeded and finely sliced
12 spring onions, sliced on the diagonal
  1. Cut the pork belly into chunks about 5cm (2in) square. Put these in a saucepan and add enough water to cover. Bring to the boil, reduce the heat so that the water is simmering and cook the pork for 5 minutes. Skim the surface of any scum that rises.
  2. Strain the pork (discard the cooking water), rinse the pan and return the pork. Add about 1.4 litres (2-1/2 pints) water (or light chicken stock if you have it), plus all the other ingredients (using only half the spring onions), Bring this up to the boil, then immediately reduce to a gentle simmer, cover tightly with a lid and leave to cook very gently for about 2 hours, or until the pork is completely tender. Make sure it doesn't boil dry and add more water if needed.
  3. Scoop the pork out of the cooking liquor with a slotted spoon and set aside. Reduce the cooking liquor by boiling it until you have a good, intensified flavour (but don't take it so far that it is unpalatably salty). Return the pork to the liquid and heat through. Serve in bowls over noodles, or with boiled rice, with the rest of the spring onions sprinkled over the top. Some kind of stir-fried greens - cabbage or bok choi - are good served on the side, too.


I'm linking this post with I Heart Cooking Clubs (IHCC), theme for this week "East Meets West"

grab button for I Heart Cooking Clubs