Friday, July 28, 2017

Pork And Root Vegetable Stew

It's Potluck Week at I Heart Cooking Clubs (IHCC). I've made our current featured chef, Hugh Fearnley-Whittingstall's delicious stew.


In the recipe, either good quality sausages or pork chops can be used, or a mixture of both. I have used pork shoulder, as I love it for braising and slow cooking dishes. I have omitted the celeriac as it is not an ingredient which is easily available over here. For the parsnip, I have replaced with carrots. I did not tie the bouquet garni together, I merely drop into the pot, the bay leaves, parsley stems, and some dried thymes. Firstly the meat has to be browned first in some hot oil, which are then removed and keep aside. White wine is then poured into the casserole to deglaze all the caramelized bits that got stuck in the pot, smells really nice, and pour onto the pork. The vegetables are then sauteed in some oil for 10 minutes until they are softened, then return the pork along with their juices, to the casserole along with all the other ingredients. Simmer over a low heat until everything is tender, about 1 hour to 1-1/4 hours. I've added the potatoes during the last 30 minutes of cooking time.


This is a delicious stew. The meat and vegetables are tender and the soup is so tasty and full of flavour. We enjoyed this stew with slices of homemade bread, Rustic Country Bread for dinner. There's no leftovers! Yum!


Sausage and Root Vegetable Stew
(River Cottage Everyday, Hugh Fearnley-Whittingstall)
serves 4
2-3 tbsp rapeseed or olive oil
6 good sausages, cut into large chunks, or 4 pork chops (or 4 of each) (I use pork shoulder)
1 glass of dry cider or white wine (use white wine)
2 onions, chopped
1 leek, sliced
2 celery stalks, chopped
1/4-1/2 celeriac, cut into chunky cubes (omitted)
2 medium floury potatoes, peeled and cut into chunky cubes
1 large parsnip, cut into chunky cubes (replace with carrots)
1 bouquet garni (a bay leaf, 2 sprigs of thyme and some parsley stalks, tied together with string)
1 tbsp chopped parsley (optional)
Sea salt and freshly ground black pepper

Heat 1 tablespoon of the oil in a casserole or large saucepan. Add the sausages (and/or chops) and brown them well over a medium heat - if you're using chops, you might need to do this in 2 batches. Transfer them to a dish.
Pour the cider or wine into the casserole and stir to deglaze, scraping to release any bits of caramelised meat from the base of the pan. Pour the pan juices into the dish with the sausages (and/or chops).
Heat another 1-2 tablespoons of oil in the casserole, add the onions, leek and celery and cook gently for 10 minutes or so, until softened. Then return the sausages (and/or chops) to the casserole with their juices and add the celeriac, potatoes and parsnip. Tuck in the bouquet garni, season with salt and pepper and add enough water to almost cover everything. Bring to a very gentle simmer.
Cook uncovered, or partially covered very gently over a low heat (or with the lid on in the oven preheated to 140C/Gas Mark 1) for about 1 hour, until everything is tender.
Take out the bouquet garni and check the seasoning. The potatoes should have started to break down and thicken the liquor a little. If not, just mash some of the vegetables against the side of the dish with a fork. Scatter over some chopped parsley, if you like, and serve.


I'm linking this post with I Heart Cooking Clubs (IHCC), theme for this week
July IHCC Potluck


and

I'm linking this post with Cookbook Countdown #19 hosted by 


Wednesday, July 26, 2017

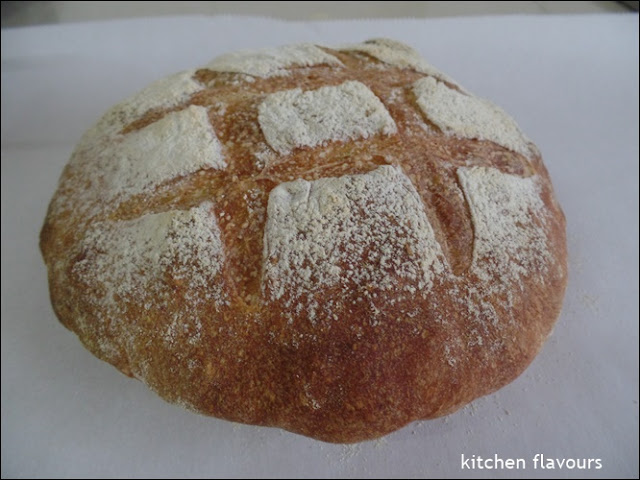
Rustic Country Bread

A simple and easy loaf to make. Just as the author describes, not only it is a straightforward recipe, it is satisfying and delicious. I started to prepare the dough in the morning, and by evening I have a lovely loaf for dinner.


The recipe uses a mixture of bread flour and all purpose flour, but I have used all bread flour, and reduced the salt to just 3/4 teaspoon. I did not have a pizza stone, so I've used an upturned baking sheet instead.  I baked the bread five minutes longer to get that darker crust.


The bread has chewy crust and soft tasty crumbs. I was glad that I have reduced the salt, as using the full amount would have been too salty for us. We enjoyed slices of this rustic bread for dinner, with some stew, lovely.


Rustic Country Bread
(The Everyday Baker, Abigail Johnson Dodge)
makes 1 loaf (1-1/4 lb/567 gm)
2 cups (9oz/255gm) bread flour
1 cup (4-1/2 oz/128gm) unbleached all purpose flour + more for dusting
1-1/2 tsp quick-rise (instant) yeast
1 tsp granulated sugar
1-1/2 tsp table salt (I use 3/4 tsp salt)
1 cup to 2 tbsp (270ml) water, warmed to between 115° and 125°F (45° and 52°C)
Nonstick cooking spray or neutral oil (safflower, canola, vegetable, or corn), for greasing the bowl
Fine or coarse cornmeal, for dusting

Make the dough
  1. Put the flours, yeast, sugar, and salt in the bowl of a stand mixer, whisk until well blended, and fit the mixer with a dough hook. Mix on medium speed while pouring the warm water into the flour mixture. Increase the speed to medium high and beat until the dough is smooth and elastic, 4 to 6 minutes. If the dough climbs up the hook, stop the mixer and scrape the dough into the bowl. The dough will be soft and sticky to the touch.
  2. Remove the dough hook, scrape the dough onto the counter, knead once or twice until it no longer sticks to the counter and passes the "window-pane" test, and shape into a ball. Lightly grease the sides of the bowl and put the dough, rounded side up, back in. Cover the bowl with a plate or plastic wrap. Let rise in a warm spot until doubled in size, 2 to 3 hours.
Shape the dough
Generously dust a pizza peel or cookie sheet with cornmeal. Scrape the dough onto an unfloured work surface and press down on the dough to deflate it. Shape the dough into a round ball about 6 inches (15cm) wide, making sure the top is smooth and there is no seam on the bottom. Arrange on the peel and cover with a large overturned bowl or cake cover. Let the dough rise until puffed and almost doubled in size, 2 to 2-1/2 hours.

Bake the bread
  1. Position a rack in the bottom third of the oven and set a pizza stone on the rack. Heat the oven to 450°F (230°C/gas 8) for at least 20 minutes. Fill a spray bottle with water.
  2. Dust the top of the loaf with 2 or 3 tbsp flour and, using a razor or long, very sharp knife, cut 4 slits across the top of the dough, about 1/2 inch (12mm) deep, in a tic-tac-toe design. Slide the bread from the peel onto the stone, and using the spray bottle, spritz the inside the of the oven several times.
  3. Bake until the loaf is deep golden brown and an instant-read thermometer inserted in the centre reads 190° to 200°F (88° to 95°C), 32 to 35 minutes. Slide the bread onto the peel or cookie sheet and move to a rack. Let cool for at least 1 hour before slicing with a serrated knife.


I'm linking this post with Cookbook Countdown #19 hosted by 


Sunday, July 23, 2017

Salt-Fried Pork with Garlic Stems

Another delicious quick stir-fry dish from Every Grain Of Rice cookbook by Fuchsia Dunlop. I love garlic stems, they are sweet, crunchy and delicious. In this recipe, very thinly sliced pork belly are fried in a little oil until they are curved and browned in places. They are then removed and keep aside.

To prepare the garlic stems, chilli bean paste and fermented black beans are stir-fried until the oil is red and fragrant, then the fried pork slices are added in, season with some sugar to taste. Add the garlic stems and continue to stir fry until the garlic stems are cooked through.


This is a delicious stir-fry. With minimal ingredients, but very tasty. Delicious with fluffy rice. We love it.

The recipe can be found here.
(from Every Grain Of Rice, Fuchsia Dunlop, pg 98)


I'm linking this post with Cookbook Countdown #19 hosted by 


Thursday, July 20, 2017

Golden Raisins Financiers

This month, at The Cake Slice Bakers, the four recipes selected from the book World Class Cakes by Roger Pizey, which we are currently baking from are ;

Raspberry Angel Cake 
Hazelnut Dacquoise 
Blueberry Financiers
Plum Madeira

Members can choose any of these cakes to bake, and my choice is Blueberry Financiers. 


The only thing is I did not use blueberries, which I was planning to use, but at the last minute, I've used golden raisins as I have been thinking about making a tea cake with golden raisins for weeks! I've made half a recipe, which yields 6 financiers, and the only change I've made to the recipe was to reduce the sugar to 1/4 cup and I've added 1/4 teaspoon of vanilla extract to the batter. The mould I had was slightly longer than the one used in the recipe, and the shape is oblong instead of rectangular. Baking time remains the same at 20 minutes.

I have also omitted the apricot glaze for the baked financiers. 


These financiers are delightful to eat, very moist and yummy. The only downside is, the raisins sank to the bottom, but that is OK with me, as these little tea cakes are really nice. Perfect with a cup of warm tea.


Tuesday, July 18, 2017

Flax Seed Oat Bread

This is a lovely bread full of oats, both in the bread and on the crust. Even healthier with the addition of flax seeds and sesame seeds.


I like the mini look of this bread, as it does not bake up that tall. I suppose a smaller loaf pan can be used for a higher loaf, with some adjustments to the baking time. It has very nice soft crumbs. We enjoyed slices of this bread with some butter and jam, and hot mugs of coffee for breakfast. 


Flax Seed Oat Bread
(The Art Of Making Bread, by Alex Goh)
50gm instant oat
15gm flax seeds
100gm boiling water

200gm high protein flour
25gm plain flour
25gm atta flour
3gm instant yeast
20gm sugar
6gm salt
120gm cold water

20gm butter

oat flakes, flax seeds and sesame seeds, extra for coating

  1. Mix instant oat, flax seeds and boiling water in a bowl and set aside to cool. Cover with cling wrap, keep in the refrigerator for 2 hours.
  2. Remove oat mixture from refrigerator and scrape into mixing bowl, with the dough hook attachment. Add the rest of the ingredients, except butter, and knead to form a rough dough.
  3. Add butter and continue to knead until smooth and elastic, about 10 minutes. 
  4. Transfer dough to an oiled bowl, cover loosely with oiled cling wrap, and leave to proof for about 60 minutes until doubled in size.
  5. Punch down dough to deflate and place on lightly floured work surface. Divide dough into two equal pieces and mould them into a ball. Let rest, covered for 15 minutes.
  6. Meanwhile, mix the extra oat flakes, flax seed and sesame seed together and place on a baking tray.
  7. Working with one dough half at a time, flatten the dough and roll it up, pressing the seams to seal. Spray the dough with some water and roll dough on the oats, flax seeds and sesame seeds mixture to coat the top and sides, leaving the seam side uncoated. Place dough, seam side down on a greased loaf pan, 9"x 4-1/2" pan. Repeat with the other half of the dough. Cover loosely with greased cling wrap and leave in a warm spot for 60 minutes or until doubled in size.
  8. Remove cling wrap and bake dough in a preheated oven at 220C for 20-25 minutes.


I'm linking this post with Cookbook Countdown #19 hosted by 


Sunday, July 16, 2017

Hot Punjabi King Prawn Curry

This month's, July Monthly Featured Dish/Ingredient Challenge theme at I Heart Cooking Clubs (IHCC) is Just For Kicks! : Spicy Dishes. I turned to Madhur Jaffrey's books for her curry recipes. It has been awhile since I last cook from her books. 


This is a fairly easy curry to cook. Recipe calls an overnight marination of  the prawns, but I've marinated them for about 4 to 5 hours. I've used 3 tablespoons of yoghurt instead of 6 tablespoons, as that was what I had left. 

The sauce is first cooked to a fragrant thick sauce, then the marinated prawns are added in, stir and simmer until they are opaque and cooked through. Stir in the remaining garam masala and chopped coriander. 


Delicious prawn curry. Very fragrant from the cumin seeds and tasted so delicious from all the other ingredients. So good with white fluffy rice. This is one dish that I will be cooking again.


Hot Punjabi King Prawn Curry
(Curry Nation by Madhur Jaffrey)
for the marinade :
600gm (1lb 4oz) raw king prawns, peeled and de-veined
6 tablespoons yoghurt
2 hot green chillies, finely sliced
1/2 teaspoon salt

for the curry :
4 tablespoons olive or sunflower oil
1/2 teaspoon cumin seeds
2 medium onions, finely chopped
1 tablespoon finely chopped or crushed garlic
1 teaspoon turmeric
2-3 hot green chillies, finely sliced
2 teaspoons garam masala
1/2 teaspoon salt
2 medium tomatoes, roughly chopped
1/2 teaspoon chilli flakes
4 teaspoons finely chopped coriander leaves

Rinse and drain the prawns. Pat them dry and put into a non-reactive bowl. Add the yoghurt, chillies and salt. Mix well, cover and marinate overnight in the fridge.
When ready to cook the curry, pour the oil into a karhai, wok or heavy-based pan, about 23 centimetres (9 inches) in diameter, and set it over a medium heat. Spoon in the cumin seeds, swirl and brown for 10 seconds. Add the onions. Saute for about 10 minutes or until brown all over. Add the garlic, reduce the heat to low and stir and fry for two minutes. Mix in the turmeric and stir for one minute.
Now add the green chillies, increase the heat to medium and stir for one minute. Mix in 1-1/2 teaspoons of the garam masala and stir for one minute. Add half the salt, and all of the tomatoes and chilli flakes. Cook for two minutes, then add 120ml (4fl oz) of boiling water. Combine to make a thick sauce.
Simmer for three minutes, then add the remaining salt. Stir in the prawns and their marinade and cook over a medium heat until they are just opaque and cooked through. 
Sprinkle the remaining garam masala over the top and stir.
Fold in the chopped coriander and serve.

I'm linking this post with I Heart Cooking Clubs (IHCC), theme for this week
Just For Kicks : Spicy Dishes

and 

I'm linking this post with Cookbook Countdown #19 hosted by 


Friday, July 14, 2017

Runner Beans With Black Beans And Chilli

A quick stir-fry dish, simple yet so tasty. I don't cook runner beans very often, simply because they are not always available. And when I do see them in the market, I would not hesitate to grab some, as we love runner beans. 


Recipe calls for the garlic and ginger to be thinly sliced, but I have chopped them instead, and have used more than the recipe calls for. Instead of boiling the runner beans for two or three minutes, I have simply microwaved them for two minutes, then proceed with the recipe.

The stir-frying part is pretty quick, takes only a few minutes. One of my usual way of stir-frying runner beans is to cook with chopped dried prawns. This recipe uses black beans, another delicious way of cooking these runner beans. We love this dish, makes a great side dish to eat with rice and other main dishes. It is now on my list of "everyday-dish" rotation!


The recipe can be found here.
(from Every Grain Of Rice, Fuchsia Dunlop, pg 154)

I'm linking this post with Cookbook Countdown #19 hosted by 

Tuesday, July 11, 2017

Honey-Lemon Whole-Wheat Bread

Bernard Clayton's New Complete Book of Breads is one of my favourite bread books, but I have been neglecting it for quite a while, and it's time to revisit this book and bake something from it again. From the many label stickers that are sticking out from the pages of the book, I chose this recipe, Honey-Lemon Whole-Wheat Bread, one that I have been wanting to make for ages.

Originally, the dough is left to rise in the refrigerator overnight, or for at least 2 hours, until the dough has risen to double its size. But I have made the usual way, and left the dough to rise at room temperature for the final rising, and bake it on the same day.


I've made only one loaf. In the recipe below, listed in blue, I have given the measurements for one loaf of bread. Please note that the amount of flour and water that I've used may not work for you, as it depends on the moistness of the dough. Feel free to adjust accordingly.

The changes I've made is to substitute the shortening with butter. I have reduced the salt slightly, using only 3/4 teaspoon. The dough was rather sticky at the initial stage, so I've added a quarter cup of bread flour at a time until the dough no longer sticks at the side of the bowl. The amount of additional bread flour that I've used was 3/4 cup, making it a  total of 2-1/4 cups in all. For the whole-wheat flour, I've used 1 cup in total.

The dough rises beautifully and bakes into a lovely brown loaf. I tent the loaf with foil at 30 minutes baking time, as the dough is getting really brown. I baked the loaf for 40 minutes.


This is one lovely, fabulous bread. Very soft, light and tasty with fabulous crumbs. I love it spread with cold salted butter. Definitely one bread that is worth making again.


Measurements listed in blue in the recipe below, is my own measurements, to make one loaf of bread, with adjustments of my own. Feel free to add more or use less flour as needed. 

Honey-Lemon Whole-Wheat Bread
(Bernard Claytons's New Complete Book of Breads)
makes 2 loaves
3 cups bread or all-purpose flour (1-1/2 cups + 3/4 cups bread flour)
2 packages dry yeast (2 teaspoons)
2 teaspoons salt (3/4 teaspoon)
2-1/2 cups hot water (120° - 130°) (1 cup)
1/4 cup honey (2 tbsp)
3 tablespoons shortening, room temperature (1-1/2 tbsp, about 30gm, butter)
1 tablespoon grated or diced lemon peel (1/2 tbsp lemon zest)
2 to 3 cups whole-wheat flour, approximately  (1 cup)
vegetable oil

Baking pans : 2 large (9"x5") baking pans, greased or Teflon

In a large mixer bowl, combine the white flour, yeast, and salt. Pour in the hot water. Add the honey, shortening, and lemon peel. Stir briskly with a wooden spoon to blend, or for 2 minutes at medium speed with the mixer flat beater. Scrape the bowl occasionally. (I use the dough hook).
Add one cup (half cup if making one loaf) whole-wheat flour.  Beat at high speed for 1 minute. The batter will be thick and rubberlike, and pull away from the bowl in strands.
Stop beating. Stir in an additional 1 to 2 cups (half cup if making one loaf) whole-wheat flour, depending on the moistness of the developing dough. The dough should be elastic, soft, and, at this stage, not overly sticky. If the dough continues to be slack and moist, add sprinkles of white flour. Knead for 10 minutes, adding sprinkles of flour is the dough sticks to the sides of the bowl.
(The dough was really sticky, I've added a quarter cup of bread flour at a time, using a total of 3/4 cup. Dough will leave the sides of the bowl, but is still just slightly sticky).
Cover the dough with a towel or a length of wax paper and allow it to rest for 20 minutes. (I transfer the dough onto a lightly floured work surface, shape into a ball, and place in an oiled mixing bowl. Turn dough over so the oiled side is up. Cover bowl loosely with greased cling wrap, and allow dough to rise until doubled, about 30 minutes).
Knead the dough for 30 seconds to press out the bubbles, and divide into 2 pieces (no need to divide if making only one loaf). Shape into balls and let rest for 3 to 4 minutes.
Form each loaf by pressing a ball under your palms or with a rolling pin into a flat oval, roughly the length of the baking pan. Fold the oval in half, pinch the seam tightly to seal, tuck under the ends, and place in the pan, seam down.
Brush the surface of the dough with vegetable oil. Cover the pans loosely with wax paper. and then with plastic wrap. The loose covering allows the dough to rise above the level of the pan. Place the pan in the refrigerator for 2 to 24 hours to double the volume. (I did not place the dough in the refrigerator. I left the dough to rise on my kitchen counter, cover loosely with oiled cling wrap, until doubled in size and bake as directed below).
Remove the pan from the refrigerator and let stand while the oven heat to 400°, about 20 minutes.
Uncover the loaves. Prick any surface bubbles with a toothpick just before slipping the loaves into the oven. (My risen dough has no surface bubbles). Bake on the lower rack of the hot oven for 30 to 40 minutes. When the loaves are brown and tapping the bottom crust yields a hard, hollow sound, they are done. If not, return them in their pans to the oven for up to an additional 10 minutes.  (If the bread gets too brown before they are done, cover the top with foil).
(If using a convection oven, reduce heat 50° and bake for 40 minutes, or until the loaves test done, as above).
Remove the bread from the oven, turn from the pan immediately, and place on a metal rack to cool.
Note : for a soft crust, brush with melted butter or margarine as soon as bread comes out of the oven.


I'm linking this post with Cookbook Countdown #19 hosted by 


Sunday, July 9, 2017

Two-Root Slaw

This week at I Heart Cooking Clubs (IHCC), the theme is Salads & Sides. I made some slaw to serve alongside some roasted chicken. Recipe uses two types of root veggies ; carrots and celeriac. Since it is almost impossible to find celeriac over here, I've used what I had in my fridge ; stalks of celery instead, since we love celery in  salads. So I should really call this slaw as "Root-Stem Slaw"! 

Very easy and quick to put together. I sliced the veggies into matchsticks instead of grating. As for the lemon juice, I've only added a squeeze or two, instead of from 1/2 a lemon, as we do not like sour slaw.


A very nice slaw indeed. Great side dish for roasted chicken.


Two-root Slaw
(River Cottage Everyday, Hugh Fearnley-Whittingstall)
serves 6
2-3 large carrots
1/2 celeriac (about 400gm) (I've replaced with 2 stalks of celery)

for the dressing :
4 tablespoons good mayonnaise
2 teaspoons English mustard
juice of 1/2 lemon, or a dash of cider vinegar
1 tablespoon caraway seeds, lightly toasted in a dry frying pan (optional) (omitted)
sea salt and freshly ground black pepper

Peel the carrots and celeriac and coarsely grate them into a bowl (or use a mandolin on the matchstick setting, if you have one).
Beat together all the ingredients for the dressing, pour them over the grated vegetables and stir to coat thoroughly.
Pack in you lunchbox or serve at home, allowing the flavours to develop for an hour or so beforehand. It's good with cold meats, especially ham and tongue, or after a stew or shepherd's pie.


I'm linking this post with I Heart Cooking Clubs (IHCC), theme for this week
Salads & Sides


and
I'm linking this post with Cookbook Countdown #19 hosted by 


Tuesday, July 4, 2017

Soup With Vegetable and Meatballs

This is a simple soup of winter melon and pork meatballs. The author mentioned that she came across this simple meal at the tranquil old lanes of central Chengdu, where a woman was eating her supper of this lovely soup of meatballs and winter melon, with a bowl of rice.

You can use any vegetable you like, such as bean sprouts, choy sum, cabbage or tomatoes. But take note that if the vegetable you choose takes a few minutes to become tender, cook it before you add the meatballs. If it cooks almost instantly, then add them in when the meatballs are just about ready. 


According to the author "If you want to make this into a one-dish meal, like the lady in the old lanes, use your chopsticks to pluck out the meatballs and vegetables and them with your rice, then drink the soup from your empty rice bowl."


We had this soup as  part of a meal with rice, along with some other main dish and a stir-fry veggie.

The recipe can be found here.
(or from Every Grain Of Rice by Fuchsia Dunlop, pg 248)


I'm linking this post with Cookbook Countdown #19 hosted by 


Rich and Delicious Dinner Rolls

The recipe for these fabulous rolls is from, The Everyday Baker by Abigail Johnson Dodge, a thick (617 pages) lovely book, with tons of recipes, with detailed instructions, tips and techniques. Recipes Chapters are divided as Morning Food, Quick To Make, Cookies, Cakes, Pies and Tarts, Puddings and Custards, Yeast Breads, Pastry, Flatbread and Fruit Desserts. 

I'm a big fan of Abby Dodge and especially love her yeasted bread recipes, and as soon as I saw the name of these rolls, Rich and Delicious Dinner Rolls, I just had to make them.


She has given a few methods of shaping ; round rolls, single-knot rolls, twist rolls, cloverleaf rolls. I've chosen to make them as round pull-apart rolls. The dough is kneaded in the stand mixer, and it was a beautiful smooth, satiny shiny dough. Enriched with butter and eggs, the dough is similar to a brioche dough. 

I've baked the rolls in a 10" square baking pan, instead of the 13 x 9-inch pan as indicated in the recipe. There's four rows of four rolls each, making a total of 16 pull-apart rolls.


Rose beautifully and baked to a lovely golden brown.


So soft with airy texture! 


Wonderful when eaten warm, spread with cold salty butter, and a mug of hot black coffee. And we even ate the rolls, split, sandwiched with onion omelette on a bed of green salad leaves, with our favourite mayo-chilli sauce. A keeper recipe.


Rich and Delicious Dinner Rolls
(The Everyday Baker, Abigail Johnson Dodge)
makes 16 rolls
3-3/4 cups (479gm) unbleached all-purpose flour
1/4 cup (50gm) granulated sugar
2-1/4 tsp quick-rise (instant) yeast
1-1/2 tsp table salt (I use scant 1/2 tsp, as the butter is salted)
1 cup (240ml) whole milk
8 tbsp (4oz/113gm) unsalted butter, cut into 6 pieces (I use salted butter)
4 yolks from large egg
1 whole large egg
1 tbsp water
nonstick cooking spray or neutral oil (safflower, canola, vegetable, or corn), for greasing the dough and bowl

  1. Put the flour, sugar, yeast and salt in the bowl of a stand mixer and whisk until well blended. Heat the milk until very hot but not boiling. Add the butter and stir until melted. Check the temperature using an instant-read thermometer. For the yeast to activate, the liquid needs to be between 115℉ and 125℉ (45℃ to 52℃). Fit the mixer with the dough hook, turn the mixer on medium-low speed, and pour the warm milk mixture into the flour mixture along with the egg yolks, mixing until the flour is completely incorporated. Increase the speed to medium and beat until the dough is smooth and shiny, 8 to 10 minutes. If the dough climbs up the hook, stop the mixer and scrape the dough into the bowl as necessary. The dough will not pull away completely from the sides and bottom of the bowl, and it will be soft and slightly sticky to the touch.
  2. Remove the dough hook, scrape the dough onto the counter, and knead once or twice until it no longer sticks to the counter and passes the windowpane test, about 1 minute. Shape the dough into a ball. Lightly grease the sides of the bowl and put the dough, rounded side up, back in. Cover the bowl with a plate or plastic wrap. Let rise in a warm spot until doubled in size, about 60 minutes.
  3. Lightly grease a 9x13x2-inch (23x33x5cm) baking dish (metal or Pyrex). Scrape the dough onto an unfloured work surface and press down on the dough to deflate it. Using a bench scraper or knife, portion the dough into 16 equal pieces, about 2 oz (57gm) each. To ensure even rolls, use a scale to weigh the portions. Working with one piece at a time and keeping the others covered, arrange the dough toward the back of your flattened palm near the thumb joint. With the edge of your other palm (curved slightly), press gently but firmly on the bottom of the dough, moving your top hand from the front to the back. This will rotate or spin the dough while keeping the top side up, Repeat until it forms a smooth-skinned ball with a sealed bottom. The goal is to stretch the top of the dough from opening up as it expands during baking.
  4. Put the ball, round side up, in the prepared baking dish, cover loosely with plastic wrap, and repeat with the remaining dough. (The dough balls can be arranged in four rows of four or just randomly yet evenly placed). Lightly spray the tops of the dough and cover loosely but completely with plastic. Let the dough rise in a warm spot until doubled in size, 25 to 40 minutes.
  5. Position a rack in the center of the oven and heat the oven to 375℉ (190℃/Gas 5). Put the egg and water in a small bowl and mix with a fork until well blended. When the rolls have risen to about 1/2 inch (12mm) above the pan, remove the plastic and brush with the egg wash. Bake until the rolls are puffed and deep golden brown, 17 to 21 minutes. Move the pan to a rack. Serve warm or let cool completely, cover, and stow at room temperature for up to 2 days.

I'm linking this post with Cookbook Countdown #19 hosted by 


Monday, July 3, 2017

Egg Tartare

It's Potluck week at I Heart Cooking Clubs (IHCC), and I've made Hugh Fearnley-Whittingstall's Egg Tartare for lunch.

Quick and easy lunch snack to make. I've omitted the dill and have replaced the parsley with cilantro. And added a pinch of paprika instead of Tabasco sauce.


I thought that my Egg Tartare was a little runny, maybe because the yolks are quite runny to begin with. But I am not complaining! 😉 We had the Egg Tartare with some store bought bread, makes a nice, quick lunch, and a full tummy! With a mug of hot black coffee.


Egg Tartare
(River Cottage Everyday, Hugh Fearnley-Whittingstall)
6 medium eggs, at room temperature
4 spring onions, or 2 small shallots, finely chopped
3-4 gherkins (about 30gm), finely diced
1 tablespoon capers, rinsed
2 tablespoons finely chopped parsley
1 tablespoon finely chopped dill (optional)
2-3 tablespoons mayonnaise
1 dab of Dijon mustard
2-3 dashes of Tabasco sauce (optional)
sea salt and freshly ground black pepper
slices of wholemeal, sourdough, rye or your favourite bread, to serve

First, boil the eggs. They should be what I call soft-hard-boiled that is, the whites completely set but the yolks just a bit runny in the middle. I achieve this pretty reliably by putting them in a pan of hand-hot water, covering it and bringing it quickly to the boil, then boiling for exactly 4 minutes - 5 if they are extra large. Then I run the eggs under the cold tap and peel them as soon as they are cool enough to handle.
Roughly chop the eggs and mix with the spring onions or shallots, gherkins, capers, parlsey and dill, if using.
In a small bowl, whisk together the mayonnaise, mustard and Tabasco, if using, Gently combine this mixture with the eggs and season with salt and pepper. Serve on wholemeal, sourdough or rye bread, as closed or open sandwiches.


I'm linking this post with I Heart Cooking Clubs (IHCC), theme for this week
June IHCC Potluck

and
I'm linking this post with Cookbook Countdown #19 hosted by