Sunday, March 18, 2012

Ham, Green Onions and Cheddar Buns

I made some savory buns from my latest favourite bread machine cookbook, "The Artisan Bread Machine" by Judith Fertig. Each bread that I've tried so far have turned out fantastic!


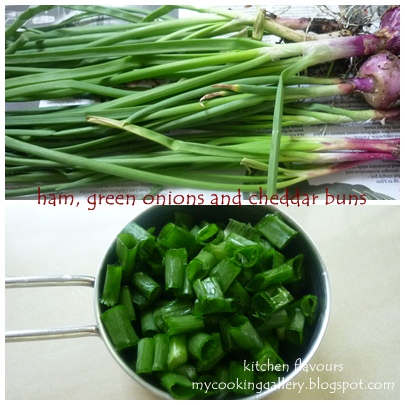
I have lots of spring onions in my garden. Harvested some of them, most of it goes into my simple stir-fry noodles for our lunch, and used some of it for this fantastic buns. The original recipe is baked as a loaf bread, and there's a variation on making these into a boule. But I wanted these to be small pan-buns, so that's what I did. However, I did not have any bacon, I substitute with sandwich hams instead, which I pan-fried lightly and chopped into pieces. Also I did not have any blue cheese, have not tried blue cheese before actually, but I always have some cheddar cheese in my freezer, so that is what I used. Since both the ham and cheese are already salty, I reduced the salt to 1/2 teaspoon, and it turns out not that salty, so I think the full 3/4 teaspoon would be alright, but I would stick to 1/2 teaspoon if you are watching on the salt intake, it's all a matter of preference. I added in about 1 teaspoon of dough enhancer.


As usual, I let the machine do the kneading for me, set at Basic Dough cycle. The top picture is the first rise in the bread pan just before the end of cycle. The second picture is when the dough is 'punched down' by the bread machine just before it beeps, signalling the end of the cycle.
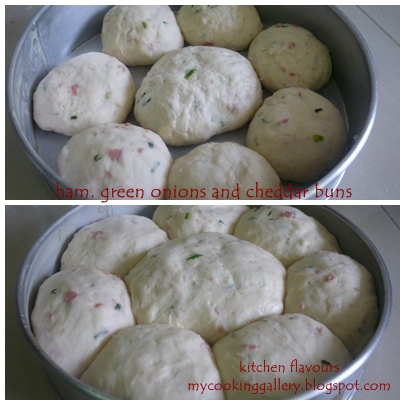


Remove the dough from the bread pan to a lightly floured bowl, divide the dough to 8 round balls as follows, 7 balls of approx 80gm in weight and 1 bigger ball at approx 140gm in weight. Place them in a round 9" greased baking pan with the bigger ball in the centre, as pictured above. Cover loosely with oiled cling wrap and leave to rise for about 45 minutes.


Bake in preheated oven for about 18-20 minutes until done. Brush top of  hot buns with melted butter for a shiny and soft crust. Leave to cool till slightly warm.


 Lovely buns!


Lovely buns! Did I mention how lovely they are?  :o)  I made some tea while waiting for it to cool a little! 


 So soft, I love doing this!  :)


The bits of ham and spring onions, the cheese got melted in.


 Couldn't resist, we ate this about 20 minutes after baking. Yum!


We love the bits of ham and the spring onions.


The texture is soft and fluffy, very tasty, good enough on its own with a cup of tea!  Or tear it open and spread a generous serving of butter! A keeper recipe that I can see returning to my kitchen! 


I'm sharing this with :
BYOB - Bake Your Own Bread hosted by Girlichef


Bacon, Green Onion and Blue Cheese Bread (Ham, Green Onions and Cheddar Buns)
(adapted from "The Artisan Bread Machine" by Judith Fertig)
Makes one 1-1/2 lb (750gm) loaf
1-1/2 tbsp granulated sugar
1 tsp instant or bread machine yeast
3/4 cup warm water (110F/43C)
1/3 cup finely chopped green onions
3 tbsp vegetable oil
2-3/4 cups bread flour
3/4 tsp salt (I use 1/2 tsp)
1/3 cup finely chopped crispy cooked bacon (I use sandwich ham)
1/3 cup crumbled blue cheese (I use cheddar cheese)
scant 1 teaspoon dough enhancer (my addition)

  1. Add sugar, yeast and water to the bread pan. Let stand for 10 minutes or until yeast starts to bubble.
  2. Add green onions and oil. Spoon flour on top of liquid. Add salt, bacon and cheese.
  3. Select the Basic/White Cycle and press Start.

kitchen flavour's notes :
~ the changes I made to the ingredients : I use sandwich ham which I pan-fried lightly, I use Cheddar cheese instead and I reduce the salt to 1/2 tsp as the cheese and ham are already salty. I added 1 scant teaspoon of dough enhancer to the flour.
~ follow step 1 and step 2 above. Select Basic Dough Cycle.
~ at the end of Basic Dough Cycle, remove dough and divide into 8 round balls, 7 balls about 80gm weight and 1 ball about 140gm weight. Arrange moulded round balls in a greased 9" round cake pan, placing the bigger ball in the centre and the smaller ones all around. Cover loosely with a greased plastic cling wrap and leave to rise for about 45 minutes. Preheat oven to 180C.
~ remove cling wrap and bake for about 18-20 minutes or until done. Transfer buns from cake pan to a wire rack to cool completely. Brush top of hot buns with melted butter for a soft and shiny crust.

Thursday, March 15, 2012

Sticky Chinese Chicken

This is one super easy, delicious dish! Zoe, my baking buddy is hosting a blog-hop, "Cook Like A Star", featuring Donna Hay as the celebrity chef for the month of March. This is the second recipe of Donna Hay's that I've tried and so far I liked them both.


This is an easy dish to prepare. Just marinate the chicken with the ingredients and baked it in the oven, that's all. Be sure to taste your marinade before marinating the chicken. After whisking the ingredients together, try for yourself how sweet and salty you want it to be. I find that 1 tablespoon of brown sugar is not enough and added about 2 tablespoons more. And adjust the soy sauce according to your taste. The mixture should be sweet and salty. 


I did as what the recipes says, baked it in a covered baking dish for one hour until tender. I covered it with aluminium foil since my dish do not have any tight-fitting cover and when one hour was up, the chicken is not brown and sticky! It is all cooked up and tender, but not brown and sticky, so pale looking and does not look so appetizing! But it does smell wonderful, the fragrance from the star anise and five spice powder. I moved the dish up a level in my oven, remove the aluminium foil and grilled it for about 3 to 4 minutes, I can see that it is  turning brown, but definitely not sticky, in fact it looked so soupy, as in the picture above!  I then remove the dish from the oven, the gravy is really bubbling hot! I added in some cornstarch solution (dissolved some cornstarch in water first), stir it in, coat the chicken pieces with the gravy and return it to the oven to grill for another 3 to 4 minutes.


Wow, what a transformation! It is all brown and the gravy has thickened! Looks so delicious! 


And it is delicious! I'm really glad that I've tried out this recipe. We had an enjoyable chicken dish for our dinner. Even the last of the gravy was mopped up with a piece of bread!  :)


I'm linking this with "Cook Like A Star" blog-hop featuring Donna Hay as the celebrity for the month of March, hosted by my friend, Zoe of Bake For Happy Kids. Please drop by Bake For Happy Kids for the full details and join in the blog-hop!


Sticky Chinese Chicken
(source : Donna Hay, here)
1 small piece ginger, peeled and sliced (grated)
2 cloves garlic, sliced  (minced finely)
1/4 teaspoon five spice powder
3 star anise
1 tablespoon brown sugar (I use about 3 tablespoons)
1/2 cup (125ml) soy sauce (to taste)
1 cup (250ml) chicken stock
1/4 cup (60ml) oyster sauce 
1 whole chicken, cut into pieces
steamed rice, to serve

Preheat oven to 200C (390F). Place the ginger, garlic, five spice, star anise, sugar, soy, stock and oyster sauce in a small bowl and whisk until well combined. Place the chicken in an ovenproof dish, pour over the ginger mixture, cover with a tight-fitting lid and cook for 1 hour or until tender. Serve with rice. Serves 6.


Tuesday, March 13, 2012

Ciabatta No. 2 : Free and Easy Bake-Along #20

My second Ciabatta, the theme of our Bake-Along this week. Thanks to Lena for picking this challenge, as it really is a challenge to me! 


The golden "slippers" !  :o)


Well, I did finally get the airholes that I was "searching" for! The crust is crusty with moist, soft chewy interior. My first Ciabatta, the previous post here, is all soft and spongy with an equally delicious crust, comparing these two, I prefer the first one. Making Ciabatta is really a challenge to me, I have tried three different recipes, second one is a total failure, as the dough is all too wet and I am unsure whether should I add in more flour as it says that it was more of a batter than a dough, which is really confusing as to what stage or texture would you consider it a batter in bread making! I'm not blaming on the recipe, it's more towards the understanding of Ciabatta making that I'm still learning!

For the Ciabatta above, I got the recipe from King Arthur Flour, here, the only changes was I reduced the salt to 1 teaspoon and I added in 2 teaspoons of Pizza Seasoning. And before baking, I spray some water over the dough.


The wonderful thing about Bake-Along is it gives us a chance to make and bake something that we would otherwise put on hold until "next time"! Ciabatta is definitely one of the items on my list of to-do, now I am happy to say that I have tried my hands at making these, though there are lots of room for improvement. Practice makes perfect, will try other recipes in my own time now until I achieve the perfect one! Have you tried making Ciabatta before, if not, give yourself a challenge, bake one and join us in our Bake-Along!

If you have not been to Lena's and Zoe's, hop over and see their beautiful Ciabatta bake, and also our friends who are baking along with us at the linky below. For our next Bake-Along, we will be baking Fresh Strawberry Cake with White Chocolate Chips, from Cake Keeper Cakes by Lauren Chattman. If you do not have this book, try google for the recipe, I'm sure you will be able to find it, otherwise, you may bake any fresh strawberries and white chocolate chips cake. The linky for this will be open on 27 March and will stay open for a week. Hope to see you! Everyone's welcome to join in.


This is a blog hop, to join in, click on the link :
get the InLinkz code