Wednesday, August 31, 2011

Barbecue Chicken Pastry

This delicious Barbecue Chicken Pastry has a flaky layered pastry crust that is crispy and flaky tender at the same time. The filling is made with chicken meat cooked with some sauces, and it should be sweet and salty. I have made this a couple of times years ago before I started my blog. Made for my family and friends and everyone loved this. I was thinking of this again about two months back and have even made the filling and the container of filling has been sitting in the freezer for more than a month. Now seems like the perfect time to make this in time for the current theme going at Janine's blog, Not The Kitchen Sink, for "Aspiring Bakers #10 : Easy as Pie, August 2011". Today, is the last day for submission actually! :)


Let's get started on how to wrap the Barbecue Chicken Pastry, recipe is at the bottom of the post :

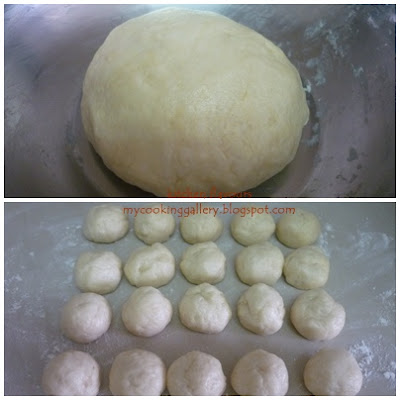
Water dough is kneaded to a smooth ball, weigh it and divide into 20 equal parts. Dough should be soft but not sticky.


The oil dough is very sticky. Flour your hands and divide into 20 equal parts.


  1. Roll out water dough and place a ball of oil dough in the centre. Wrap the water dough around the oil dough.
  2. Flatten the dough.
  3. Roll it up like a swiss roll. Flatten the dough and roll it up again, repeat one more time.


  1. Flatten the dough and roll out into a thin round. Place about 1 tablespoon of filling in the center.
  2. Fold over the top and bottom to meet at the center, pinching the left sides together to seal. You may do this by placing the dough on the work surface or ...


  1. ..or by placing the dough on your palm. 
  2. Fold over the dough on the right, bringing towards the center.


  1. Pinch  and seal the sides of dough together, making sure there are no holes, into a triangle shape.
  2. Place in a greased baking pan, with the seam facing down.


  1. Brush the top of pastry with egg wash (beat lightly 2 egg yolks with 1 tablespoon of egg white together), sprinkle some sesame seeds over the top.
  2. Bake in preheated oven at 200C, about 25 minutes until golden brown.


Let pastry cool in pan on rack for 10 minutes and transfer to a wire rack to cool.


Best eaten while still warm with a pot of Chinese Tea!


Pastry is very flaky and crispy!


The multi layers of the crispy and tender pastry.


Yummy! Just pop into the oven for about 8 minutes at 150 degrees C to reheat for breakfast the next morning! 


The last time I made this was for a family outing. The filling can be made a couple of weeks in advance, just keep them in a container and store in the freezer section of the refrigerator. Thaw before use. To bake the pastry the next morning, make the ready-wrapped pastry with the filling the day before, do not apply any egg yolk at the top, just place them in a container in a single layer, keep them refrigerated overnight. Instead of triangle, these can be made into a round, rectangle or square pastry. The next morning, remove them from the fridge, leave them on the kitchen counter for about 20 minutes or so,   heat up the oven while waiting, brush the pastry with egg yolk, sprinkle with sesame seeds and proceed with the baking. Perfect for a picnic!

I'm submitting this to
Aspiring Bakers #10: Easy as Pie (August 2011), hosted by Janine of Not the Kitchen Sink!

And also sharing this with :
Bake with Bizzy at Bizzy B. Bakes


Barbecue Chicken Pastry
(adapted from "Irresistible Pastry" by Alex Goh)
Ingredients
Filling
A)
2 tbsp oil
2 cloves garlic, crushed
1 tbsp bean paste


(B)
400gm chicken meat, diced
1/2 tsp salt
1/2 tsp pepper
35gm sugar
1 tbsp oyster sauce
1 tbsp dark soy sauce
1 tbsp light soy sauce
1/2 tsp sesame oil


(C)
100gm water


(D)
1 tbsp potato starch
2 tbsp cornflour
50gm water


Water Dough
200gm flour
40gm shortening
20gm oil
40gm sugar
100gm water


Oil Dough
200gm flour
130gm shortening


Method :
Filling : Mix (B). Set aside for 1 hour. Heat the oil. Add in garlic and bean paste. Stir fry until fragrant. Add in (B) and cook until the chicken becomes white. Add in (C) and cook until it boils. Add in premix (D) and cook until it thickens. Dish up and leave it to cool. Keep in the freezer for 1 hour.


Water Dough : Mix all ingredients to form a smooth dough. Divide it into 20 equal parts.


Oil Dough : Mix all ingredients to form a paste. Divide it into 20 equal parts.


  1. Wrap the Oil Dough with Water Dough. Flatten the dough and roll it up twice. Flatten the dough and wrap in the filling. Seal to form a triangle shape.
  2. Place the seam downward onto a greased baking pan. Egg wash twice and sprinkle some sesame seeds on top. Bake at 200C for 25 minutes.

(As you can see, the instructions from pastry chef Alex Goh, is VERY BRIEF and may seem confusing. His recipes are good, but his instructions are not! In his book, there are only two photos illustrating the wrapping of the filling. I hope the steps that I've shown will help in some way or other! )


Monday, August 29, 2011

Nectarine Cake with Cinnamon-Nut Topping : Free and Easy Bake-Along #8

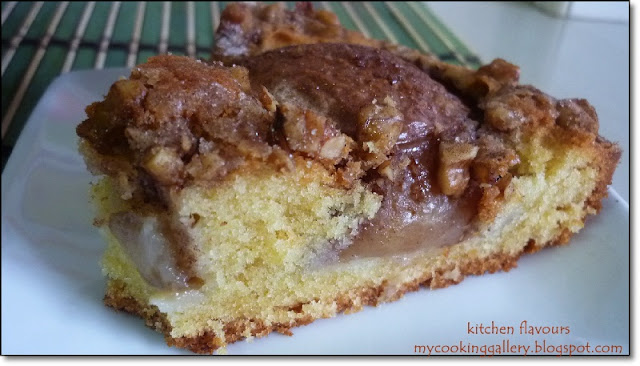
Together with my baking buddies, Lena and Zoe, we baked this Nectarine Cake for our Free and Easy Bake-Along #8. How does this cake fare? Delicious! I love it!


Gorgeous rosy nectarines.


We are not sure whether it was an error in the sugar ingredient for the topping, at least the three of us thought so! :)  In the ingredient listing, the amount of sugar was listed as 1 cup plus 1 tablespoon, whereas in the instruction for mixing the topping, only calls for 1 tablespoon! We guess that 1 cup of sugar for the topping is way too much! Zoe was the first to bake this, and alerted us on the sweetness even after she reduced the sugar. Thanks, Zoe!


Since I do not like sweet cakes and always reduced the sugar in most recipes, I did as I always do, reduced the sugar, especially after Zoe informed us that it is very sweet! I only use 2 tablespoons for the topping and 80gm for the cake batter. It was perfect for me. The smell is wonderful, the sweet aroma of the cinnamon fills the house when this cake is baking.


The topping is really nice, the walnuts coated with the sugar and cinnamon is so good. The cake balances well with the topping and the soft nectarine, which I left unpeeled.


Overall rating, this is a delicious cake! It did not last long in my house! Baked this in the evening and finished it all by the next morning!


Do drop by Lena of Her Frozen Wings and Zoe of Bake for Happy Kids to see their version of this cake. For our next Bake-Along, we will be baking Sweet Potato Sandwich Rolls  from King Arthur Flour website, and we will be posting it, on 10/09. 


Nectarine Cake with Cinnamon-Nut Topping
(adapted from "Cake Keeper Cakes" by Lauren Chattman)
For The Topping :
1 cup plus 1 tablespoon sugar (guess this is an error! I only use 2 tablespoons sugar)
1/2 teaspoon ground cinnamon
1/3 cup walnuts or pecans, finely chopped


For The Cake :
1 cup unbleached all-purpose flour
1 teaspoon baking powder
1/4 teaspoon salt
1 cup sugar (I use 80gm)
1/2 cup (1 stick) unsalted butter, softened
2 large eggs
1/2 teaspoon pure vanilla extract
5 medium ripe nectarines, halved, pitted and peeled


Make The Topping :
  1.  Preheat the oven to 375F. Grease the inside of a 10-inch round springform pan.
  2. Combine 2 tablespoons sugar, the cinnamon, and the nuts in a small bowl. Set aside.

Make The Cake :
  1. Combine the flour, baking powder and salt in a medium mixing bowl.
  2. Combine the sugar and butter in a large mixing bowl and cream with an electric mixer on medium-high speed until fluffy, about 3 minutes, scraping down the sides of the bowl once or twice as necessary. With the mixer on low, add the eggs one at a time, scraping down the sides of the bowl after each addition. Stir in the vanilla. Add the flour mixture, 1/2 cup at a time, scraping down the sides of the bowl after each addition.
  3. Scrape the batter into the prepared pan and smooth the top with a rubber spatula. Arrange the nectarines, cut side down, on top of the batter. Sprinkle with the topping. Bake the cake until it is golden and a toothpick inserted in the center comes out clean, 50 to 55 minutes. Let the cake cool in the pan on a wire rack for 10 minutes. Release the sides of the pan and use a large spatula to slide the cake from the pan bottom to a wire rack. Cool completely, cut into wedges, and serve. (I did have a problem sliding the cake from the pan bottom, so I just let it cool completely in the pan. It turned out fine).
  4. Store uneaten cake in a cake keeper or wrap in plastic and store at room temperature for up to 2 days.

I would like to wish all my Muslim blogger friends "SELAMAT HARI RAYA ADILFITRI", and everyone "HAPPY HOLIDAYS"
Have a safe 'balik kampung' journey and see you when you get back!

*****************


Saturday, August 27, 2011

Nyonya Stir-Fried Long Beans with Shrimp Paste

My mom used to cook this when we were young, taught to her by her Nyonya mother. Like most things in life, this simple dish was taken for granted without any much thought, it is just a dish that we love to eat, without realizing how special and valuable it is  until much later, when we are much older and have family of our own. How could a simple dish like this with only four ingredients can taste so wonderful, at least to me it is. Just like how my  mom used to prepare the ingredients, by pounding, using a mortar and pestle, I now do the same.  I have tried blending the ingredients in a blender before, somehow the taste is not quite as tasty. You can say it's all in the mind, but to me it is just not the same! Modern gadgets definitely cuts the work by half, but it does not necessarily mean they give the same results! I guess that every household in Malaysia, no matter the race, would definitely have a set of mortar and pestle in the kitchen, admist all the modern kitchen appliances.


This is how I pound the garlic, onions and shrimp paste. Put a third of the garlic, onions and shrimp paste into the mortar and pound away. Pounding the shrimp paste together with the onions and garlic will help to absorb the juice from the onions and garlic and preventing the juice from splattering out (and gets into your eyes!). When it has been pounded to a coarse paste, add another third of the ingredients, pound and repeat with the remaining portion. This way, the chopped garlic and onions will not be popping out of the mortar as you pound. Or you may crush the chopped onions and garlic with the pestle before you start to  pound. Pound until the paste is coarsely fine. 


Now I cook this for my family, and they love it as much as I do. 


Unlike other stir-fries veggies where they are best eaten hot right after cooking, I prefer to eat this barely warm or at room temperature.


A simple, delicious dish that really complements well with plain white rice or even plain porridge.


I am sharing this with
Heritage Food Trail at Precious Moments
Vintage Recipe Thursday at Joy of Desserts
Full Plate Thursday at Miz Helen's Country Cottage


Nyonya Stir-Fried Long Beans with Shrimp Paste
(by kitchen flavours)
400gm long beans
8-10 shallots, chopped coarsely
4 cloves garlic, chopped coarsely
25-30gm shrimp paste
salt to taste
1/2 cup water
3-4 tbsp cooking oil
  1. Cut long beans to 2" lengths.
  2. Pound shallots, garlic and shrimp paste together. Paste need not be pounded until very fine.
  3. Heat oil in wok, swirl oil over sides of wok. When oil is hot, add in pounded ingredients, stir-fry over medium heat until paste is light brown and fragrant, this would take about 4-5 minutes.
  4. Add in long beans and stir to combine. Add in water, stir and cover, turn heat to medium low and simmer, stirring occasionally, adding some water if appears dry. Add salt to taste, go easy on the salt as the shrimp paste is usually salty. Continue to simmer, covered, stirring now and then,  for about 10 minutes until long beans has softened.
  5. Dish out to a serving plate.