Friday, June 14, 2013

Homemade Peanut Butter

Click on the link to submit your post to : Cook-Your-Books #1

******************

Clearing my pantry : Peanuts. I have been wanting to make Homemade Peanut Butter for ages, especially so, right after Chinese New Year. Because I have almost 2 kilo of peanuts leftover from making the Chinese New Year cookies. Yup, I bought more than I need, doesn't that sound familiar? LOL!

I finally made myself a jar of Homemade Peanut Butter! That's one homemade item off my list now!


Homemade Peanut Butter

Peanut Butter does not contain any dairy butter. Butter in this sense, means that the dry roasted peanuts are grinded with some oil to a smooth, thick paste, thus it is called butter, as in fruit butter eg. apple butter, where the apples are cooked to a thick paste in a long cooking process. If you take a look at the jar of store-bought peanut butter in your pantry, you would not find dairy butter in the list of ingredients. Though some fruit butter may contain only a minimum amount of dairy butter.

There is a difference between butter, jam, jellies, marmalades, conserves, preserves and curds. I have previously posted about some of it here, or you may read more about it, if you google for further info.  :)


Let's start making some Homemade Peanut Butter :


  1. First you would need some dry roasted peanuts, not too much at a time, unless your food processor is a heavy-duty model. I have used about 2-1/2 cups of unsalted roasted peanuts, without skins. Place half of the peanuts in the bowl of the food processor.
  2. Put the cover on and switch on the food processor and whiz the peanuts until coarsely ground. Add in the rest of the peanuts and process until finely ground as possible.
  3. The grounded peanuts would be not smooth yet. 
  4. Add some honey and vegetable oil, preferably canola oil as it has a neutral taste and light texture.
  5. Continue to process until the paste is smooth and is to the consistency you like, adding more oil or honey as necessary. You may add some salt to taste. Bear in mind that the peanut butter will thicken further upon refrigeration, so you may want to add in a little more oil.
  6. The smooth peanut butter is now ready for your sterilized jar!
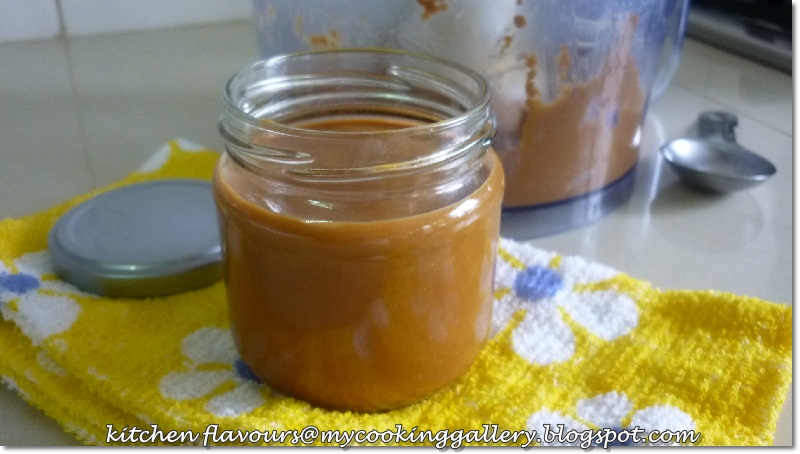

Smooth, creamy and good. Best thing is, it is HOMEMADE !


Store in the refrigerator and it may keep for several months, but it is best to be consumed within a month. Since homemade peanut butter are free from additives and food conditioners, it will thicken further upon refrigeration and would be quite difficult to spread on bread, you may need to to add a little more oil during the processing (as I've mentioned in step 5 above).


Mine is a little thick, but it does not stop me from enjoying it with my morning toasts. My daughter even ate it by the spoonfuls, which I've got to stop her after a couple of spoonfuls! For someone who does not like nuts, she seems to love this Homemade Peanut Butter!

I'm sharing this with :
See Ya In The Gumbo hosted by Ms. enPlace
Full Plate Thursday hosted by Miz Helen's Country Cottage


Homemade Peanut Butter
2-1/2 cups unsalted roasted peanuts, without skin
6 tbsps canola oil
3 tbsps honey
1/2 teaspoon salt, or to taste
  1. First you would need some dry roasted peanuts. I have used unsalted roasted peanuts, without skins. Place them in the bowl of the food processor.
  2. Switch on the food processor and whiz half of the peanuts until coarsely ground, add in the other half and process until finely ground as possible.
  3. The grounded peanuts would be not smooth yet. 
  4. Add some honey and vegetable oil, preferably canola oil as it has a neutral taste and light texture.
  5. Continue to process until the paste is smooth and is to the consistency you like, adding more oil or honey as necessary. You may add some salt to taste. Bear in mind that the peanut butter will thicken slightly upon refrigeration, so you may need to use a little more oil. Process until smooth.
  6. Transfer peanut butter to a sterilized jar, keep covered, refrigerated.


Thursday, June 13, 2013

Lemon and Curry Leaf Rice : IHCC

Click on the link to submit your post to : Cook-Your-Books #1

******************

"A Little Bit of Sunshine", is the theme for this week at I Heart Cooking Clubs (IHCC), where we are currently cooking from Yotam Ottolenghi's recipe until September. This theme is all about food or ingredients with the sunny colour of yellow and/or orange. There are quite a number of recipes that I've thought of making, especially the Roasted Sweet Potatoes Wedges, which sounds really good, but I cannot get any nice sweet potatoes, so that will have to wait. And since I'm craving for some Indian meal (again!), I've made YO's, Lemon And Curry Leaf Rice to go with some pork curry and a vegetable dish, both from Madhur Jaffrey's recipes which I will be sharing next week. 


The original recipe requires the rice to be baked in the oven. But I chose to cook the rice in the rice cooker, just because I'm cooking the rice earlier and it will be nice and warm when we have it for dinner later. This is really easy to cook. Wash the basmati rice and soak in water for about 20 minutes. Next, in a saucepan, put the cinnamon stick, cloves, lemon zest, curry leaves, salt and white pepper, together with some water and let it come to a boil. I have reduced the amount of salt, since I'm having it later with some curry. Drain the rice, put it in the rice cooker pot, pour the hot spice water into the rice cooker pot, cover and cook as usual. (For baking in the oven, please refer to the recipe below).


When the rice are done, melt some butter in a small saucepan, here I have added some curry leaves into the melting butter for some nice curry leaf fragrance since my curry leaf plant has lots of green lush leaves at the moment, better use them up! The original recipe does not call for these extra curry leaves, you may omit this step if you want to. When the butter has fully melted, swirl in one tablespoon of lemon juice, and pour this mixture onto the cooked rice, fluff them up with a fork and serve. Remember to remove the cinnamon stick and cloves before serving.


The lemon rice is really nice! It has a mild lemon flavour and just a hint of lemony taste which is just right. We had the lemon rice with some pork curry (so delicious!) and a vegetable dish. I have added some freshly grated lemon zest for more lemony fragrance just before serving, and for myself, some pickled lemon, which is really good eaten with the rice and curry. A satisfying meal!


IHCC Ottolenghi Leek
Badge resized


Please do stop by I Heart Cooking Clubs (IHCC) to view what my friends have made for the theme of this week, "A Little Bit of Sunshine", and if you are interested to join us, please find out more details from IHCC.


Lemon and Curry Leaf Rice
(source from here)
serves 4
5 short cinnamon sticks (10gm)
10 whole cloves
1 lemon, zest shaved, pith removed
2 stems fresh curry leaves - about 25 leaves (or 35 dried leaves)
salt and white pepper
400gm basmati rice, rinsed, soaked in water for 15 minutes and drained
60gm unsalted butter
1 tbsp lemon juice

Heat the oven to 180C/350F/gas mark 4. In a saucepan put the cinnamon, cloves, lemon zest, curry leaves, a teaspoon and a half of salt, half a teaspoon of pepper and 650ml of cold water, and place on a high heat. As soon as it comes to a boil, remove from the heat.

Put the rice in a roughly 24cmx30cm ovenproof dish or roasting tray, pour over the hot spice water and stir. Lay a piece of greaseproof paper over the surface and cover the dish with foil. Bake for 25 minutes, then remove and leave, still covered, to sit for 8 to 10 minutes.

Just before serving, melt the butter in a small saucepan. Once it has melted and is very hot, carefully add the lemon juice and swirl to mix. Pour this over the hot rice and fluff it up with a fork. Taste for seasoning, transfer to a serving bowl and serve at once (if you prefer, remove the curry leaves and cinnamon sticks).


Tuesday, June 11, 2013

Chapa Pulusu (Andhra-style Tamarind-and-Fish Curry)

Click on the link to submit your post to : Cook-Your-Books #1

******************

One of the books that I've bought from last BBW book sale, is this rather heavy, very thick book (608 pages), "Mastering The Art of Indian Cooking" by Sanjeev Kapoor. I have heard of this chef's name only in passing when I was browsing for Indian recipes from the internet and have never tried any of his recipes before. Since this book is rather cheap with more than 500 recipes, I figured that at least there would be some good recipes in it. And mind you, there's not a single photo in the book! The only photo is the chef himself at the back page of the book! I don't mind getting books with no photos, as long as the recipes are great, I'll even read the book from front to end!  If only I was this interested in my school books when I was younger, perhaps if I was enrolled in a culinary school, then it would be different!!!   Hahaha!


For this month's Little Thumbs Up event, where the theme is "Curry Powder or Paste", hosted by Everybody Eats Well in Flanders, got me searching for my first recipe from this book. I do have a personal challenge to try cooking or baking at least one recipe from all the twenty over books which I've bought from the book sale, and other books from my collection that I have never used before!


This is a mild fish curry, suitable for the whole family. This recipe uses the tomatoes and tamarind paste as the souring agents. When adding in the tamarind paste, try adding in 1/4 tsp at a time, until you get the sourness that you like. Here I have used only 1/2 teaspoon (Adabi brand tamarind paste),instead of the original 1 tablespoon as stated in the recipe, as sometimes tomatoes can get a little sour. For the fish, I have used black pomfret and cut it into halves. 

One of the interesting thing about this curry dish is, the fish is soaked in a mixture of water, turmeric powder, ginger paste, garlic paste, lemon juice and salt for 20 minutes. Maybe this is to get rid of any fishy smell. Drain the fish before cooking.


This fish curry dish turns out very nice. I can actually taste the fresh sweetness from the tomatoes and the fish is very fresh and tasty. There's no fishy smell. Get some really nice, really fresh fish for a good result, it makes a lot of difference to a good tasting curry. A thumbs up curry, very good eaten with plain white rice.

Thumbs Up for this first recipe and am looking forward to try out other recipes from this book. 


Little Thumbs Up


and ....

"Cook-Your-Books #1" hosted by me, Kitchen Flavours. Cook or bake any recipes from your cookbooks or magazines and link them up at "Cook-Your-Books", full details from here.

 photo 77951578-1914-4b72-8eda-9e40a91183ac_zps331eb4b4.jpg


Chapa Pulusu (Andhra-style Tamarind-and-Fish Curry)
(adapted from "Mastering The Art of Indian Cooking", Sanjeev Kapoor)
400gms pomfret, cut into 8 fillets
1 teaspoon ground turmeric
3-1/2 teaspoons fresh ginger paste
3-1/2 teaspoons fresh garlic paste
1 tablespoon freshly squeezed lemon juice
1-1/2 teaspoon table salt
2 tablespoons vegetable oil
1/2 teaspoon cumin seeds
1/2 teaspoon brown mustard seeds
1/4 teaspoon fenugreek seeds
10 fresh curry leaves
2 dried red chillies, stemmed and broken in half
1 large red onion, chopped
2 medium tomatoes, chopped
1-1/2 teaspoons red chile powder (used 2-1/2 teaspoons)
1/4 teaspoon ground roasted cumin (did not roast)
1/2 teaspoon ground coriander
1/4 cup tomato puree
1 tablespoon tamarind pulp (use on 1/2 tsp)

  1. Wash the fish slices under running water and drain them well in a colander.
  2. In a large bowl, combine 2 cups (400ml) water, the turmeric, 2 teaspoons of the ginger paste, 2 teaspoons of the garlic paste, the lemon juice, and 1/2 teaspoon of the salt. Add the fish and set aside for 20 minutes.
  3. Place a nonstick saute pan over medium heat and add the oil. When small bubbles appear at the bottom of the pan, add the cumin seeds, mustard seeds, fenugreek, curry leaves, and chiles, and saute for 30 seconds or until fragrant.
  4. Add the onion and saute for 4 minutes or until the onion is translucent. Add the remaining 1-1/2 teaspoon ginger paste and garlic paste, and saute for 1 minute.
  5. Add the chopped tomatoes and saute for 2 minutes. Add the remaining 1 teaspoon salt and stir. Add the chile powder, ground cumin, and coriander, and stir well. Add 3 cups (600ml) water and cook for 3 minutes or until the tomatoes are pulpy. Add the tomato puree and bring to a boil. Simmer for 10 minutes.
  6. Add the tamarind pulp and stir well. When it comes to a boil, cook, stirring occasionally, for 7 minutes or until the oil comes to the top.
  7. Drain the fish and gently slide the slices into the sauce. Lower the heat to low, cover, and cook for 10 minutes or until the fish is cooked through.
  8. Serve hot.
#52/100