Sunday, December 21, 2014

Roasted Chicken Legs with Potatoes

"December Potluck" the theme for this week at I Heart Cooking Clubs (IHCC). I've made one of Nigella Lawson's roasted duck legs recipe, but used chicken legs instead. And instead of thyme leaves, I've used fresh rosemary leaves from my garden pot. 


This is just a simple roast that do not require lots of ingredients, but the end result is just delicious. I've used chicken legs which I jointed. Using the technique from Diana Henry when I made one of her chicken recipes months ago, I rubbed the salt on the chicken skin to crisp up the skin during roasting. I've skipped the searing part on the stove. And I've used a mixture of chad potatoes and russet potatoes. Season with salt and pepper, scatter the rosemary and baked for about an hour until the chicken is cooked and the skin is golden brown and crispy. If duck legs is used, recipe instructs to roast it for about 2 hours.


Simple and yummy!


Roasted Duck Legs and Potatoes
(adapted from "Nigella Kitchen", Nigella Lawson)
2 duck legs (chicken legs)
2 baking potatoes or 1 pound other large white-skinned potatoes
few sprigs fresh thyme
salt and pepper

  1. Preheat the oven to 400F. On the stove, heat a small roasting pan (Nigella uses a slightly oversized tarte tatin pan) and sear the duck legs, skin-side down, over medium heat until the skin turns golden and gives out some oil.
  2. Turn the legs over, and take the pan off the heat while you cut the potatoes into 1-inch slices across, then cut each slice into 4. Arrange these potato pieces around the duck legs, then let a few sprigs of thyme fall over the duck and potatoes, and season with salt and pepper, before putting into the preheated oven.
  3. Cook for 2 hours, occasionally turning the potatoes, for optimal outcome, which is tender duck legs and crispy potatoes, though both will be ready to eat after 1-/2 hours.

(I've skipped the searing of the chicken legs, simply rubbed the skin with salt and roast as per recipe).


*************************************

I'm linking this post to I Heart Cooking Clubs (IHCC), theme for this week "December Potluck"


*************************


I would like to wish everyone

MERRY CHRISTMAS AND A BLESSED NEW YEAR!


(I am on a short blogging break, see you when I get back!)


Thursday, December 18, 2014

Stained Glass Biscotti : Bake-Along #72

My third biscotti for Bake-Along #72, Theme - Biscotti, where I'm baking along with Lena and Zoe and anyone is welcome to join us. I like eating biscotti, and I've enjoyed making the different varieties and flavours. There are just so many I've bookmarked to try, eventually I'll be trying out the other flavours, when my craving for biscotti starts creeping in again!


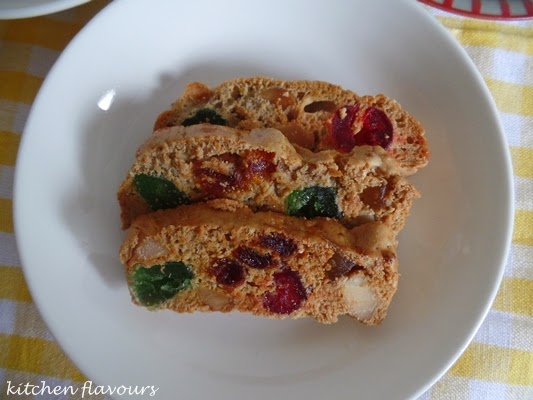
These biscotti are rather addicitive! There's red and green glace cherries, glazed ginger, macadamia nuts, wheat germ, dried apricots, and orange liqueur, which I've used Grand Marnier. (Recipe uses brandy and Brazil nuts). According to the magazine, "The bold colours give this 'gem-studded' biscotti a celebratory air, reminding one of a rich Christmas fruitcake. The dried candied fruits make this biscotti both crisp and chewy, but it's not as sweet as one would have expected." And I totally agree! Could not have described it any better!

Why is it called Stained Glass Biscotti ?

If it is sliced thin enough, especially when sliced thru the glazed cherries, it does look like stained glass! Only thing is, it is difficult to slice them really thin, so I only sliced a few pieces thinly, and the rest the usual thickness that I normally do for other biscotti. 


These biscotti are really addictive! And the author is right, it is not as sweet as one would have expected. In fact, the sweetness is just right, the glace cherries are really not sweet at all, and with the nutty macadamia nuts, and the wheat germ, each bite is chewy and crispy, from the candied fruits, wheat germ and nuts. I love the taste of the glace ginger!


I finished almost all of it on my own. I've made only half a recipe for one log, and it is makes quite a number of sliced biscotti. Find myself reaching for a few slices each night to snack on! Now that I've run out of biscotti, planning to make another flavour soon! :)


Stained Glass Biscotti
(adapted from ""Flavours" magazine, Nov-Dec 2010 issue)
200gm egg whites
1/2 teaspoon fine sea salt
150gm caster sugar
2 egg yolks
1/2 teaspoon vanilla extract
1 tablespoon brandy (I use orange liqueur, Grand Marnier)

Flour mixture :
300gm flour, sifted
2 teaspoons baking powder
25gm wheat germ
1 teaspoon all spice powder
80gm red glace cherries
80gm green glace cherries
100gm glace or crystallised ginger, quartered
100gm glace or dried apricot, quartered
200gm Brazil nuts, toasted (I use macadamia)

Whisk egg whites with salt until foamy. Gradually beat in sugar until glossy and stiff peaks form. Beat in egg yolks until combined. Stir in vanilla and brandy. Fold in flour mixture in three batches and mix to form a sticky dough.
Shape the dough into a log. (I damp my hands to shape the dough, as the dough was quite sticky). Place the shaped dough on a baking sheet lined with non-stick parchment paper. Brush the top with an egg white glaze for a glossy brown effect. Bake in a preheated oven at 160C for 20 to 25 minutes, or until the dough is dry and firm. Rotate the tray halfway to ensure even baking. Alternatively, the dough can be baked in non-stick moulds or loaf pans.
The logs have to be cooled before slicing. Slice 8 to 10m thick. 
Arrange the slices in a lined baking sheet or pan, in single layer. They can be packed tightly as the dough will not expand anymore. The second baking is done at 150C, for about 25 minutes, turning half way through baking, until the biscotti is dry and crisp.

********************************

Do stop by Lena of Frozen Wings and Zoe of Bake For Happy Kids, and all our friends who has baked along with us in the linky below :

For our next Bake-Along, we will be baking "Theme : Mille Feuille (Napoleon)". Please do join us, bake any Mille Feuille recipe, also known as Napoleon, and link your post to our linky which will start on 8th till 17h January. Everyone is welcome to join us! Only current post please.


Photobucket

A friendly reminder when linking to our blog hop :
1. Please mention Bake-Along event in your own post linking direct to any of the hosts' post (JoyceLena or Zoe)
2. Please link only new and current post, PLEASE FOLLOW THE BAKE OR THEME provided by us. Unrelated post will be deleted.
3. Feel free to display our Bake-Along badge in your post.


************************
 I'm linking this post to :
Cook & Celebrate Christmas 2014 hosted by Bake For Happy KidsEat Your Heart Out and Domestic Goddess Wannabe.


and 

Cook-Your-Books


Join our blog hop, click on the link to get the codes :
get the InLinkz code

Tuesday, December 16, 2014

Asian Pork Balls with Chilli Dipping Sauce

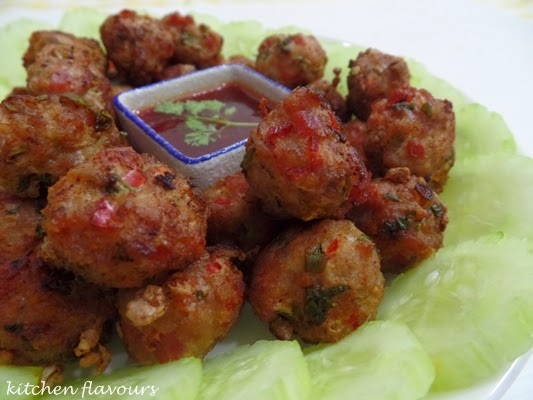
"Party Pleasers", theme for this week at I Heart Cooking Clubs (IHCC). There are so many recipes of Diana Henry's that are so fitting for a party. I've selected  Asian Pork Balls with Chilli Dipping Sauce. I love meatballs, especially when they are fried and dipped in chilli sauce with some cucumbers to munch on! I could eat a plateful! So, if meatballs are served at a party, you will definitely find them on my plate!

Diana Henry's recipe comes with chili sauce for dipping, but I've only made the meatballs and not the chilli sauce, since I'm really trying to use up all the leftover sauces in my refrigerator, and I already have about a quarter jar of chili dipping sauce, which I really wanted to clear. But if you prefer to make your own, I've included the recipe for the chilli dipping sauce in the recipe below.


The pork balls are really easy to put together. All ingredients are combined ; minced pork, chopped bacon, chopped coriander, chopped spring onions, crushed garlic and ginger, chopped red chilli, lime juice and zest, seasoned with salt and pepper. Once everything are combined, I test-fried one pork ball, ate it to check on the seasoning, and I immediately knew that my family would love this! It is delicious!

According to the recipe, when the mixture are formed into balls, it is advisable to refrigerate them for at least an hour, to firm them up otherwise they tend to fall apart when fried right after. I did not do this, but I did refrigerate the mixture in a covered bowl for about an hour or so, and form the balls just before frying, which seems to work out fine.


These pork balls are delicious. Moist, very tasty and fragrant from the fresh herbs and lime. We had this with rice for our weeknight dinner, and there's a request for these again. Yums!

This would indeed be great for a party, that is, if ALL of it make it to the party table! :)


Asian Pork Balls with Chilli Dipping Sauce
Serves 6
For the Chilli Sauce :
6 large red chillies, 3 deseeded and roughly chopped
5cm (2in) root ginger, peeled and roughly chopped
grated zest of 3 and juice of 2 limes
12 garlic cloves
1 large bunch of coriander, leaves only
300gm (10-1/2oz) caster sugar
50ml (2fl oz) Thai fish sauce
120ml (4fl oz) white wine vinegar

For the Pork Balls :
1 kg (2lb 4oz) minced pork
200gm (7oz) bacon, very finely chopped
4 garlic cloves, crushed
2cm (3/4in) fresh root ginger, peeled and grated
1 red chilli, deseeded and chopped
grated zest of 1 and juice of 1/2 lime
3 spring onions, finely chopped
10gm (1/4 oz) coriander, finely chopped
salt and pepper
groundnut oil, for frying
  1. First make the chilli sauce. Put the chillies, ginger, lime zest and juice, garlic and coriander leaves into a food processor and puree into a coarse puree. Put the sugar into a thick-bottomed pan with 6 tbsp water and place on medium heat until the sugar dissolves. Increase the heat slowly and gradually boil until the syrup becomes a caramel colour. Stir in the paste, fish sauce and vinegar and simmer for 2 minutes. Leave to cool.
  2. Mix everything for the pork balls (not the oil) together in a large bowl, combining all the ingredients with your hands to make sure they get well mixed. Season well. Pull off chunks and form into balls about the size of a walnut. It is better to chill these before cooking them, otherwise they tend to fall apart, so lay them on a baking sheet, cover with clingfilm and refrigerate for an hour or so.
  3. Heat about 1cm (1/2 in) oil in a frying pan and cook the pork balls in batches, colouring them all over. It takes about 4 minutes, but do check you are frying them long enough for the pork in the middle to be cooked
  4. Serve with the chilli sauce (or indeed a bought dipping sauce, such as Thai chilli or plum) and eat with plain boiled rice and stir-fried vegetables.


I'm linking this post with I Heart Cooking Clubs (IHCC), the theme for this week, "Party Pleasers"
grab button for I Heart Cooking Clubs


and 

Cook-Your-Books


Sunday, December 14, 2014

Savoury Biscotti : Bake-Along #72

I was searching for savoury biscotti recipes from the web, and to my surprise, found only a few recipes when I searched online. There are not many savoury biscotti recipes, and decided to try one from Giada de Laurentiis, which had some pretty good reviews. This is my second bake for our Bake-Along #72, Christmas Theme : Biscotti, which I'm baking together with Lena, Zoe and anyone who wishes to bake along with us.

A simple recipe, which uses Herbes de Provence and goat cheese which I've replaced with cream cheese as goat cheese is not easily available in my area. The dough was really easy to work with, a little sticky, but with lightly wet hands as advised by Giada, shaping the dough is a breeze.

As usual, after the logs are baked, let it cool a little, then slice to pieces, place the slices on a baking sheet and bake until golden brown and crisp.


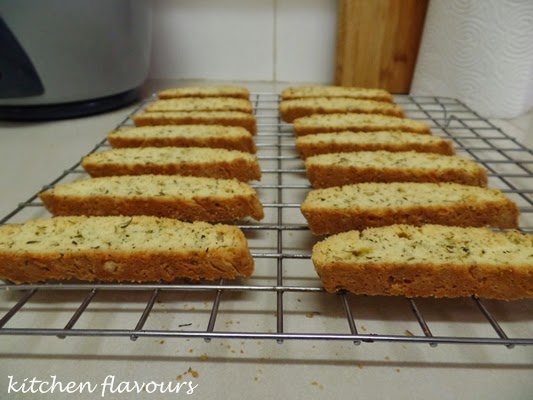
The baked biscotti cooling off on the rack. I've baked them a little longer for crispier bite.


These are very good! The Herbes de Provence is really fragrant. But the next time, I would reduce the sugar slightly. Even though the recipe uses only 3 tablespoons, I can taste the  sweetness from the sugar, which rather surprised me, as I was expecting a salty biscotti.


We had the Savoury Biscotti with some canned mushroom soup.


Dip the biscotti in the hot soup, or if you prefer....


.... simply break them into chunks and soak them in the hot soup. Either way, yummy!

Think of all the different herbs that can be used, the next time I would love to try with dried oregano or dried parsley or even dried rosemay, and reduce the sugar for a savoury taste. Would be lovely with any hot soups (tomato soup would be good!) or stews! Perfect to dip into any leftover Christmas stews or soups!


Savoury Biscotti
(source from : foodnetwork.com , Giada de Laurentiss)
Ingredients
2 cups all-purpose flour
3 tablespoons herbes de Provence
1-1/2 teaspoons baking powder
3/4 teaspoon fine sea salt (I used a pinch of salt, as the butter was salted)
1/2 cup (1 stick) unsalted butter at room temperature
1/4 cup (2 ounces) goat cheese, at room temperature (I replaced with cream cheese)
3 tablespoons sugar
2 eggs, beaten, at room temperature

Place an oven rack in the center of the oven. Preheat the oven to 350F. Line a baking sheet with parchment paper. Set aside.
In a medium bowl, whisk together the flour, herbes de Provence, baking powder and salt. Set aside.
In a stand mixer fitted with a paddle attachment, beat the butter and goat cheese together until smooth. Beat in the sugar and eggs. In batches, add the flour mixture and beat until just combined. Transfer the dough to the prepared baking sheet. With damp hands, form the dough into a 13-inch-long, 3-1/2-inch-wide loaf. Bake until light golden, about 30 minutes. Cool on the baking sheet for 30 minutes.
Transfer the loaf to a cutting board. Using a serrated knife, cut the log on the diagonal into 1/2-inch thick slices. Arrange the biscotti cut side down on the baking sheet. Bake until pale golden, about 15 minutes. Transfer the biscotti to a wire rack and cool completely, about 30 minutes.


********************************

Do stop by Lena of Frozen Wings and Zoe of Bake For Happy Kids, and all our friends who has baked along with us in the linky below :

For our next Bake-Along, we will be baking "Theme : Mille Feuille (Napoleon)". Please do join us, bake any Mille Feuille recipe, also known as Napoleon, and link your post to our linky which will start on 8th till 17h January. Everyone is welcome to join us! Only current post please.


Photobucket

A friendly reminder when linking to our blog hop :
1. Please mention Bake-Along event in your own post linking direct to any of the hosts' post (JoyceLena or Zoe)
2. Please link only new and current post, PLEASE FOLLOW THE BAKE OR THEME provided by us. Unrelated post will be deleted.
3. Feel free to display our Bake-Along badge in your post.


************************
 I'm linking this post to :
Cook & Celebrate Christmas 2014 hosted by Bake For Happy KidsEat Your Heart Out and Domestic Goddess Wannabe.


To join our blog hop, click on the link to get the codes :
get the InLinkz code


Thursday, December 11, 2014

Chocolate Cappuccino Biscotti : Bake-Along #72

It's time for our bake #72 at Bake-Along, and our theme is "Christmas Theme : Biscotti". Even though biscotti can be baked anytime of the year, it is best shared during Christmas, and a box of homemade crispy biscotti makes a lovely gift for this festive season.

Do join us ; Lena, Zoe and myself, bake any biscotti recipe and link your post in the linky below.

My first biscotti post for this theme, Chocolate Cappuccino Biscotti. I have made several other biscotti and will post them soon.


Biscotti are traditional Italian cookie, perfect for dunking in coffee, espresso or even milk, if you prefer! These cookies are baked twice,  very crispy, and can keep for weeks in an air-tight container. Should they become softened, they can be toasted in the oven until crispy.

To make biscotti, firstly, make the dough by using the required ingredients, shape them into long, slightly flattened logs, bake for about 20 minutes until slightly brown and set. Cool for about 15 minutes, and cut into 1/2 inch slices at a diagonal. Place the sliced pieces on a baking sheet, and bake as per instructions in the recipe, until light brown and crisp. 


This Chocolate Cappuccino Biscotti is so crispy, delicious and perfect with a cup of hot coffee. The recipe uses instant espresso coffee powder and coffee liqueur, which I've used Kahlua. It smells incredibly good while these are baking. I did reduce the sugar by half and it was still a little sweet for me, but lovely when dipped in strong black coffee. I like my biscotti to be really crispy, so I have baked them a little longer than the recipe calls for, until they were really brown all around the edges. When my last piece was gone a few days later, I was wishing there was more for my morning cuppa! Yum!


** my changes listed in blue
Chocolate Cappuccino Biscotti
(adapted from "Bake Something Great", Jill Snider)
  • Preheat oven to 375F (190C)
  • Cookie sheet, greased or lined with parchment paper
2-1/2 cups all-purpose flour
1-1/2 tsp baking powder
1/4 tsp salt (omitted, use salted butter)
2 tbsp instant espresso coffee powder
1 tsp ground cinnamon
1/2 cup butter, softened (125gm)
1 cup granulated sugar (1/2 cup)
2 eggs
2 tbsp coffee liqueur (Kahlua)
3 squares (1oz/28gm each) semisweet chocolate, finely chopped (100gm choc chips)

Glaze
1 egg, lightly beaten
2 tbsp turbinado sugar (demerara sugar)

  1. On a sheet of waxed paper or in a bowl, combine flour, baking powder, salt, espresso powder and cinnamon. Set aside.
  2. In a large bowl, using an electric mixer on medium speed, beat butter and granulated sugar until light and creamy, about 3 minutes. Add eggs, one at a time, beating well after each addition. Add liqueur. On low speed, gradually add flour mixture, beating until dough becomes too stiff for the mixer, then finish mixing with a wooden spoon until smooth. Stir in chopped chocolate. Using your hands, knead to form a smooth dough.
  3. Divide dough into halves. Shape each into a roll 12 inches (30cm) long. Place about 4 inches (10cm) apart on prepared cookie sheet. Flatten rolls to 2 inches (5cm) wide, leaving top slightly rounded.
  4. Glaze : Brush top of rolls with beaten egg. Sprinkle turbinado sugar evenly over top. Bake in preheated oven for 20 minutes or until set and lightly browned around edges. Cool for 15 minutes on sheet, then trransfer to a cutting board. Cut into 1/2-inch (1cm) slices. Stand upright on cookie sheet. Bake for 10 to 15 minutes or until crisp and golden. Cool for 5 minutes on sheet, then transfer to a rack and cool completely.

**************************

Do stop by Lena of Frozen Wings and Zoe of Bake For Happy Kids, and all our friends who has baked along with us in the linky below :

For our next Bake-Along, we will be baking "Theme : Mille Feuille (Napoleon)". Please do join us, bake any Mille Feuille recipe, also known as Napoleon, and link your post to our linky which will start on 8th till 17h January. Everyone is welcome to join us! Only current post please.


Photobucket

A friendly reminder when linking to our blog hop :
1. Please mention Bake-Along event in your own post linking direct to any of the hosts' post (JoyceLena or Zoe)
2. Please link only new and current post, PLEASE FOLLOW THE BAKE OR THEME provided by us. Unrelated post will be deleted.
3. Feel free to display our Bake-Along badge in your post.


************************
 I'm linking this post to :
Cook & Celebrate Christmas 2014 hosted by Bake For Happy KidsEat Your Heart Out and Domestic Goddess Wannabe.


To join our blog hop, click on the link to get the codes :
get the InLinkz code

Tuesday, December 9, 2014

The Rugelach That Won Over France : TWD

It's the third bake at Tuesdays With Dorie (TWD), from Baking Chez Moi (BCM) cookbook by Dorie Greenspan. With the festive Christmas just round the corner, The Rugelach That Won Over France is the popular choice selected by BCM's bakers. That's a rather long name for a rugelach. But then I can understand why it is named as such. According to Dorie, one year, while she and her husband was on a flight, her husband offered some of these rugelach to the French flight crew, and they were treated like loyalties for the next seven hours! Obviously these rugelach has certainly won over the hearts of the crew! Well, if you've tried one of these, you would too! These were so yummy!


The Rugelach That Won Over France

These were the best looking of the lot, out of the batch that I've made. To view "distorted" ones, scroll down below! (big grin!).

The dough was pretty difficult to handle, but I've expected that, as I've made the Rugelach recipe from Dorie's other book, Baking From My Home To Yours, here. I've reduced the amount of butter and cheese, but the dough was still sticky. In our hot and humid weather, it is always a challenge when handling pastry such as this! 


The flour, cream cheese and butter is mixed in the food processor, just until large curds form. Turn the dough out onto a work surface, shape into a ball, divide it in half, wrap in cling wrap and chill for at least 2 hours. Roll the dough into a thin 12" square, divide into half. Mine was definitely not a straight square, I rolled it between two sheets of plastic. The dough was soft, sticky and I got to refrigerate it until it was firm, about 20-30 minutes. 

The filling is made up of sweetened shredded coconut, pecans, semisweet chocolate (I've used chocolate chips), and raisins.

Remove the dough from the refrigerator, brush some melted butter over it, sprinkle with a mixture of cinnamon-sugar, place the filling on one half with borders all around, roll it up snugly. I have problem with rolling them up snugly. With our hot and humid weather, the dough has turned soft, sticky and difficult to roll. Did the best I can and wrapped the logs individually in plastic wrap, keep in freezer for at least an hour. 
I actually left them in the freezer overnight. The next morning, took them out , brush one log with some beaten egg and attempted to slice them, according to Dorie, "slice and bake directly from the freezer." It does not work, at least mine did not, the dough breaks into little crumbles. So I left it resting on the kitchen counter for about 10 minutes, when it has soften a little. Sliced them with a serrated knife, and the dough was too fragile, and breaks easily. I did not want to refrigerate them again, so I just carry on with the slicing,and I did not bother brushing the top of the other 3 logs with egg wash because the stickiness got worse with the first one when I applied the egg wash. 
Bake the slices until the rugelach are golden brown. 


There, my "distorted" rugelach! LOL! I've got to bake them these rugelach longer than the recipe states, takes about 22 minutes, till they are brown. 


These are the best-looking ones! Despite how they look, these are really yummy! The whole lot was gone on the next day, even the crumbs! I would probably attempt these again when I am up for a challenge.


To view the other bakers' take on these yummy cookies, stop by TWD.


and I'm sharing this post with 

Cook-Your-Books

Monday, December 8, 2014

Chiang Mai Chicken Noodle

"December Mystery Box Madness Challenge", the theme for this week at I Heart Cooking Clubs (IHCC). We must make a dish that contains at least 3 of the ingredients listed in this month's Mystery Box ; chocolate, cherries, cinnamon, rolled oats, couscous, pomegranate, curry (powder/paste), coconut milk, lentils, and hot peppers/chilli, from any of our previous or current featured chefs' recipes.

I've decided to cook one of Diana Henry's Asian style noodle recipe, taken from her cookbook, "Food From Plenty".

Chiang Mai Chicken Noodle


Used these three ingredients, from the Mystery Box ; Red curry paste, Coconut Milk, and Chilli

This is a simple and easy noodle dish. The great thing about this cookbook is, there are loads of recipes which uses leftover roasts or meats and even veggies, so that nothing goes to waste. In this recipe, she uses leftover cooked chicken. I do not have any leftover cooked chicken, but I've used half a chicken breast meat cooked with some homemade chicken stock. Firstly I made some quick simple chicken stock by simmering two chicken carcass with some carrots and onion for about an hour. I then added into the stock, half a piece of chicken breast meat, letting it cook in the stock for about 20 minutes. Remove the chicken breast meat, let it cool a little and cut into bite size chunks. Strain the stock and use it for the recipe.

Once the stock is done, the cooking of the curry soup comes together rather quickly. The sliced onion are sauteed in a little oil until golden, then the sliced garlic are added in, to which I've added 2 stalks of lemon grass, the white part which I've bruised lightly and fry with the garlic until aromatic. Add in the ground turmeric and red curry paste, fry for a few minutes until fragrant, then the coconut milk and stock are added in, bring to a simmer for about 15 minutes. Add in the cooked chicken and fish sauce to taste. Cook noodle as per packet instructions, divide noodles in bowls and ladle hot curry soup over, garnish with chopped coriander, chopped spring onions and finely sliced red chilli. Serve hot with a wedge of lime.


My notes/changes : In the recipe, the amount of stock used is only 200ml, together with 400ml of coconut milk, to me, it is not enough to serve four bowls of noodles. I have used about slightly more than a litre of chicken stock and 300ml of coconut milk. Which is enough for 4 bowls of noodles. We love more soup or gravy for curry noodles! Also I have added in 2 stalks of lemongrass and have omitted the sugar. For the red curry paste, I've used about 4-5 tablespoons, to taste,  since I've used more stock. I did not add the lime juice to the curry soup, preferring to serve the noodles with the limes for individual serving. I've used calamansi limes from my garden pot and they were very large and juicy! I've added some fish balls to which I've added into the curry stock together with the chicken breast chunks, simply because my both my son and daughter love fish balls in soupy noodles.

We certainly enjoyed this bowl of noodles. Rather a mild curry noodle, but tastes really nice. Thumbs up from my son and daughter, and one that I would cook again.


Chiang Mai Chicken Noodle
(adapted from "Food From Plenty", Diana Henry)
Serves 4
For the Noodles :
groundnut oil
1 onion, sliced into crescent moon shapes, or 6 shallots, sliced
4 garlic cloves, sliced
2 stalks lemongrass, white part, bruised (my addition)
1 tsp ground turmeric
2 tbsp red Thai curry paste (I've used about 4-5 tablespoons)
400ml can coconut milk
200ml (7fl oz) chicken stock (I've used about slightly more than 1 litre of homemade stock)
350gm (12 oz) leftover cooked chicken, in chunks
1/2 tsp soft light brown sugar, or to taste (did not use)
2 tsp fish sauce, or to taste
juice of 1/2 lime,  or to taste
400gm (14oz) egg noodles

To serve :
2 spring onions, chopped on the diagonal
1 red chilli, halved, deseeded and shredded
2 tbsp chopped coriander
wedges of lime

Put 1 tbsp of the oil into a saucepan and saute the onion or shallots until golden. Add the garlic (and lemongrass, if using) and cook for 2 minutes, then add the turmeric and curry paste. Stir for 1 minute until the spices become fragrant. Add the coconut milk and stock and bring to a simmer. Cook for 15 minutes. Add the chicken and heat through thoroughly. Season with the sugar and fish sauce and adjust it to your taste; you may want lime or more sugar.

Cook the noodles according to the packet instructions. Divide them between four bowls, spoon over the chicken curry and sprinkle over the spring onions, chilli and coriander. Offer wedges of lime to serve.

****************************** 

I'm linking this post with I Heart Cooking Clubs (IHCC), theme for this week "Mystery Box Madness"
Monthly Mystery Box Madness Challenge!


and 

Cook-Your-Books

Sunday, December 7, 2014

Cook-Your-Books #19

Cook-Your-Books is all about cooking or baking from your many cookbooks or magazines that you have collected over the years. If you love collecting cookbooks, read them like novels and love trying out new recipes, then this is the perfect place to share. It's time to get those books (or magazines) out of the shelves, and start using them. Bake or cook anything from any of your books or magazines, and link your posts to Cook-Your-Books here at Kitchen Flavours. The linky will start on the 7th of every month right up to the end of the month. The three most viewed submissions will be featured at the next Cook-Your-Books.


 photo 77951578-1914-4b72-8eda-9e40a91183ac_zps331eb4b4.jpg


Featured posts for this month
The three most viewed posts from Cook-Your-Books #18


Butter Loaf Bread
by my little favourite DIY


Maple Pecan Bundt Cake
by Peng's Kitchen


Thank you everyone for sharing all the delicious dishes and bakes from your cookbooks!

It's now time to link-up!

A little note when submitting your post to Cook-Your-Books
  1. Linky for submissions will start on the 7th of every month right up to the end of the month. The submission with the most views will be featured at the next Cook-Your-Books.
  2. All submissions must be new and current posts, within the current month. Old posts will be deleted. Please link directly to your post, not your homepage.
  3. Please mention from which book or magazine you are cooking or baking from, as this is a cooking/baking event using recipes from cookbooks and magazines.
  4. Please mention Cook-Your-Books in your post and link it back to Kitchen FlavoursYou may display Cook-Your-Books badge anywhere in your post.
  5. Please leave a comment after you have linked.
  6. It would be great if you could visit at least one link, everyone loves visitors.


Link-up with Cook-Your-Books #19 from 
7th - 31st December 2014


Friday, December 5, 2014

French Lemon-Poppy Pound Cake

I was thinking of lemon poppy seed cake for the last two weeks! Haha! Not just any lemon-poppy seed cake, but this cake, French Lemon-Poppy Pound Cake from "Flour" cookbook. I finally made the cake last week, so I can stop thinking about it, for now! :) Why THIS cake? Because I made it the first time a couple of months ago, and really liked it. And I am so craving for it again, with a warm cup of my favourite tea!

This cake uses a different method of mixing the batter, instead of the usual way of making pound cakes. Firstly, eggs and sugar are whipped together until really light and fluffy and gently fold in the flour. In another bowl, whisk melted butter, cream, lemon zest and juice, and poppy seeds together to combine. These are then quickly and gently mix into the mixture. 
I have reduced the sugar to 180gm (from original 250gm), and the reduced sugar works out fine, the sweetness was just right. Recipe mentioned that to bake the cake at a preheated oven at 350F, about 1 hour and 1 hour 10 minutes. However I have checked the cake at 50 minutes of baking time, and the cake was already done. Take note of the baking time depending on your oven.

There's a lemon glaze to drizzle over the warm cake, but I have omitted that. I like eating pound cakes without any glazes. 


The cake has a tight, light dense but soft, moist crumbs. Taste really good! Lemony and buttery cake, with the nutty, cracking bite from the poppy seeds. I really enjoyed this cake, so perfect with a cup of warm tea. Fearing that I'll eat most of it (like the first time when I made it!), I packed some slices for hubby to bring to work. Thumbs up from his colleagues and they are expecting more slices the next time round. OK. Got it! Will bake a whole cake for them soon!

If you are hosting a Christmas party, this cake would be lovely to serve, cut into small slices. Or if you are invited to one, it would make a lovely gift. Make the lemony glaze to drizzle over the cake for a more festive treat! Enjoy!


French Lemon-Poppy Pound Cake
(adapted from "Flour", Joanne Chang)
2 cups (240gm) cake flour
3/4 teaspoon baking powder
1/2 kosher kosher salt
1/2 cup plus 3 tablespoons (1-3/8 sticks/156gms) unsalted butter, melted and cooled to slightly warm
1/4 cup (60 gms) heavy cream, at room temperature
3 tablespoons finely grated lemon zest (about 2 lemons)
1 tablespoon fresh lemon juice (about 1/2 lemon)
3 tablespoons poppy seeds
4 eggs
1-1/4 cups (250gms) granulated sugar (I use 180gm)

Lemon Glaze
1/2 cup (70 gms) confectioners' sugar
1 to 2 tablespoons fresh lemon juice (1/2 to 1 lemon)
  1. Position a rack in the center of the oven, and heat the oven to 350 degrees F. Butter and flour a 9-by-5-inch loaf pan, or line the bottom and sides of the pan with parchment paper.
  2. In a medium bowl, sift together the flour, baking powder, and salt. Set aside.
  3. In a large bowl, whisk together the butter, cream, lemon zest, lemon juice, and poppy seeds. The mixture should have the consistency of a thick liquid. If the butter hardens into little lumps, heat the mixture gently until the butter melts again. Set aside.
  4. Using a stand mixer fitted with the whip attachment (or a hand-held mixer), beat together the eggs and granulated sugar on medium speed for 4 to 5 minutes, or until light and fluffy and lemon coloured. (If you use a handheld mixer, this same step will take 8 to 10 minutes).
  5. Using a rubber spatula, gently fold the flour mixture into the egg mixture just until combined. Fold about one-fourth of the egg-flour mixture into the butter-cream mixture to lighten it. Then fold in the remaining egg-flour mixture just until thoroughly combined. Pour the batter into the prepared pan.
  6. Bake for 1 hour to 1 hour and 10 minutes, or until the top of the cake is golden brown and springs back when you press it in the middle. Let cool in the pan on a wire rack for at least 30 minutes.
  7. To make the lemon glaze : While the cake is cooling, in a small bowl, whisk together the confectioners' sugar and enough of the lemon juice to make an easily spreadable, smooth glaze.
  8. When the cake has cooled for at least 30 minutes, pop it out of the pan and place it on the rack. Spread or spoon the glaze over the top of the still-warm cake, letting the glaze dribble down the sides.
  9. The cake can be stored tightly wrapped in plastic wrap at room temperature for up to 3 days.


************************
 I'm linking this post to :
Cook & Celebrate Christmas 2014 hosted by Bake For Happy KidsEat Your Heart Out and Domestic Goddess Wannabe.


and
I'm sharing this post with :
Cook-Your-Books


Wednesday, December 3, 2014

Rosemary Cheese Crisps

These are delightful savoury crackers, great for snacking. There's two types of cheeses used, Cheddar and Parmesan, and chopped fresh rosemary, one of my favourite herb! I have two pots of rosemary plants growing in my little potted garden, and I can smell their lovely scent each time I water the plants, or simply touch them with my fingers, love doing that! 


I've used salted butter and have omitted the salt, taking into consideration that the cheeses are already salty. The dough has to be refrigerated for at least two hours to firm up before rolling and cutting into shapes. Sprinkle some finely grated Parmesan cheese over each cracker before baking. I don't have to tell you how the kitchen smells while these are baking, so cheesy nice!


Crispy, salty and cheesy with the fragrance of rosemary. They are perfect for snacking, and especially nice with a cup of warm tea.


I have baked them a few minutes longer for crispier bite!


Rosemary Cheese Crisps
(adapted from "The Good Cookie", Tish Boyle)
1-1/2 cups all-purpose flour
1/2 cup grated white Cheddar cheese
1/4 cup plus 2 tablespoons finely grated Parmesan cheese, divided
2 teaspoons finely chopped fresh rosemary
1 teaspoon salt (omit salt, used salted butter)
1/8 teaspoon freshly ground black pepper
9 tablespoons cold unsalted butter, cut into 1/4-inch pieces (use salted butter)
1/4 cup sour cream
2 teaspoons extra-virgin olive oil
1 large egg yolk

special equipment :
1-3/4 inch scalloped round cookie cutter
  1. Place the flour, Cheddar cheese, 2 tablespoons of the Parmesan cheese, the rosemary, salt, and pepper in the bowl of a food processor and pulse until combined. Scatter the butter pieces over the flour mixture and pulse until the mixture resembles coarse meal. Add the sour cream, olive oil, and egg yolk and pulse just until blended. Turn the dough out onto a work surface and shape it into a disk. Wrap the disk in plastic wrap and refrigerate for at least 2 hours until firm (or up to 2 days).
  2. Position a rack in the center of the oven and preheat the oven to 375F.
  3. Place the chilled dough on a lightly floured work surface and, using a rolling pin, roll it out to a thickness of 1/8 inch, sprinkling it with flour as necessary to prevent sticking. Using a 1-3/4-inch scalloped round cookie cutter, cut out as many rounds as possible from the dough and arrange them 1/2 inch apart on ungreased baking sheets. Reroll the scraps and cut out more crackers until all the dough is used. Sprinkle a small amount of the remaining 1/4 cup Parmesan cheese on top of each cracker.
  4. Bake the crackers, one sheet at a time, for 13 to 16 minutes, until light golden brown. Transfer the crackers to a wire rack and cool completely.

************************
I'm linking this post to :
Cook & Celebrate Christmas 2014 hosted by Bake For Happy KidsEat Your Heart Out and Domestic Goddess Wannabe.


and
I'm sharing this post with :
Cook-Your-Books


and 4th Dec is National Cookie Day! Thanks to Louise for this info! I'm linking this post to "Cookbook Wednesday @ Months of Edible Celebrations" which I'm sharing this book "The Good Cookie" by Tish Boyle for this week.


    Product Details