Friday, December 23, 2016

Gingerbread

This month at The Cake Slice Bakers, the four selected recipes from the book which we are currently baking from, World Class Cakes by Roger Pizey, are :

Coffee and Walnut Cake
Paul A. Young's Torta Gianduja
Caribbean Coconut Cake with Rum
Gingerbread

Members can choose any one of these recipes to bake. My choice is Gingerbread.


This is a simple and easy bake. I've made half a recipe, bake in a 8-1/2x4-1/2 inch loaf pan. The only changes I made was to use Lyle's Golden Syrup instead of dark corn syrup, and brown sugar instead of superfine sugar, as indicated in the recipe. 

From the photo in the book, the cake is beautifully decorated with a lace pattern using royal icing. Of course, the frosting can be spread over the cake instead, but I've decided to omit the frosting.


The gingerbread turns out moist, soft and tender, though the colour is not as dark as other gingerbread. And the taste of the ginger is rather mild. I was thinking that some chopped crystallized ginger mixed into the batter would be nice.


Overall this is a nice moist, soft cake. Great with a cup of warm tea.


Sunday, December 18, 2016

Cranberry-Almond-Chocolate Clusters

This week at I Heart Cooking Clubs (IHCC), it is December's Monthly Featured Dish/Ingredient Challenge : Sweet Treats!.  I've made Ellie Krieger's sweet treat, Cranberry-Almond-Chocolate Clusters. Easy, simple and delightful. 


These chocolaty nutty sweet treat needs no baking at all. Simply toast the almonds and coarsely chop. Place in a bowl and mix with dried cranberries. Ellie's recipe uses dried cherries, but they are not available and even if I can find them, they are very costly. Dark chocolate is then melted, then mix the almond-cranberry into the melted chocolate, mix till well combine. Scoop heaping tablespoonfuls of the chocolaty mixture and place on baking sheet lined with parchment paper. Refrigerate for about 20 minutes until set. 


These are delightful to eat! 


Place each cluster on cupcake liners, would make a pretty plate on your dessert or snack table for the festive season. If I were to serve to guests, I would make them a little smaller, maybe a heaping teaspoon instead. These little sweet treats are a definite repeat!


Cherry-Almond-Chocolate Clusters
(So Easy by Ellie Krieger)
1 cup whole roasted almonds, coarsely chopped
1/2 cup dried cherries, coarsely chopped
6 ounces dark or bittersweet chocolate (60% to 70% cocoa solids), finely chopped

In a medium bowl, toss together the almonds and cherries. Line a baking sheet with wax paper.
Melt half of the chocolate in the top of a double boiler over slightly simmering water, over the lowest possible heat, stirring frequently, make sure the water is not touching the top pan. Remove the double boiler from the heat, and stir in the rest of the chocolate until melted. Remove the top pan with the chocolate in it, gently wipe the bottom of it, and set it aside for a moment. Replace the simmering water in the bottom pan with warm tap water. Put the pan of melted chocolate on top of the warm water. This will keep the chocolate at the right temperature while you make the clusters. 
(My note : I melted the chocolate in the microwave oven, and skip the step on placing the bowl of melted chocolate over a pan of warm water).
Stir in the fruit/nut mixture into the chocolate. Spoon out heaping tablepsoon-size clusters of the chocolate mixture onto the baking sheet about 1 inch apart. Put them in the refrigerator to cool and set for about 20 minutes. Store and serve at room temperature.


I'm linking this post with I Heart Cooking Clubs, theme for this week
Sweet Treats!

Friday, December 16, 2016

Onion Tart

Cook The Book Fridays, a group of lovely foodie bloggers are cooking their way through David Lebovitz's cookbook, My Paris Kitchen. The selected recipe for this week is Onion Tart (Pissaladiere).

I've only made Pissaladiere once before. And remember that my kids were asking where is the cheese! My kids' idea that as long as it is some kind of pizza, or looks like it, it must have their favourite ingredient, Mozzarella cheese, and lots of it, the more the better! So this time, when I make David Lebovitz's Pissaladiere, I reminded them that I am making Pissaladiere, and traditionally it is made with NO cheese!

The caramelized onions took about 50 minutes to cook till dark golden brown. A few whole sprigs of thyme are cooked together with the onions. Remove the thyme sprigs before assembling the pissaladiere. 

I've made only two thirds of the recipe, to fit the size of the baking sheet I had. The dough was easy to handle. Pull and spread the dough to fill the base of the baking sheet. Spread the caramelized onions on the dough and arrange some olives and anchovies on the onions.


The pissaladiere is baked for about 20 minutes, though I baked mine for 25 minutes, until the crust is lightly browned. 


Delicious especially when eaten warm.


According to David, Pissaladiere should be crisp and very thin, not thick and bready. This is thin and crisp, and very delicious! Especially good eaten while still warm. My favourite part are the sides where you get to bite into the crispy edges and the crispy bottom of the crust. The caramelized onions are delicious and sweet,  match perfectly with the salty anchovies. 

This is a delicious onion tart. I love the crust, it would make a fabulous pizza base, and would be great with other pizza toppings, and of course, with lots of cheese too! 

Stop by Cook the Book Fridays to see what everyone thought about this Onion Tart.

Wednesday, December 14, 2016

Spiced Honey Cake

This month at Tuesdays With Dorie (TWD) : Baking Chez Moi, the selected recipes are Spiced Honey Cake and Chocolate Truffles. I've made Spiced Honey Cake for this week. 


This cake is made with honey and a spice infusion. To make the spice infusion, in a small saucepan, add a fat strip of orange zest, water, lavender, Sichuan peppercorns and ginger. Bring to a boil, remove from heat, keep covered and leave to infuse for at least 1 hour. Strain the spiced water and discard the solids before use.

I have replaced the dried cherries with dried cranberries, as dried cherries are not easy to find and they are very costly. Also I have reduced the sugar slightly. The batter for the cake is very thick. This cake is baked at a low temperature of 300F for 75 minutes. The cake will need a rest after it cools, a day or two (or three or four) days later. I doubled wrapped the cake with plastic and only slice into it on the third day.


Cake has a dense close crumbs, not exactly dry but not moist as most cakes are. I can taste the light sweetness of the honey, the orange and a hint of the spices and the lavender. I was surprised to find that the taste of the spices is not strong at all. But it's there, with a light mild taste to it. The sliced almonds makes a nice topping.


This cake is quite tasty, but we are not used to eating dense, not so moist cakes like this, which is like eating a bread, yet not quite a bread! Somewhere in between a cake and a bread. Though I did enjoy a few slices with a mug of warm tea, it is quite nice actually, but the family does not like it. I enjoy the taste, but not so much on the texture of the cake. I have been eating it alone, and have toasted a few slices for my morning breakfast. Looks like I would not be making this cake again. 

Drop by TWD to see what the other bakers thought of this bake.

Monday, December 12, 2016

Soy Sauced Potatoes

A simple potato dish, yet quite tasty, and especially good, as a side dish to eat with rice along with some meat dishes and vegetables, perhaps a bowl of soup. This dish is called gamja jorim in Korean and it is from the cookbook which I have used at Cookbook Countdown #11, last month. According to the author, this dish can be spicy if you use Korean chiles or jalapenos with a lot of heat, and for milder heat, use red or green bell pepper. 


I have used jalapenos for this dish. This recipe uses 2 tablespoons of sugar, but I do not like sweet dishes, so I have used only 1/2 teaspoon.


The family enjoys this dish very much. It is very tasty and one that I would cook again.


Soy Sauced Potatoes
(Seoul Food Korean Cookbook by Naomi Imatome-Yun)
2 tablespoons vegetable oil
1-1/4 pounds potatoes, peeled and cut into thin slices or small cubes
1 tablespoon toasted sesame oil
2 tablespoons sugar (1/2 tsp)
1/4 cup soy sauce
1 tablespoon minced garlic
5 tablespoons water
1/2 teaspoon freshly ground black pepper
5 small green Korean chiles, seeded and cut into 1-inch pieces
pinch of toasted sesame seeds, for garnish (optional)

  1. Heat the vegetable oil in a large skillet over medium heat.
  2. Add the potatoes and stir-fry for 2 to 3 minutes
  3. Add the sesame oil, sugar, soy sauce, garlic, water, and pepper and reduce the heat to low. Cover and simmer for 3 to 4 minutes.
  4. Add the chiles and cook for 2 to 3 more minutes, until the potatoes are cooked through.
  5. To serve, add the sesame seeds and toss to mix (if using).

********************************

I'm linking this post with Cookbook Countdown #12 hosted by 


Sunday, December 11, 2016

Millet Muffins

This week at I Heart Cooking Clubs (IHCC), it is "Expand Your Pantry!" theme. I've made Heidi Swanson's, Millet Muffins. Millet is a new ingredient in my kitchen, I have never cooked with it before, so I thought that using it in a muffin recipe would be a good start. 


I've made half a recipe and yield only 5 muffins. I've used all-purpose flour instead of pastry flour. There's no sugar used in these muffins, sweetened by honey instead. There's lemon zest, lemon juice, yoghurt and barely melted butter. 


These Millet Muffins bakes up really nice with wonderful rise and golden top.


Lovely muffins. The crumbs are tender and soft. Not too sweet, with just the right sweetness from the honey, and crunch from the millet with a hint of the citrusy lemon. These are great with a cup of warm unsweetened tea. 


Millet Muffins
(Super Natural Everyday, Heidi Swanson or here)
2-11/4 cups (40gm) whole-wheat pastry flour
1/3 cup (60 gm) raw millet
1 teaspoon aluminium free baking powder
1 teaspoon baking soda
1/2 teaspoon fine-grain sea salt
1 cup (225gm) plain yoghurt
2 large eggs, lighty beaten
1/2 cup (120ml) barely melted unsalted butter
1/2 cup (120ml) honey
grated zest and 2 tablespoons juice from one lemon

Preheat the oven to 400F/2015C with a rack in the top third of the oven. Butter a standard 12-cup muffin pan or line with paper liners.
Whisk together the flour, millet, baking powder, baking soda and salt in a large bowl. In another bowl, whisk together the yoghurt, eggs, butter, honey, and lemon zest and juice until smooth. Add the wet ingredients to the dry ingredients and stir until the flour is just incorporated. Divide the batter among the muffin cups, spooning a heaping 1/4 cup batter into each one, filling it a bit below the rim. 
Bake for about 15 minutes, until the muffin tops are browned and just barely beginning to crack. Let cool for 5 minutes in the pan, then turn the muffins out of the pan to cool completely on the rack.


I'm linking this post with I Heart Cooking Clubs (IHCC), theme for this week
Expand Your Pantry!


Tuesday, December 6, 2016

Pfefferneusse

I've made Pfefferneusse, a cookie which I cannot even pronounce its name. This recipe is from Dorie Greenspan's latest baking book "Dorie's Cookies". Tuesdays With Dorie (TWD) is currently baking from two books of Dorie's, every Tuesday of the week. 

According to Dorie, Pfefferneusse, (the name is German for "peppernut"), are made with chopped nuts, lots of spice and citrus. And there are lots of different spices used in these cookies ; ground cinnamon, ground black pepper, grated nutmeg, ground cardamom, dry mustard, orange zest and pecans. 


The recipe yields 38 cookies for me, close enough to 40 as indicated in the recipe. As mentioned in the book, these cookies can be kept for weeks as they are dry and firm by nature. 


Either glazed the top with melted chocolate mixed with espresso powder, or just a dusting of confectioners' sugar. I glazed most of the cookies with the chocolate glaze and about a dozen with the confectioners' sugar. 

I have mixed feelings over these cookies. As you bite into them, you would first notice the dry texture, (though not overly dry!), the crumbly crumbs and the taste of the spices all blended into one, though the spices are surprisingly mild. At the end of it, when you have finished the whole piece, there's the taste of black pepper lingering in the mouth. These cookies are rather different and new to me, I have not made cookies with so many different spices combined together. When I first bite into these cookies, I thought that it was just OK, but I find it sort of grow on you. They tasted nicer when I ate the second and the third piece. While the ones with the chocolate glaze is nice, I prefer the ones with the confectioners' sugar, goes really well with these spiced cookies. "Sugar and Spice and Everything Nice"! 

Stop by TWD to see what everyone is baking this week.


Saturday, December 3, 2016

Apple Pie Bread

If you have some apples begging to be used, use them to make this Apple Pie Bread. You would be glad you did, this is one delicious quick bread. This wonderful recipe is from Better Homes and Garden : Baking, a lovely cookbook with more than 350 recipes of delicious baking treats, with photos for each recipe. This was the cookbook I've used at Cookbook Countdown #2 back in February, and sharing it again this month for Cookbook Countdown #12.  For this month of December, we are using those books again, the ones that we have shared before at Cookbook Countdown from January to November. 


I've used Fuji apples, which are shredded, and there was a lot of juice, so I've squeezed the shredded apples gently, just to extract out most of the juice. Don't discard the juice, drink it, it's sweet and yummy, and good for you! I have omitted the walnuts in the batter, using it only for the streusel topping. As usual, I have reduced the sugar, by half. For the raisins, I have used a 1/4 cup more. Very easy quick bread to make. Once the batter is done, sprinkle the streusel topping evenly over the top and bake as instructed. For the streusel topping, I've added half a teaspoon of ground cinnamon, after all apple pie always has ground cinnamon! 


Though the recipe indicated that the bread be double wrapped and left overnight before slicing, I did not wait that long. Sliced the cake after a few hours of cooling.


This quick bread is very moist and flavourful, with soft, tender crumbs. See the shredded apples throughout the slice. And I love the bite of the raisins in each slice. I did not miss the walnuts in the bread as there's walnuts in the streusel topping, which is "cinnamon-y" fragrant. This Apple Pie Bread is delicious, makes a perfect breakfast treat with a cup of hot coffee, or, perfect with in the afternoon with a cup of warm tea.


Apple Pie Bread
(Better Homes and Gardens : Baking)
1/2 cup butter, softened
1 cup sugar (1/2 cup)
1/4 cup buttermilk
2 teaspoons baking powder
2 eggs
1 teaspoon vanilla
2 cups all-purpose flour
1/2 teaspoon salt
2 cups shredded, peeled apples (about 4 medium)
1 cup chopped walnuts or pecans, lightly roasted (if desired)
1/2 cup raisins
1 recipe streusel-nut topping

  1. Preheat oven to 350F. Grease the bottom and 1/2 inch up the sides of an 9x5x3-inch loaf pan; set pan aside.
  2. In a large mixing bowl beat butter with an electric mixer on medium to high speed for 30 seconds. Beat in sugar until combined. Add buttermilk and baking powder; beat until combined. Add eggs and vanilla; beat until combined. Add flour and salt; beat until combined. Stir in apples, nuts, and raisins. Spoon batter into the prepared pan, spreading evenly. Sprinkle Streusel-Nut Topping over batter.
  3. Bake for 60 to 65 minutes or until a wooden toothpick inserted near the centre comes out clean. Cool in pan on a wire rack for 10 minutes. Remove bread from pan. Cool completely on wire rack. Wrap and store overnight before slicing.

Streusel-Nut Topping :
In a small bowl, stir together 1/4 cup packed brown sugar and 3 tablespoons all-purpose flour. Cut in 3 tablespoons butter until mixture resembles coarse crumbs. Stir in 1/3 cup chopped walnuts or pecans. (I've added 1/2 teaspoon cinnamon powder).


********************************


Grab a  cookbook and join us!

Cookbook Countdown is a monthly cooking/baking event, which I'm co-hosting with Emily's Cooking (Makan2) Foray.  Everyone is welcome to join us. How does it work? To summarize, you may select a cookbook from your own cookbook collection, to cook or bake from each month. That selected book shall be your cookbook of the month. You may cook any recipes and as many recipes as you want from your selected book of the month. This is a fabulous way of using your cookbooks at least once! For more information on how to join Cookbook Countdown, please click here. 


Friday, December 2, 2016

Grated Carrot Salad

Cook The Book Fridays, a group of lovely foodie bloggers are cooking their way through David Lebovitz's cookbook, My Paris Kitchen. The selected recipe for this week is Grated Carrot Salad. According to David Lebovitz, Grated Carrot Salad is so commonplace in France, that you'll hardly find it mentioned in any of the books on traditional French cuisine. Everyone has their own version of making this salad.

I have never grated carrots for salads before. What I would usually do is to slice them either thinly in rounds or half-moons, or sometimes julienned them to matchsticks, but never grated, for a salad. One of the things that I dislike doing while preparing veggies for a dish, is grating root veggies! I do grate carrots when making carrot cakes, which I enjoy eating, but dislike grating the carrots. I prefer chopping my veggies over grating, as chopping can be a rather enjoyable task, rather therapeutic at times. 

Because this is a Grated Carrot Salad, I dutifully grate my carrots. 

The grated carrots and some fresh chopped cilantro greens from my garden pot. 

The dressing is a mixture of Dijon mustard, honey, olive oil, lemon juice and salt, whisk to combine. Toss the carrots and fresh herbs with the dressing and serve. 


Quite a nice salad. The sweetness of the carrots balances well with the lemony-mustard sweet dressing. My son likes this. 


Makes a nice side dish. I served it alongside some baked chicken breast with fresh crisp celery sticks.

Stop by Cook the Book Fridays to see what everyone thought about this salad.


Wednesday, November 30, 2016

Rich and Creamy Ginger Scones

This month's selected recipe at Rose's Bread Bible Bakers, is Rich and Creamy Ginger Scones. Rose's Bread Bible Bakers is a group of bloggers who are currently baking from Rose Levy Beranbaum's book, The Bread Bible.

I've made half a recipe as I do not want to freeze any leftovers, there's no space in my freezer! And since I've made only half a recipe, I've mixed the dough by hand method. Rose has provided both methods of using the Food Processor Method and Hand Method. These scones are easy to make and did not take up much time at all. There's ground ginger and diced crystallized ginger in the dough.

One of the ingredients used is whipping cream, which is whipped just until soft peaks. But according to Rose's Pointer For Success at the end of the recipe, these scones will just be as delicious without whipping the cream. So I took the easy way out and did not whip the cream, that makes me smile as there will be no extra bowl and beater to wash! Ha! 


The dough is very sticky and with some sprinkling of flour on the work surface and a light dusting over the dough helps in handling the dough better. Shape into a 6" round, about 3/4" thick, and freeze for 15 minutes. Cut the firm dough into 6 or 8 wedges, brush the top with some whipping cream and sprinkle with some turbinado sugar. I did not have any turbinado sugar, so I have used what I have, demerara sugar. The oven is preheated with a baking stone placed on the middle rack. I do not have any baking stone, so I have used an upturned baking tray. Place the scones on greased baking tray, and place the baking tray on the preheated upturned baking tray in the oven. Bake for 15 to 20 minutes until the edges are browned and the tops are golden brown. Mine was done at 17 minutes. 


Cool to room temperature though these are so, so good when eaten while still warm. 


These scones are light and delicate, just as Rose described. They are tender, buttery and delicious! I love the crystallized ginger. These are so perfect with a cup of hot tea! Love these scones!

Up next in December, we will be baking "Levy's" Real Jewish Rye Bread, pg 324.

I'm also linking this post with Cookbook Countdown Specials : Bake


Tuesday, November 29, 2016

Shortcut Sausage Meatballs

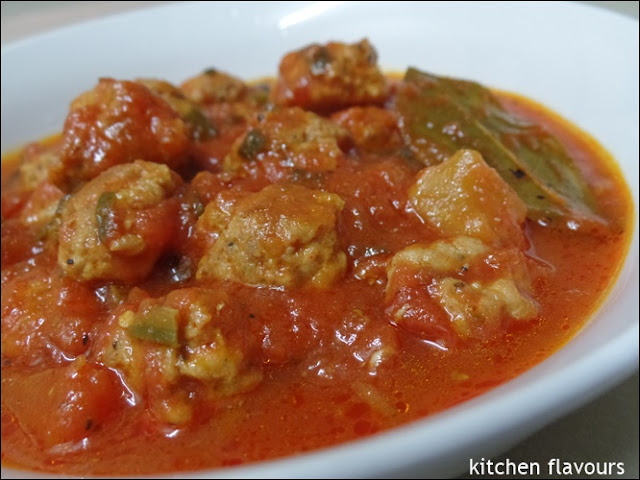
It's Potluck time at I Heart Cooking Clubs (IHCC). This week we get to select any recipes from either our present or past featured chefs, and once again, I've cooked with Nigella. I've made her Shortcut Sausage Meatballs, though it is not shortcut for me. Nigella's recipe using store bought Italian Sausages, but I have made my own, without the casing.


For the Italian sausages, I used minced pork mixed with some salt, coarse black pepper powder, fennel seeds, paprika and hot red pepper flakes. Combine well and leave covered overnight in the refrigerator. Taste the seasoning by frying about a teaspoon of the mixture in a little oil. Add more salt or any of the spice ingredients if needed. 

The sausages are then rolled into small balls, about the size of cherry tomatoes, and fry in some oil until golden, then the rest of the ingredients are added in. Simmer for about 20 minutes until the sauce has thickened slightly.


A very easy and simple meatballs in tomato sauce, and do not take long to cook. We had this meatballs served over spaghetti for a weeknight dinner.


Shortcut Sausage Meatballs
(Nigellissima by Nigella Lawson)
serves 4, approximately 40 meatballs
450-500gm Italian sausages
2 tablespoons garlic oil
4 fat or 6 spindly spring onions, finely sliced
1 teaspoon dried oregano
60ml white wine or vermouth
2 x 400gm cans chopped tomatoes, plus water to rinse 1/2 can
2 bay leaves
salt and pepper, to taste
chopped fresh parsley, to serve (optional)

Squeeze the sausage meat from the sausages, and roll small cherry-tomato-sized meatballs out of it, putting them onto a clingfilm-lined baking tray as you go. Your final tally should be around 40.
Heat the oil in a large, heavy-based pan or flameproof casserole and add the meatballs, frying them until golden; as they become firmer, nudge them up in the pan to make room for the rest, if you can't fit them all in at first.
When all the meatballs are in the pan and browned, add the spring onion and oregano and stir about gently.
Add the wine or vermouth and chopped tomatoes, then fill half of one of empty cans with cold water and tip it into the other empty can, then into the pan. The can-to-can technique is just my way of making sure you swill out as much of the tomato residue as possible.
Pop in the bay leaves and let the pan come to a fast simmer. Leave to cook like this, uncovered, for 20 minutes until the sauce has thickened slightly and the meatballs are cooked through. Check the sauce for seasoning, adding some salt and pepper, if you like.
During this time you can cook whatever you fancy to go with the meatballs, whether it be pasta, rice, whatever.
Once the meatballs are ready, you can eat them immediately or let them stand, off the heat but still on the stove, for 15 minutes. The sauce will thicken up a bit on standing. Sprinkle with parsely on serving.

I'm linking this post with I Heart Cooking Clubs (IHCC), theme for this week
"November Potluck"


Friday, November 25, 2016

Tofu with Sauteed Kimchi

My selected cookbook for November's Cookbook Countdown #11 is Seoul Food Korean Cookbook by Naomi Imatome-Yun. The next recipe I've made is Tofu with Sauteed Kimchi.


A simple dish but nevertheless quite delicious. Here I have used my Homemade Napa Cabbage Kimchi. The kimchi is chopped into 1-inch pieces which is sauteed with some thin slices of soft pork fillet, chopped garlic and is seasoned with soy sauce, sugar, sesame oil and sesame seeds. Firm white tofu is simmered in boiling water for just a few minutes until cooked, then drain, and sliced to rectangles or cubes. Place the sauteed kimchi in the centre of the serving plate and place the sliced tofu all around.

Really easy and simple, we enjoyed it with rice, along with other dishes.


Tofu with Sauteed Kimchi (Dubu Kimchi)
(Seoul Food Korean Cookbook by Naomi Imatome-Yun)
2 teaspoons vegetable oil
1/2 cup thinly sliced pork (or bacon), cut into1-inch pieces
3 garlic cloves, minced
1 cup Napa Cabbage Kimchi, roughly chopped into 1-inch pieces
2 teaspoons sugar
1 teaspoon soy sauce
1 teaspoon sesame seeds
1 teaspoon toasted sesame oil
1 block (12 to 14-ounce package) firm tofu

  1. Coat a large skillet or wok with the vegetable oil and heat over medium-high heat. Add the pork and saute until almost cooked through, about 5 minutes. Drain off excess oil if necessary.
  2. Add the garlic and saute for about 2 minutes, stirring constantly. Add the kimchi and saute for about 5 minutes, or until it becomes a darker reddish brown. Add the sugar, soy sauce, sesame seeds, and sesame oil to the pan and cook, stirring, for about 1 minutes. Remove from heat.
  3. Meanwhile, bring a pot of water to a gentle boil. Add the whole tofu block and boil for 3 minutes. Drain the tofu well and pat it dry with a paper towel.
  4. Gently cut the tofu into rectangles or squares.
  5. To serve, arrange the tofu on a serving platter and top with the sauteed kimchi. Alternatively, you can place the sauteed kimchi in the center of serving plate and arrange the tofu around it.

********************************

I'm linking this post with Cookbook Countdown #11 hosted by 


Grab a  cookbook and join us!

Cookbook Countdown is a monthly cooking/baking event, which I'm co-hosting with Emily's Cooking (Makan2) Foray.  Everyone is welcome to join us. How does it work? To summarize, you may select a cookbook from your own cookbook collection, to cook or bake from each month. That selected book shall be your cookbook of the month. You may cook any recipes and as many recipes as you want from your selected book of the month. This is a fabulous way of using your cookbooks at least once! For more information on how to join Cookbook Countdown, please click here. 

Wednesday, November 23, 2016

Whoopie Pies With Salted Dulce De Leche

I've made some Dulce De Leche for a tart recipe, and still have more than a jar left. So I'll be using it for various recipes using dulce de leche, which I have bookmarked to try for ages. One of it is, Whoopie Pies with Salted Dulce de Leche.

Even though Whoopie Pies are listed as under Cookies, they are really cake-like, and to me, are really little mini cakes. Sandwiched with some filling, they make nice little snacks. The dough for these cookies are really very thick batter, which needs to be refrigerated for 2 hours to firm up before shaping into small balls.


You will need to wet your hands when shaping tablespoons of the thick batter into little rounds and place on a parchment lined baking sheet, spacing them slightly apart, and pressing them down a little. These cookies are baked for just 8-10 minutes until puffed and slightly firm. Leave to cool on pans for 5 minutes, then tranfer to the wire racks to cool completely.

The filling is made of ; butter, confectioners' sugar, a little heavy cream, salt and dulce de leche. I have reduced the amount of the confectioners' sugar to half. I like this filling, as it is not too sweet, even with the dulce de leche, very nice actually.


Spread some filling on the flat side of one cookie and top with another cookie, with flat side on filling. The recipe indicate to refrigerate the whoopie pies for at least 1 hour until the filling is set. But there's really no need for that, the filling is firm enough that it holds very well. Plus we could not wait to taste it right away!


I was expecting these cookies to be on the sweet side, but surprisingly the sweetness is just right. Maybe because I reduced the brown sugar for the batter slightly, by using about 3 tablespoons less than the amount stated in the recipe. The cookies are a little chocolaty bitter and goes perfectly well with the not-so-sweet filling. Very nice! For those who love a sweeter cookie, use the full amount of brown sugar as per the recipe.

I keep the leftovers in the refrigerator and they are as good on the next day.


The Whoopie Pies cookie is soft, chocolaty, moist and perfect with the salted Dulce de Leche filling.


Whoopie Pies With Salted Dulce De Leche
(Home Baked Comfort by Kim Laidlaw)
makes 10 whoopie pies
for the cookies :
6 tbsp (90gm) unsalted butter, at room temperature
1/2 cup (105gm) firmly packed light brown sugar
1 large egg
1 tsp pure vanilla extract
3/4 cup (125gm) all-purpose flour
1/2 cup (45gm) natural cocoa powder
1/2 tsp baking powder
1/4 tsp kosher salt

for the filling :
4 tbsp (60gm) unsalted butter, at room temperature
3/4 cup (90gm) confectioners' sugar
2 tbsp heavy cream
1/4-1/2 tsp kosher salt
1/3 cup (80ml) dulce de leche

To make the cookies, in the bowl of a mixer fitted with the paddle attachment, beat the butter and sugar on medium-high speed until combined. Add the egg and vanilla and beat until blended. Sift the flour, cocoa, baking soda, and salt into the bowl and beat just until blended. Cover the bowl and refrigerate the dough until firm, about 2 hours.
Space 2 racks evenly in the oven and preheat to 350F (180C). Line 2 baking sheets with parchment.
With dampened hands, shape tablespoonfuls of the dough into balls. Place them firmly on the prepared pans, spacking them slightly apart and squishing them a little. You should have about 20 balls. Bake until the cookies are puffed and slightly firm, 8-10 minutes, rotating the pans about halfway through. Let the cookies cool on the pans for 5 minutes, then transfer to wire racks to cool completely.
While the cookies are cooling, make the filling : In the bowl of a mixer fitted with the paddle attachment, beat the butter and confectioners' sugar on medium-high speed until lightened. Stir in the cream and salt, to taste, on low speed, then stir in the dulce de leche until the filling is smooth.
Spread the flat side of half of the cookies with a big dollop of the filling. Top each with a second cookie, placing the flat side on the filling. Refrigerate until the filling is set, at least 1 hour. Whoopie!


********************************

I'm linking this post with Cookbook Countdown Special : BAKE! hosted by 


Cookbook Countdown is a monthly cooking/baking event, which I'm co-hosting with Emily's Cooking (Makan2) Foray.  Everyone is welcome to join us. How does it work? To summarize, you may select a cookbook from your own cookbook collection, to cook or bake from each month. That selected book shall be your cookbook of the month. You may cook any recipes and as many recipes as you want from your selected book of the month. This is a fabulous way of using your cookbooks at least once! For more information on how to join Cookbook Countdown, please click here. 


Grab a cookbook and join us!

To link to Cookbook Countdown #11, click here
To link to Cookbook Countdown Specials : BAKE, click here


Monday, November 21, 2016

Danish Apple Cake

The Cake Slice Bakers, an online group of lovely bakers are starting from a new book starting this month, World Class Cakes by Roger Pizey, to bake for a year, once a month. Each month, four recipes are selected from the book and members can choose any one of these recipes to bake. I am a returning baker, having baked with TCS a few years ago while Katie (one of the founders of this group) was the administrator. Over the years, the group has been managed by a few administrators and now the running of TCS is taken over by Anabel of Oven Delights. I'm happy to be back baking with TCS!

To kick start the bakes from this book, the first four selected recipes are :

Bee Sting Cake
Danish Apple Cake
Maple Syrup and Pecan Layer Cake
Chocolate and Rum Canneles


My chosen cake to bake : Danish Apple Cake


Could not decide between Bee Sting Cake and Danish Apple Cake, but since I have lots of apples in my refrigerator, Danish Apple Cake it is! This is a very simple and easy cake to bake. The only changes I've made was to reduce the sugar to 130gm. Apples are peeled and cored, cut into 1/2-in wedges, and arrange around the top of the cake, pushing them slightly into the batter. Some brown sugar is sprinkled over the batter and apples before the cake goes into the oven. The baking time took longer to bake, about 60 minutes. 

As soon as the cake was baked, I brushed the top with a thin layer of apricot glaze.


The cake bakes up nice and golden.


It may be sliced and served while still warm, and was suggested by the author that it's the most delicious when served warm from the oven with a scoop of ice cream. Too bad I don't have any ice cream!


But we are happy to eat it as it is! This cake is delicous, though it is a little sweet for me even though I've reduced the sugar quite a bit. The crumbs are buttery, moist, tender and wonderful with the golden raisins and apple slices. 


A slice is good with a cup of hot tea or coffee. This would make a wonderful plain butter cake without the fruits, one that I plan to bake one of these days. 

My first bake from World Class Cakes by Roger Pizey, and it is a keeper recipe, Looking forward to more baking from this lovely book. Get the book and join us. you may get full info here. 


Linky is for TCS members only

Sunday, November 20, 2016

Kale Rice Bowl

This week at I Heart Cooking Clubs, we are making Buddha Bowls!. Heidi Swanson-Inspired Buddha Bowls, a one bowl meal with several added components like grains, beans, veggies, nuts, etc... I've made her Kale Rice Bowl, to use some kale which I've harvested from my garden pot. 

Kale Rice Bowl is a one bowl meal which is really some cooked rice stir-fry with sauteed kale, and is topped with several toppings as recommended by Heidi Swanson. I have made some slight changes.


Firstly, instead of brown rice, I have used some leftover jasmine rice. The recipe did not use any garlic, but I have used three large garlic cloves, peeled and chopped, fry in a little oil until light brown, then add in the shredded kale. Stir-fry for a minute or two until wilted, add some salt and stir in the cooked cold rice. Fry for a few minutes until the rice is heated through and taste for seasoning, adding more salt if necessary. Scoop into a bowl and top with the suggested toppings.

The toppings I've used are, capers which are pan-fried in butter until blistered. I love this! Instead of a poached egg, I made soft hard-boiled eggs. I've made some caramelized onions seasoned lightly with a pinch of salt.  There's toasted sesame seeds and zaatar, a wonderful Middle Eastern spice blend, to sprinkle over. I've however, omitted the yoghurt, simply because I had none left.


This is delicious. I love everything in this bowl! The capers are really nice fried until blistered in butter, yum! Caramelized onions, I'm so glad that I've made these, as I love caramelized onions! The soft hard-boiled eggs are perfect for this rice meal, the sesame seeds added some light nutty crunch but I would not miss it if it's not there. But the star of this one bowl meal has got to be the spice blend, Zaatar! No wonder Heidi recommends to use lots of Zaatar! It really adds a delicious flavour to the rice meal. I sprinkled more zaatar in my bowl as I was eating the rice. Same goes with my son! I kept a bowl of this rice meal for my daughter who wasn't in, but she came back late, hours later. So I reheated it by stir-frying everything together with some zaatar added in, and she said this is a delicious "fried rice", yum! 

I'll be cooking this again. A very versatile rice meal, you can use any other veggie you like and try with a different spice blend as suggested by Heidi. One thing I must put on my grocery list, a new jar of Zaatar!


(my changes, listed in blue)
Kale Rice Bowl
(source from Heidi Swanson's blog, 101cookbooks.com)
serves 2-3
olive oil or clarified butter
1 bunch of keale, destemmed, chopped/shredded
3 cups cooked brown rice (jasmine rice)
3 large garlic cloves, peeled and minced

To serve :
capers, rinsed, dried, and pan-fried until blistered in butter
a poached egg (soft hard-boiled eggs)
a dollop of salted greek yoghurt (omitted)
a big drizzle of good extra-virgin olive oil (omitted)
lots of zaatar
toasted sesame seeds
caramelized onions

In a large skillet or pot, heat the olive oil over medium heat. Add the kale and a couple pinches of salt. Saute until the kale softens a bit and brightens, just a minute or so. Stir in the rice, and cook until the rice is hot. If your rice is on the dry side, you might have to add a small splash of water.
Serve the kale rice topped with (preferably) all of the following : the capers, poached egg, yoghurt drizzled with olive oil, and plenty of zaatar.


I'm linking this post with I Heart Cooking Clubs (IHCC), theme for this week
Buddha Bowl!