Showing posts with label How To Be A Domestic Goddess. Show all posts

Friday, September 25, 2015

Garlic and Parsley Hearthbreads

"September 2015 IHCC Potluck", the theme for this week at I Heart Cooking Clubs (IHCC). For our potluck week, I've made Nigella's garlicky flatbread.

I've been wanting to make this flatbread for quite sometime. With garlic and parsley, it already sounds so aromatic. According to Nigella, "These are something between garlic naan and herby focaccia". Yes, it is similar to a focaccia and can't help thinking how close it is to a fougasse too, when I took a crispy bite of it! Crispy crust with chewy texture on the inside.


Oops...ignore the pinch-off corners of the bread! The photos before this, are not clear, so I've got to clean the lens of the camera and took the photo again, but that corner was torn off by then, (for quality control purposes!! hahaha!).

The dough is mixed and left to proof before it's punched down, separate into two halves and shape each half into squares or oval, flattened and leave to proof until puffy. Make some dimples on the puffy breads with your fingers, and spread the garlicky parsley mixture over it. Bake till golden and crispy. I have reduced the amount of salt slightly to 3/4 tablespoon and the next time, I will reduce just a little bit more. I have used only 1 cup of water, and still find that the dough is sticky, so I have added about 1/4 cup of bread flour. The type of flour and our humidity weather do make a difference when mixing a dough for bread making, so adjust accordingly.

For the garlic and parsley mixture, firstly the garlic is baked for about 45 minutes, enclosed in a parcel of foil. Leave until cool enough to handle. Parsley leaves are chopped in the food processor, then the garlic is squeezed out of their skins into the food processor and process again. Pour in some oil, while processing to a paste. I "overdo" it for both the garlic and the parsley. I added extra garlic heads and used a large bunch of parsley. The paste does not look anywhere like Nigella's, but I am not complaining, it tasted good! I added some salt and coarse black pepper to the paste too. (I omitted the sprinkle of salt during serving).


These hearthbreads are yummy! Especially so when fresh out of the oven. I've baked them a little longer than the recipe stated, because I love crispy crust. With the crispy crust and chewy bread texture on the inside, this reminded me of eating a fougasse! And even though the garlicky-parsley paste did not look at all like Nigellas, it is delicious! And I'm glad I've added some coarse black pepper, yummy! 
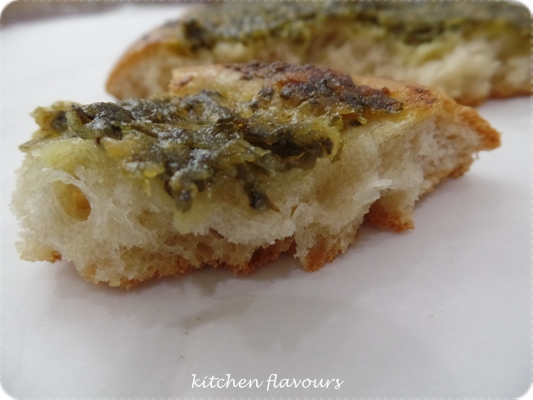

I did not sprinkle any salt or drizzle any oil over it. The paste is oily enough and the bread itself is salty enough. Good enough to eat it as it is. I had this with a mug of hot tea, it was good!


Garlic and Parsley Hearthbreads
(adapted from "How To Be A Domestic Goddess", Nigella Lawson)
3-1/2 cups white bread flour (additional 1/4 cup)
1 package (1/4 ounce) rapid-rise yeast or 1 tablespoon fresh yeast (2 teaspoons instant yeast)
1 tablespoon salt (use about 3/4 tablespoon, and will reduce slightly more the next time)
1-1/3 - 1-2/3 cups warm water (1 cup)
5 tablespoons olive oil, plus more for greasing and for pouring over the garlic
3 large or 4 small heads of garlic
extra-virgin olive oil for drizzling
bunch of flat-leaf parsley
1/4 tsp coarse black pepper (my addition)
salt for sprinkling

2 baking sheets

Preheat the oven to 375F.
Combine the flour, yeast, and salt in a bowl. Pour 1-1/3 cups warm water into a measuring cup and stir in the olive oil. Mix the liquid with the dry ingredients to make a soft but firm dough, adding more liquid as needed, and either turn this out onto a surface and knead by hand or keep in the bowl and use a mixer fitted with the dough hook and knead until smooth, supple, and full of elastic life. Form into a ball, wash out and dry the bowl, oil it, and turn the dough in it so it's lightly oiled all over. Cover the bowl with plastic wrap and leave to rise for an hour or so until doubled in size.

While the bread is rising, trim the tops off the heads of the garlic, making sure they remain whole, sit them in some torn-off squares of foil, dribble over some oil, and wrap them loosely. That's to say, the package should be baggy but the foil tightly sealed at the edges. Cook the garlic packages for 45 minutes; they should not be mushy by this stage but still just holding their shape. Remove from the oven, unwrap, and let cool till you can handle them. Turn the oven up to 400F.

Tear the parsley leaves from their stems and add a good handful to the bowl of the food processor - not worrying if some stems here and there are left on - and chop. Squeeze the soft garlic cloves out of their skins and into the bowl and process again. Pour in enough extra-virgin oil to make a runny paste down the funnel, while still processing, and leave this pungent emulsion where it is while you get back to the bread.

When the dough's risen, punch it down and leave to rest for 10 minutes. Divide the dough in half, and get out 2 sheets of baking parchment. Sit a ball of dough on each, and roll out to form a curved rectangle or bulky oval. Then, using your hands, press out a little more. Transfer the breads on their papers to the baking sheets, cover with tea towels and leave to rise and get puffy for about 25 minutes.

Poke your fingers all over the tops of the breads to dimple them, then go back to the processor and pulse once or twice to make sure the parsley, garlic, and oil are combined and pour this green mixture all over the corrugated flatbreads.

Put the baking sheets into the oven and bake for 20 minutes or until the breads are cooked - becoming golden in parts, with the garlic flecks a darker brown, and the rims puffing up around the oily topping. Whip out of the oven and drizzle over a generous amount of good extra-virgin olive oil. Sprinkle over some salt and set down on the table for people to tear greedily at with their bare hands.
Serves 4 generously.


I'm linking this post with I Heart Cooking Clubs (IHCC), theme for this week 
September 2015 IHCC Potluck


Thursday, May 21, 2015

My Mother-In-Law's Madeira Cake (Nigella Lawson) : Bake-Along #79

Bake-Along #79, My Mother-In-Law's Madeira Cake, by Nigella Lawson, from her book "How To Be A Domestic Goddess", selected by Lena to bake together with Zoe and myself, and anyone who wishes to join in our bake-along.

Despite it's name, there's no madeira in the cake at all, though I am wondering why it is called as such. That led me to google out of curiosity, and read from Wikipedia, that it is called after Madeira wine, a Portuguese wine, which this cake is usually served with, and was very popular in England during the nineteenth century.


I baked the cakes in two mini cake pans. There's no madeira in the recipe, but I've added 2 tablespoons of rum, well, just because!  :)  I have omitted the sprinkling of sugar over the top.


A nice cake to have with a cup of tea or coffee, though I love to try having it with a glass of Madeira! The crumbs are soft and lemony with the light fragrance of the rum which I've added.


My Mother-In-Law's Madeira Cake
(source from "How To Be A Domestic Goddess", Nigella Lawson or here)
1 cup softened unsalted butter
3/4 cup sugar, plus extra for sprinkling
grated zest and juice of 1 lemon
3 large eggs
1-1/3 cup self-raising cake flour
1/2 cup all-purpose flour
2 tablespoons rum (my addition)

9x5-inch loaf pan, buttered and lined with parchment or wax paper

Preheat the oven to 350F.
Cream the butter and 3/4 cup sugar, and add the lemon zest. Add the eggs one at a time with a tablespoon of the flour for each. Then gently mix in the rest of the flour and, finally, the lemon juice (and rum). Pour batter into prepared pan. Sprinkle with sugar (about 2 tablespoons should do it) as it goes onto the oven, and bake for 1 hour or until a cake tester comes out clean. Remove to a wire rack, and let cool in the pan before turning out.

Makes 8-10 slices.


********************************

Do stop by Lena of Frozen Wings and Zoe of Bake For Happy Kids, and all our friends who has baked along with us in the linky below :

For our next Bake-Along, we will be baking "Theme : Croissant". If you are up to the challenge at trying your hands in making some croissants, now is the time!  Please do join us, link your post to our linky which will open from 4th till 13th June. Everyone is welcome to join us! Only current post please.


Photobucket

A friendly reminder when linking to our blog hop :
1. Please mention Bake-Along event in your own post linking direct to any of the hosts' post (JoyceLena or Zoe)
2. Please link only new and current post, PLEASE FOLLOW THE BAKE OR THEME provided by us. Unrelated post will be deleted.
3. Feel free to display our Bake-Along badge in your post.


Thursday, November 20, 2014

Jam-Doughnut Muffins : Bake-Along #71

For our Bake-Along #71, Lena has selected these cute little Jam-Doughnut Muffins to bake together with Zoe, myself and anyone who wishes to bake along with us. These muffins makes a delightful treat for tea-time, especially if your are making snacks for kids!


Freshly baked muffins, ready to be dipped and rolled.

Really easy to make, just mix the wet ingredients into the dry ingredients, fill small mini muffin pans with a little of the batter, drop a dollop of your favourite jam, top with more batter, and bake until the muffins are puffy and golden brown.  I've used blueberry jam, and this is a great way to use up all that leftover jam lying around in the fridge. My muffin pan has 24-mini-holes cups, and I got about 30 mini muffins.

Have ready a bowl of melted butter, and a shallow dish with some caster sugar. Dip the doughnut muffins in the melted butter and roll them in the sugar. Serve warm.


I have rolled some of the muffins with plain caster sugar, and the other half with a mixture of cinnamon and caster sugar. 


These cute little doughnut muffins are fun to eat!


Which one do you prefer? With plain sugar? Or with Cinnamon-Sugar?

As can be seen from the photo above, I did not dip the whole muffins in the butter, but only the top, then roll that top part in the sugar, as I do not want overly sweet muffins, and these are already sweet with the rolled-on sugar on the top.


We love the cinnamon-sugar, though the plain ones are really nice too! These doughnut muffins have soft and tender crumbs, lovely for tea-time treat. Especially nice when eaten while still warm.


Jam-Doughnut Muffins
1/2 cup milk
scant 7 tablespoons corn or other vegetable oil, plus more for greasing
1 large egg
1/2 teaspoon vanilla extract
1-1/3 cups self-rising cake flour
1/3 cup superfine sugar
12 teaspoons strawberry jam
scant 1/2 cup unsalted butter
1/2 cup granulated sugar
1 incredibly well-greased or nonstick 12-cup mini-muffin pan

Preheat the oven to 375F.
With a fork, beat together the milk, oil, egg and vanilla extract. Stir this into the flour and 1/3 cup sugar to combine (just); the lumps don't matter and if you overbeat, the muffins will be tough. Spoon the mixture into each muffin cup so that its just under a third full. Then with a teaspoon add a dollop of strawberry jam - about the size of a fat lima bean- then top with more muffin mix so that the cases are just about full.
Put them in a preheated oven and cook for about 20 minutes or until the tops feel springy and resistant and the muffins have puffed up into little toadstools.
Meanwhile, melt the butter slowly in a thick-bottomed pan, and lay the remaining sugar out in a wide, shallow bowl. As soon as the muffins are ready, remove them from their cups, dip them in the butter, and roll them in the sugar. Eat warm.

**************************

Do stop by Lena of Frozen Wings and Zoe of Bake For Happy Kids, and all our friends who has baked along with us in the linky below :

For our next Bake-Along, we will be baking based on a theme, Christmas Theme : Biscotti. Yup, Chrismas is just round the corner! Biscotti is great to munch during this festive season, and they make lovely gifts for this season of sharing! Bake any biscotti recipe and please do join us by linking your post to our linky which will start on 11th till 222nd December. Everyone is welcome to join us! Only current post please.


Photobucket

A friendly reminder when linking to our blog hop :
1. Please mention Bake-Along event in your own post linking direct to any of the hosts' post (JoyceLena or Zoe)
2. Please link only new and current post, PLEASE FOLLOW THE BAKE OR THEME provided by us. Unrelated post will be deleted.
3. Feel free to display our Bake-Along badge in your post.


I'm sharing this post with :

Cook-Your-Books

To join our blog hop, click on the link to get the codes :
get the InLinkz code

Thursday, March 6, 2014

Cream Cheese Brownies : Bake-Along #58

Bake-Along is back after a month's rest! For this week, we are baking Cream Cheese Brownies, selected by Lena, to bake together with Zoe and all our friends who wish to bake-along with us. This recipe is taken from Nigella Lawson's, "How To Be A Domestic Goddess".


"
This is a straightforward brownie, where the chocolate is melted together with the butter in a saucepan, and in another bowl, the eggs are mixed with the sugar and vanilla extract. Add this mixture to the chocolate-butter mixture, then fold in the sifted flour. Mix everything to combine, batter will be rather gooey. Pour half of the batter into a lined and greased 9" square pan, and now the interesting part is the cream cheese. The cream cheese is sliced to thin slices and place them over the batter in the pan in one layer. Slicing the cream cheese is not as easy as it seems, it was actually quite difficult to slice them thinly, I ended up with thick slices and flatten them out with my fingers! Maybe it would be better if the cream cheese is left in the freezer for half an hour or so to harden them up before slicing. The other half of the batter is then poured over the cream cheese slices and bake for about 20 minutes until the top is pale and dry, and the centre is still slightly sticky. I baked mine for 23 minutes.


These brownies are very nice. It has a very fudgy, soft and moist texture, with delicious chocolaty taste, and a thin layer of crust at the top with a layer of creamy, salty cream cheese in the centre. However, on the next day, it gets more moister and fudgy, with almost no crust visible, as the crust has turn very moist and kinda blend into one fudgy slice!


Want a slice?


Cream Cheese Brownies
(adapted from "How To Be A Domestic Goddess", Nigella Lawson)
4 ounces bittersweet chocolate
1/2 cup unsalted butter
2 large eggs
3/4 cup sugar (I use 1/2 cup)
1 teaspoon vanilla extract
1/3 cup plus 2 tablespoons all-purpose flour
pinch of salt
7 ounces cold cream cheese
(9-inch square pan, greased and lined with parchment or wax paper)

Preheat the oven to 350 degrees F.
Melt the chocolate and butter over medium-to-low heat in a heavy-based saucepan. While you're waiting for it to melt, idly beat the eggs in a bowl with the sugar and vanilla. Measure the flour into another bowl and add the salt. When the chocolate mixture has all but completely melted, take the pan off the heat. The bits of unmelted chocolate or butter will continue to dissolve if left. Leave for a bit longer to cool slightly before beating in the eggs and sugar. Finally, add the flour and beat until smooth. 
Pour half the mixture into the pan, slice the cream cheese as thinly as you can and top the brownie mixture in the pan with these thin slices. Pour over the remaining half of brownie-gunge, using a rubber spatula or whatever to make sure each bit of cheese is covered. Then put in the oven and bake for about 20 minutes : the top should be slightly paled and dry, but a cake tester poked within should reveal a still-sticky center. Cool for about 10 minutes before cutting into little squares, and eat warm or cold, though the cooler they are the easier they'll be to lift out. Reckon on a first, botched slice : cook's treat.

Makes 8-10

****************

To join our blog hop, bake this brownie and link your post to our Bake-Along linky.
Please visit my baking buddies, Lena from Frozen Wings and Zoe from Bake For Happy Kids, and all our friends who has baked along with us in the linky below :

For our next Bake-Along, we will be baking based on a theme, which is "Theme : Marbled Butter Cake". Bake any marbled butter cake of your choice, and link your post to the our blog-hop linky which will start on 20th March right up to 29th March. Everyone is welcome! 


Photobucket


A friendly reminder when linking to our blog hop :
1. Please mention Bake-Along event in your own post linking direct to any of the hosts' post (JoyceLena or Zoe)
2. Please link only new and current post, related to the current bake or theme provided by us. Unrelated post will be deleted.
3. Feel free to display our Bake-Along badge in your post.

and

I'm linking this post to Cook Like A Star, All-Stars Anniversary Party, hosted by Zoe of Bake For Happy KidsMich of Piece of Cake and Joyce of Kitchen Flavours.
(click on any of the hostess blog for further info and to link your posts)

All-Stars Anniversary Party featured chefs :  Ina Garten, Jamie Oliver, Nigella Lawson, Curtis Stone, Ree Drummond, Bill Granger, Masterchefs, Martha Stewart, Delia Smith, Donna Hay


click on the link to get the codes :
get the InLinkz code

Tuesday, March 4, 2014

Banana Bread

I have baked this Banana Bread, which actually a cake really, many times ever since I got this book of Nigella ages ago. For those of you who have tried Nigella's recipe would know that this is one delicious banana bread/cake. Most of us have our own favourite recipe when it comes to Banana Cake, and at the moment, this is my favourite.


This is one of the best banana cake (I'll just refer this as a cake!) that I've eaten. The yellow raisins (sultanas), are first boiled for a minute with some rum and left to cool so that the raisins soaked up all that rum and gets all plump and yummy. The raisins are then drained before use. A small amount of walnuts are used, which I did not bother toasting. I use 3 bananas which comes to about 300gm in weight without the skins. The recipe calls for 4 small bananas, the ones I had was medium to large, thought of using 2, but I had three, so I used all three. I just mashed them with a fork, leaving some pieces chunky and some mashed.


The cake bakes up beautifully with a lovely crust, mine was done in exactly an hour.


Look at the plump raisins and the chunky bananas with bits of walnuts. The raisins are really nice, plump and juicy with a slight crunch when you bite into it, and the fragrance of the rum really came through, yummy! Of course, the bananas are delightful and with the nutty walnuts, simply delicious!


The texture of the cake is really moist, soft and "banana-ey"! This cake was gone in no time! Give it a try, especially if you are a fan of banana cakes.


Banana Bread
(adapted from "How To Be A Domestic Goddess" by Nigella Lawson)
Makes 8 to 10 slices
scant 1/2 cup golden raisins
6 tablespoons or 3 ounces bourbon or dark rum
1 cup plus 2 tablespoons all-purpose flour
2 teaspoons baking powder
1/2 teaspoon baking soda
1/2 teaspoon salt (I omit this as I use salted butter)
1/2 cup unsalted butter, melted
1/2 cup sugar
2 large eggs
4 small, very ripe bananas, mashed (I use 300gm, without skins)
1/4 cup chopped walnut
1 teaspoon vanilla extract


9x5-inch loaf pan, buttered and floured or with a paper insert


Put the golden raisins and rum or bourbon in a small saucepan and bring to the boil. Remove from the heat, cover, and leave for an hour if you can, or until the raisins have absorbed most of the liquid, then drain.
Preheat the oven to 325F and get started on the rest. Put the flour, baking powder, baking soda, and salt in a medium-sized bowl, and using your hands or a wooden spoon, combine well. In a large bowl, mix the melted butter and sugar and beat until blended. Beat in the eggs one at a time, then the mashed bananas. Then, with your wooden spoon, stir in the walnuts, drained raisins, and vanilla extract. Add the flour mixture, a third at a time, stirring well after each bit. Scrape into the loaf pan and bake in the middle of the oven for 1 to 1-1/4 hours. When its ready, an inserted toothpick or fine skewer should come out clean. Leave in the pan on a rack to cool, and eat thickly or thinly sliced, as you prefer.


*******************


I'm linking this post to Cook Like A Star, All-Stars Anniversary Party, hosted by Zoe of Bake For Happy KidsMich of Piece of Cake and Joyce of Kitchen Flavours.
(click on any of the hostess blog for further info and to link your posts)

All-Stars Anniversary Party featured chefs :  Ina Garten, Jamie Oliver, Nigella Lawson, Curtis Stone, Ree Drummond, Bill Granger, Masterchefs, Martha Stewart, Delia Smith, Donna Hay


See you at the Party!
From 1st March to 30th April!

and

I'm linking this post to :


 photo 77951578-1914-4b72-8eda-9e40a91183ac_zps331eb4b4.jpg

Monday, August 19, 2013

Mini Lime-Syrup Sponges

I have some limes left (from my previous post here), and was looking for some simple lime recipes. I need not look that far, this delightful Mini Lime-Syrup Sponges is from Nigella's "How To Be A Domestic Goddess".

These Mini Lime-Syrup Sponges are really nice! If you have some limes in your fridge, I would recommend you to give this recipe a try. Even if you do not have any limes right now, a good idea to get some limes on your next trip to the market or supermarket. Or like what Nigella suggests, instead of limes, you can replace with lemons, oranges or even a mixture of oranges and limes juices. Perhaps I'll try the orange-lime mixture the next time.


These mini cakes bakes up high and golden.


The recipe is for 8 mini cakes, but I got only 7, filling the moulds about two thirds full. Recipe uses self-raising cake flour, since my cake flour is not self-raising, I have added in 1-1/2 teaspoons of baking powder. And have reduced the sugar slightly to scant 1/2 cup, original calls for 1/2 cup plus 1 tablespoon. 

A breeze to make, the batter takes just minutes to mix, and while the cakes are baking, prepare the lime syrup. Mix some lime juice and confectioners' sugar in a saucepan over medium low heat until the sugar dissolves. Once the cakes are done, remove the pan from the oven, poke the cake all over with a skewer and spoon over each cake evenly with the lime syrup all over, making sure the centre of the cake absorbs the syrup. Let the cake cool in the pan. 


Garnish with some grated lime zest before serving.


It has a very soft, moist and tender texture. Not too sweet and I like it that the lime syrup uses confectioner's sugar making it less sweet than if granulated sugar is used. A light limey taste and fragrance, without being too citrusy, simply delightful. I love it! Yums!


Mini Lime-Syrup Sponges
(adapted from "How To Be A Domestic Goddess", Nigella Lawson)
Makes 8
1/2 cup unsalted butter, softened
1/2 cup plus 1 tablespoon sugar (I use scant 1/2 cup)
2 large eggs
zest of 1 lime
1 cup plus 2 tablespoons self-raising cake flour (I use cake flour plus 1-1/2 tsps baking powder)
pinch of salt (omit this, since butter is salted)
4 tablespoons milk

8-cup mini-loaf pan, buttered very well

for the syrup :
4 tablespoons lime juice (of 1-2 limes)
zest for decoration
1/2 cup confectioners' sugar

Preheat the oven to 350F.

Cream together the butter and sugar, and add the eggs and lime zest, beating them in well. Add the flour and salt, folding in gently, and then the milk. Spoon into the mini-loaf pan, and cook for 
25 minutes.

While the cakes are cooking, prepare the syrup by putting the lime juice and sugar into a small saucepan and heating gently so that the sugar dissolves.

As soon as the mini-sponges are ready, take them out of the oven and prick them with a cake-tester all over. Pour over the syrup evenly. Try to let the middle absorb the liquid as well as the sides, then leave it to soak up the rest. Don't try to take the cakes out of the pan until they have cooled slightly and the syrup looks like it has been absorbed, but be aware that if you leave these to cool completely they might be very difficult to get out of the pan.
(mine was easily removed with no problem at all)

So, after an hour or two, turn them out onto a rack and grate some lime zest over them before serving.

#78/100

I'm linking this post to Cook Like A Star, where the featured chef for this month is NIGELLA LAWSON. Cook Like A Star is an event organized by Zoe from Bake For Happy Kids, and the co-hosts for this month are Anuja from Simple Baking and me, Joyce from Kitchen Flavours. Cook or bake any of Nigella Lawson's recipes and link your posts to any of the hosts' linky which will stay open for the whole month of August. All submissions to this event must be current posts, published within the current month of this event, any older posts will be deleted. Please mention and link Cook Like A Star somewhere in your post. Do join us, everyone is welcome!


Cook Like A Star featuring Nigella Lawson, from 1st August to 31st August 2013


 photo 77951578-1914-4b72-8eda-9e40a91183ac_zps331eb4b4.jpg


and Little Thumbs Up, where the ingredient for this month is Eggs, hosted by Baby Sumo from Eat Your Heart Out, and organized by Zoe from Bake For Happy Kids, together with Doreen from My Little Favourite D.I.Y.


Sunday, August 12, 2012

Apple Kuchen

The first Apple Streuselkuchen I made was more than a year ago.  It had a streusel topping and the dough was made in the bread machine. The dough was so fluffy and soft, and between both my daughter and myself, we finished half the loaf! So when I saw a recipe of Nigella's for Apple Kuchen, I knew that I wanted to try her version, which does not have a streusel but a topping of flaked almonds instead.


Just like all of Nigella's recipes, this is a winner!


I use about 2-1/2 medium Granny Smith apples.


Nigella mentioned that the dough can be mixed in the stand mixer or by hand. I chose to knead the dough by hand. 
1. Flour is mixed with salt, sugar and yeast. I use 2-1/4 cups of flour at the beginning, as recommended in the recipe, adding more later, if necessary.
2. The eggs are lightly beaten and mix into the lukewarm milk, together with vanilla, orange zest (original calls for lemon zest, which I do not have), and freshy grated nutmeg, stir to combine.
3. Stir the liquid ingredients into the dry ingredients, stir to combine. 


1. Add in the softened butter and knead to a dough,
2. I find that the dough is really wet
3. I then added in 1/4 cup of flour at a time, in total I used almost 3 cups of flour.


1.Knead the dough for about 10 minutes until they are smooth.
2. Cover loosely with an oiled cling wrap and leave to rise for about 1 to 1-1/4 hours until doubled in size.
3. Punch down the risen dough.


1. Spread the dough into the greased pan, size 12 x 8 inches, covering the base. Leave to rise for about 15-20 minutes. It will puff up a little. Brush the top of the dough with a mixture of beaten egg, freshly grated nutmeg and a little cream (I use milk).
2.Cover the dough with the chopped apples, and sprinkle the apples with a mixture of sugar and all-spice (I use ground cinnamon). Scatter some flaked almonds all over. Bake at 400F for 15 minutes, turn down temperature to 350F and bake for another 15 minutes or until golden brown and cooked.
3. Make the icing, stir together the confectioners' sugar and hot water. Drizzle icing all over the top. Then slice and .....


..... enjoy with a cup of coffee! This is so good! The bread is so soft and fluffy! Even with the icing, this cake is not sweet at all, just perfect! The apples has not gone totally soft, but has a light crunch which is so good with the crunchy fragrant almonds! 


Can you see the softness and fluffiness of the bread?


Yum! I had a big piece with a cup of coffee and later, another piece with a cup of tea! Great with both coffee or tea!


I'm sharing this with the following :


Apple Kuchen
(adapted from "How To Be A Domestic Goddess" by Nigella Lawson)
Swiss-roll pan or rectangular baking dish approximately 12x8 inches
Serves 8
for the dough :
2-1/4 - 3 cups white bread flour
1/2 teaspoon salt
2 tablespoons sugar
1-1/2 teaspoon rapid-rise yeast
2 large eggs
1/2 teaspoon vanilla extract
grated zest of 1/2 a lemon (I use grated zest from 1 orange)
good grating fresh nutmeg
1/2 cup milk, lukewarm
1/4 cup unsalted butter, softened

for the topping :
2 Granny Smith apples
1 large egg
1 tablespoon cream (I use milk)
grating of fresh nutmeg
1 tablespoon demerara or turbinado sugar
1 tablespoon sugar
1/4 teaspoon allspice (I use 1/2 tsp ground cinnamon)
2 tablespoons slivered almonds

for the icing :
1/3 cup confectioners' sugar, sifted
1 tablespoon hot water

Put 2-1/4 cups of the flour in a bowl with the salt, sugar, and yeast. Beat the eggs and add them, with the vanilla, lemon zest, and nutmeg, to the lukewarm milk. Stir the liquid ingredients into the dry ingredients, to make a medium-soft dough, being prepared to add more flour as necessary. I generally use about 2-2/3 cups, but advise you to start off with the smaller amount; just add more as needed. Work in the soft butter and knead by hand for about 10 minutes or half that time by machine. When the dough is ready it will appear smoother, and springier. It suddenly seems to plump up into glossy life.

Cover with a tea towel and leave till doubled (1 to 1-1/4 hours), or leave to rise slowly in a cold place overnight. Then punch down and press to line the pan. You may think it's never going to stretch to fill, but let it rest for 10 minutes or so mid-stretch, especially if the dough had a cold rise. When it's pressed out on the pan, leave it to rise for 15-20 minutes. Preheat the oven to 400F. Peel and core the apples and chop them finely; I use a processor but there's really no need. And you could use other apples, too, if your prefer; whatever you've got to hand; cooking apples can easily be substituted and are better if you want a pulpier covering.

When the dough's ready, beat the egg with the cream, grate over a little nutmeg and brush the top of the dough with this mixture. Cover the egg-glazed dough with the apples, then mix together the sugars and allspice and sprinkle over. Top with the flaked almonds and put in the oven for 15 minutes. Then turn down to 350F and cook for a further 15 minutes or so, until the dough is swelling and golden at the edges and cooked within.

Remove from the oven and make a runny paste with the sifted confectioners' sugar and the hot water. Spoon or trickle over the cake.

Leave to cool for about 15 minutes, then slice it, and eat while it's still warm and juicily, stickily fragrant.

Tuesday, June 26, 2012

Scones : Free And Easy Bake-Along #27, Theme : Scones

It's Bake-Along time! Scones is the theme that Lena from Frozen Wings chose for our Bake-Along No. 27. I love eating scones, especially when they are warm minutes after baking. I thought of making some sweet scones as well as savoury, I've already chosen the recipes, but then that did not happen! The weather is really hot, and much as I love to bake, somehow the weather puts me off from baking more often than I would have liked. Many a times when  butter was taken out earlier, my recipe book, opened on a chosen recipe, I would stand right in my kitchen, sweating and irritated, and decided to call it quits! Hot and humid! Excuses, but really, all I could think of was a shower, switch on the air-cond and relax with a cup of tea and some homemade bakes, but of course, there is no homemade bakes, when the baker call it quits! :)

So my plans for sweet scones and savoury ones remain as my plans, for the time being! I made these more than a week ago, would you call this savoury, this is definitely not sweet, as there's no sugar in them. Savoury? I will just describe them as original!


These lovely scones is from one of Nigella Lawson's earlier cookbooks "How To Be A Domestic Goddess"


These scones uses lots of baking soda and cream of tartar. I almost did not make these, just because of the amount used for these two ingredients. But then Nigella Lawson describes these as the best scones she's ever eaten, so I was rather curious! According to her, the cream of tartar contributes to the lightness of the scones. And Nigella advises to eat this freshly baked, while still warm from the oven.


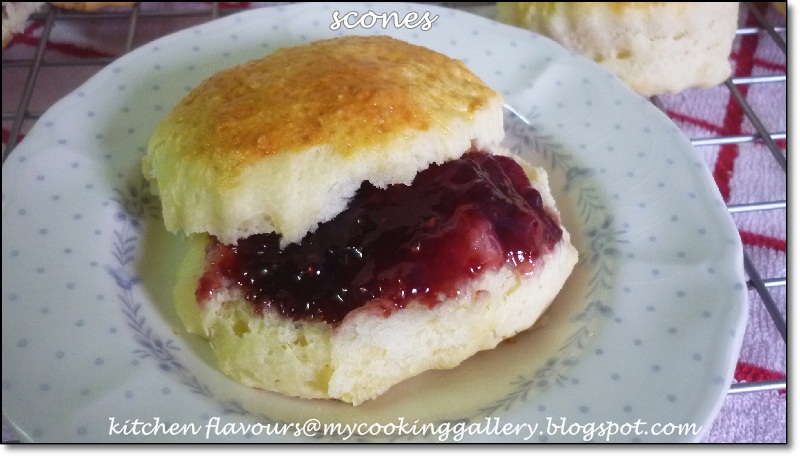
These scones are lovely. They are indeed buttery, light and tender, and I like eating these plain while still warm. 


Spread it with your favourite jam or clotted cream as suggested by Nigella, or just ate them plain like I did with a cup of tea. I reheated some leftovers by wrapping them in aluminium foil for about 8-10 minutes in the oven and they will be soft again. Do not throw away the aluminium foil, simply wipe them clean and reuse again for heating other bakes like breads and cakes. Reuse and recycle!


To take a look at all the lovely scones, please visit my baking buddies, Lena from Frozen Wings and Zoe from Bake For Happy Kids, and our baking friends who has baked along with us in the linky below.


Photobucket


For our next Bake-Along, we shall be baking Coconut Checkerboard Brownies from Bon Appetit Desserts, page 589 or you may get the recipe here. The link for this bake will be open from 11 July to 17 July. Please do join us, everyone's welcome!


Lily's Scones
(adapted from "How To Be A Domestic Goddess" by Nigella Lawson)
3-1/2 cups all-purpose flour
1 teaspoon salt
2 teaspoons baking soda
4-1/2 teaspoons cream of tartar
1/4 cup cold unsalted butter, diced
2 tablespoons vegetable shortening, in teaspooned lumps
1-1/3 cups milk
1 large egg, beaten, for egg-wash

2-1/2-inch crinkle-edged round cutter
1 baking pan, lightly greased

Preheat the oven to 425F.
Sift the flour, salt, baking soda, and cream of tartar into a large bowl. Rub in the fats till the mixture goes like damp sand. Add the milk all at once, mix briefly - briefly being the operative word - and then turn out onto a floured surface and knead lightly to form a dough.
Roll out to about 1 to 1-1/4 inch thickness. Dip the cutter into some flour, then stamp put at least 10 scones. You get 12 in all from this, but may need to reroll for the last 2. Place on the baking sheet very close together -the idea is that they bulge and stick together on cooking - then brush the tops with the egg wash. Put in the oven and cook for 10 minutes or until risen and golden.
Always eat freshly baked, preferably still warm from the oven, with clotted cream and jam or, my favourite, Thunder and Lighting, which is clotted cream and molasses.

Variation :
Add 3 ounces of raisins or golden raisins for fruit scones, or, something I'm keen on, use the same amount of dried sour cherries, with or without the finely grated zest of 1/2 an orange. To make cheese scones, add 3 ounces of sharp Cheddar, grated.


Join our blog hop, get the codes from the link below
get the InLinkz code